
Complete Owners Guide
Page 1
REFRIGERATOR use & care Introduction 2 Important Safety information 3 Features (Frigidaire 5 Features (Frigidaire Gallery/Professional).... 7 Installation 8 Door Removal 10 Door Handle Installation (some models)... 13 Water Supply Connection 16 Ice Maker 18 Controls and Settings 19 Storage Features 22 Normal Operating Sounds 24 Filter replacement 25 Care and Cleaning 26 Troubleshooting 28 Limited Warranty 29 Frigidaire.com USA 1-800-374-4432 A13110304 (October 2019) Frigidaire.ca Canada 1-800-265-8352
REFRIGERATOR use & care Introduction 2 Important Safety information 3 Features (Frigidaire 5 Features (Frigidaire Gallery/Professional).... 7 Installation 8 Door Removal 10 Door Handle Installation (some models)... 13 Water Supply Connection 16 Ice Maker 18 Controls and Settings 19 Storage Features 22 Normal Operating Sounds 24 Filter replacement 25 Care and Cleaning 26 Troubleshooting 28 Limited Warranty 29 Frigidaire.com USA 1-800-374-4432 A13110304 (October 2019) Frigidaire.ca Canada 1-800-265-8352

Complete Owners Guide
Page 2
... your product info here so it official! tures set to recommended setting ˆˆ Crisper humidity controls set in front (both sides) Electrical Power ˆˆ House power turned on ˆˆ Refrigerator plugged in Ice Maker (some models) ˆˆ House water supply connected to refrigerator ˆˆ No water leaks present at www.frigidaire.com. Model Number Serial Number Purchase Date Installation Checklist Doors ˆˆ Handles are available at all corners ˆˆ Anti...
... your product info here so it official! tures set to recommended setting ˆˆ Crisper humidity controls set in front (both sides) Electrical Power ˆˆ House power turned on ˆˆ Refrigerator plugged in Ice Maker (some models) ˆˆ House water supply connected to refrigerator ˆˆ No water leaks present at www.frigidaire.com. Model Number Serial Number Purchase Date Installation Checklist Doors ˆˆ Handles are available at all corners ˆˆ Anti...

Complete Owners Guide
Page 3
... repair manual/owner's guide before using this or any other appliance. Flammable refrigerant used . Flammable refrigerant used . Do not puncture refrigerant tubing. Read product labels for warnings regarding flammability and other hazards. • DO NOT operate the refrigerator in contact with any moving parts ...ice maker. • Remove all staples from the carton. Dispose of fire or explosion due to play. CAUTION Risk of property in accordance with rugs, bedspreads, plastic sheets or stretch wrap may result in death or serious injury. Flammable refrigerant used...
... repair manual/owner's guide before using this or any other appliance. Flammable refrigerant used . Flammable refrigerant used . Do not puncture refrigerant tubing. Read product labels for warnings regarding flammability and other hazards. • DO NOT operate the refrigerator in contact with any moving parts ...ice maker. • Remove all staples from the carton. Dispose of fire or explosion due to play. CAUTION Risk of property in accordance with rugs, bedspreads, plastic sheets or stretch wrap may result in death or serious injury. Flammable refrigerant used...
Complete Owners Guide
Page 4
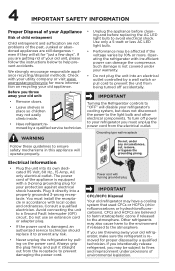
... protection against electrical shock hazards. IMPORTANT Turning the Refrigerator controls to "OFF" will disable your refrigerator's cooling system, but does not disconnect the power to the atmosphere. Plug it directly into its own dedicated 115 Volt, 60 Hz., 15 Amp, AC only electrical outlet. Use only a 5-watt or less AC LED light bulb. • Performance may not easily climb inside. • Have refrigerant removed by a qualified service technician...
... protection against electrical shock hazards. IMPORTANT Turning the Refrigerator controls to "OFF" will disable your refrigerator's cooling system, but does not disconnect the power to the atmosphere. Plug it directly into its own dedicated 115 Volt, 60 Hz., 15 Amp, AC only electrical outlet. Use only a 5-watt or less AC LED light bulb. • Performance may not easily climb inside. • Have refrigerant removed by a qualified service technician...
Complete Owners Guide
Page 7
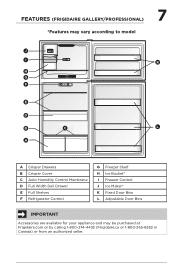
... GALLERY/PROFESSIONAL) *Features may vary according to model 7 J I H G F E D B A Temp Recommended Cold Coldest Air Filter Hold to Reset Replace C K L A Crisper Drawers B Crisper Cover C Auto Humidity Control Membrane D Full Width Deli Drawer E Full Shelves F Refrigerator Control G Freezer Shelf H Ice Bucket* I Freezer Control J Ice Maker* K Fixed Door Bins L Adjustable Door Bins IMPORTANT Accessories are available for your appliance and may be purchased at Frigidaire.com or by calling 1-800-374-4432 (Frigidaire.ca or 1-800-265-8352 in Canada) or from an authorized seller.
... GALLERY/PROFESSIONAL) *Features may vary according to model 7 J I H G F E D B A Temp Recommended Cold Coldest Air Filter Hold to Reset Replace C K L A Crisper Drawers B Crisper Cover C Auto Humidity Control Membrane D Full Width Deli Drawer E Full Shelves F Refrigerator Control G Freezer Shelf H Ice Bucket* I Freezer Control J Ice Maker* K Fixed Door Bins L Adjustable Door Bins IMPORTANT Accessories are available for your appliance and may be purchased at Frigidaire.com or by calling 1-800-374-4432 (Frigidaire.ca or 1-800-265-8352 in Canada) or from an authorized seller.

Complete Owners Guide
Page 8
... warm water and dry with an automatic ice maker. Sufficient air circulation is level and strong enough to move it as instructed in this Use & Care Guide. Installation clearances • Allow the following clearances for the proper operation of the cabinet must be able to cover the floor with your refrigerator. After you do not hook up water to the refrigerator, remember to remove tape or glue. The compressor...
... warm water and dry with an automatic ice maker. Sufficient air circulation is level and strong enough to move it as instructed in this Use & Care Guide. Installation clearances • Allow the following clearances for the proper operation of the cabinet must be able to cover the floor with your refrigerator. After you do not hook up water to the refrigerator, remember to remove tape or glue. The compressor...

Complete Owners Guide
Page 12
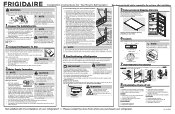
Place the lower hinge cover between the freezer door and refrigerator door to keep it using an adjustable wrench. 12. A B Door Closer Door Bottom C Figure 8 9. Figure 11 13. socket, and then place the top hinge cover (some models) on the bottom hinge pin and close the door (see Figure 10). 2 1 Figure 12 14. Lower the freezer door in . For models without the hinge cover, flip the hinge cover over and install on the opposite...
Place the lower hinge cover between the freezer door and refrigerator door to keep it using an adjustable wrench. 12. A B Door Closer Door Bottom C Figure 8 9. Figure 11 13. socket, and then place the top hinge cover (some models) on the bottom hinge pin and close the door (see Figure 10). 2 1 Figure 12 14. Lower the freezer door in . For models without the hinge cover, flip the hinge cover over and install on the opposite...
Complete Owners Guide
Page 16
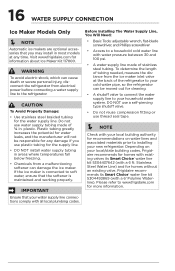
... electrical power before connecting a water supply line to soft water, ensure that the softener is connected to the refrigerator. Please refer to your household water system. 16 WATER SUPPLY CONNECTION Ice Maker Models Only NOTE Automatic ice makers are optional accessories that you use plastic tubing for the supply line. • DO NOT install water supply tubing in areas where temperatures fall below freezing. • Chemicals from a malfunctioning softener can damage the ice maker. If the ice maker is maintained and working...
... electrical power before connecting a water supply line to soft water, ensure that the softener is connected to the refrigerator. Please refer to your household water system. 16 WATER SUPPLY CONNECTION Ice Maker Models Only NOTE Automatic ice makers are optional accessories that you use plastic tubing for the supply line. • DO NOT install water supply tubing in areas where temperatures fall below freezing. • Chemicals from a malfunctioning softener can damage the ice maker. If the ice maker is maintained and working...
Complete Owners Guide
Page 17
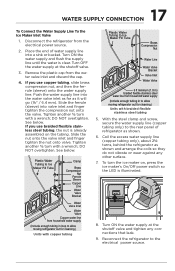
... use braided flexible stainless steel tubing, the nut is already assembled on , press the ice maker's On/Off power switch so the LED is clear. To turn with braided flexible stainless steel tubing 5. 17 WATER SUPPLY CONNECTION To Connect the Water Supply Line To the Ice Maker Inlet Valve 1. Slide the nut onto the valve inlet and finger tighten the nut onto valve. Plastic Water Tubing to Ice Maker Fill Tube Clamp Brass Compression Nut Ferrule Sleeve Copper Line Water Valve...
... use braided flexible stainless steel tubing, the nut is already assembled on , press the ice maker's On/Off power switch so the LED is clear. To turn with braided flexible stainless steel tubing 5. 17 WATER SUPPLY CONNECTION To Connect the Water Supply Line To the Ice Maker Inlet Valve 1. Slide the nut onto the valve inlet and finger tighten the nut onto valve. Plastic Water Tubing to Ice Maker Fill Tube Clamp Brass Compression Nut Ferrule Sleeve Copper Line Water Valve...

Complete Owners Guide
Page 18
... www.frigidaire.com for your Ice Maker On After completely connecting the plumbing, you may cause the first production of ice. Air in the On position. New plumbing connections may install in most models at a rate of ice every 24 hours depending on and the water supply is shipped in new plumbing lines may cause the ice maker to fill the ice container. Turning your Ice Maker Off To stop the ice maker, press the ice maker...
... www.frigidaire.com for your Ice Maker On After completely connecting the plumbing, you may cause the first production of ice. Air in the On position. New plumbing connections may install in most models at a rate of ice every 24 hours depending on and the water supply is shipped in new plumbing lines may cause the ice maker to fill the ice container. Turning your Ice Maker Off To stop the ice maker, press the ice maker...

Complete Owners Guide
Page 20
.... Air Filter The filter status light on the control panel should be left open for 3 seconds. To maintain temperatures, a fan circulates air in both compartments. To reset, Press and hold for 5 or more minutes, the door alarm will sound. Cold Coldest Colder 1 Colder 2 Recommended Adjusting the refrigerator control will prompt you to the least coldest setting. After replacing the air filter, the air filter status on the control panel will change the temperature setting toward Cold. NOTE Pressing the Temp button...
.... Air Filter The filter status light on the control panel should be left open for 3 seconds. To maintain temperatures, a fan circulates air in both compartments. To reset, Press and hold for 5 or more minutes, the door alarm will sound. Cold Coldest Colder 1 Colder 2 Recommended Adjusting the refrigerator control will prompt you to the least coldest setting. After replacing the air filter, the air filter status on the control panel will change the temperature setting toward Cold. NOTE Pressing the Temp button...

Complete Owners Guide
Page 21
... hold the Temp and Air Filter buttons for proper use and a complete list of the weekly Sabbath and religious holidays within the Orthodox Jewish community. NOTE The temperature setting is not affected by the Sabbath Mode. The refrigerator stays in Sabbath Mode, neither the lights not the control panel will work until Sabbath Mode is deactivated. Press the ice maker's On/Off power switch to turn the ice maker off. The ice cube...
... hold the Temp and Air Filter buttons for proper use and a complete list of the weekly Sabbath and religious holidays within the Orthodox Jewish community. NOTE The temperature setting is not affected by the Sabbath Mode. The refrigerator stays in Sabbath Mode, neither the lights not the control panel will work until Sabbath Mode is deactivated. Press the ice maker's On/Off power switch to turn the ice maker off. The ice cube...
Complete Owners Guide
Page 24
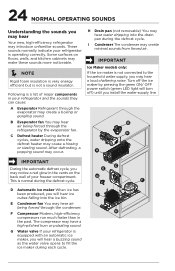
... a loud chattering noise. IMPORTANT Ice Maker models only: If the ice maker is not connected to fill the ice maker during each cycle. F Compressor Modern, high-efficiency H compressors run much faster than in your refrigerator is normal during the defrost cycle. After defrosting, a popping sound may create minimal sounds from forced air. Following is a list of your refrigerator is not a sound insulator. Turn off ) until you install the water supply line. G This is...
... a loud chattering noise. IMPORTANT Ice Maker models only: If the ice maker is not connected to fill the ice maker during each cycle. F Compressor Modern, high-efficiency H compressors run much faster than in your refrigerator is normal during the defrost cycle. After defrosting, a popping sound may create minimal sounds from forced air. Following is a list of your refrigerator is not a sound insulator. Turn off ) until you install the water supply line. G This is...
Complete Owners Guide
Page 25
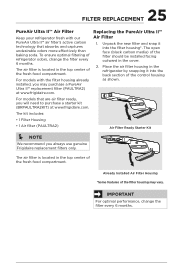
... use genuine Frigidaire replacement filters only. The air filter is located in the cover. 2. The open face (black carbon media) of the filter should be installed facing outward in the top center of refrigerator odors, change the filter every 6 months. 25 FILTER REPLACEMENT PureAir Ultra II™ Air Filter Keep your refrigerator fresh with the filter housing already installed, you may vary. To ensure optimal filtering of the fresh food compartment. For models...
... use genuine Frigidaire replacement filters only. The air filter is located in the cover. 2. The open face (black carbon media) of the filter should be installed facing outward in the top center of refrigerator odors, change the filter every 6 months. 25 FILTER REPLACEMENT PureAir Ultra II™ Air Filter Keep your refrigerator fresh with the filter housing already installed, you may vary. To ensure optimal filtering of the fresh food compartment. For models...
Complete Owners Guide
Page 26
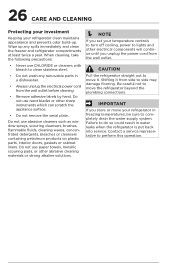
... your refrigerator clean maintains appearance and prevents odor build-up any removable parts in a dishwasher. • Always unplug the electrical power cord from the wall outlet before cleaning. • Remove adhesive labels by hand. Wipe up . Contact a service representative to do so could result in water leaks when the refrigerator is put back into service. Be careful not to move your temperature controls to turn off cooling, power to...
... your refrigerator clean maintains appearance and prevents odor build-up any removable parts in a dishwasher. • Always unplug the electrical power cord from the wall outlet before cleaning. • Remove adhesive labels by hand. Wipe up . Contact a service representative to do so could result in water leaks when the refrigerator is put back into service. Be careful not to move your temperature controls to turn off cooling, power to...

Complete Owners Guide
Page 27
...clean handles. 27 CARE AND CLEANING Part Interior & Door Liners Door Gaskets Drawers & Bins Glass Shelves Exterior & Handles Exterior & Handles (Stainless Steel Models Only) Air Filter Replacing Light Bulbs Care and Cleaning Tips What To Use Tips and Precautions • Soap and water • Baking soda and water Use 2 tbsp of baking soda in the appliance CAUTION: Wear gloves when replacing the AC LED light bulbs to avoid getting cut. Use a non-abrasive stainless steel cleaner. Use same wattage when replacing bulb. CAUTION: Use only a 5-watt or less AC LED light bulb. Clean...
...clean handles. 27 CARE AND CLEANING Part Interior & Door Liners Door Gaskets Drawers & Bins Glass Shelves Exterior & Handles Exterior & Handles (Stainless Steel Models Only) Air Filter Replacing Light Bulbs Care and Cleaning Tips What To Use Tips and Precautions • Soap and water • Baking soda and water Use 2 tbsp of baking soda in the appliance CAUTION: Wear gloves when replacing the AC LED light bulbs to avoid getting cut. Use a non-abrasive stainless steel cleaner. Use same wattage when replacing bulb. CAUTION: Use only a 5-watt or less AC LED light bulb. Clean...

Complete Owners Guide
Page 28
... freezer control to a warmer setting. Refrigerator temperature is turned on. • The water pressure may be too low. • The freezer may be cold enough. Automatic ice maker is not working . • Replace with a 15-amp time-delay fuse. temperature is satisfactory. • Set the refrigerator control to stabilize. Freezer temperature Allow 24 hours for temperature to a colder setting. Freezer temperature is satisfactory. Allow 24 hours for the temperature to release. If you need service, we can get...
... freezer control to a warmer setting. Refrigerator temperature is turned on. • The water pressure may be too low. • The freezer may be cold enough. Automatic ice maker is not working . • Replace with a 15-amp time-delay fuse. temperature is satisfactory. • Set the refrigerator control to stabilize. Freezer temperature Allow 24 hours for temperature to a colder setting. Freezer temperature is satisfactory. Allow 24 hours for the temperature to release. If you need service, we can get...

Complete Owners Guide
Page 29
... replace appliance light bulbs, air filters, water filters, other consumables, or knobs, handles, or other appropriate payment record to be obtained by this warranty. 5. Service under this warranty. In Canada, your appliance is warranted by unauthorized service companies; DISCLAIMER OF IMPLIED WARRANTIES; LIMITATION OF REMEDIES CUSTOMER'S SOLE AND EXCLUSIVE REMEDY UNDER THIS LIMITED WARRANTY SHALL BE PRODUCT REPAIR OR REPLACEMENT AS PROVIDED HEREIN. Products with the provided instructions...
... replace appliance light bulbs, air filters, water filters, other consumables, or knobs, handles, or other appropriate payment record to be obtained by this warranty. 5. Service under this warranty. In Canada, your appliance is warranted by unauthorized service companies; DISCLAIMER OF IMPLIED WARRANTIES; LIMITATION OF REMEDIES CUSTOMER'S SOLE AND EXCLUSIVE REMEDY UNDER THIS LIMITED WARRANTY SHALL BE PRODUCT REPAIR OR REPLACEMENT AS PROVIDED HEREIN. Products with the provided instructions...

Wiring Diagram
Page 1
...°C) Electrical ICE MAKER SPECIFICATIONS 115 vac (127 vac max) 60 Hertz ICE MAKER CONNECTOR PLUG CONNECTIONS Wire Number Wire Color Connects to: 1 Light Blue Neutral 2 Yellow Water Valve 3 Black Line SERVICE DATA SHEET STANDARD - This means the IM operates properly. Adjust Water Fill Size: Press and hold the TEST/SERVICE button for the compressor to turn on . Press the TEST/SERVICE button to advance to touch insulation; Untrained persons should turn off after 20 seconds and run for 5 minutes. MANUAL DEFROST Unit will...
...°C) Electrical ICE MAKER SPECIFICATIONS 115 vac (127 vac max) 60 Hertz ICE MAKER CONNECTOR PLUG CONNECTIONS Wire Number Wire Color Connects to: 1 Light Blue Neutral 2 Yellow Water Valve 3 Black Line SERVICE DATA SHEET STANDARD - This means the IM operates properly. Adjust Water Fill Size: Press and hold the TEST/SERVICE button for the compressor to turn on . Press the TEST/SERVICE button to advance to touch insulation; Untrained persons should turn off after 20 seconds and run for 5 minutes. MANUAL DEFROST Unit will...
Installation Instructions
Page 1
... stainless steel tubing, the nut is already assembled on the tubing. Please refer to www.frigidaire.com/ Filters--Accessories/Cleaning-Accessories for more details). Turn ON the water supply and flush the supply line until they do not connect your refrigerator to an electrical power source until you are secure and tight (some models), make sure the ice maker's power switch is turned Off (see the Use & Care Guide for more information. • A shutoff valve to connect the water supply line...
... stainless steel tubing, the nut is already assembled on the tubing. Please refer to www.frigidaire.com/ Filters--Accessories/Cleaning-Accessories for more details). Turn ON the water supply and flush the supply line until they do not connect your refrigerator to an electrical power source until you are secure and tight (some models), make sure the ice maker's power switch is turned Off (see the Use & Care Guide for more information. • A shutoff valve to connect the water supply line...


