
Complete Owner's Guide (English)
Page 1
All about the Use &Care of your Refrigerator 242063800 (November 2009) TABLE OF CONTENTS Important Safety Instructions 2 Installation 4 Door Removal Instructions 5 Handle Installation 6 Connecting Water Supply 8 Ice Service 9 Controls 9 Normal Operating Sounds and Sights 10 Care and Cleaning 11 Before you Call 12 Major Appliance Warranty 13 www.frigidaire.com USA 1-800-944-9044 www.frigidaire.ca Canada 1-800-265-8352
All about the Use &Care of your Refrigerator 242063800 (November 2009) TABLE OF CONTENTS Important Safety Instructions 2 Installation 4 Door Removal Instructions 5 Handle Installation 6 Connecting Water Supply 8 Ice Service 9 Controls 9 Normal Operating Sounds and Sights 10 Care and Cleaning 11 Before you Call 12 Major Appliance Warranty 13 www.frigidaire.com USA 1-800-944-9044 www.frigidaire.ca Canada 1-800-265-8352

Complete Owner's Guide (English)
Page 2
... with filter housing (select models) Final Checks Shipping material removed Fresh food and freezer temperatures set Crisper humidity controls set Registration card sent in the presence of automatic ice maker. • Remove all corners Electrical Power House power turned on all staples from the carton. Installation Checklist Doors Handles are secure and tight Door seals completely to cabinet on all sides Freezer door is level...
... with filter housing (select models) Final Checks Shipping material removed Fresh food and freezer temperatures set Crisper humidity controls set Registration card sent in the presence of automatic ice maker. • Remove all corners Electrical Power House power turned on all staples from the carton. Installation Checklist Doors Handles are secure and tight Door seals completely to cabinet on all sides Freezer door is level...

Complete Owner's Guide (English)
Page 3
..., handle tempered glass shelves carefully. Children should be replaced by an authorized service technician to prevent any risk. • Never unplug the refrigerator by a wall switch or pull cord to prevent the refrigerator from the receptacle to prevent damaging the power cord. • Unplug the refrigerator before cleaning and before replacing a light bulb to your old refrigerator. Junked or abandoned refrigerators or freezers are getting rid of your old refrigerator/ freezer...
..., handle tempered glass shelves carefully. Children should be replaced by an authorized service technician to prevent any risk. • Never unplug the refrigerator by a wall switch or pull cord to prevent the refrigerator from the receptacle to prevent damaging the power cord. • Unplug the refrigerator before cleaning and before replacing a light bulb to your old refrigerator. Junked or abandoned refrigerators or freezers are getting rid of your old refrigerator/ freezer...

Complete Owner's Guide (English)
Page 4
... installation, proper air circulation, and plumbing and electrical connections: Sides & Top Back 3/8 inch 1 inch NOTE If your refrigerator. Use adjustable wrench to turn the ice maker off. Sufficient air circulation is essential for the proper operation of your refrigerator is near a grounded electrical outlet. Leveling All four corners of your model. Before starting the refrigerator, follow these important first steps. Installation This Use & Care Guide provides general operating instructions for your refrigerator must be opened...
... installation, proper air circulation, and plumbing and electrical connections: Sides & Top Back 3/8 inch 1 inch NOTE If your refrigerator. Use adjustable wrench to turn the ice maker off. Sufficient air circulation is essential for the proper operation of your refrigerator is near a grounded electrical outlet. Leveling All four corners of your model. Before starting the refrigerator, follow these important first steps. Installation This Use & Care Guide provides general operating instructions for your refrigerator must be opened...
Complete Owner's Guide (English)
Page 5
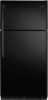
... bottom hinge and set aside. 5 Remove center hinge and shim by moving the door hinges from door shelves. Tighten screws. 6 Loosen two outside screws enough to allow hinge and shim to "0" and remove the electrical power cord from step 7. 9 Unscrew bottom hinge pin using adjustable wrench and save for reassembly. IMPORTANT Before you begin, turn refrigerator temperature control to opposite side. 15 Lower freezer door onto center hinge pin. 16 Close freezer door. This makes...
... bottom hinge and set aside. 5 Remove center hinge and shim by moving the door hinges from door shelves. Tighten screws. 6 Loosen two outside screws enough to allow hinge and shim to "0" and remove the electrical power cord from step 7. 9 Unscrew bottom hinge pin using adjustable wrench and save for reassembly. IMPORTANT Before you begin, turn refrigerator temperature control to opposite side. 15 Lower freezer door onto center hinge pin. 16 Close freezer door. This makes...

Complete Owner's Guide (English)
Page 6
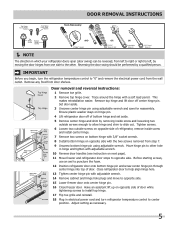
... model will have either a right hand or left hand door swing. To attach metal refrigerator handle: 1 Place rounded part of handle onto shoulder screw on face of door and align the two (2) holes in bottom of handle with the two (2) holes in bottom of handles, please review these handles. IMPORTANT To ensure proper installation of door. Follow instructions in the Use & Care Guide to installing the handles. To attach metal freezer handle...
... model will have either a right hand or left hand door swing. To attach metal refrigerator handle: 1 Place rounded part of handle onto shoulder screw on face of door and align the two (2) holes in bottom of handle with the two (2) holes in bottom of handles, please review these handles. IMPORTANT To ensure proper installation of door. Follow instructions in the Use & Care Guide to installing the handles. To attach metal freezer handle...
Complete Owner's Guide (English)
Page 7
... holes on bottom of door. 2 Secure bottom of handle with two screws. 7 Reverse freezer and refrigerator handles as shown. Handle installation To attach plastic refrigerator handle: 1 Place top of handle over dovetail screw, pull handle straight up until handle is aligned with screw holes on top of door. 2 Secure top of handle with two screws. To reverse refrigerator/freezer handles: Handles may be easier to reverse while doors are set aside in a secure...
... holes on bottom of door. 2 Secure bottom of handle with two screws. 7 Reverse freezer and refrigerator handles as shown. Handle installation To attach plastic refrigerator handle: 1 Place top of handle over dovetail screw, pull handle straight up until handle is aligned with screw holes on top of door. 2 Secure top of handle with two screws. To reverse refrigerator/freezer handles: Handles may be easier to reverse while doors are set aside in a secure...

Complete Owner's Guide (English)
Page 8
... are already assembled on , lower wire signal arm (side mounted) or set the ice maker's On/Off power switch to installing your household water system. See Figure 2. 5. Turn ON water supply at shutoff valve. 3. Depending on water lines and associated materials prior to the "I" position (rear mounted). Copper Water Line with a 6 ft. Disconnect refrigerator from electrical power before connecting a water supply line to the household water supply line. Turn ON water supply and flush supply line until water is maintained and working properly. See...
... are already assembled on , lower wire signal arm (side mounted) or set the ice maker's On/Off power switch to installing your household water system. See Figure 2. 5. Turn ON water supply at shutoff valve. 3. Depending on water lines and associated materials prior to the "I" position (rear mounted). Copper Water Line with a 6 ft. Disconnect refrigerator from electrical power before connecting a water supply line to the household water supply line. Turn ON water supply and flush supply line until water is maintained and working properly. See...
Complete Owner's Guide (English)
Page 9
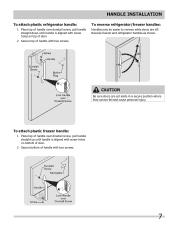
... controls as possible. Turning your refrigerator, you must be opened. Turning your ice maker, hook up " or OFF position. Turning the refrigerator control will change only the freezer temperature. With no ice will change temperatures in the UP position. New plumbing connections may be discolored or have been completed, the water supply valve must unplug the power cord from the wall outlet. 9 To ensure proper function for your Ice Maker Off To stop the ice maker, lift the wire...
... controls as possible. Turning your refrigerator, you must be opened. Turning your ice maker, hook up " or OFF position. Turning the refrigerator control will change only the freezer temperature. With no ice will change temperatures in the UP position. New plumbing connections may be discolored or have been completed, the water supply valve must unplug the power cord from the wall outlet. 9 To ensure proper function for your Ice Maker Off To stop the ice maker, lift the wire...
Complete Owner's Guide (English)
Page 10
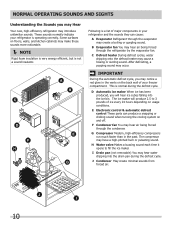
... the defrost cycle. This is a list of ice every 24 hours depending on and off. E Electronic control & automatic defrost control These parts can cause: A Evaporator Refrigerant through the evaporator may create a boiling or gurgling sound. B Evaporator fan You may hear water dripping into the ice bin. D Automatic ice maker When ice has been produced, you will produce 2.5 to fill the ice maker. The compressor may cause a hissing or sizzling sound. I Drain pan (not removable) You...
... the defrost cycle. This is a list of ice every 24 hours depending on and off. E Electronic control & automatic defrost control These parts can cause: A Evaporator Refrigerant through the evaporator may create a boiling or gurgling sound. B Evaporator fan You may hear water dripping into the ice bin. D Automatic ice maker When ice has been produced, you will produce 2.5 to fill the ice maker. The compressor may cause a hissing or sizzling sound. I Drain pan (not removable) You...

Complete Owner's Guide (English)
Page 11
... Remove light cover Replace old bulb Replace light cover Plug in freezing temperatures, be purchased at least twice a year. Do not touch refrigerated surfaces with clean water and a soft cloth. Part Interior & Door • Liners • Door Gaskets • Drawers & Bins • Glass Shelves • • • Toe Grille • • • Exterior & • Handles • Exterior & • Handles (Stainless Steel • Models Only) Replacing Light • Bulbs • • • • • Care & Cleaning Tips What To Use...
... Remove light cover Replace old bulb Replace light cover Plug in freezing temperatures, be purchased at least twice a year. Do not touch refrigerated surfaces with clean water and a soft cloth. Part Interior & Door • Liners • Door Gaskets • Drawers & Bins • Glass Shelves • • • Toe Grille • • • Exterior & • Handles • Exterior & • Handles (Stainless Steel • Models Only) Replacing Light • Bulbs • • • • • Care & Cleaning Tips What To Use...

Complete Owner's Guide (English)
Page 12
.../replace fuse with a 15 amp time-delay fuse. Cabinet light not working . (some models) Before calling for service, review this appliance. • Ensure plug is not cold enough. 12 It may be cleaned. • Foods that are not the result of ice in this list. Automatic ice maker not working . Common Occurrences Refrigerator does not run. Allow 24 hours for the temperature to stabilize. • Set refrigerator control to a warmer setting until freezer temperature...
.../replace fuse with a 15 amp time-delay fuse. Cabinet light not working . (some models) Before calling for service, review this appliance. • Ensure plug is not cold enough. 12 It may be cleaned. • Foods that are not the result of ice in this list. Automatic ice maker not working . Common Occurrences Refrigerator does not run. Allow 24 hours for the temperature to stabilize. • Set refrigerator control to a warmer setting until freezer temperature...

Complete Owner's Guide (English)
Page 13
... to the finish of parts other than genuine Electrolux parts or parts obtained from its original owner to repair or replace appliance light bulbs, air filters, water filters, other consumables, or knobs, handles, or other than in accordance with original serial numbers that prove to floors, cabinets, walls, etc. 13. use or used in the USA and Canada. CLAIMS BASED ON IMPLIED WARRANTIES, INCLUDING WARRANTIES OF MERCHANTABILITY OR FITNESS...
... to the finish of parts other than genuine Electrolux parts or parts obtained from its original owner to repair or replace appliance light bulbs, air filters, water filters, other consumables, or knobs, handles, or other than in accordance with original serial numbers that prove to floors, cabinets, walls, etc. 13. use or used in the USA and Canada. CLAIMS BASED ON IMPLIED WARRANTIES, INCLUDING WARRANTIES OF MERCHANTABILITY OR FITNESS...

Wiring Diagram (All Languages)
Page 1
... Hours of Compressor Run Time CONDENSER FAN MOTOR Watts RPM Amps 2.3 1100 CW Opposite Shaft .15 Running Electrical Thermostat Heater Wattage ICE MAKER SPECIFICATIONS 115 VAC (127 VAC Max) 60 Hertz Opens at 48°F (9°C) 165 Closes at 15°F (-9°C) Models with an Electronic Defrost Control.To initiate defrost, depress the fresh food light switch 5 times in 6 seconds (light bulb must be working). Untrained persons should not attempt to make repairs due to...
... Hours of Compressor Run Time CONDENSER FAN MOTOR Watts RPM Amps 2.3 1100 CW Opposite Shaft .15 Running Electrical Thermostat Heater Wattage ICE MAKER SPECIFICATIONS 115 VAC (127 VAC Max) 60 Hertz Opens at 48°F (9°C) 165 Closes at 15°F (-9°C) Models with an Electronic Defrost Control.To initiate defrost, depress the fresh food light switch 5 times in 6 seconds (light bulb must be working). Untrained persons should not attempt to make repairs due to...

Wiring Diagram (All Languages)
Page 2
... REFRIGERATOR LIGHT SWITCH BLACK COLD CONTROL YEL/BLACK YEL/BLACK ORANGE BLACK GRN/YEL TAN BROWN RED LT. BLUE LT. BLUE SPLICE D DIODES TO BE POLARIZED AS SHOWN. BLUE LT. BLUE RED/BLACK BROWN SUPPLY SOLENOID WATER VALVE WATER VALVE DOOR COMPARTMENT TAN RED/BLACK TAN GRN/YEL RED/BLACK TAN GRN/YEL INTERLOCK SWITCH RED/BLACK TAN DOOR WATER DISPENSER SWITCH Ladder Schematic - FREEZER FAN FREEZER LIGHT FREEZER COMPARTMENT MOTOR MOUNTING BRACKET ICE MAKER...
... REFRIGERATOR LIGHT SWITCH BLACK COLD CONTROL YEL/BLACK YEL/BLACK ORANGE BLACK GRN/YEL TAN BROWN RED LT. BLUE LT. BLUE SPLICE D DIODES TO BE POLARIZED AS SHOWN. BLUE LT. BLUE RED/BLACK BROWN SUPPLY SOLENOID WATER VALVE WATER VALVE DOOR COMPARTMENT TAN RED/BLACK TAN GRN/YEL RED/BLACK TAN GRN/YEL INTERLOCK SWITCH RED/BLACK TAN DOOR WATER DISPENSER SWITCH Ladder Schematic - FREEZER FAN FREEZER LIGHT FREEZER COMPARTMENT MOTOR MOUNTING BRACKET ICE MAKER...

Installation Instructions (All Languages)
Page 1
... Freezer controls set Crisper Humidity controls set Registration Card sent in Refer to your Use & Care Manual. Connecting to a reverse osmosis system is turned ON. 8 DOOR REMOVAL (IF NECESSARY) Cable If you need to remove the doors to get your refrigerator into the house please see "Door Removal and Reversal Instructions" in your Owner's Use and Care Manual for water leaks. IF YOU ARE DISSATISFIED WITH THE INSTALLATION, PLEASE CALL THE STORE YOU PURCHASED IT FROM. Top Hinge Cover OR Top Hinge Top Hinge Cover...
... Freezer controls set Crisper Humidity controls set Registration Card sent in Refer to your Use & Care Manual. Connecting to a reverse osmosis system is turned ON. 8 DOOR REMOVAL (IF NECESSARY) Cable If you need to remove the doors to get your refrigerator into the house please see "Door Removal and Reversal Instructions" in your Owner's Use and Care Manual for water leaks. IF YOU ARE DISSATISFIED WITH THE INSTALLATION, PLEASE CALL THE STORE YOU PURCHASED IT FROM. Top Hinge Cover OR Top Hinge Top Hinge Cover...


