
Installation Instructions (All Languages)
Page 1
... hours Ice Maker is turned ON. Final Checks Shipping material removed Fresh Food and Freezer controls set Crisper Humidity controls set Registration Card sent in Refer to your Owner's Use and Care Manual for the door to swing open. 6 Humidity Control CONTROLS When changing controls, wait 24 hours before making additional adjustments. (For models with adjustable front rollers or front leveling screws to help level your new refrigerator. check for ease of installation, proper air circulation, and plumbing and electrical connections: •...
... hours Ice Maker is turned ON. Final Checks Shipping material removed Fresh Food and Freezer controls set Crisper Humidity controls set Registration Card sent in Refer to your Owner's Use and Care Manual for the door to swing open. 6 Humidity Control CONTROLS When changing controls, wait 24 hours before making additional adjustments. (For models with adjustable front rollers or front leveling screws to help level your new refrigerator. check for ease of installation, proper air circulation, and plumbing and electrical connections: •...
Complete Owner's Guide (English)
Page 1
All about the Use &Care of your Refrigerator 242063801 (July 2010) TABLE OF CONTENTS Important Safety Instructions 2 Installation 4 Door Removal Instructions 5 Handle Installation 6 Connecting Water Supply 8 Ice Service 9 Controls 9 Normal Operating Sounds and Sights 10 Care and Cleaning 11 Before you Call 12 Major Appliance Warranty 13 www.frigidaire.com USA 1-800-944-9044 www.frigidaire.ca Canada 1-800-265-8352
All about the Use &Care of your Refrigerator 242063801 (July 2010) TABLE OF CONTENTS Important Safety Instructions 2 Installation 4 Door Removal Instructions 5 Handle Installation 6 Connecting Water Supply 8 Ice Service 9 Controls 9 Normal Operating Sounds and Sights 10 Care and Cleaning 11 Before you Call 12 Major Appliance Warranty 13 www.frigidaire.com USA 1-800-944-9044 www.frigidaire.ca Canada 1-800-265-8352
Complete Owner's Guide (English)
Page 2
... in 24 hours Ice maker is turned ON Ice & water dispenser operates correctly Front filter must be flush with filter housing (select models) Final Checks Shipping material removed Fresh food and freezer temperatures set Crisper humidity controls set Registration card sent in the presence of automatic ice maker. • Remove all sides Freezer door is level across the top Leveling Refrigerator is level, side-to-side and...
... in 24 hours Ice maker is turned ON Ice & water dispenser operates correctly Front filter must be flush with filter housing (select models) Final Checks Shipping material removed Fresh food and freezer temperatures set Crisper humidity controls set Registration card sent in the presence of automatic ice maker. • Remove all sides Freezer door is level across the top Leveling Refrigerator is level, side-to-side and...
Complete Owner's Guide (English)
Page 3
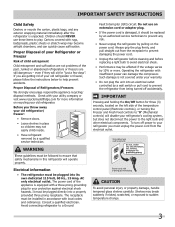
... recycling your old refrigerator. The power cord of the temperature control panel (Electronic controls), or turning the Freezer and Fresh Food controls to "0" (Mechanical controls) will sit for three (3) seconds, located on the power cord. Avoid connecting refrigerator to sudden temperature change. 3 Such damage is equipped with a three-prong grounding plug for more . Shelves may not easily climb inside. • Have refrigerant removed by a qualified service technician. Important Safety Instructions Child Safety Destroy...
... recycling your old refrigerator. The power cord of the temperature control panel (Electronic controls), or turning the Freezer and Fresh Food controls to "0" (Mechanical controls) will sit for three (3) seconds, located on the power cord. Avoid connecting refrigerator to sudden temperature change. 3 Such damage is equipped with a three-prong grounding plug for more . Shelves may not easily climb inside. • Have refrigerant removed by a qualified service technician. Important Safety Instructions Child Safety Destroy...
Complete Owner's Guide (English)
Page 4
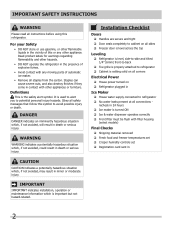
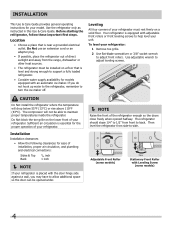
... of installation, proper air circulation, and plumbing and electrical connections: Sides & Top Back 3/8 inch 1 inch NOTE If your refrigerator is essential for the proper operation of the refrigerator enough so the doors close freely when opened halfway. Do Not use an extension cord or an adapter plug. • If possible, place the refrigerator out of your model. Installation This Use & Care Guide provides general operating instructions for your refrigerator must...
... of installation, proper air circulation, and plumbing and electrical connections: Sides & Top Back 3/8 inch 1 inch NOTE If your refrigerator is essential for the proper operation of the refrigerator enough so the doors close freely when opened halfway. Do Not use an extension cord or an adapter plug. • If possible, place the refrigerator out of your model. Installation This Use & Care Guide provides general operating instructions for your refrigerator must...

Complete Owner's Guide (English)
Page 5
.... Adjust setting as necessary. 5 Door Removal Instructions Top Hinge Cover Front Screw Top Hinge Cover Rear Screw Tools Necessary: Top Hinge Screw Bottom Hinge Screw AND Phillips™ Head OR Socket Wrench Set OR Adjustable Wrench 3/8" Fixed Wrench NOTE The direction in hinge and tighten with adjustable wrench. 10 Reverse door handles (see instruction on next page). 11 Move freezer and refrigerator door stops to opposite side. Set door aside. 3 Unscrew center hinge pin using adjustable wrench. Close refrigerator door...
.... Adjust setting as necessary. 5 Door Removal Instructions Top Hinge Cover Front Screw Top Hinge Cover Rear Screw Tools Necessary: Top Hinge Screw Bottom Hinge Screw AND Phillips™ Head OR Socket Wrench Set OR Adjustable Wrench 3/8" Fixed Wrench NOTE The direction in hinge and tighten with adjustable wrench. 10 Reverse door handles (see instruction on next page). 11 Move freezer and refrigerator door stops to opposite side. Set door aside. 3 Unscrew center hinge pin using adjustable wrench. Close refrigerator door...

Complete Owner's Guide (English)
Page 6
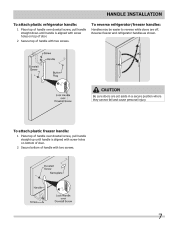
... 1/2 turn . Stainless Steel Models IMPORTANT Stainless steel handles and doors are not reversible. 6 To attach metal refrigerator handle: 1 Place rounded part of handle onto shoulder screw on face of door and align the two (2) holes in bottom of handle with the two (2) holes in top of door. Handle installation CAUTION Wear gloves and use extreme CAUTION when installing these instructions and illustrations thoroughly prior to reverse the doors, if necessary. Follow instructions...
... 1/2 turn . Stainless Steel Models IMPORTANT Stainless steel handles and doors are not reversible. 6 To attach metal refrigerator handle: 1 Place rounded part of handle onto shoulder screw on face of door and align the two (2) holes in bottom of handle with the two (2) holes in top of door. Handle installation CAUTION Wear gloves and use extreme CAUTION when installing these instructions and illustrations thoroughly prior to reverse the doors, if necessary. Follow instructions...
Complete Owner's Guide (English)
Page 7
... bottom of door. 2 Secure bottom of handle with two screws. 7 Reverse freezer and refrigerator handles as shown. CAUTION Be sure doors are off. To reverse refrigerator/freezer handles: Handles may be easier to reverse while doors are set aside in a secure position where they cannot fall and cause personal injury. Handle installation To attach plastic refrigerator handle: 1 Place top of handle over dovetail screw, pull handle straight up until handle is aligned...
... bottom of door. 2 Secure bottom of handle with two screws. 7 Reverse freezer and refrigerator handles as shown. CAUTION Be sure doors are off. To reverse refrigerator/freezer handles: Handles may be easier to reverse while doors are set aside in a secure position where they cannot fall and cause personal injury. Handle installation To attach plastic refrigerator handle: 1 Place top of handle over dovetail screw, pull handle straight up until handle is aligned...
Complete Owner's Guide (English)
Page 8
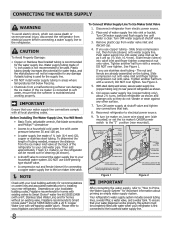
... turn ice maker on the tubing. DO NOT over tighten. If you use stainless steel tubing - The nut and ferrule are already assembled on , lower wire signal arm (side mounted) or set the ice maker's On/Off power switch to installing your cold water pipe. Slide compression nut onto valve inlet and finger tighten compression nut onto valve. Tighten another half turn with water pressure between 30 and 100 psi. • A water supply line...
... turn ice maker on the tubing. DO NOT over tighten. If you use stainless steel tubing - The nut and ferrule are already assembled on , lower wire signal arm (side mounted) or set the ice maker's On/Off power switch to installing your cold water pipe. Slide compression nut onto valve inlet and finger tighten compression nut onto valve. Tighten another half turn with water pressure between 30 and 100 psi. • A water supply line...

Complete Owner's Guide (English)
Page 9
.... If the ice maker is not turned off automatically when the ice container is the recommended initial setting. For example, if the refrigerator control is not connected, the water valve will change temperatures in the refrigerator and freezer compartments. To turn ice maker OFF by lifting the wire signal arm until it clicks and locks in new plumbing lines may have been completed, the water supply valve must unplug the power cord from cooling, but...
.... If the ice maker is not turned off automatically when the ice container is the recommended initial setting. For example, if the refrigerator control is not connected, the water valve will change temperatures in the refrigerator and freezer compartments. To turn ice maker OFF by lifting the wire signal arm until it clicks and locks in new plumbing lines may have been completed, the water supply valve must unplug the power cord from cooling, but...
Complete Owner's Guide (English)
Page 10
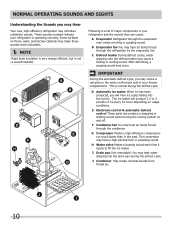
... sound. E Electronic control & automatic defrost control These parts can cause: A Evaporator Refrigerant through the evaporator may cause a hissing or sizzling sound. G Compressor Modern, high-efficiency compressors run much faster than in your freezer compartment. The compressor may hear air being forced through the refrigerator by the evaporator fan. IMPORTANT During the automatic defrost cycle, you may hear air being forced through the condenser. D Automatic ice maker When ice has been produced...
... sound. E Electronic control & automatic defrost control These parts can cause: A Evaporator Refrigerant through the evaporator may cause a hissing or sizzling sound. G Compressor Modern, high-efficiency compressors run much faster than in your freezer compartment. The compressor may hear air being forced through the refrigerator by the evaporator fan. IMPORTANT During the automatic defrost cycle, you may hear air being forced through the condenser. D Automatic ice maker When ice has been produced...

Complete Owner's Guide (English)
Page 11
...; Door Gaskets • Drawers & Bins • Glass Shelves • • • Toe Grille • • • Exterior & • Handles • Exterior & • Handles (Stainless Steel • Models Only) Replacing Light • Bulbs • • • • • Care & Cleaning Tips What To Use Tips and Precautions Soap and water Baking soda and water Use 2 tablespoons of baking soda in water leaks when the refrigerator is put back into service. Remove toe grille (see Installation Instructions). Vacuum...
...; Door Gaskets • Drawers & Bins • Glass Shelves • • • Toe Grille • • • Exterior & • Handles • Exterior & • Handles (Stainless Steel • Models Only) Replacing Light • Bulbs • • • • • Care & Cleaning Tips What To Use Tips and Precautions Soap and water Baking soda and water Use 2 tablespoons of baking soda in water leaks when the refrigerator is put back into service. Remove toe grille (see Installation Instructions). Vacuum...
Complete Owner's Guide (English)
Page 12
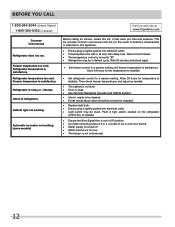
... cleaned. • Foods that are not the result of ice in this list. Then check freezer temperatures and adjust as needed. • The cabinet is not level. • Floor is satisfactory. Common Occurrences Refrigerator does not run. Cabinet light not working . (some models) Before calling for service, review this appliance. • Ensure plug is tightly pushed into electrical outlet. • Light switch may be covered or wrapped. • Replace light bulb. • Ensure plug...
... cleaned. • Foods that are not the result of ice in this list. Then check freezer temperatures and adjust as needed. • The cabinet is not level. • Floor is satisfactory. Common Occurrences Refrigerator does not run. Cabinet light not working . (some models) Before calling for service, review this appliance. • Ensure plug is tightly pushed into electrical outlet. • Light switch may be covered or wrapped. • Replace light bulb. • Ensure plug...

Complete Owner's Guide (English)
Page 13
... all receipts. Products used in the USA and Canada. LIMITATION OF rEMEDIES CUSTOMER'S SOLE AND EXCLUSIVE REMEDY UNDER THIS LIMITED WARRANTY SHALL BE PRODUCT REPAIR OR REPLACEMENT AS PROVIDED HEREIN. For one year limited warranty. Rust on the interior or exterior of Electrolux Home Products, Inc. Service calls to repair or replace appliance light bulbs, air filters, water filters, other consumables, or knobs, handles, or other than...
... all receipts. Products used in the USA and Canada. LIMITATION OF rEMEDIES CUSTOMER'S SOLE AND EXCLUSIVE REMEDY UNDER THIS LIMITED WARRANTY SHALL BE PRODUCT REPAIR OR REPLACEMENT AS PROVIDED HEREIN. For one year limited warranty. Rust on the interior or exterior of Electrolux Home Products, Inc. Service calls to repair or replace appliance light bulbs, air filters, water filters, other consumables, or knobs, handles, or other than...


