
Installation Instructions
Page 1
... Grille 9 Installation Checkoff List Doors Ice Maker ȽȽ Handles are provided only as it through close proximity to refrigerator ȽȽ Cabinet is properly attached to a range, dishwasher or other surfaces. 9 Open water supply shut-off . •...connections: Sides & Top: 3/8 inch Rear: 1 inch NOTE Information about 2½ turns) behind (Include enough tubing in your refrigerator's shipping carton. Tools Necessary: Phillips Head or Quadrex Head Screwdriver (OR) OR Socket Wrench Set Plastic Putty Knife Pliers Adjustable Wrench ...
... Grille 9 Installation Checkoff List Doors Ice Maker ȽȽ Handles are provided only as it through close proximity to refrigerator ȽȽ Cabinet is properly attached to a range, dishwasher or other surfaces. 9 Open water supply shut-off . •...connections: Sides & Top: 3/8 inch Rear: 1 inch NOTE Information about 2½ turns) behind (Include enough tubing in your refrigerator's shipping carton. Tools Necessary: Phillips Head or Quadrex Head Screwdriver (OR) OR Socket Wrench Set Plastic Putty Knife Pliers Adjustable Wrench ...
Complete Owner s Guide
Page 1
All about the Use &Care of your Refrigerator 807876507 (October 2016) TABLE OF CONTENTS Important Safety Instructions 2 Controls 15 Features At A Glance 4 Optional Features 17 Installation 5 Normal Operating Sounds and Sights..........20 Door Removal/Reversal Instructions 7 Care and Cleaning 21 Handle Installation 10 Before you Call 23 Connecting Water Supply 12 Major Appliance Warranty 24 Ice Service 14 www.frigidaire.com USA 1-800-944-9044 www.frigidaire.ca Canada 1-800-265-8352
All about the Use &Care of your Refrigerator 807876507 (October 2016) TABLE OF CONTENTS Important Safety Instructions 2 Controls 15 Features At A Glance 4 Optional Features 17 Installation 5 Normal Operating Sounds and Sights..........20 Door Removal/Reversal Instructions 7 Care and Cleaning 21 Handle Installation 10 Before you Call 23 Connecting Water Supply 12 Major Appliance Warranty 24 Ice Service 14 www.frigidaire.com USA 1-800-944-9044 www.frigidaire.ca Canada 1-800-265-8352
Complete Owner s Guide
Page 2
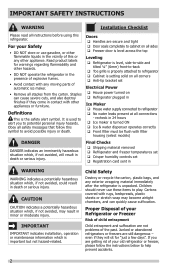
...and can cause severe cuts, and also destroy finishes if they will result in Ice Maker House water supply connected to refrigerator No water leaks present at all connections - Children should never use gasoline, or other flammable liquids in the vicinity of...maintenance information which , if not avoided, will sit for warnings regarding flammability and other hazards. • DO NOT operate the refrigerator in minor or moderate injury. IMPORTANT SAFETY INSTRUCTIONS WARNING Installation Checklist Please read all instructions before using this symbol to avoid possible ...
...and can cause severe cuts, and also destroy finishes if they will result in Ice Maker House water supply connected to refrigerator No water leaks present at all connections - Children should never use gasoline, or other flammable liquids in the vicinity of...maintenance information which , if not avoided, will sit for warnings regarding flammability and other hazards. • DO NOT operate the refrigerator in minor or moderate injury. IMPORTANT SAFETY INSTRUCTIONS WARNING Installation Checklist Please read all instructions before using this symbol to avoid possible ...

Complete Owner s Guide
Page 3
...atmosphere. WARNING Do not attempt to replace LED lights due to replace. It must be subject to fines and imprisonment under your refrigerator's cooling system, but does not disconnect the power to avoid electrical shock. • Performance may be plugged directly into a ...extension cord or adapter plug. • If the power cord is not covered under provisions of environmental legislation. 3 Avoid connecting refrigerator to the atmosphere. Such damage is damaged, it should be installed in accordance with 3-prong grounded plug CAUTION To avoid personal injury...
...atmosphere. WARNING Do not attempt to replace LED lights due to replace. It must be subject to fines and imprisonment under your refrigerator's cooling system, but does not disconnect the power to avoid electrical shock. • Performance may be plugged directly into a ...extension cord or adapter plug. • If the power cord is not covered under provisions of environmental legislation. 3 Avoid connecting refrigerator to the atmosphere. Such damage is damaged, it should be installed in accordance with 3-prong grounded plug CAUTION To avoid personal injury...
Complete Owner s Guide
Page 4
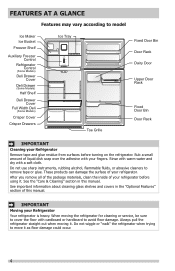
...damage could occur. 4 After you remove all of the package materials, clean the inside of this manual. Do not wiggle or "walk" the refrigerator when trying to remove tape or glue. FEATURES AT A GLANCE Features may vary according to model Ice Maker Ice Bucket Freezer Shelf Auxiliary Freezer ...Crisper Drawers Ice Tray Toe Grille Fixed Door Bin Door Rack Dairy Door Upper Door Rack Fixed Door Bin Door Rack IMPORTANT Cleaning your Refrigerator Remove tape and glue residue from surfaces before using it. Rinse with warm water and dry with cardboard or hardboard to avoid floor damage...
...damage could occur. 4 After you remove all of the package materials, clean the inside of this manual. Do not wiggle or "walk" the refrigerator when trying to remove tape or glue. FEATURES AT A GLANCE Features may vary according to model Ice Maker Ice Bucket Freezer Shelf Auxiliary Freezer ...Crisper Drawers Ice Tray Toe Grille Fixed Door Bin Door Rack Dairy Door Upper Door Rack Fixed Door Bin Door Rack IMPORTANT Cleaning your Refrigerator Remove tape and glue residue from surfaces before using it. Rinse with warm water and dry with cardboard or hardboard to avoid floor damage...

Complete Owner s Guide
Page 5
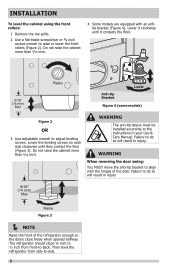
.... NOTE For additional instructions on the side corresponding with the door hinge side against a wall, you do not hook up water to the refrigerator, remember to "Controls" section. To install the toe grille: 1. Do not block the toe grille on the floor. Guidelines for models equipped with ...model. Do Not use an extension cord or an adapter plug. • The sides should align with each other heat sources. • The refrigerator must rest firmly on the lower front of future door reversals, save the toe grille cover not being used. 5 CAUTION Do not install the...
.... NOTE For additional instructions on the side corresponding with the door hinge side against a wall, you do not hook up water to the refrigerator, remember to "Controls" section. To install the toe grille: 1. Do not block the toe grille on the floor. Guidelines for models equipped with ...model. Do Not use an extension cord or an adapter plug. • The sides should align with each other heat sources. • The refrigerator must rest firmly on the lower front of future door reversals, save the toe grille cover not being used. 5 CAUTION Do not install the...
Complete Owner s Guide
Page 6
... do so will result in injury. WARNING When reversing the door swing: You MUST move the anti-tip bracket to -back. Then level the refrigerator from front-to align with an antitip bracket (Figure 4). Lower the leveling screws on each side clockwise until it contacts the floor. 9/16" ... the front of the door. Do not raise the cabinet more than 9/16 inch. 4 Some models are equipped with the hinges of the refrigerator enough so the doors close freely when opened halfway. Failure to raise or lower the front rollers (Figure 2). Lower it clockwise until they contact...
... do so will result in injury. WARNING When reversing the door swing: You MUST move the anti-tip bracket to -back. Then level the refrigerator from front-to align with an antitip bracket (Figure 4). Lower the leveling screws on each side clockwise until it contacts the floor. 9/16" ... the front of the door. Do not raise the cabinet more than 9/16 inch. 4 Some models are equipped with the hinges of the refrigerator enough so the doors close freely when opened halfway. Failure to raise or lower the front rollers (Figure 2). Lower it clockwise until they contact...

Complete Owner s Guide
Page 7
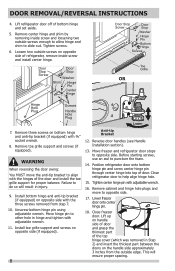
...Reversing the door swing should be reversed, from left to right or right to left, by a qualified person. IMPORTANT Before you begin, turn the refrigerator temperature control to "0" (Mechanical controls) or "OFF" (Electronic controls) and remove the electrical power cord from door shelves. Top Hinge Cover Top Hinge...Top Hinge Cover Front Screw Top Hinge Cover Rear Screw Top Hinge Screw Bottom Hinge Screw NOTE The direction in which your refrigerator doors open (door swing) can be performed by moving the door hinges from one side to the other. Unscrew center hinge pin ...
...Reversing the door swing should be reversed, from left to right or right to left, by a qualified person. IMPORTANT Before you begin, turn the refrigerator temperature control to "0" (Mechanical controls) or "OFF" (Electronic controls) and remove the electrical power cord from door shelves. Top Hinge Cover Top Hinge...Top Hinge Cover Front Screw Top Hinge Cover Rear Screw Top Hinge Screw Bottom Hinge Screw NOTE The direction in which your refrigerator doors open (door swing) can be performed by moving the door hinges from one side to the other. Unscrew center hinge pin ...
Complete Owner s Guide
Page 8
...and install the toe grille support for proper balance. DOOR REMOVAL/REVERSAL INSTRUCTIONS 4. Unscrew bottom hinge pin using adjustable wrench. Move freezer and refrigerator door stops to help align hinge hole. 15. Lower freezer door onto center hinge pin. 18. Close freezer door. This will result... in hinge and tighten with the hinges of refrigerator, remove inside screw and loosening two outside screws on the handle side approximately 3 inches from step 7. 10. Failure to puncture the foam....
...and install the toe grille support for proper balance. DOOR REMOVAL/REVERSAL INSTRUCTIONS 4. Unscrew bottom hinge pin using adjustable wrench. Move freezer and refrigerator door stops to help align hinge hole. 15. Lower freezer door onto center hinge pin. 18. Close freezer door. This will result... in hinge and tighten with the hinges of refrigerator, remove inside screw and loosening two outside screws on the handle side approximately 3 inches from step 7. 10. Failure to puncture the foam....
Complete Owner s Guide
Page 9
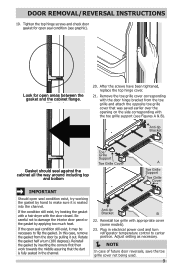
... gasket from the toe grille and attach the opposite toe grille cover that the dart is seated into the channel. Rotate the gasket half a turn refrigerator temperature control to damage the interior door panel or the gasket by inserting the corners first then work towards the middle assuring that was saved...
... gasket from the toe grille and attach the opposite toe grille cover that the dart is seated into the channel. Rotate the gasket half a turn refrigerator temperature control to damage the interior door panel or the gasket by inserting the corners first then work towards the middle assuring that was saved...
Complete Owner s Guide
Page 10
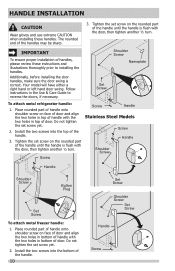
... and align the two holes in top of handle with the door, then tighten another ½ turn . Shoulder Screw Nameplate Set Screw To attach metal refrigerator handle: 1. Screw Screw Handle Stainless Steel Models Screw Handle Shoulder Screw Handle Shoulder Screw Button Plug Set Screw To attach metal freezer handle: 1. Additionally, before...
... and align the two holes in top of handle with the door, then tighten another ½ turn . Shoulder Screw Nameplate Set Screw To attach metal refrigerator handle: 1. Screw Screw Handle Stainless Steel Models Screw Handle Shoulder Screw Handle Shoulder Screw Button Plug Set Screw To attach metal freezer handle: 1. Additionally, before...

Complete Owner s Guide
Page 11
... be easier to reverse while doors are set aside in a secure position where they cannot fall and cause personal injury. HANDLE INSTALLATION To attach plastic refrigerator handle: To reverse refrigerator/freezer handles: 1. Secure bottom of handle with screw holes on top of door. 2. Reverse freezer and...
... be easier to reverse while doors are set aside in a secure position where they cannot fall and cause personal injury. HANDLE INSTALLATION To attach plastic refrigerator handle: To reverse refrigerator/freezer handles: 1. Secure bottom of handle with screw holes on top of door. 2. Reverse freezer and...
Complete Owner s Guide
Page 12
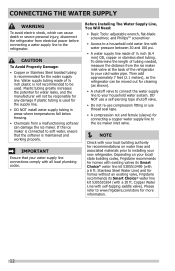
...increases the potential for water leaks, and the manufacturer will not be moved out for recommendations on your local/ state building codes, Frigidaire recommends for the supply line. • DO NOT install water supply tubing in areas where temperatures fall below freezing. • Chemicals... from a malfunctioning softener can cause death or severe personal injury, disconnect the refrigerator from the ice maker inlet valve at the back of tubing needed, measure the distance from electrical power before connecting a water ...
...increases the potential for water leaks, and the manufacturer will not be moved out for recommendations on your local/ state building codes, Frigidaire recommends for the supply line. • DO NOT install water supply tubing in areas where temperatures fall below freezing. • Chemicals... from a malfunctioning softener can cause death or severe personal injury, disconnect the refrigerator from the ice maker inlet valve at the back of tubing needed, measure the distance from electrical power before connecting a water ...
Complete Owner s Guide
Page 13
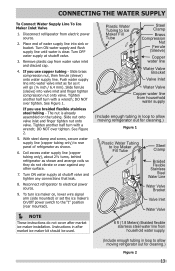
... from household water supply (Include enough tubing in loop to allow moving refrigerator out for cleaning.) Figure 1 Plastic Water Tubing to allow moving refrigerator out for cleaning.) Figure 2 13 Disconnect refrigerator from household water supply. (Include enough tubing in loop to Ice Maker... Valve Bracket Valve Inlet Water Valve 6 ft (1.8 Meters) Braided flexible stainless steel water line from electric power source. 2. Place end of refrigerator as it will go (¼ inch / 6.4 mm). Remove plastic cap from water valve inlet and discard cap. 4. Slide brass compression nut...
... from household water supply (Include enough tubing in loop to allow moving refrigerator out for cleaning.) Figure 1 Plastic Water Tubing to allow moving refrigerator out for cleaning.) Figure 2 13 Disconnect refrigerator from household water supply. (Include enough tubing in loop to Ice Maker... Valve Bracket Valve Inlet Water Valve 6 ft (1.8 Meters) Braided flexible stainless steel water line from electric power source. 2. Place end of refrigerator as it will go (¼ inch / 6.4 mm). Remove plastic cap from water valve inlet and discard cap. 4. Slide brass compression nut...
Complete Owner s Guide
Page 14
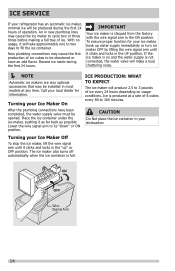
... signal arm until it as far back as possible. With no usage, it clicks and locks in the ON position. Ice is full. Call your refrigerator has an automatic ice maker, minimal ice will take approximately one to two days to cycle two or three times before making a full tray of...
... signal arm until it as far back as possible. With no usage, it clicks and locks in the ON position. Ice is full. Call your refrigerator has an automatic ice maker, minimal ice will take approximately one to two days to cycle two or three times before making a full tray of...

Complete Owner s Guide
Page 15
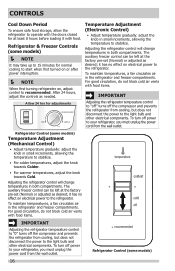
... temperature control in the refrigerator section. NOTE If your unit is in the refrigeration section. Cool Down Period To ensure safe food storage, allow the refrigerator to Normal. Refrigerator & Freezer Controls (some models) NOTE When first turning refrigerator on, adjust the refrigerator control to operate with ... for at least 8 hours before loading it with food. After 24 hours, adjust the controls as needed. NOTE Your refrigerator is designed to prevent food stored in the freezer from melting when installed in areas below 39° F will likely result in ...
... temperature control in the refrigerator section. NOTE If your unit is in the refrigeration section. Cool Down Period To ensure safe food storage, allow the refrigerator to Normal. Refrigerator & Freezer Controls (some models) NOTE When first turning refrigerator on, adjust the refrigerator control to operate with ... for at least 8 hours before loading it with food. After 24 hours, adjust the controls as needed. NOTE Your refrigerator is designed to prevent food stored in the freezer from melting when installed in areas below 39° F will likely result in ...
Complete Owner s Guide
Page 16
... • Adjust temperature gradually: adjust the knob in small increments, allowing the temperature to stabilize. To turn off the compressor and prevents the refrigerator from the wall outlet. The auxiliary freezer control can be left at the factory pre-set (Normal) or adjusted as desired; it has no ... take up to 15 minutes for normal cooling to start when first turned on or after power interruption. NOTE When first turning refrigerator on electrical power to the light bulb and other electrical components. For good circulation, do not block cold air vents with food items....
... • Adjust temperature gradually: adjust the knob in small increments, allowing the temperature to stabilize. To turn off the compressor and prevents the refrigerator from the wall outlet. The auxiliary freezer control can be left at the factory pre-set (Normal) or adjusted as desired; it has no ... take up to 15 minutes for normal cooling to start when first turned on or after power interruption. NOTE When first turning refrigerator on electrical power to the light bulb and other electrical components. For good circulation, do not block cold air vents with food items....

Complete Owner s Guide
Page 17
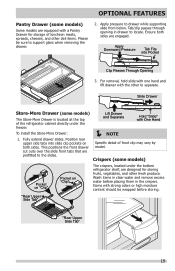
... that can be quickly selected. To remove door rack: 1. Shelves and covers may break if exposed to stop position. 2. Tempered glass is normal. Shelf Adjustment Refrigerator shelves are cold. To install door rack: 1. Sliding Wire Shelf Door Rack 17 OPTIONAL FEATURES CAUTION Do not clean glass shelves or covers with warm...
... that can be quickly selected. To remove door rack: 1. Shelves and covers may break if exposed to stop position. 2. Tempered glass is normal. Shelf Adjustment Refrigerator shelves are cold. To install door rack: 1. Sliding Wire Shelf Door Rack 17 OPTIONAL FEATURES CAUTION Do not clean glass shelves or covers with warm...
Complete Owner s Guide
Page 19
... tabs into Pocket Clip Passes Through Opening 3. Lift Drawer and Separate Hold "Slide" with One Hand NOTE Specific detail of the refrigerator cabinet directly under the bottom refrigerator shelf, are designed for storage of luncheon meats, spreads, cheeses, and other deli items. Please be wrapped before placing them in drawer to...
... tabs into Pocket Clip Passes Through Opening 3. Lift Drawer and Separate Hold "Slide" with One Hand NOTE Specific detail of the refrigerator cabinet directly under the bottom refrigerator shelf, are designed for storage of luncheon meats, spreads, cheeses, and other deli items. Please be wrapped before placing them in drawer to...
Complete Owner s Guide
Page 20
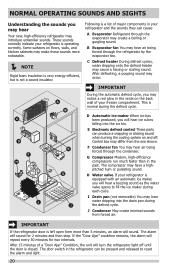
.... H Water valve If your freezer compartment. J Condenser May create minimal sounds from the one shown. These sounds normally indicate your refrigerator and the sounds they can be pressed and released to fill the ice maker during the defrost cycle. NORMAL OPERATING SOUNDS AND SIGHTS... Understanding the sounds you may hear Your new, high-efficiency refrigerator may differ from forced air. The alarm will sound. G Compressor Modern, high-efficiency compressors run much faster than 5 minutes, ...
.... H Water valve If your freezer compartment. J Condenser May create minimal sounds from the one shown. These sounds normally indicate your refrigerator and the sounds they can be pressed and released to fill the ice maker during the defrost cycle. NORMAL OPERATING SOUNDS AND SIGHTS... Understanding the sounds you may hear Your new, high-efficiency refrigerator may differ from forced air. The alarm will sound. G Compressor Modern, high-efficiency compressors run much faster than 5 minutes, ...


