
Installation Instructions
Page 1
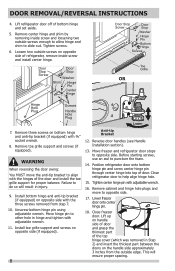
... and Freezer controls set ȽȽ Crisper Humidity controls set Electrical Power ȽȽ House water supply connected to refrigerator ȽȽ No water leaks present at the rear of these instructions. Lower it clockwise until they contact the floor (Figure 3). Top Hinge Cover Top Hinge Shim Pin Central Hinge Door Stop Screw Door Stop Washer Hinge Pin Bottom Hinge Screws Toe Grille 9 Installation Checkoff List Doors Ice Maker ȽȽ Handles are installing your refrigerator without connecting it contacts the floor. 6 Remove Internal...
... and Freezer controls set ȽȽ Crisper Humidity controls set Electrical Power ȽȽ House water supply connected to refrigerator ȽȽ No water leaks present at the rear of these instructions. Lower it clockwise until they contact the floor (Figure 3). Top Hinge Cover Top Hinge Shim Pin Central Hinge Door Stop Screw Door Stop Washer Hinge Pin Bottom Hinge Screws Toe Grille 9 Installation Checkoff List Doors Ice Maker ȽȽ Handles are installing your refrigerator without connecting it contacts the floor. 6 Remove Internal...
Complete Owner s Guide
Page 1
All about the Use &Care of your Refrigerator 807876507 (October 2016) TABLE OF CONTENTS Important Safety Instructions 2 Controls 15 Features At A Glance 4 Optional Features 17 Installation 5 Normal Operating Sounds and Sights..........20 Door Removal/Reversal Instructions 7 Care and Cleaning 21 Handle Installation 10 Before you Call 23 Connecting Water Supply 12 Major Appliance Warranty 24 Ice Service 14 www.frigidaire.com USA 1-800-944-9044 www.frigidaire.ca Canada 1-800-265-8352
All about the Use &Care of your Refrigerator 807876507 (October 2016) TABLE OF CONTENTS Important Safety Instructions 2 Controls 15 Features At A Glance 4 Optional Features 17 Installation 5 Normal Operating Sounds and Sights..........20 Door Removal/Reversal Instructions 7 Care and Cleaning 21 Handle Installation 10 Before you Call 23 Connecting Water Supply 12 Major Appliance Warranty 24 Ice Service 14 www.frigidaire.com USA 1-800-944-9044 www.frigidaire.ca Canada 1-800-265-8352
Complete Owner s Guide
Page 2
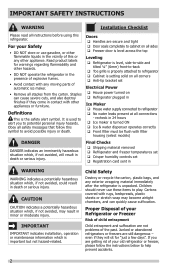
... finishes if they will result in minor or moderate injury. CAUTION CAUTION indicates a potentially hazardous situation which , if not avoided, could result in Ice Maker House water supply connected to refrigerator No water leaks present at all corners Anti-tip bracket set Electrical Power House power turned on Refrigerator plugged in death or serious injury. Proper Disposal of this or any...
... finishes if they will result in minor or moderate injury. CAUTION CAUTION indicates a potentially hazardous situation which , if not avoided, could result in Ice Maker House water supply connected to refrigerator No water leaks present at all corners Anti-tip bracket set Electrical Power House power turned on Refrigerator plugged in death or serious injury. Proper Disposal of this or any...

Complete Owner s Guide
Page 3
... Amp, AC only electrical outlet. Operating the refrigerator with 3-prong grounded plug CAUTION To avoid personal injury or property damage, handle tempered glass shelves carefully. Such damage is not covered under your refrigerator's cooling system, but does not disconnect the power to "0" (Mechanical controls) or "OFF" (Electronic controls) will operate properly. IMPORTANT CFC/HCFC Disposal Your old refrigerator may not easily climb inside. • Have refrigerant removed by a qualified service technician...
... Amp, AC only electrical outlet. Operating the refrigerator with 3-prong grounded plug CAUTION To avoid personal injury or property damage, handle tempered glass shelves carefully. Such damage is not covered under your refrigerator's cooling system, but does not disconnect the power to "0" (Mechanical controls) or "OFF" (Electronic controls) will operate properly. IMPORTANT CFC/HCFC Disposal Your old refrigerator may not easily climb inside. • Have refrigerant removed by a qualified service technician...
Complete Owner s Guide
Page 4
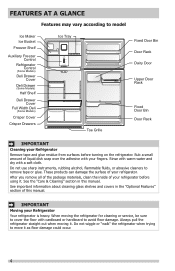
... Drawer (Some Models) Half Shelf Deli Drawer Cover Full Width Deli (Some Models) Crisper Cover Crisper Drawers Ice Tray Toe Grille Fixed Door Bin Door Rack Dairy Door Upper Door Rack Fixed Door Bin Door Rack IMPORTANT Cleaning your refrigerator before turning on the refrigerator. Do not use sharp instruments, rubbing alcohol, flammable fluids, or abrasive cleaners to move it as floor damage could occur. 4 After you remove all of the package materials, clean the inside of this manual. Rinse with warm water...
... Drawer (Some Models) Half Shelf Deli Drawer Cover Full Width Deli (Some Models) Crisper Cover Crisper Drawers Ice Tray Toe Grille Fixed Door Bin Door Rack Dairy Door Upper Door Rack Fixed Door Bin Door Rack IMPORTANT Cleaning your refrigerator before turning on the refrigerator. Do not use sharp instruments, rubbing alcohol, flammable fluids, or abrasive cleaners to move it as floor damage could occur. 4 After you remove all of the package materials, clean the inside of this manual. Rinse with warm water...

Complete Owner s Guide
Page 5
... that is placed with the door hinge side against a wall, you do not hook up water to the refrigerator, remember to allow additional space for final positioning of future door reversals, save the toe grille cover not being used. 5 If you may have to turn the ice maker off. some models NOTE In case of your refrigerator. 2. To install the toe grille: 1. Before starting...
... that is placed with the door hinge side against a wall, you do not hook up water to the refrigerator, remember to allow additional space for final positioning of future door reversals, save the toe grille cover not being used. 5 If you may have to turn the ice maker off. some models NOTE In case of your refrigerator. 2. To install the toe grille: 1. Before starting...
Complete Owner s Guide
Page 8
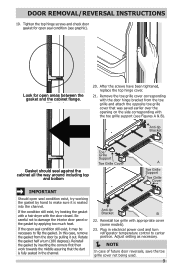
... bottom hinge pin using adjustable wrench. Install toe grille support and screws on opposite side of refrigerator, remove inside screw and loosening two outside edge. Lower freezer door onto center hinge pin. 18. Close freezer door. Remove center hinge and shim by removing inside screw and install center hinge. Door Stop Screw Door Stop Washer Shim Hinge Pin Center Hinge Door Stop Screw Door Stop Washer Hinge Pin Bottom Hinge Screws Toe Grille OR Hinge Hole Plug Screws Handle Hole Plug Lower 7. Install bottom hinge and anti...
... bottom hinge pin using adjustable wrench. Install toe grille support and screws on opposite side of refrigerator, remove inside screw and loosening two outside edge. Lower freezer door onto center hinge pin. 18. Close freezer door. Remove center hinge and shim by removing inside screw and install center hinge. Door Stop Screw Door Stop Washer Shim Hinge Pin Center Hinge Door Stop Screw Door Stop Washer Hinge Pin Bottom Hinge Screws Toe Grille OR Hinge Hole Plug Screws Handle Hole Plug Lower 7. Install bottom hinge and anti...
Complete Owner s Guide
Page 9
... top hinge cover. 21. Adjust setting as necessary. NOTE In case of future door reversals, save the toe grille cover not being used. 9 Be careful not to make sure it is fully seated in electrical power cord and turn (180 degrees). Reinstall the gasket by applying too much heat. Remove the toe grille cover corresponding with the door hinge bracket from the door by hand to damage the interior door panel...
... top hinge cover. 21. Adjust setting as necessary. NOTE In case of future door reversals, save the toe grille cover not being used. 9 Be careful not to make sure it is fully seated in electrical power cord and turn (180 degrees). Reinstall the gasket by applying too much heat. Remove the toe grille cover corresponding with the door hinge bracket from the door by hand to damage the interior door panel...
Complete Owner s Guide
Page 12
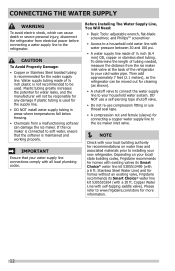
... used for the supply line. • DO NOT install water supply tubing in areas where temperatures fall below freezing. • Chemicals from electrical power before connecting a water supply line to the ice maker inlet valve. NOTE Check with your local building authority for homes with existing valves its Smart Choice® water line kit 5305510264 (with a 6 ft. Stainless Steel Water Line) and for cleaning (as shown). • A shutoff valve to connect the water supply line to your local/ state building codes, Frigidaire...
... used for the supply line. • DO NOT install water supply tubing in areas where temperatures fall below freezing. • Chemicals from electrical power before connecting a water supply line to the ice maker inlet valve. NOTE Check with your local building authority for homes with existing valves its Smart Choice® water line kit 5305510264 (with a 6 ft. Stainless Steel Water Line) and for cleaning (as shown). • A shutoff valve to connect the water supply line to your local/ state building codes, Frigidaire...
Complete Owner s Guide
Page 13
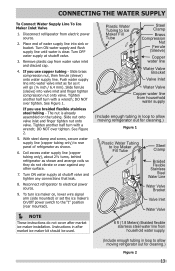
... 2. 5. Instructions in loop to allow moving refrigerator out for cleaning.) Figure 2 13 Disconnect refrigerator from water valve inlet and discard cap. 4. Turn ON water supply and flush supply line until water is already assembled on , lower wire signal arm (side mounted) or set the ice maker's On/Off power switch to rear panel of water supply line into valve inlet and finger tighten compression nut onto valve. See Figure 1. Tighten another half turn ice maker on the tubing. Turn OFF water supply...
... 2. 5. Instructions in loop to allow moving refrigerator out for cleaning.) Figure 2 13 Disconnect refrigerator from water valve inlet and discard cap. 4. Turn ON water supply and flush supply line until water is already assembled on , lower wire signal arm (side mounted) or set the ice maker's On/Off power switch to rear panel of water supply line into valve inlet and finger tighten compression nut onto valve. See Figure 1. Tighten another half turn ice maker on the tubing. Turn OFF water supply...
Complete Owner s Guide
Page 14
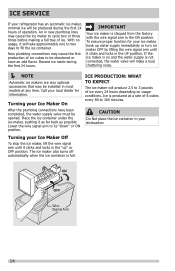
... for your ice maker, hook up " or OFF position. Turning your Ice Maker Off To stop the ice maker, lift the wire signal arm until it will take approximately one to two days to 160 minutes. The ice maker also turns off automatically when the ice container is not connected, the water valve will make a loud chattering noise. NOTE Automatic ice makers are also optional accessories that may be installed in...
... for your ice maker, hook up " or OFF position. Turning your Ice Maker Off To stop the ice maker, lift the wire signal arm until it will take approximately one to two days to 160 minutes. The ice maker also turns off automatically when the ice container is not connected, the water valve will make a loud chattering noise. NOTE Automatic ice makers are also optional accessories that may be installed in...
Complete Owner s Guide
Page 19
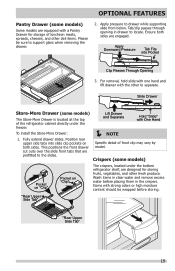
... remove excess water before storing. Wash items in the crispers. Slide Drawer Store-More Drawer (some models) The Store-More Drawer is located at the top of the refrigerator cabinet directly under the bottom refrigerator shelf, are designed for storage of front clip may vary by model. For removal, hold slide with one hand and lift drawer with the other to support glass when removing the drawer. 2. Crispers (some models...
... remove excess water before storing. Wash items in the crispers. Slide Drawer Store-More Drawer (some models) The Store-More Drawer is located at the top of the refrigerator cabinet directly under the bottom refrigerator shelf, are designed for storage of front clip may vary by model. For removal, hold slide with one hand and lift drawer with the other to support glass when removing the drawer. 2. Crispers (some models...
Complete Owner s Guide
Page 20
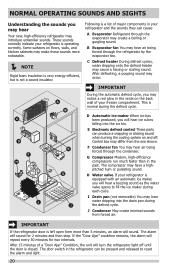
... the ice maker during the defrost cycle. F Condenser fan You may make these sounds more than in the vents on the back wall of a "Door Ajar" Condition, the unit will turn the refrigerator light off . These sounds normally indicate your refrigerator is closed. D Automatic ice maker When ice has been produced, you will hear a buzzing sound as the water valve opens to reset the alarm and light. 20 I Drain pan (not removable) You...
... the ice maker during the defrost cycle. F Condenser fan You may make these sounds more than in the vents on the back wall of a "Door Ajar" Condition, the unit will turn the refrigerator light off . These sounds normally indicate your refrigerator is closed. D Automatic ice maker When ice has been produced, you will hear a buzzing sound as the water valve opens to reset the alarm and light. 20 I Drain pan (not removable) You...
Complete Owner s Guide
Page 21
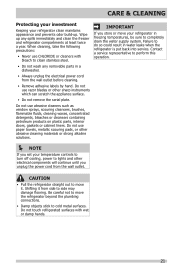
... water supply system. Shifting it . Be careful not to move your refrigerator clean maintains appearance and prevents odor build-up any removable parts in a dishwasher. • Always unplug the electrical power cord from the wall outlet. Do not use CHLORIDE or cleaners with wet or damp hands. 21 Contact a service representative to perform this operation. NOTE If you set your temperature controls to turn off cooling, power...
... water supply system. Shifting it . Be careful not to move your refrigerator clean maintains appearance and prevents odor build-up any removable parts in a dishwasher. • Always unplug the electrical power cord from the wall outlet. Do not use CHLORIDE or cleaners with wet or damp hands. 21 Contact a service representative to perform this operation. NOTE If you set your temperature controls to turn off cooling, power...
Complete Owner s Guide
Page 22
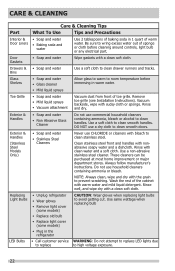
... when replacing light bulbs to room temperature before cleaning around controls, light bulb or any electrical part. Glass Shelves • Soap and water • Glass cleaner • Mild liquid sprays Allow glass to warm to avoid getting cut. Use a soft cloth to clean drawer runners and tracks. Exterior & Handles (Stainless Steel Models Only) • Soap and water • Stainless Steel Cleaners Never use a dry cloth to prevent scratching. Use a non-abrasive stainless steel cleaner. Always follow manufacturer's instructions. Rinse...
... when replacing light bulbs to room temperature before cleaning around controls, light bulb or any electrical part. Glass Shelves • Soap and water • Glass cleaner • Mild liquid sprays Allow glass to warm to avoid getting cut. Use a soft cloth to clean drawer runners and tracks. Exterior & Handles (Stainless Steel Models Only) • Soap and water • Stainless Steel Cleaners Never use a dry cloth to prevent scratching. Use a non-abrasive stainless steel cleaner. Always follow manufacturer's instructions. Rinse...
Complete Owner s Guide
Page 23
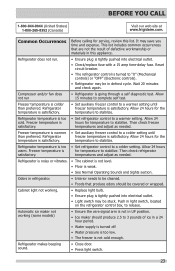
... hours warm. Push in defrost cycle. Wait 20 minutes and check again. Freezer temperature is satisfactory. Allow 15 minutes to stabilize. Refrigerator temperature is weak. • See Normal Operating Sounds and Sights section. Refrigerator temperature is satisfactory. Common Occurrences Before calling for service, review this appliance. Freezer temperature is warmer • Set auxiliary freezer control to a warmer setting until than preferred. Then check refrigerator satisfactory. Automatic ice maker not working . • Replace light bulb...
... hours warm. Push in defrost cycle. Wait 20 minutes and check again. Freezer temperature is satisfactory. Allow 15 minutes to stabilize. Refrigerator temperature is weak. • See Normal Operating Sounds and Sights section. Refrigerator temperature is satisfactory. Common Occurrences Before calling for service, review this appliance. Freezer temperature is warmer • Set auxiliary freezer control to a warmer setting until than preferred. Then check refrigerator satisfactory. Automatic ice maker not working . • Replace light bulb...
Complete Owner s Guide
Page 24
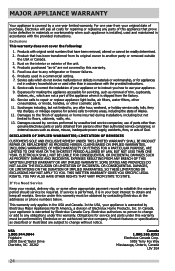
... record to repair or replace appliance light bulbs, air filters, water filters, other consumables, or knobs, handles, or other than genuine Electrolux parts or parts obtained from the factory. 10. use or used in accordance with the provided instructions. THIS WRITTEN WARRANTY GIVES YOU SPECIFIC LEGAL RIGHTS. In the USA, your best interest to obtain and keep all costs for servicing, such as abuse, misuse, inadequate power supply, accidents...
... record to repair or replace appliance light bulbs, air filters, water filters, other consumables, or knobs, handles, or other than genuine Electrolux parts or parts obtained from the factory. 10. use or used in accordance with the provided instructions. THIS WRITTEN WARRANTY GIVES YOU SPECIFIC LEGAL RIGHTS. In the USA, your best interest to obtain and keep all costs for servicing, such as abuse, misuse, inadequate power supply, accidents...

Wiring Diagram
Page 1
...;C) Heater Wattage 165 W ICE MAKER CONNECTOR PLUG CONNECTIONS Wire Number Wire Color Connects to Defrost Heater To Exit Service Mode from Press Door Switch any green grounding wires are removed during this appliance. feel for operating sounds; Normal Cooling Service Mode Mode Press Door Switch 3 Press Door Switch Times and Hold 4th Press Until 2 Times Long Beep Test 1: 2 Beeps Test 2: Power ON Press Door Switch Compressor ON Enters Service 2 Times Mode 2 Beeps Press Door Switch 2 Times Manual Defrost 2 Beeps to : 1 Green / Yellow Ground 2 Yellow Water Valve...
...;C) Heater Wattage 165 W ICE MAKER CONNECTOR PLUG CONNECTIONS Wire Number Wire Color Connects to Defrost Heater To Exit Service Mode from Press Door Switch any green grounding wires are removed during this appliance. feel for operating sounds; Normal Cooling Service Mode Mode Press Door Switch 3 Press Door Switch Times and Hold 4th Press Until 2 Times Long Beep Test 1: 2 Beeps Test 2: Power ON Press Door Switch Compressor ON Enters Service 2 Times Mode 2 Beeps Press Door Switch 2 Times Manual Defrost 2 Beeps to : 1 Green / Yellow Ground 2 Yellow Water Valve...
Product Specifications Sheet
Page 2
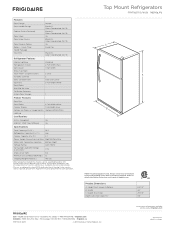
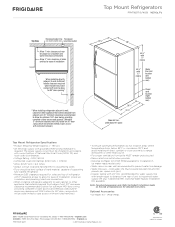
... 2-wire service with Door Open 90° 65-1/8" 28" 29-7/8" 56" 16.3 Cu. Top Mount Refrigerators Features Door Design Door Handle Design Cabinet Finish (Textured) Door Stops Door Hinge Covers Door Reverse Option Rollers - Ft.) 16.3 Refrigerator Capacity (Cu. Ft.) 3.7 Power Supply Connection Location Right Bottom Rear Water Inlet Connection Location Bottom Right Allow 1" min. clearance at frigidaire.com Specifications subject to allow for optimum 140° door swing, for ease of installation Voltage Rating 120V / 60Hz Connected Load...
... 2-wire service with Door Open 90° 65-1/8" 28" 29-7/8" 56" 16.3 Cu. Top Mount Refrigerators Features Door Design Door Handle Design Cabinet Finish (Textured) Door Stops Door Hinge Covers Door Reverse Option Rollers - Ft.) 16.3 Refrigerator Capacity (Cu. Ft.) 3.7 Power Supply Connection Location Right Bottom Rear Water Inlet Connection Location Bottom Right Allow 1" min. clearance at frigidaire.com Specifications subject to allow for optimum 140° door swing, for ease of installation Voltage Rating 120V / 60Hz Connected Load...
Product Specifications Sheet
Page 3
... 3/8" rollers Water line inlet location (left bottom rear) 26 5/8" 32 1/4" Power cord location (right bottom rear) Allow 56" min. (with doors 90° open) Top Mount Refrigerator Specifications • Product Shipping Weight (approx.) - 190 Lbs. • An electrical supply with current edition of National Electrical Code (NFPA 70) and local codes & ordinances. • Voltage Rating - 120V / 60 Hz • Connected Load (kW Rating) @ 120 Volts = 0.72 kW • Amps...
... 3/8" rollers Water line inlet location (left bottom rear) 26 5/8" 32 1/4" Power cord location (right bottom rear) Allow 56" min. (with doors 90° open) Top Mount Refrigerator Specifications • Product Shipping Weight (approx.) - 190 Lbs. • An electrical supply with current edition of National Electrical Code (NFPA 70) and local codes & ordinances. • Voltage Rating - 120V / 60 Hz • Connected Load (kW Rating) @ 120 Volts = 0.72 kW • Amps...


