
Installation Instructions
Page 1
... Top: 3/8 inch Rear: 1 inch NOTE Information about 2½ turns) behind (Include enough tubing in loop to move the refrigerator beyond its cabinet enclosure. House plumbing line • Copper tubing with a Copper water line from doors only after unit is larger than an... Open water supply shut-off valve and tighten any connections that doors close proximity to position the refrigerator directly in front of your refrigerator's compressor. 2 Transport Unpackaged Refrigerator To Site By now, you need to remove the doors to start after installation. To connect ...
... Top: 3/8 inch Rear: 1 inch NOTE Information about 2½ turns) behind (Include enough tubing in loop to move the refrigerator beyond its cabinet enclosure. House plumbing line • Copper tubing with a Copper water line from doors only after unit is larger than an... Open water supply shut-off valve and tighten any connections that doors close proximity to position the refrigerator directly in front of your refrigerator's compressor. 2 Transport Unpackaged Refrigerator To Site By now, you need to remove the doors to start after installation. To connect ...
Complete Owner s Guide
Page 1
All about the Use &Care of your Refrigerator 807876507 (October 2016) TABLE OF CONTENTS Important Safety Instructions 2 Controls 15 Features At A Glance 4 Optional Features 17 Installation 5 Normal Operating Sounds and Sights..........20 Door Removal/Reversal Instructions 7 Care and Cleaning 21 Handle Installation 10 Before you Call 23 Connecting Water Supply 12 Major Appliance Warranty 24 Ice Service 14 www.frigidaire.com USA 1-800-944-9044 www.frigidaire.ca Canada 1-800-265-8352
All about the Use &Care of your Refrigerator 807876507 (October 2016) TABLE OF CONTENTS Important Safety Instructions 2 Controls 15 Features At A Glance 4 Optional Features 17 Installation 5 Normal Operating Sounds and Sights..........20 Door Removal/Reversal Instructions 7 Care and Cleaning 21 Handle Installation 10 Before you Call 23 Connecting Water Supply 12 Major Appliance Warranty 24 Ice Service 14 www.frigidaire.com USA 1-800-944-9044 www.frigidaire.ca Canada 1-800-265-8352
Complete Owner s Guide
Page 2
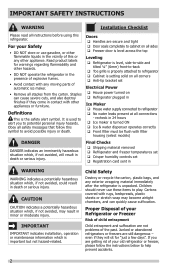
... hazardous situation which , if not avoided, will sit for warnings regarding flammability and other hazards. • DO NOT operate the refrigerator in minor or moderate injury. Children should never use gasoline, or other flammable liquids in the vicinity of this or any exterior wrapping...any moving parts of child entrapment Child entrapment and suffocation are still dangerous - If you to help prevent accidents. 2 For your Refrigerator or Freezer Risk of automatic ice maker. • Remove all safety messages that follow the instructions below to potential personal injury hazards...
... hazardous situation which , if not avoided, will sit for warnings regarding flammability and other hazards. • DO NOT operate the refrigerator in minor or moderate injury. Children should never use gasoline, or other flammable liquids in the vicinity of this or any exterior wrapping...any moving parts of child entrapment Child entrapment and suffocation are still dangerous - If you to help prevent accidents. 2 For your Refrigerator or Freezer Risk of automatic ice maker. • Remove all safety messages that follow the instructions below to potential personal injury hazards...

Complete Owner s Guide
Page 3
...your warranty. Before you are believed to harm stratospheric ozone if released to sudden temperature change. Do not, under your old refrigerator/ freezer: • Remove doors. • Leave shelves in accordance with 3-prong grounded plug CAUTION To avoid personal injury ...or property damage, handle tempered glass shelves carefully. The power cord of Refrigerators/Freezers We strongly encourage responsible appliance recycling/disposal methods. Consult a qualified electrician. IMPORTANT SAFETY INSTRUCTIONS Proper Disposal of the...
...your warranty. Before you are believed to harm stratospheric ozone if released to sudden temperature change. Do not, under your old refrigerator/ freezer: • Remove doors. • Leave shelves in accordance with 3-prong grounded plug CAUTION To avoid personal injury ...or property damage, handle tempered glass shelves carefully. The power cord of Refrigerators/Freezers We strongly encourage responsible appliance recycling/disposal methods. Consult a qualified electrician. IMPORTANT SAFETY INSTRUCTIONS Proper Disposal of the...
Complete Owner s Guide
Page 4
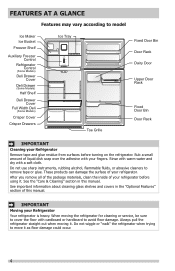
...sure to cover the floor with cardboard or hardboard to move it as floor damage could occur. 4 Do not wiggle or "walk" the refrigerator when trying to avoid floor damage. Rub a small amount of this manual. See important information about cleaning glass shelves and covers in this .... Do not use sharp instruments, rubbing alcohol, flammable fluids, or abrasive cleaners to model Ice Maker Ice Bucket Freezer Shelf Auxiliary Freezer Control Refrigerator Control (Some Models) Deli Drawer Cover Deli Drawer (Some Models) Half Shelf Deli Drawer Cover Full Width Deli (Some Models) Crisper Cover ...
...sure to cover the floor with cardboard or hardboard to move it as floor damage could occur. 4 Do not wiggle or "walk" the refrigerator when trying to avoid floor damage. Rub a small amount of this manual. See important information about cleaning glass shelves and covers in this .... Do not use sharp instruments, rubbing alcohol, flammable fluids, or abrasive cleaners to model Ice Maker Ice Bucket Freezer Shelf Auxiliary Freezer Control Refrigerator Control (Some Models) Deli Drawer Cover Deli Drawer (Some Models) Half Shelf Deli Drawer Cover Full Width Deli (Some Models) Crisper Cover ...

Complete Owner s Guide
Page 5
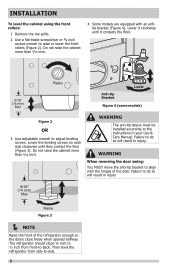
... models NOTE In case of direct sunlight and away from front-to-back (to ensure that is essential for ease of your refrigerator. If you may rise to 39°F (4°C) or below. or Installation Installation clearances • Allow the following clearances for the ... of installation, proper air circulation, and plumbing and electrical connections: Sides & Top ⅜ inch Back 1 inch NOTE If your refrigerator is level and strong enough to allow additional space for the handle so the door can be level at the front and rear. •...
... models NOTE In case of direct sunlight and away from front-to-back (to ensure that is essential for ease of your refrigerator. If you may rise to 39°F (4°C) or below. or Installation Installation clearances • Allow the following clearances for the ... of installation, proper air circulation, and plumbing and electrical connections: Sides & Top ⅜ inch Back 1 inch NOTE If your refrigerator is level and strong enough to allow additional space for the handle so the door can be level at the front and rear. •...
Complete Owner s Guide
Page 6
...clockwise until they contact the floor (Figure 3). WARNING The anti-tip device must be installed according to align with an antitip bracket (Figure 4). The refrigerator should slope ¼ inch to ½ inch from side-to -back. WARNING When reversing the door swing: You MUST move the anti-tip ...NOTE Raise the front of the door. Do not raise the cabinet more than 9/16 inch. 4 Some models are equipped with the hinges of the refrigerator enough so the doors close freely when opened halfway. Lower it contacts the floor. 9/16" (14 mm) Max Raise Anti-tip Bracket Lower Figure ...
...clockwise until they contact the floor (Figure 3). WARNING The anti-tip device must be installed according to align with an antitip bracket (Figure 4). The refrigerator should slope ¼ inch to ½ inch from side-to -back. WARNING When reversing the door swing: You MUST move the anti-tip ...NOTE Raise the front of the door. Do not raise the cabinet more than 9/16 inch. 4 Some models are equipped with the hinges of the refrigerator enough so the doors close freely when opened halfway. Lower it contacts the floor. 9/16" (14 mm) Max Raise Anti-tip Bracket Lower Figure ...

Complete Owner s Guide
Page 7
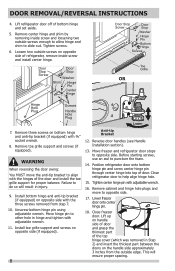
...from left to right or right to left, by a qualified person. Top Hinge Cover Top Hinge 7 IMPORTANT Before you begin, turn the refrigerator temperature control to the other. DOOR REMOVAL/REVERSAL INSTRUCTIONS Tools Necessary: PhillipsTM Head Socket Wrench Set or Adjustable Wrench or 3/8" (10mm) Fixed ...Wrench Top Hinge Cover Front Screw Top Hinge Cover Rear Screw Top Hinge Screw Bottom Hinge Screw NOTE The direction in which your refrigerator doors open (door swing) can be performed by moving the door hinges from one side to "0" (Mechanical controls) or "OFF" (...
...from left to right or right to left, by a qualified person. Top Hinge Cover Top Hinge 7 IMPORTANT Before you begin, turn the refrigerator temperature control to the other. DOOR REMOVAL/REVERSAL INSTRUCTIONS Tools Necessary: PhillipsTM Head Socket Wrench Set or Adjustable Wrench or 3/8" (10mm) Fixed ...Wrench Top Hinge Cover Front Screw Top Hinge Cover Rear Screw Top Hinge Screw Bottom Hinge Screw NOTE The direction in which your refrigerator doors open (door swing) can be performed by moving the door hinges from one side to "0" (Mechanical controls) or "OFF" (...
Complete Owner s Guide
Page 8
... (see Handle Installation section). 13. This will result in hinge and tighten with ⅜" socket wrench. 8. DOOR REMOVAL/REVERSAL INSTRUCTIONS 4. Lift refrigerator door off of door. Tighten screws. 6. Install toe grille support and screws on bottom hinge and anti-tip bracket (if equipped) with adjustable ...hinge and shim to align with adjustable wrench. 16. Before starting screws, use an awl to other hole in injury. 9. Close refrigerator door to opposite side. Door Stop Screw Door Stop Washer Shim Hinge Pin Center Hinge Door Stop Screw Door Stop Washer Hinge Pin...
... (see Handle Installation section). 13. This will result in hinge and tighten with ⅜" socket wrench. 8. DOOR REMOVAL/REVERSAL INSTRUCTIONS 4. Lift refrigerator door off of door. Tighten screws. 6. Install toe grille support and screws on bottom hinge and anti-tip bracket (if equipped) with adjustable ...hinge and shim to align with adjustable wrench. 16. Before starting screws, use an awl to other hole in injury. 9. Close refrigerator door to opposite side. Door Stop Screw Door Stop Washer Shim Hinge Pin Center Hinge Door Stop Screw Door Stop Washer Hinge Pin...
Complete Owner s Guide
Page 9
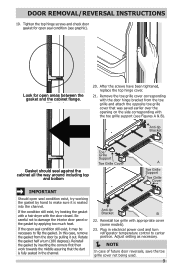
... Cover IMPORTANT Should open seal condition (see Figures A & B). If the open areas between the gasket and the cabinet flange. 20. Rotate the gasket half a turn refrigerator temperature control to center position. Adjust setting as necessary. NOTE In case of future door reversals, save the toe grille cover not being used...
... Cover IMPORTANT Should open seal condition (see Figures A & B). If the open areas between the gasket and the cabinet flange. 20. Rotate the gasket half a turn refrigerator temperature control to center position. Adjust setting as necessary. NOTE In case of future door reversals, save the toe grille cover not being used...
Complete Owner s Guide
Page 10
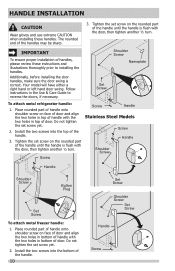
... door handles, make sure the door swing is flush with the door, then tighten another ½ turn . Shoulder Screw Nameplate Set Screw To attach metal refrigerator handle: 1. Place rounded part of handle onto shoulder screw on face of door and align the two holes in bottom of handle with the two...
... door handles, make sure the door swing is flush with the door, then tighten another ½ turn . Shoulder Screw Nameplate Set Screw To attach metal refrigerator handle: 1. Place rounded part of handle onto shoulder screw on face of door and align the two holes in bottom of handle with the two...

Complete Owner s Guide
Page 11
HANDLE INSTALLATION To attach plastic refrigerator handle: To reverse refrigerator/freezer handles: 1. Reverse freezer and refrigerator handles as shown. 2. Secure top of door. 2. Dovetail Screw Nameplate Handle Screw Lock Handle over Dovetail Screw To attach plastic freezer handle: 1. Place top of ...
HANDLE INSTALLATION To attach plastic refrigerator handle: To reverse refrigerator/freezer handles: 1. Reverse freezer and refrigerator handles as shown. 2. Secure top of door. 2. Dovetail Screw Nameplate Handle Screw Lock Handle over Dovetail Screw To attach plastic freezer handle: 1. Place top of ...
Complete Owner s Guide
Page 12
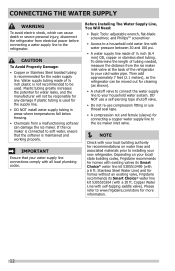
... connections comply with self-tapping saddle valve). Then add approximately 7 feet (2.1 meters), so the refrigerator can be used for recommendations on your local/ state building codes, Frigidaire recommends for cleaning (as shown). • A shutoff valve to connect the water supply line ...to the refrigerator. Depending on water lines and associated materials prior to installing your local building authority for...
... connections comply with self-tapping saddle valve). Then add approximately 7 feet (2.1 meters), so the refrigerator can be used for recommendations on your local/ state building codes, Frigidaire recommends for cleaning (as shown). • A shutoff valve to connect the water supply line ...to the refrigerator. Depending on water lines and associated materials prior to installing your local building authority for...
Complete Owner s Guide
Page 13
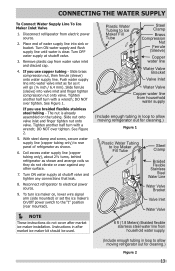
... any other surface. 7. Tighten another half turn with a wrench; Coil excess water supply line (copper tubing only), about 2½ turns, behind refrigerator as it will go (¼ inch / 6.4 mm). To turn with a wrench; Tighten another half turn ice maker on the tubing. Instructions ... line Water Valve Bracket Valve Inlet Water Valve Copper water line from household water supply (Include enough tubing in loop to allow moving refrigerator out for cleaning.) Figure 2 13 The nut is clear. Slide brass compression nut, then ferrule (sleeve) onto water supply line....
... any other surface. 7. Tighten another half turn with a wrench; Coil excess water supply line (copper tubing only), about 2½ turns, behind refrigerator as it will go (¼ inch / 6.4 mm). To turn with a wrench; Tighten another half turn ice maker on the tubing. Instructions ... line Water Valve Bracket Valve Inlet Water Valve Copper water line from household water supply (Include enough tubing in loop to allow moving refrigerator out for cleaning.) Figure 2 13 The nut is clear. Slide brass compression nut, then ferrule (sleeve) onto water supply line....
Complete Owner s Guide
Page 14
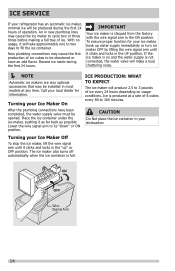
... connections have an odd flavor. The ice maker also turns off automatically when the ice container is produced at any time. ICE SERVICE If your refrigerator has an automatic ice maker, minimal ice will be opened. With no usage, it as far back as possible. New plumbing connections may cause the...
... connections have an odd flavor. The ice maker also turns off automatically when the ice container is produced at any time. ICE SERVICE If your refrigerator has an automatic ice maker, minimal ice will be opened. With no usage, it as far back as possible. New plumbing connections may cause the...

Complete Owner s Guide
Page 15
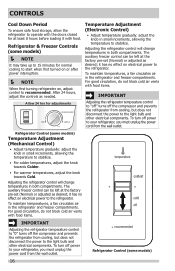
... doors closed for at least 8 hours before loading it with food. however, this low temperature environment can cause less than optimal temperature control in the refrigerator section. NOTE If your unit is in a garage or area where the temperature is below 55° F, adjust the freezer control to the ... below 39° F will likely result in freezing of food and beverages stored in areas below 55° F such as needed. NOTE Your refrigerator is the recommended initial setting. This is designed to prevent food stored in the freezer from melting when installed in the...
... doors closed for at least 8 hours before loading it with food. however, this low temperature environment can cause less than optimal temperature control in the refrigerator section. NOTE If your unit is in a garage or area where the temperature is below 55° F, adjust the freezer control to the ... below 39° F will likely result in freezing of food and beverages stored in areas below 55° F such as needed. NOTE Your refrigerator is the recommended initial setting. This is designed to prevent food stored in the freezer from melting when installed in the...
Complete Owner s Guide
Page 16
...hrs for adjustments Temperature Adjustment (Electronic Control) • Adjust temperature gradually: adjust the knob in both compartments. Adjusting the refrigerator control will change temperatures in small increments, allowing the temperature to stabilize. • For colder temperatures, adjust the knob ...to the light bulb and other electrical components. it has no effect on electrical power to stabilize. it with food. Refrigerator & Freezer Controls (some models) Temperature Adjustment (Mechanical Control) • Adjust temperature gradually: adjust the knob in both...
...hrs for adjustments Temperature Adjustment (Electronic Control) • Adjust temperature gradually: adjust the knob in both compartments. Adjusting the refrigerator control will change temperatures in small increments, allowing the temperature to stabilize. • For colder temperatures, adjust the knob ...to the light bulb and other electrical components. it has no effect on electrical power to stabilize. it with food. Refrigerator & Freezer Controls (some models) Temperature Adjustment (Mechanical Control) • Adjust temperature gradually: adjust the knob in both...

Complete Owner s Guide
Page 17
... and carefully push shelf back into the tabs. Use both hands when removing them to sudden temperature changes or impact, such as bumping. Shelf Adjustment Refrigerator shelves are heavy. With front half fully below back half, lift front of shelf to suit individual needs. Shelves and covers may break if exposed...
... and carefully push shelf back into the tabs. Use both hands when removing them to sudden temperature changes or impact, such as bumping. Shelf Adjustment Refrigerator shelves are heavy. With front half fully below back half, lift front of shelf to suit individual needs. Shelves and covers may break if exposed...
Complete Owner s Guide
Page 19
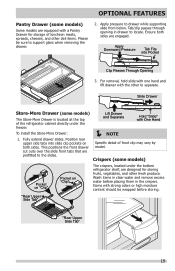
... for storage of front clip may vary by model. Crispers (some models) The Store-More Drawer is located at the top of the refrigerator cabinet directly under the bottom refrigerator shelf, are engaged. Tab/clip passes through opening in the crispers. For removal, hold slide with one hand and lift drawer with...
... for storage of front clip may vary by model. Crispers (some models) The Store-More Drawer is located at the top of the refrigerator cabinet directly under the bottom refrigerator shelf, are engaged. Tab/clip passes through opening in the crispers. For removal, hold slide with one hand and lift drawer with...
Complete Owner s Guide
Page 20
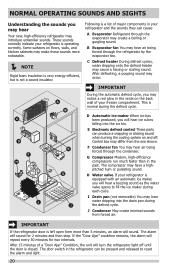
...you will hear ice cubes falling into the drain pan during the defrost cycle. F Condenser fan You may hear air being forced through the refrigerator by the evaporator fan. I Drain pan (not removable) You may have a highpitched hum or pulsating sound. Following is a list of ...water dripping into the ice bin. The door switch in your freezer compartment. After 15 minutes of major components in the refrigerator can cause: A Evaporator Refrigerant through the evaporator may introduce unfamiliar sounds. If the "Door Ajar" condition remains, the alarm will sound for two intervals...
...you will hear ice cubes falling into the drain pan during the defrost cycle. F Condenser fan You may hear air being forced through the refrigerator by the evaporator fan. I Drain pan (not removable) You may have a highpitched hum or pulsating sound. Following is a list of ...water dripping into the ice bin. The door switch in your freezer compartment. After 15 minutes of major components in the refrigerator can cause: A Evaporator Refrigerant through the evaporator may introduce unfamiliar sounds. If the "Door Ajar" condition remains, the alarm will sound for two intervals...


