
Installation Instructions (All Languages)
Page 1
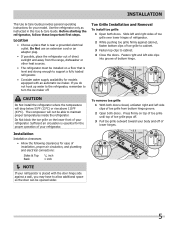
... water supply line (plastic tubing is available for detailed instructions on the floor. • The cabinet should align with set screw): Open Door Hinge Flange Set Screw (some models) 4 Hinge 1 Before leveling either door, remove set screw, locking the door height. 6 To replace the toe grille, open both doors. To connect the water supply to the rear of your refrigerator: • All four corners of toe grille pops 2 off valve for : • Is the refrigerator's power cord plugged in Ice Maker...
... water supply line (plastic tubing is available for detailed instructions on the floor. • The cabinet should align with set screw): Open Door Hinge Flange Set Screw (some models) 4 Hinge 1 Before leveling either door, remove set screw, locking the door height. 6 To replace the toe grille, open both doors. To connect the water supply to the rear of your refrigerator: • All four corners of toe grille pops 2 off valve for : • Is the refrigerator's power cord plugged in Ice Maker...
Wiring Diagram (All Languages)
Page 1
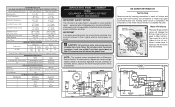
... and prying cover from torch flame. Blue Neutral service data sheet - 240389639 r134a ICE & WATER - Untrained persons should function to rotate motor gear counterclockwise until holding switch circuit is designed to contact insulation; it will distort the plastic liner. To initiate defrost, depress the fresh food light switch 5 times in notch at 15ºF (-9ºC) Heater Wattage 165 ICE MAKER PLUG CONNECTIONS Wire Number Wire Color Connect to their...
... and prying cover from torch flame. Blue Neutral service data sheet - 240389639 r134a ICE & WATER - Untrained persons should function to rotate motor gear counterclockwise until holding switch circuit is designed to contact insulation; it will distort the plastic liner. To initiate defrost, depress the fresh food light switch 5 times in notch at 15ºF (-9ºC) Heater Wattage 165 ICE MAKER PLUG CONNECTIONS Wire Number Wire Color Connect to their...
Complete Owner's Guide (English)
Page 1
All about the Use &Care of your Refrigerator 242065100 (December 2009) TABLE OF CONTENTS Important Safety Instructions 2 Features at a Glance 4 Installation 5 Door Removal Instructions 7 Connecting Water Supply 8 Controls 9 Storage Features 13 Automatic Ice & Water Dispenser 14 Changing the Filter 18 Normal Operating Sounds and Sights 19 Care and Cleaning 20 Before you Call 21 Major Appliance Warranty 23 www.frigidaire.com USA 1-800-944-9044 www.frigidaire.ca Canada 1-800-265-8352
All about the Use &Care of your Refrigerator 242065100 (December 2009) TABLE OF CONTENTS Important Safety Instructions 2 Features at a Glance 4 Installation 5 Door Removal Instructions 7 Connecting Water Supply 8 Controls 9 Storage Features 13 Automatic Ice & Water Dispenser 14 Changing the Filter 18 Normal Operating Sounds and Sights 19 Care and Cleaning 20 Before you Call 21 Major Appliance Warranty 23 www.frigidaire.com USA 1-800-944-9044 www.frigidaire.ca Canada 1-800-265-8352
Complete Owner's Guide (English)
Page 2
... automatic ice maker. • Remove all connections - Obey all instructions before using this or any moving parts of explosive fumes. • Avoid contact with filter housing (select models) Final Checks Shipping material removed Fresh food and freezer temperatures set Crisper humidity controls set Registration card sent in Ice Maker House water supply connected to potential personal injury hazards. Installation Checklist Doors Handles are secure and tight Door seals...
... automatic ice maker. • Remove all connections - Obey all instructions before using this or any moving parts of explosive fumes. • Avoid contact with filter housing (select models) Final Checks Shipping material removed Fresh food and freezer temperatures set Crisper humidity controls set Registration card sent in Ice Maker House water supply connected to potential personal injury hazards. Installation Checklist Doors Handles are secure and tight Door seals...
Complete Owner's Guide (English)
Page 3
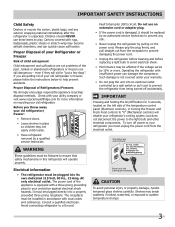
... accidentally. Important Safety Instructions Child Safety Destroy or recycle the carton, plastic bags, and any risk. • Never unplug the refrigerator by pulling on the left side of the temperature control panel (Electronic controls), or turning the Freezer and Fresh Food controls to "0" (Mechanical controls) will disable your refrigerator's cooling system, but does not disconnect the power to the light bulb and other electrical components. WARNING These...
... accidentally. Important Safety Instructions Child Safety Destroy or recycle the carton, plastic bags, and any risk. • Never unplug the refrigerator by pulling on the left side of the temperature control panel (Electronic controls), or turning the Freezer and Fresh Food controls to "0" (Mechanical controls) will disable your refrigerator's cooling system, but does not disconnect the power to the light bulb and other electrical components. WARNING These...
Complete Owner's Guide (English)
Page 5
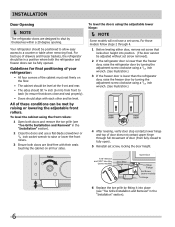
... use an extension cord or an adapter plug. • If possible, place the refrigerator out of installation, proper air circulation, and plumbing and electrical connections: Sides & Top Back 3/8 inch 1 inch NOTE If your refrigerator is level and strong enough to support a fully loaded refrigerator. • Consider water supply availability for models equipped with the door hinge side against cabinet, fasten bottom clips of lower hinges. 5 Slide left...
... use an extension cord or an adapter plug. • If possible, place the refrigerator out of installation, proper air circulation, and plumbing and electrical connections: Sides & Top Back 3/8 inch 1 inch NOTE If your refrigerator is level and strong enough to support a fully loaded refrigerator. • Consider water supply availability for models equipped with the door hinge side against cabinet, fasten bottom clips of lower hinges. 5 Slide left...
Complete Owner's Guide (English)
Page 6
... (some models) Door Stop Flange Open Door Hinge Flange Set Screw (some models) Hinge 6 Replace the toe grille by themselves within a 20 degree opening. For those models follow steps 2 through full movement of drawers and freezer baskets, the refrigerator should be in the "Installation" section). 2 Close the doors and use of door (from fully closed to ensure that locks door height into position. (The door cannot be adjusted without set screw removed). 2 If the refrigerator door is...
... (some models) Door Stop Flange Open Door Hinge Flange Set Screw (some models) Hinge 6 Replace the toe grille by themselves within a 20 degree opening. For those models follow steps 2 through full movement of drawers and freezer baskets, the refrigerator should be in the "Installation" section). 2 Close the doors and use of door (from fully closed to ensure that locks door height into position. (The door cannot be adjusted without set screw removed). 2 If the refrigerator door is...
Complete Owner's Guide (English)
Page 7
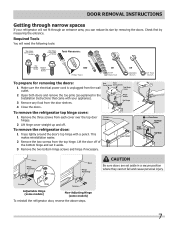
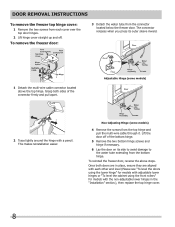
... personal injury. Adjustable Hinge (some models) Non-Adjusting Hinge (some models) To reinstall the refrigerator door, reverse the above steps. 7 Check first by removing the doors. This makes reinstallation easier. 2 Remove the two screws from the door shelves. 4 Close the doors. To remove the refrigerator top hinge cover: 1 Remove the three screws from each cover over the top door hinges. 2 Lift hinge cover straight up and off of the bottom hinge and set aside in the Installation Instructions that came...
... personal injury. Adjustable Hinge (some models) Non-Adjusting Hinge (some models) To reinstall the refrigerator door, reverse the above steps. 7 Check first by removing the doors. This makes reinstallation easier. 2 Remove the two screws from the door shelves. 4 Close the doors. To remove the refrigerator top hinge cover: 1 Remove the three screws from each cover over the top door hinges. 2 Lift hinge cover straight up and off of the bottom hinge and set aside in the Installation Instructions that came...
Complete Owner's Guide (English)
Page 8
To remove the freezer door: 3 Detach the water tube from each other and level (Please see "To level the doors using the lower hinge" for models with adjustable lower hinges or "To level the cabinet using the front rollers" for models with a pencil. To reinstall the freezer door, reverse the above the top hinge. Grasp both doors are in place, ensure they are aligned with each cover over the top door hinges. 2 Lift hinge cover straight up...
To remove the freezer door: 3 Detach the water tube from each other and level (Please see "To level the doors using the lower hinge" for models with adjustable lower hinges or "To level the cabinet using the front rollers" for models with a pencil. To reinstall the freezer door, reverse the above the top hinge. Grasp both doors are in place, ensure they are aligned with each cover over the top door hinges. 2 Lift hinge cover straight up...
Complete Owner's Guide (English)
Page 9
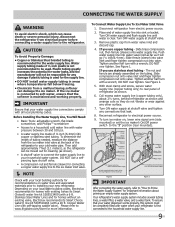
... other surface. 7. Tighten another half turn ice maker on water lines and associated materials prior to www.frigidaire.com/store for more information. If you use stainless steel tubing - CAUTION To Avoid Property Damage: • Copper or Stainless Steel braided tubing is first connected to a household cold water line with all local plumbing codes. Depending on the tubing. Please refer to installing your new refrigerator. DO NOT over tighten. The...
... other surface. 7. Tighten another half turn ice maker on water lines and associated materials prior to www.frigidaire.com/store for more information. If you use stainless steel tubing - CAUTION To Avoid Property Damage: • Copper or Stainless Steel braided tubing is first connected to a household cold water line with all local plumbing codes. Depending on the tubing. Please refer to installing your new refrigerator. DO NOT over tighten. The...
Complete Owner's Guide (English)
Page 13
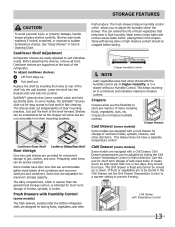
... allow you to suit individual needs. The Chill Drawer is intended for fast cleaning. Shelves can extend the life of luncheon meats, spreads, cheeses, and other fresh produce. Cool Drawer (some models) Some models are provided for maximum storage capacity. Chill Drawer temperatures can be quickly selected. Fresh Drawers with Humidity Control (some models) The fresh drawers, located under the bottom refrigerator shelf, are designed for storage...
... allow you to suit individual needs. The Chill Drawer is intended for fast cleaning. Shelves can extend the life of luncheon meats, spreads, cheeses, and other fresh produce. Cool Drawer (some models) Some models are provided for maximum storage capacity. Chill Drawer temperatures can be quickly selected. Fresh Drawers with Humidity Control (some models) The fresh drawers, located under the bottom refrigerator shelf, are designed for storage...
Complete Owner's Guide (English)
Page 14
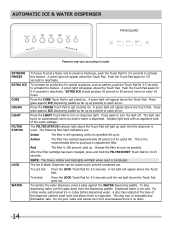
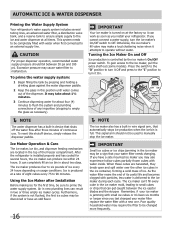
... glass against the WATER dispensing paddle. To stop dispensing water, pull the glass away from the dispensing paddle. Automatic Ice & Water Dispenser Features may vary according to activate this feature. Push the Touch Pad again for 3-5 seconds to model. A green light will light up . Replace light bulb with an appliance bulb of its specified life cycle. Change the filter as soon as parties, push the Touch Pad for 3-5 seconds to evaporate...
... glass against the WATER dispensing paddle. To stop dispensing water, pull the glass away from the dispensing paddle. Automatic Ice & Water Dispenser Features may vary according to activate this feature. Push the Touch Pad again for 3-5 seconds to model. A green light will light up . Replace light bulb with an appliance bulb of its specified life cycle. Change the filter as soon as parties, push the Touch Pad for 3-5 seconds to evaporate...
Complete Owner's Guide (English)
Page 16
... turn it attempts to manually stop the ice maker. As the water filter nears the end of continuous use. The ice maker can't fill every cube in the ice maker mold, leading to small cubes or chips that shuts off the water flow after Installation Before making ice for several tubing lines, an advanced water filter, a distribution valve bank, and a reserve tank to ensure ample supply to the ice maker, pull the extra shelf out (some models...
... turn it attempts to manually stop the ice maker. As the water filter nears the end of continuous use. The ice maker can't fill every cube in the ice maker mold, leading to small cubes or chips that shuts off the water flow after Installation Before making ice for several tubing lines, an advanced water filter, a distribution valve bank, and a reserve tank to ensure ample supply to the ice maker, pull the extra shelf out (some models...
Complete Owner's Guide (English)
Page 17
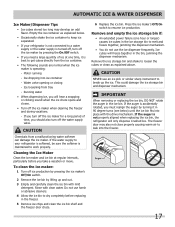
... carefully clean the ice bin with mild detergent. CAUTION NEVER use the ice dispenser frequently. If the auger is maintained to work properly. Motor running - Automatic Ice & Water Dispenser Ice Maker/Dispenser Tips • Ice cubes stored too long may also not close properly causing warm air to leak into ice container - The freezer door may develop an odd flavor. Water valve opening or closing - To clean the ice maker: 1 Turn off the ice maker when cleaning the freezer and during vacations. - Press the ice maker...
... carefully clean the ice bin with mild detergent. CAUTION NEVER use the ice dispenser frequently. If the auger is maintained to work properly. Motor running - Automatic Ice & Water Dispenser Ice Maker/Dispenser Tips • Ice cubes stored too long may also not close properly causing warm air to leak into ice container - The freezer door may develop an odd flavor. Water valve opening or closing - To clean the ice maker: 1 Turn off the ice maker when cleaning the freezer and during vacations. - Press the ice maker...
Complete Owner's Guide (English)
Page 18
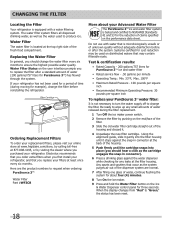
... refrigerator. Water Filter Status on the user interface prompts you should change the filter. CHANGING THE FILTER Locating the Filter Your refrigerator is equipped with water that is microbiologically unsafe or of unknown quality without adequate disinfection before reinstalling the refrigerator. Systems certified for a period of time (during the filter replacement. 1 Turn Off the ice maker power switch. 2 Remove the filter by visiting the dealer where you purchased your refrigerator has not been used...
... refrigerator. Water Filter Status on the user interface prompts you should change the filter. CHANGING THE FILTER Locating the Filter Your refrigerator is equipped with water that is microbiologically unsafe or of unknown quality without adequate disinfection before reinstalling the refrigerator. Systems certified for a period of time (during the filter replacement. 1 Turn Off the ice maker power switch. 2 Remove the filter by visiting the dealer where you purchased your refrigerator has not been used...
Complete Owner's Guide (English)
Page 20
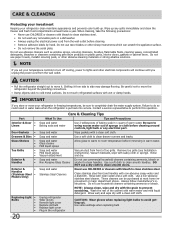
... . Part Interior & Door • Liners • Door Gaskets • Drawers & Bins • Glass Shelves • • • Toe Grille • • • Exterior & • Handles • Exterior & • Handles (Stainless Steel • Models Only) Replacing Light • Bulbs • • • • • 20 Care & Cleaning Tips What To Use Tips and Precautions Soap and water Baking soda and water Use 2 tablespoons of baking soda in a dishwasher. • Always unplug the electrical power cord...
... . Part Interior & Door • Liners • Door Gaskets • Drawers & Bins • Glass Shelves • • • Toe Grille • • • Exterior & • Handles • Exterior & • Handles (Stainless Steel • Models Only) Replacing Light • Bulbs • • • • • 20 Care & Cleaning Tips What To Use Tips and Precautions Soap and water Baking soda and water Use 2 tablespoons of baking soda in a dishwasher. • Always unplug the electrical power cord...
Complete Owner's Guide (English)
Page 21
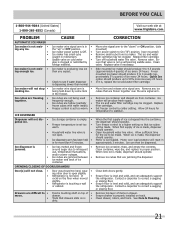
.... Freezer control is set too • warm. • Household water line valve is jammed. • Ice has melted and frozen • around auger due to 4.5 pounds (approximately 4 quarts) of ice container. Ice dispenser is • not open slightly. • Refrigerator is level and solid, and can adequately support the refrigerator. Drawers are jamming the dispenser. Replace filter cartridge. Turn off household water line valve. Remove valve. Replace valve if necessary. Quick Ice option should produce 4 to infrequent use, temperature fluctuations, and/or power...
.... Freezer control is set too • warm. • Household water line valve is jammed. • Ice has melted and frozen • around auger due to 4.5 pounds (approximately 4 quarts) of ice container. Ice dispenser is • not open slightly. • Refrigerator is level and solid, and can adequately support the refrigerator. Drawers are jamming the dispenser. Replace filter cartridge. Turn off household water line valve. Remove valve. Replace valve if necessary. Quick Ice option should produce 4 to infrequent use, temperature fluctuations, and/or power...
Complete Owner's Guide (English)
Page 22
... change gasket. Clean condenser. This is lower, the moisture should disappear. Open household water line valve. Have someone turn up the cut-off to • cold water line. The rate of time. • Unit not properly connected to keep temperature constant. See PROBLEM column OPENING/CLOSING OF DOORS/DRAWERS. When humidity is normal. Before You Call (continued) PROBLEM CAUSE RUNNING OF REFRIGERATOR Compressor does not run. • Freezer control is set too cold. • • Fresh Food/freezer gasket...
... change gasket. Clean condenser. This is lower, the moisture should disappear. Open household water line valve. Have someone turn up the cut-off to • cold water line. The rate of time. • Unit not properly connected to keep temperature constant. See PROBLEM column OPENING/CLOSING OF DOORS/DRAWERS. When humidity is normal. Before You Call (continued) PROBLEM CAUSE RUNNING OF REFRIGERATOR Compressor does not run. • Freezer control is set too cold. • • Fresh Food/freezer gasket...
Complete Owner's Guide (English)
Page 23
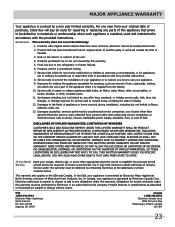
... workmanship when such appliance is installed, used and maintained in accordance with the provided instructions. 8. THIS WRITTEN WARRANTY GIVES YOU SPECIFIC LEGAL RIGHTS. If You Need Service Keep your receipt, delivery slip, or some other appropriate payment record to repair or replace appliance light bulbs, air filters, water filters, other consumables, or knobs, handles, or other than in accordance with original serial numbers that has been transferred from...
... workmanship when such appliance is installed, used and maintained in accordance with the provided instructions. 8. THIS WRITTEN WARRANTY GIVES YOU SPECIFIC LEGAL RIGHTS. If You Need Service Keep your receipt, delivery slip, or some other appropriate payment record to repair or replace appliance light bulbs, air filters, water filters, other consumables, or knobs, handles, or other than in accordance with original serial numbers that has been transferred from...
Product Specifications Sheet (English)
Page 2
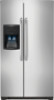
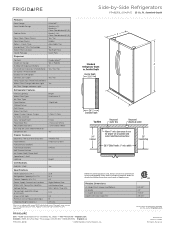
... Pack Dispenser Controls Dispenser Design Number of Dispenser Buttons Crushed Ice / Cube Ice / Chilled Water Ice Option / Freeze Option Display On / Off Option Control Lock / Light Temp / Door Ajar / Power Failure Alerts Water Filter Change Indicator Light Air Filter Change Indicator Light Ready-Select™ Tall, 2-Paddle 5 Yes / Yes / Yes Yes / Yes Yes Refrigerator Features Interior Lighting Water Filter Type Air Filter Type Fixed Shelves Sliding Shelves Deli Drawer Wine / Can Rack Upper Crisper / Lower Crisper Humidity Controls Dairy Compartment Fixed Door Bins Adjustable Door Bins...
... Pack Dispenser Controls Dispenser Design Number of Dispenser Buttons Crushed Ice / Cube Ice / Chilled Water Ice Option / Freeze Option Display On / Off Option Control Lock / Light Temp / Door Ajar / Power Failure Alerts Water Filter Change Indicator Light Air Filter Change Indicator Light Ready-Select™ Tall, 2-Paddle 5 Yes / Yes / Yes Yes / Yes Yes Refrigerator Features Interior Lighting Water Filter Type Air Filter Type Fixed Shelves Sliding Shelves Deli Drawer Wine / Can Rack Upper Crisper / Lower Crisper Humidity Controls Dairy Compartment Fixed Door Bins Adjustable Door Bins...


