Use and Care Manual
Page 1
All about the Use &Care of your Refrigerator 242291900 (October 2012) TABLE OF CONTENTS Important Safety Instructions 2 Features at a Glance 4 Installation 5 Door Removal Instructions 9 Installing Door Handles 11 Connecting Water Supply 13 Controls ... Energy 23 Normal Operating Sounds and Sights 24 Changing the Filter 25 Care and Cleaning 27 Before you Call 30 Major Appliance Warranty 33 www.frigidaire.com USA 1-800-944-9044 www.frigidaire.ca Canada 1-800-265-8352
All about the Use &Care of your Refrigerator 242291900 (October 2012) TABLE OF CONTENTS Important Safety Instructions 2 Features at a Glance 4 Installation 5 Door Removal Instructions 9 Installing Door Handles 11 Connecting Water Supply 13 Controls ... Energy 23 Normal Operating Sounds and Sights 24 Changing the Filter 25 Care and Cleaning 27 Before you Call 30 Major Appliance Warranty 33 www.frigidaire.com USA 1-800-944-9044 www.frigidaire.ca Canada 1-800-265-8352
Use and Care Manual
Page 2
... and tilted 1/4" (6 mm) front-to-back Toe grille is properly attached to refrigerator Cabinet is setting solid on all corners Electrical Power House power turned on Refrigerator plugged in the vicinity of automatic ice maker. • Remove all connections - recheck in ...24 hours Ice maker is used to alert you to refrigerator No water leaks present at all staples from the carton. It is turned ON Ice & water dispenser operates correctly Final...
... and tilted 1/4" (6 mm) front-to-back Toe grille is properly attached to refrigerator Cabinet is setting solid on all corners Electrical Power House power turned on Refrigerator plugged in the vicinity of automatic ice maker. • Remove all connections - recheck in ...24 hours Ice maker is used to alert you to refrigerator No water leaks present at all staples from the carton. It is turned ON Ice & water dispenser operates correctly Final...

Use and Care Manual
Page 3
... power cord is equipped with your utility company or visit www.energystar.gov/recycle for "just a few days". Proper Disposal of your old refrigerator/ freezer: • Remove doors. • Leave shelves in accordance with 3-prong grounded plug CAUTION To avoid personal injury or property damage,...to play. Consult a qualified electrician. Do not use these items to fines and imprisonment under any exterior wrapping material immediately after the refrigerator is unpacked. If you must be plugged directly into its own dedicated 115 Volt, 60 Hz., 15 Amp, AC only electrical outlet....
... power cord is equipped with your utility company or visit www.energystar.gov/recycle for "just a few days". Proper Disposal of your old refrigerator/ freezer: • Remove doors. • Leave shelves in accordance with 3-prong grounded plug CAUTION To avoid personal injury or property damage,...to play. Consult a qualified electrician. Do not use these items to fines and imprisonment under any exterior wrapping material immediately after the refrigerator is unpacked. If you must be plugged directly into its own dedicated 115 Volt, 60 Hz., 15 Amp, AC only electrical outlet....
Use and Care Manual
Page 4
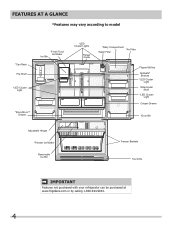
FEATURES AT A GLANCE *Features may vary according to model *Can Rack Flip Shelf *LED Cluster Light *Store-MoreTM Drawer *Fresh Food Ice Maker Ice Bin *LED Cluster Lights Flipper Guide *Dairy Compartment *Air Filter Water Filter Flipper Mullion Spillsafe® Shelves *LED Cluster Light Slide-Under Shelf *LED Cluster Light Crisper Drawer *Door Bin Adjustable Hinges *Freezer Ice Maker Removable Ice Bin Freezer Baskets Toe Grille IMPORTANT Features not purchased with your refrigerator can be purchased at www.frigidaire.com or by calling 1-800-944-9044. 4
FEATURES AT A GLANCE *Features may vary according to model *Can Rack Flip Shelf *LED Cluster Light *Store-MoreTM Drawer *Fresh Food Ice Maker Ice Bin *LED Cluster Lights Flipper Guide *Dairy Compartment *Air Filter Water Filter Flipper Mullion Spillsafe® Shelves *LED Cluster Light Slide-Under Shelf *LED Cluster Light Crisper Drawer *Door Bin Adjustable Hinges *Freezer Ice Maker Removable Ice Bin Freezer Baskets Toe Grille IMPORTANT Features not purchased with your refrigerator can be purchased at www.frigidaire.com or by calling 1-800-944-9044. 4
Use and Care Manual
Page 5
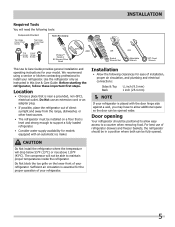
...Set OR Adjustable Wrench 3/8" Fixed Wrench This Use & Care Guide provides general installation and operating instructions for the proper operation of your refrigerator. The compressor will not be positioned to allow easy access to allow additional space so the door can be installed on the lower ...front of your refrigerator is near a grounded, non-GFCI, electrical outlet. Location • Choose a place that is essential for your model. For best use...
...Set OR Adjustable Wrench 3/8" Fixed Wrench This Use & Care Guide provides general installation and operating instructions for the proper operation of your refrigerator. The compressor will not be positioned to allow easy access to allow additional space so the door can be installed on the lower ...front of your refrigerator is near a grounded, non-GFCI, electrical outlet. Location • Choose a place that is essential for your model. For best use...
Use and Care Manual
Page 6
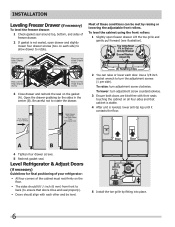
... pull forward (see illustration). A B 4 Tighten four drawer screws. 5 Recheck gasket seal. To raise: turn the adjustment screws (1 per side). Level Refrigerator & Adjust Doors (if necessary) Guidelines for final positioning of your refrigerator: • All four corners of the cabinet must rest firmly on Anti-tip Bracket Screw/Washer Assembly (3) Retaining Clips 2 You...
... pull forward (see illustration). A B 4 Tighten four drawer screws. 5 Recheck gasket seal. To raise: turn the adjustment screws (1 per side). Level Refrigerator & Adjust Doors (if necessary) Guidelines for final positioning of your refrigerator: • All four corners of the cabinet must rest firmly on Anti-tip Bracket Screw/Washer Assembly (3) Retaining Clips 2 You...
Use and Care Manual
Page 7
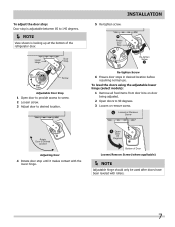
... use. To adjust the door stop: Door stop until it makes contact with rollers. 7 INSTALLATION 5 Re-tighten screw. A Open Door 90 Degrees Bottom of the refrigerator door. Lower Hinge Door Stop Min Open Screw Max Open Adjustable Door Stop 1 Open door to provide access to screw. 2 Loosen screw. 3 Adjust door to...
... use. To adjust the door stop: Door stop until it makes contact with rollers. 7 INSTALLATION 5 Re-tighten screw. A Open Door 90 Degrees Bottom of the refrigerator door. Lower Hinge Door Stop Min Open Screw Max Open Adjustable Door Stop 1 Open door to provide access to screw. 2 Loosen screw. 3 Adjust door to...
Use and Care Manual
Page 9
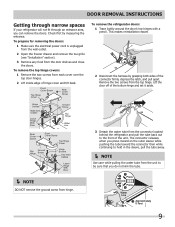
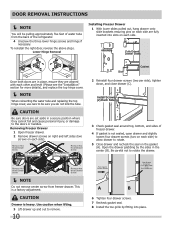
... the unit. This makes reinstallation easier. 2 Disconnect the harness by measuring the entrance. Press Press Water Line Approximately 5 Feet 9 To remove the refrigerator doors: 1 Trace lightly around the door's top hinges with a pencil. Remove the two screws from the unit to be sure that you do ... the door off of the connector firmly, depress the latch, and pull apart. DOOR REMOVAL INSTRUCTIONS Getting through narrow spaces If your refrigerator will not fit through an entrance area, you press inward on the outer sleeve while pushing the tube toward the connector then while ...
... the unit. This makes reinstallation easier. 2 Disconnect the harness by measuring the entrance. Press Press Water Line Approximately 5 Feet 9 To remove the refrigerator doors: 1 Trace lightly around the door's top hinges with a pencil. Remove the two screws from the unit to be sure that you do ... the door off of the connector firmly, depress the latch, and pull apart. DOOR REMOVAL INSTRUCTIONS Getting through narrow spaces If your refrigerator will not fit through an entrance area, you press inward on the outer sleeve while pushing the tube toward the connector then while ...
Use and Care Manual
Page 10
... four drawer screws (two per side), tighten down, and close drawer (C). Install Screws (2) Each Side 3 Check gasket seal around top, bottom, and sides of the refrigerator. 4 Unscrew the three lower hinge screws and hinge if necessary. DOOR REMOVAL INSTRUCTIONS NOTE You will be sure you do not kink the tube...
... four drawer screws (two per side), tighten down, and close drawer (C). Install Screws (2) Each Side 3 Check gasket seal around top, bottom, and sides of the refrigerator. 4 Unscrew the three lower hinge screws and hinge if necessary. DOOR REMOVAL INSTRUCTIONS NOTE You will be sure you do not kink the tube...
Use and Care Manual
Page 11
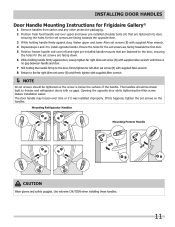
... screws (B) with supplied Allen wrench. 4 Repeat steps 2 and 3 to freezer and refrigerator doors with supplied Allen wrench. NOTE All set screws on the handles. Mounting Refrigerator Handles Mounting Freezer Handle CAUTION Wear gloves and safety goggles. The handles should be tightened so... tighten with no gaps. Use extreme CAUTION when installing these handles. 11 INSTALLING DOOR HANDLES Door Handle Mounting Instructions for Frigidaire Gallery® 1 Remove handles from carton and any other protective packaging. 2 Position fresh food handle end over time or ...
... screws (B) with supplied Allen wrench. 4 Repeat steps 2 and 3 to freezer and refrigerator doors with supplied Allen wrench. NOTE All set screws on the handles. Mounting Refrigerator Handles Mounting Freezer Handle CAUTION Wear gloves and safety goggles. The handles should be tightened so... tighten with no gaps. Use extreme CAUTION when installing these handles. 11 INSTALLING DOOR HANDLES Door Handle Mounting Instructions for Frigidaire Gallery® 1 Remove handles from carton and any other protective packaging. 2 Position fresh food handle end over time or ...
Use and Care Manual
Page 12
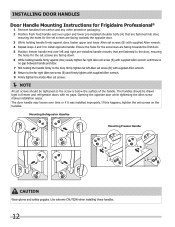
...screws. NOTE All set screws (B) with supplied Allen wrench until there is below the surface of the handle. Mounting Refrigerator Handles Mounting Freezer Handle CAUTION Wear gloves and safety goggles. Ensure the holes for the set screws are facing towards the first ...install opposite handle. Opening the opposite door while tightening the Allen screw makes installation easier. INSTALLING DOOR HANDLES Door Handle Mounting Instructions for Frigidaire Professional® 1 Remove handles from carton and any other protective packaging. 2 Position fresh food handle end over upper and lower ...
...screws. NOTE All set screws (B) with supplied Allen wrench until there is below the surface of the handle. Mounting Refrigerator Handles Mounting Freezer Handle CAUTION Wear gloves and safety goggles. Ensure the holes for the set screws are facing towards the first ...install opposite handle. Opening the opposite door while tightening the Allen screw makes installation easier. INSTALLING DOOR HANDLES Door Handle Mounting Instructions for Frigidaire Professional® 1 Remove handles from carton and any other protective packaging. 2 Position fresh food handle end over upper and lower ...
Use and Care Manual
Page 13
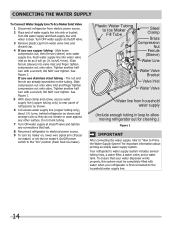
... line made of ¼ inch plastic is used . Then add approximately 7 feet (2.1 meters), so the refrigerator can be used for recommendations on your local/state building codes, Frigidaire recommends for homes with existing valves its Smart Choice® water line kit 5305510264 (with your local building authority... the ice maker inlet valve at the back of the refrigerator to your cold water pipe. Copper Water Line with a 6 ft. Please refer to www.frigidaire.com/store for connecting a copper water supply line to the refrigerator. To determine the length of tubing needed, measure the ...
... line made of ¼ inch plastic is used . Then add approximately 7 feet (2.1 meters), so the refrigerator can be used for recommendations on your local/state building codes, Frigidaire recommends for homes with existing valves its Smart Choice® water line kit 5305510264 (with your local building authority... the ice maker inlet valve at the back of the refrigerator to your cold water pipe. Copper Water Line with a 6 ft. Please refer to www.frigidaire.com/store for connecting a copper water supply line to the refrigerator. To determine the length of tubing needed, measure the ...
Use and Care Manual
Page 14
...Bracket Valve Inlet Water Valve Water line from household water supply (Include enough tubing in loop to allow moving refrigerator out for important information about 2½ turns, behind refrigerator as it will go (¼ inch/6.4 mm). Push water supply line into water valve inlet as far as... tubing - Do not kink tubing. 7 Turn ON water supply at shutoff valve. 3 Remove plastic cap from electric power source. 2 Place end of refrigerator as shown. 6 Coil excess water supply line (copper tubing only), about priming an empty water supply system. See Figure 1. 5 With steel clamp and...
...Bracket Valve Inlet Water Valve Water line from household water supply (Include enough tubing in loop to allow moving refrigerator out for important information about 2½ turns, behind refrigerator as it will go (¼ inch/6.4 mm). Push water supply line into water valve inlet as far as... tubing - Do not kink tubing. 7 Turn ON water supply at shutoff valve. 3 Remove plastic cap from electric power source. 2 Place end of refrigerator as shown. 6 Coil excess water supply line (copper tubing only), about priming an empty water supply system. See Figure 1. 5 With steel clamp and...
Use and Care Manual
Page 15
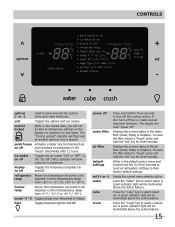
...the current menu selection option. Press the "water" key to Celsius. A green indicator light will read "power off the ice maker and all refrigerator settings to be illuminated above the active feature. 15 To reset the filter status to "Good", press and hold for three seconds. A green...exit the options menu and make selections. CONTROLS options (∧ or ∨) Used to select crushed ice. exit Toggles the options and run modes. refrigerator Allows the temperature set " key for three seconds to be able to +47° F / +8° C. light Toggles dispenser light On and ...
...the current menu selection option. Press the "water" key to Celsius. A green indicator light will read "power off the ice maker and all refrigerator settings to be illuminated above the active feature. 15 To reset the filter status to "Good", press and hold for three seconds. A green...exit the options menu and make selections. CONTROLS options (∧ or ∨) Used to select crushed ice. exit Toggles the options and run modes. refrigerator Allows the temperature set " key for three seconds to be able to +47° F / +8° C. light Toggles dispenser light On and ...
Use and Care Manual
Page 16
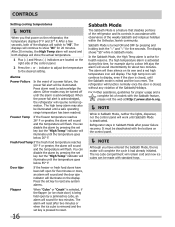
... any system alarms. Flapper When "Cube" or "Crush" is selected, if the flapper (or ice chute door) is a feature that disables portions of the refrigerator and its own and a red high temperature icon will flash. If a high temperature alarm is turned ON and OFF by pressing the set key but... until the temperature goes below 26° F. You can disable the alarm by pressing and holding both the "∨" and "+" for five seconds. The refrigerator will function normally once the door is exited and the icon reset. Door Ajar If the freezer or fresh food doors have entered the Sabbath...
... any system alarms. Flapper When "Cube" or "Crush" is selected, if the flapper (or ice chute door) is a feature that disables portions of the refrigerator and its own and a red high temperature icon will flash. If a high temperature alarm is turned ON and OFF by pressing the set key but... until the temperature goes below 26° F. You can disable the alarm by pressing and holding both the "∨" and "+" for five seconds. The refrigerator will function normally once the door is exited and the icon reset. Door Ajar If the freezer or fresh food doors have entered the Sabbath...
Use and Care Manual
Page 17
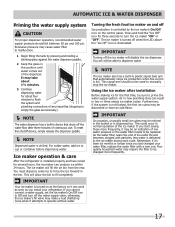
... dispensing water for about four minutes to turn off the water flow after installation Before making ice for the first time, be changed your refrigerator. Press and hold the "Ice Off" icon for several hours, the ice maker can result in normal operation of low water pressure or... you cannot connect a water supply, set the ice maker's On/Off icon to operate without water. Ice maker operation & care After the refrigerator is chilled. To reset this position until water comes out of continuous use. If you start seeing these more frequently. 17 Turning the fresh ...
... dispensing water for about four minutes to turn off the water flow after installation Before making ice for the first time, be changed your refrigerator. Press and hold the "Ice Off" icon for several hours, the ice maker can result in normal operation of low water pressure or... you cannot connect a water supply, set the ice maker's On/Off icon to operate without water. Ice maker operation & care After the refrigerator is chilled. To reset this position until water comes out of continuous use. If you start seeing these more frequently. 17 Turning the fresh ...
Use and Care Manual
Page 18
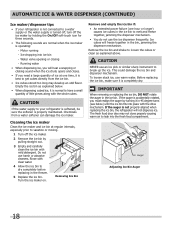
...ice maker on. This could damage the ice bin and dispenser mechanism. If the auger is not properly aligned when replacing the ice bin, the refrigerator will freeze together in 45 degree turns (see below . • When dispensing cubed ice, it is best to loosen the cubes or clean ...below ) until the ice bin fits into place with the whole cubes. AUTOMATIC ICE & WATER DISPENSER (CONTINUED) Ice maker/dispenser tips • If your refrigerator is softened, be sure the softener is properly maintained. Remove the ice bin and shake to get cubes directly from a water softener can damage the...
...ice maker on. This could damage the ice bin and dispenser mechanism. If the auger is not properly aligned when replacing the ice bin, the refrigerator will freeze together in 45 degree turns (see below . • When dispensing cubed ice, it is best to loosen the cubes or clean ...below ) until the ice bin fits into place with the whole cubes. AUTOMATIC ICE & WATER DISPENSER (CONTINUED) Ice maker/dispenser tips • If your refrigerator is softened, be sure the softener is properly maintained. Remove the ice bin and shake to get cubes directly from a water softener can damage the...
Use and Care Manual
Page 19
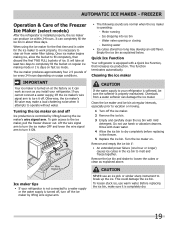
...maker OFF and lower the wire signal arm to turn it attempts to operate without water. Motor running - Quick Ice Function Your refrigerator is turned on at the factory so it can produce ice within 24 hours. This function terminates automatically. When using the ice ...mode. Water valve opening or closing - Rinse with mild detergent. FREEZER Operation & Care of the Freezer Ice Maker (select models) After the refrigerator is operating: - Ice dropping into ice bin - It can damage the ice maker. It will take at regular intervals, especially prior to melt...
...maker OFF and lower the wire signal arm to turn it attempts to operate without water. Motor running - Quick Ice Function Your refrigerator is turned on at the factory so it can produce ice within 24 hours. This function terminates automatically. When using the ice ...mode. Water valve opening or closing - Rinse with mild detergent. FREEZER Operation & Care of the Freezer Ice Maker (select models) After the refrigerator is operating: - Ice dropping into ice bin - It can damage the ice maker. It will take at regular intervals, especially prior to melt...

Use and Care Manual
Page 20
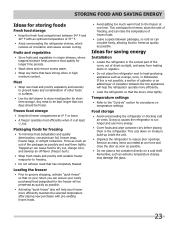
Your refrigerator includes SpillSafeTM glass shelves that attach to catch and hold accidental spills. Allow the glass shelves to stabilize to suit your needs. You can easily ... Control set on Lower Humidity. The shelves have mounting brackets that are designed for storing fruits, vegetables, and other fresh produce. Shelf features Drawers Your refrigerator includes a variety of a shelf: 1 Remove all food from shelf. 2 Lift the front edge up and pull the shelf out. 3 Replace by inserting the mounting bracket...
Your refrigerator includes SpillSafeTM glass shelves that attach to catch and hold accidental spills. Allow the glass shelves to stabilize to suit your needs. You can easily ... Control set on Lower Humidity. The shelves have mounting brackets that are designed for storing fruits, vegetables, and other fresh produce. Shelf features Drawers Your refrigerator includes a variety of a shelf: 1 Remove all food from shelf. 2 Lift the front edge up and pull the shelf out. 3 Replace by inserting the mounting bracket...
Use and Care Manual
Page 23
...the temperature of other foods or surfaces. • Use the deli drawer to store meat/poultry for saving energy Installation • Locate the refrigerator in the coolest part of the room, out of the packages as possible. • Activating "quick freeze" also will help your freezer ...storage. Any meat to the "Controls" section for freezing • To minimize food dehydration and quality deterioration, use more efficiently. • Level the refrigerator so that the doors close the door as soon as possible. • Do not place a hot container directly on a cold shelf. Frozen food...
...the temperature of other foods or surfaces. • Use the deli drawer to store meat/poultry for saving energy Installation • Locate the refrigerator in the coolest part of the room, out of the packages as possible. • Activating "quick freeze" also will help your freezer ...storage. Any meat to the "Controls" section for freezing • To minimize food dehydration and quality deterioration, use more efficiently. • Level the refrigerator so that the doors close the door as soon as possible. • Do not place a hot container directly on a cold shelf. Frozen food...


