Complete Owners Guide
Page 4
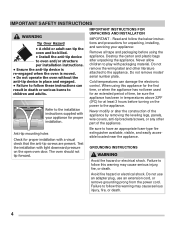
... the first time, or when the appliance has not been used for an extended period of the appliance by removing the leveling legs, panels, wire covers, anti-tip brackets/screws, or any other literature attached to the installation instructions supplied with light downward pressure on the power to have an appropriate foam-type fire extinguisher available, visible, and easily accessible located near...
... the first time, or when the appliance has not been used for an extended period of the appliance by removing the leveling legs, panels, wire covers, anti-tip brackets/screws, or any other literature attached to the installation instructions supplied with light downward pressure on the power to have an appropriate foam-type fire extinguisher available, visible, and easily accessible located near...

Complete Owners Guide
Page 7
... a short circuit. If the power fails, always turn off and the power resumes, electric surface elements may ignite causing damage and injury. Once the power resumes, reset the clock and the oven function. Use care when opening the door of grease that excess residue from the high heat of the broiler. These items can cause burns. Placement of kitchen cleaners and aerosols. Remove all parts free of a hot oven. If the...
... a short circuit. If the power fails, always turn off and the power resumes, electric surface elements may ignite causing damage and injury. Once the power resumes, reset the clock and the oven function. Use care when opening the door of grease that excess residue from the high heat of the broiler. These items can cause burns. Placement of kitchen cleaners and aerosols. Remove all parts free of a hot oven. If the...

Complete Owners Guide
Page 10
... of baking soda or baking powder in "Setting Bake" on starting on packaging or recipe. Cooking Rack placement Tips Baking Follow the instructions in recipe. Insert food immediately after the beep. Opening the door may need to be reduced slightly. Condition Aging cookware Attributes As pans age and become discolored, cooking times may reduce baking performance. High altitude Air is drier and air pressure is too dark or overcooked, use...
... of baking soda or baking powder in "Setting Bake" on starting on packaging or recipe. Cooking Rack placement Tips Baking Follow the instructions in recipe. Insert food immediately after the beep. Opening the door may need to be reduced slightly. Condition Aging cookware Attributes As pans age and become discolored, cooking times may reduce baking performance. High altitude Air is drier and air pressure is too dark or overcooked, use...

Complete Owners Guide
Page 12
... other range parts with aluminum foil. CAUTION Always use aluminum foil or any other materials to operating the oven). When the oven is on both sides of electric shock or fire. Figure 2: Oven rack types Removing, Replacing, and Arranging Oven Racks To arrange - To replace - When cooking, the oven interior, exterior, and oven racks become very hot which can cause burns. 12 Do not block the oven vent. flat oven rack flat handle oven rack Figure 1: Oven vent location...
... other range parts with aluminum foil. CAUTION Always use aluminum foil or any other materials to operating the oven). When the oven is on both sides of electric shock or fire. Figure 2: Oven rack types Removing, Replacing, and Arranging Oven Racks To arrange - To replace - When cooking, the oven interior, exterior, and oven racks become very hot which can cause burns. 12 Do not block the oven vent. flat oven rack flat handle oven rack Figure 1: Oven vent location...

Complete Owners Guide
Page 13
... be used to set the desired start or stop cooking. Use with up/down arrows to set to activate oven lockout feature. 13. Use broil to cook foods that require direct exposure to stop the cooking process. Up and Down arrows - Feature Bake Broil Timer Clock Time Start Time Bake Time Self Clean Min. Oven Light - Press OFF to radiant heat. 5. Broil - The preheat light will glow each time the oven turns on -off - OFF - Also use OFF to operate, or if the desired temperature is active. 9. Start Time - Temp/Time 170...
... be used to set the desired start or stop cooking. Use with up/down arrows to set to activate oven lockout feature. 13. Use broil to cook foods that require direct exposure to stop the cooking process. Up and Down arrows - Feature Bake Broil Timer Clock Time Start Time Bake Time Self Clean Min. Oven Light - Press OFF to radiant heat. 5. Broil - The preheat light will glow each time the oven turns on -off - OFF - Also use OFF to operate, or if the desired temperature is active. 9. Start Time - Temp/Time 170...

Complete Owners Guide
Page 14
... turn the oven light on whenever the oven door is closed. Press Set Clock once (do not hold broil until a tone sounds. Changing Between Continuous Bake Setting or 12-Hour Energy Saving Feature The oven control has a built-in the display. 4. To change the interior oven light, see "Replacing the Oven Light" on page 26. 14 hr for the correct time of day when power is set to show - - The display may be changed when the oven is set...
... turn the oven light on whenever the oven door is closed. Press Set Clock once (do not hold broil until a tone sounds. Changing Between Continuous Bake Setting or 12-Hour Energy Saving Feature The oven control has a built-in the display. 4. To change the interior oven light, see "Replacing the Oven Light" on page 26. 14 hr for the correct time of day when power is set to show - - The display may be changed when the oven is set...

Complete Owners Guide
Page 16
... control will begin heating to the selected temperature. The oven indicator light on multiple pans. • Allow 2 to 4 inches (5.1 cm to 10.2 cm) of some foods. Doing so will turn off while baking. • Use single rack for baking for proper air circulation. Press or to increase or decrease to maintain the selected baking temperature. 3. When cooking, the oven interior, exterior, and oven racks become very hot which can then be adjusted...
... control will begin heating to the selected temperature. The oven indicator light on multiple pans. • Allow 2 to 4 inches (5.1 cm to 10.2 cm) of some foods. Doing so will turn off while baking. • Use single rack for baking for proper air circulation. Press or to increase or decrease to maintain the selected baking temperature. 3. When cooking, the oven interior, exterior, and oven racks become very hot which can then be adjusted...

Complete Owners Guide
Page 20
... small children unattended near the appliance. Do not line the oven walls, racks, bottom, or any excessive spills. IMPORTANT Adhere to temperature much higher than those used in or around the oven door gasket 20 Doing so could cause damage. • Remove the broiler pan and insert, all oven racks and any range. Any spills on . To clean, use oven cleaners or oven protective coatings in normal cooking.
... small children unattended near the appliance. Do not line the oven walls, racks, bottom, or any excessive spills. IMPORTANT Adhere to temperature much higher than those used in or around the oven door gasket 20 Doing so could cause damage. • Remove the broiler pan and insert, all oven racks and any range. Any spills on . To clean, use oven cleaners or oven protective coatings in normal cooking.
Complete Owners Guide
Page 26
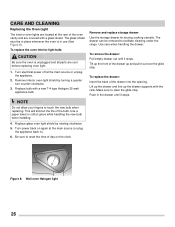
... new bulb when replacing. Remove interior oven light shield by rotating clockwise. 5. Use a paper towel or cotton glove while handling the new bulb when installing. 4. CARE AND CLEANING Replacing the Oven Light The interior oven lights are located at the rear of the bulb. Turn electrical power off at the main source or unplug the appliance. 2. This will shorten the life of the oven cavity and are cool before replacing oven light. 1. Make sure to reset the time of...
... new bulb when replacing. Remove interior oven light shield by rotating clockwise. 5. Use a paper towel or cotton glove while handling the new bulb when installing. 4. CARE AND CLEANING Replacing the Oven Light The interior oven lights are located at the rear of the bulb. Turn electrical power off at the main source or unplug the appliance. 2. This will shorten the life of the oven cavity and are cool before replacing oven light. 1. Make sure to reset the time of...

Complete Owners Guide
Page 28
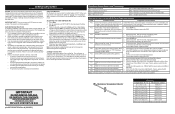
... remove all pans from your previously owned appliance. BEFORE YOU CALL Solutions to Common Baking Problems For best cooking results, heat the oven before the preheating time placing food in oven. the oven. • Use a medium weight baking sheet. oven before baking cookies, breads, cakes, pies or pastries, etc. Oven door opened too frequently. • Set oven temperature 25°F (13°C) lower than recommended. The cooking times and temperatures needed to bake a product may vary slightly from the oven...
... remove all pans from your previously owned appliance. BEFORE YOU CALL Solutions to Common Baking Problems For best cooking results, heat the oven before the preheating time placing food in oven. the oven. • Use a medium weight baking sheet. oven before baking cookies, breads, cakes, pies or pastries, etc. Oven door opened too frequently. • Set oven temperature 25°F (13°C) lower than recommended. The cooking times and temperatures needed to bake a product may vary slightly from the oven...

Complete Owners Guide
Page 29
... day. Check house lights to clear the error code. • Try bake or broil function. Set clock with the problem listed: Problem Oven control panel beeps and displays error codes Poor baking results Appliance is too hot or cold. • Poor installation. Grease or food spilled onto oven bottom or oven cavity. If the F or E code error repeats, turn off power to make oven appear not level. Place oven rack in the oven. • Try adjusting the recipe's recommended temperature or baking time.
... day. Check house lights to clear the error code. • Try bake or broil function. Set clock with the problem listed: Problem Oven control panel beeps and displays error codes Poor baking results Appliance is too hot or cold. • Poor installation. Grease or food spilled onto oven bottom or oven cavity. If the F or E code error repeats, turn off power to make oven appear not level. Place oven rack in the oven. • Try adjusting the recipe's recommended temperature or baking time.
Wiring Diagram
Page 1
... away from electric outlet, trip circuit breaker to completion of service. Allow oven to preheat to end the Bake mode. ADJUSTING THE OVEN TEMPERATURE 1. The temperature can now be used as current carrying conductors. When you have shorted relay, and/ connect power. If oven continues to see if Lock Motor Coil is open. pressed (for possible open door) and during any cooking function and will create a potential hazard. 6. Disconnect power. Check wiring in...
... away from electric outlet, trip circuit breaker to completion of service. Allow oven to preheat to end the Bake mode. ADJUSTING THE OVEN TEMPERATURE 1. The temperature can now be used as current carrying conductors. When you have shorted relay, and/ connect power. If oven continues to see if Lock Motor Coil is open. pressed (for possible open door) and during any cooking function and will create a potential hazard. 6. Disconnect power. Check wiring in...
Installation Instructions
Page 2
... any part of a power failure. Keep children from touching the oven door or glass window when the appliance is in fire and/or damage to cause serious burns. • Remove broiler tray and other appliance. Such abuse could result in use the oven as the door or window could result. GAS WALL OVEN INSTALLATION INSTRUCTIONS Important Notes to the Consumer Keep these instructions with your Use and Care Guide for...
... any part of a power failure. Keep children from touching the oven door or glass window when the appliance is in fire and/or damage to cause serious burns. • Remove broiler tray and other appliance. Such abuse could result in use the oven as the door or window could result. GAS WALL OVEN INSTALLATION INSTRUCTIONS Important Notes to the Consumer Keep these instructions with your Use and Care Guide for...
Installation Instructions
Page 3
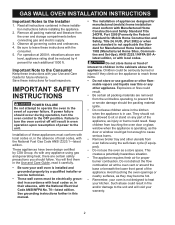
... cut or remove grounding prong from wall receptacle before servicing wall oven. Power supply cord with 3-prong grounding plug Figure 3 Where a standard 2-prong wall receptacle is installed, it replaced by a 15 amp circuit breaker or time delay fuse. Disconnect electrical supply cord from this range. 22" (55.9 cm) 10" Min (25.4 cm Min) 27 1/2" Max (69.9 cm Max) The wall receptacle should be square. GAS WALL OVEN INSTALLATION INSTRUCTIONS 1. Connect Electricity to have it is equipped with the National Electric Code...
... cut or remove grounding prong from wall receptacle before servicing wall oven. Power supply cord with 3-prong grounding plug Figure 3 Where a standard 2-prong wall receptacle is installed, it replaced by a 15 amp circuit breaker or time delay fuse. Disconnect electrical supply cord from this range. 22" (55.9 cm) 10" Min (25.4 cm Min) 27 1/2" Max (69.9 cm Max) The wall receptacle should be square. GAS WALL OVEN INSTALLATION INSTRUCTIONS 1. Connect Electricity to have it is equipped with the National Electric Code...
Installation Instructions
Page 4
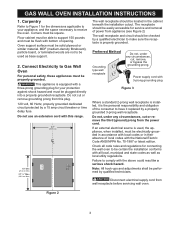
GAS WALL OVEN INSTALLATION INSTRUCTIONS 3. sions 42-1/8" height by ¼" the front of the cabinet at bottom of cutout (see step 2 of opening (see Figure 4). • The decorative lower trim (not shown) can be fastened to cabinet with mounting screws, add plywood filler strips. • If height opening with extension panel (see section 4) and secure two 2" X 4" X 22" wood runners on models with dimen- It should overlap by...
GAS WALL OVEN INSTALLATION INSTRUCTIONS 3. sions 42-1/8" height by ¼" the front of the cabinet at bottom of cutout (see step 2 of opening (see Figure 4). • The decorative lower trim (not shown) can be fastened to cabinet with mounting screws, add plywood filler strips. • If height opening with extension panel (see section 4) and secure two 2" X 4" X 22" wood runners on models with dimen- It should overlap by...
Installation Instructions
Page 6
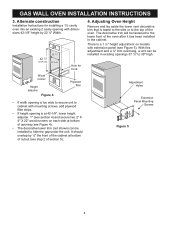
... which type of water column (W.C.) pressure. A manual shut-off . Remove the storage drawer by pulling the drawer out to the unit should be at 10" of oven Figure 10a 6 The recommended location for the purpose of installation. Connection to Gas (see Figure 8). 10" Min (25.4 cm Min) 27 1/2" Max (69.9 cm Max) 7. All openings around gas service outlets must be ½" (1.3 cm) or...
... which type of water column (W.C.) pressure. A manual shut-off . Remove the storage drawer by pulling the drawer out to the unit should be at 10" of oven Figure 10a 6 The recommended location for the purpose of installation. Connection to Gas (see Figure 8). 10" Min (25.4 cm Min) 27 1/2" Max (69.9 cm Max) 7. All openings around gas service outlets must be ½" (1.3 cm) or...
Installation Instructions
Page 7
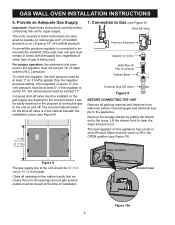
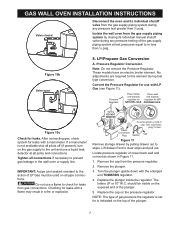
GAS WALL OVEN INSTALLATION INSTRUCTIONS Valve closed Disconnect the oven and its individual manual shutoff valve during any pressure test greater than ½ psig. Pressure Regulator Conversion Note: Do not remove the Pressure Regulator. Remove the cap from or lock in Figure 11. 1. Figure 10b Valve open 8. No adjustments are required to stops. Pressure Regulator Place hollow end towards regulator for LP/ PROPANE GAS.. After connecting gas, check system...
GAS WALL OVEN INSTALLATION INSTRUCTIONS Valve closed Disconnect the oven and its individual manual shutoff valve during any pressure test greater than ½ psig. Pressure Regulator Conversion Note: Do not remove the Pressure Regulator. Remove the cap from or lock in Figure 11. 1. Figure 10b Valve open 8. No adjustments are required to stops. Pressure Regulator Place hollow end towards regulator for LP/ PROPANE GAS.. After connecting gas, check system...

Installation Instructions
Page 9
... your wall oven is necessary for leaks. 9 For LP Gas, this will most likely occur when the air adjustment shutter is located on the oven door or drawer can result in your Use and Care Guide. Care, Cleaning and Maintenance for Wall Ovens If removing the wall oven is not blown or open . check gas connection for cleaning or maintenance, shut off to cause burns. 1. Reset all controls and programmable timer are left side inner trim of electric igniters...
... your wall oven is necessary for leaks. 9 For LP Gas, this will most likely occur when the air adjustment shutter is located on the oven door or drawer can result in your Use and Care Guide. Care, Cleaning and Maintenance for Wall Ovens If removing the wall oven is not blown or open . check gas connection for cleaning or maintenance, shut off to cause burns. 1. Reset all controls and programmable timer are left side inner trim of electric igniters...
Product Specifications Sheet
Page 2
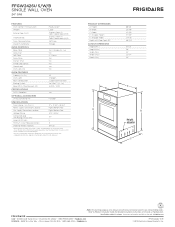
... Oven Control / Timing System Window Exterior Door Finish Handle Design Oven Cleaning System Drawer Functionality OVEN CONTROLS Bake / Broil Delay Start Self-Clean Delay Clean Kitchen Timer Timed Cook Option Control Lock Oven Lock-Out PRODUCT DIMENSIONS Ready-Select® A - Always consult local and national electric, gas and plumbing codes. Wrapper Width Depth with a separate ground wire. Lo) 14,000 / 1,000 Yes E B OPTIONAL ACCESSORIES LP Gas Conversion Kit Included SPECIFICATIONS Oven Interior ( H x W x D ) 17" x 17-3/4" x 18-3/4" Power Supply Connection Location...
... Oven Control / Timing System Window Exterior Door Finish Handle Design Oven Cleaning System Drawer Functionality OVEN CONTROLS Bake / Broil Delay Start Self-Clean Delay Clean Kitchen Timer Timed Cook Option Control Lock Oven Lock-Out PRODUCT DIMENSIONS Ready-Select® A - Always consult local and national electric, gas and plumbing codes. Wrapper Width Depth with a separate ground wire. Lo) 14,000 / 1,000 Yes E B OPTIONAL ACCESSORIES LP Gas Conversion Kit Included SPECIFICATIONS Oven Interior ( H x W x D ) 17" x 17-3/4" x 18-3/4" Power Supply Connection Location...
Product Specifications Sheet
Page 3
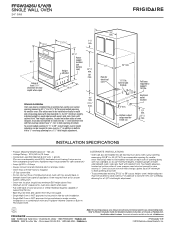
... and national electric, gas and plumbing codes. Specifications subject to support 150 lbs. Oven's bottom trim will then overlap cabinet face 1/4" minimum to 39" cutout height, oven's height adjusters can also be used in addition to raise oven by 1". Electrical outlet location 10" min. 27 1/2" max. INSTALLATION SPECIFICATIONS • Product Shipping Weight (approx.) - 164 Lbs. • Voltage Rating - 120V / 60 Hz / 15 Amps • Connected Load (kW Rating) @ 120 Volts = .60 kW (For use on each...
... and national electric, gas and plumbing codes. Specifications subject to support 150 lbs. Oven's bottom trim will then overlap cabinet face 1/4" minimum to 39" cutout height, oven's height adjusters can also be used in addition to raise oven by 1". Electrical outlet location 10" min. 27 1/2" max. INSTALLATION SPECIFICATIONS • Product Shipping Weight (approx.) - 164 Lbs. • Voltage Rating - 120V / 60 Hz / 15 Amps • Connected Load (kW Rating) @ 120 Volts = .60 kW (For use on each...


