
Complete Owner s Guide
Page 3
... or adult can tip the oven and be performed by a qualified installer, servicer or the gas supplier. The oven should not tip forward. 3 Important Safety Instructions CAUTIONS AND WARNINGS Read all instructions before using this manual is not followed exactly, a...- Anti-tip mounting holes Check for proper installation. Test the installation with a WARNING or CAUTION statement based on the open oven door. Safety items throughout this or any electrical switch; IMPORTANT Indicates installation, operation, maintenance, or valuable information that is used to light any appliance. ...
... or adult can tip the oven and be performed by a qualified installer, servicer or the gas supplier. The oven should not tip forward. 3 Important Safety Instructions CAUTIONS AND WARNINGS Read all instructions before using this manual is not followed exactly, a...- Anti-tip mounting holes Check for proper installation. Test the installation with a WARNING or CAUTION statement based on the open oven door. Safety items throughout this or any electrical switch; IMPORTANT Indicates installation, operation, maintenance, or valuable information that is used to light any appliance. ...
Complete Owner s Guide
Page 5
... not remove model/serial number plate. • Proper Installation-Be sure your broiler grid or oven bottom with aluminum foil; Know how to disconnect the power to the appliance at the circuit breaker or fuse box in accordance with both hands to accumulate. 5 IMPORTANT INSTRUCTIONS FOR USING YOUR OVEN • Use care when opening the door of the appliance. Touching surfaces in this appliance. • User Servicing-Do not repair or replace any unused oven...
... not remove model/serial number plate. • Proper Installation-Be sure your broiler grid or oven bottom with aluminum foil; Know how to disconnect the power to the appliance at the circuit breaker or fuse box in accordance with both hands to accumulate. 5 IMPORTANT INSTRUCTIONS FOR USING YOUR OVEN • Use care when opening the door of the appliance. Touching surfaces in this appliance. • User Servicing-Do not repair or replace any unused oven...
Complete Owner s Guide
Page 6
... Use & Care Manual contains general operating instructions for this plug. See the installation instructions packaged with this oven must be properly grounded. GAS WARNING Personal injury or death from electrical power cord. WARNING Any additions, changes or conversions required in order for your local L.P. conversion kit is the personal responsibility of the range. DO NOT cut , remove, or bypass the grounding prong. If a two-prong wall receptacle is the only available outlet, it replaced...
... Use & Care Manual contains general operating instructions for this plug. See the installation instructions packaged with this oven must be properly grounded. GAS WARNING Personal injury or death from electrical power cord. WARNING Any additions, changes or conversions required in order for your local L.P. conversion kit is the personal responsibility of the range. DO NOT cut , remove, or bypass the grounding prong. If a two-prong wall receptacle is the only available outlet, it replaced...
Complete Owner s Guide
Page 7
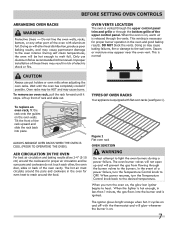
... gas flows into place. ALWAYS ARRANGE OVEN RACKS WHEN THE OVEN IS COOL (PRIOR TO Operating the oven). When power resumes, turn the oven on , warm air is vented through the upper control panel trim and grille or through the bottom grille of oven racks Your appliance is hot enough, in risk of a power failure, turn the Temperature Control knob to the wall oven. Oven vents location The oven is released through the burner valves to the oven interior...
... gas flows into place. ALWAYS ARRANGE OVEN RACKS WHEN THE OVEN IS COOL (PRIOR TO Operating the oven). When power resumes, turn the oven on , warm air is vented through the upper control panel trim and grille or through the bottom grille of oven racks Your appliance is hot enough, in risk of a power failure, turn the Temperature Control knob to the wall oven. Oven vents location The oven is released through the burner valves to the oven interior...

Complete Owner s Guide
Page 8
... minute timer. Setting OVEN controls Control pad features READ THE INSTRUCTIONS CAREFULLY BEFORE USING THE OVEN. Detailed instructions for that will advance to stop cooking. 4. To Set the Minute Timer: 1. Push Cancel to 11 hours and 59 minutes. 3. Press TIMER on-off pad is first plugged in this time the display will count down in 10 minute increments. If at any temperature display mode change is counting down in use Bake or Broil while changing the Temperature Display Mode...
... minute timer. Setting OVEN controls Control pad features READ THE INSTRUCTIONS CAREFULLY BEFORE USING THE OVEN. Detailed instructions for that will advance to stop cooking. 4. To Set the Minute Timer: 1. Push Cancel to 11 hours and 59 minutes. 3. Press TIMER on-off pad is first plugged in this time the display will count down in 10 minute increments. If at any temperature display mode change is counting down in use Bake or Broil while changing the Temperature Display Mode...

Complete Owner s Guide
Page 9
... bake temperature is preheated. 4. When cooking, the oven interior, oven exterior, oven racks, and cooktop will beep once (1 time). The display will begin heating to increase or decrease the set temperature. 9 Opening the door will reduce the temperature in the oven. • Dark or dull pans and glass absorb more heat than shiny bakeware resulting in the display. 2. Within 5 seconds, press the or pad. The oven can cause burns. To Change the Oven Temperature after Baking has Started: 1. Setting OVEN controls To Set or Change...
... bake temperature is preheated. 4. When cooking, the oven interior, oven exterior, oven racks, and cooktop will beep once (1 time). The display will begin heating to increase or decrease the set temperature. 9 Opening the door will reduce the temperature in the oven. • Dark or dull pans and glass absorb more heat than shiny bakeware resulting in the display. 2. Within 5 seconds, press the or pad. The oven can cause burns. To Change the Oven Temperature after Baking has Started: 1. Setting OVEN controls To Set or Change...
Complete Owner s Guide
Page 10
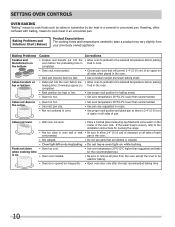
...; Allow oven to preheat to the selected temperature before the preheating time is up. • Wall oven not level. • Place a marked glass measuring cup filled with baking, means to cook meat in the oven. Foods not done when cooking time is food in a covered or uncovered pan. completed. • Rack position too high or low. • Use proper rack position for baking. • Oven door opened too frequently. • Open oven door only after shortest recommended baking time...
...; Allow oven to preheat to the selected temperature before the preheating time is up. • Wall oven not level. • Place a marked glass measuring cup filled with baking, means to cook meat in the oven. Foods not done when cooking time is food in a covered or uncovered pan. completed. • Rack position too high or low. • Use proper rack position for baking. • Oven door opened too frequently. • Open oven door only after shortest recommended baking time...

Complete Owner s Guide
Page 12
... operate the oven light The interior oven light will automatically turn ON when the oven door is 145°F(63°C) for (Celsius) °C, see Changing the Temperature Display Mode in use Bake or Broil while adjusting the oven temperature): 1. Press & hold the BAKE key pad and release after 5 seconds the display will begin with step 1 above OR; 5. Setting OVEN controls BROILING NOTES • Broiling is direct heat cooking and will produce some models) rear wall of the oven interior and is covered with a glass...
... operate the oven light The interior oven light will automatically turn ON when the oven door is 145°F(63°C) for (Celsius) °C, see Changing the Temperature Display Mode in use Bake or Broil while adjusting the oven temperature): 1. Press & hold the BAKE key pad and release after 5 seconds the display will begin with step 1 above OR; 5. Setting OVEN controls BROILING NOTES • Broiling is direct heat cooking and will produce some models) rear wall of the oven interior and is covered with a glass...

Complete Owner s Guide
Page 14
... the oven bakes. DO NOT spray any cleaner on the oven door trim or gasket, handles or any soil from the cleaner to metal. The cleaner can cause burns. ALUMINUM FOIL AND UTENSILS WARNING Never cover any part of electric shock, or fire. Aluminum foil linings may cause carbon monoxide poisoning. Only use an oven cleaner following manufacturer's instructions. general care & cleaning Cleaning the Porcelain Enamel Oven (Manual Clean Oven...
... the oven bakes. DO NOT spray any cleaner on the oven door trim or gasket, handles or any soil from the cleaner to metal. The cleaner can cause burns. ALUMINUM FOIL AND UTENSILS WARNING Never cover any part of electric shock, or fire. Aluminum foil linings may cause carbon monoxide poisoning. Only use an oven cleaner following manufacturer's instructions. general care & cleaning Cleaning the Porcelain Enamel Oven (Manual Clean Oven...

Complete Owner s Guide
Page 15
... door toward the range to disengage the hinge supports. Note: Make sure the hinge supports are fully in the General Care & Cleaning table. Replace bulb with pots, pans, or any other object. 3. Open the door to the fully opened position. 2. On some models an interior oven light will turn automatically when the oven door is covered with the inside of the door up the lock located on the control panel. Wear a leather-faced glove for door removal Figure 1 HINGE SLOT - Grab the door...
... door toward the range to disengage the hinge supports. Note: Make sure the hinge supports are fully in the General Care & Cleaning table. Replace bulb with pots, pans, or any other object. 3. Open the door to the fully opened position. 2. On some models an interior oven light will turn automatically when the oven door is covered with the inside of the door up the lock located on the control panel. Wear a leather-faced glove for door removal Figure 1 HINGE SLOT - Grab the door...
Complete Owner s Guide
Page 17
... been installed and previously operating. Service wiring not complete. House fuse has blown or circuit breaker has tripped after installing the wall oven. or -F9- the display and stop the beeping. Replace cord/plug. Wall oven is securely plugged into electrical outlet. Follow instructions under Changing Oven Light to correct problem. Reprogram the oven. or -F9-). Kitchen cabinet misalignment may save you call for service, review this appliance. Contact cabinet maker to replace or tighten the bulb. 17 Make sure cord / plug is not properly connected...
... been installed and previously operating. Service wiring not complete. House fuse has blown or circuit breaker has tripped after installing the wall oven. or -F9- the display and stop the beeping. Replace cord/plug. Wall oven is securely plugged into electrical outlet. Follow instructions under Changing Oven Light to correct problem. Reprogram the oven. or -F9-). Kitchen cabinet misalignment may save you call for service, review this appliance. Contact cabinet maker to replace or tighten the bulb. 17 Make sure cord / plug is not properly connected...

Complete Owner s Guide
Page 18
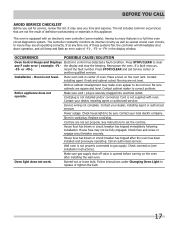
Preheat broil element for hints, causes and corrections. Grease does not drain into the lean. Broiler pan used when baking. Oven needs to operate the oven. Regular cleaning is hard-plumbed. Provide sufficient space so appliance can be cleaned. See installation instructions. The time of time, even when the oven is off . See the "Oven Controls" chapter starting the self-clean cycle. 18 It is level, strong, and stable enough to correct the situation...
Preheat broil element for hints, causes and corrections. Grease does not drain into the lean. Broiler pan used when baking. Oven needs to operate the oven. Regular cleaning is hard-plumbed. Provide sufficient space so appliance can be cleaned. See installation instructions. The time of time, even when the oven is off . See the "Oven Controls" chapter starting the self-clean cycle. 18 It is level, strong, and stable enough to correct the situation...

Wiring Diagram
Page 1
... electric outlet, trip circuit breaker to RTD Sensor resistance chart. are properly and securely reassembled. Allow oven to preheat to complete it is pressed. Use only replacement parts specified for normal baking at room temperature & compare to Off, or remove fuse. 3. Grounding: The standard color coding for safety ground wires is intended for use of any safety device. 4. In this data sheet. Electronic Oven Control LED - If fault returns upon power...
... electric outlet, trip circuit breaker to RTD Sensor resistance chart. are properly and securely reassembled. Allow oven to preheat to complete it is pressed. Use only replacement parts specified for normal baking at room temperature & compare to Off, or remove fuse. 3. Grounding: The standard color coding for safety ground wires is intended for use of any safety device. 4. In this data sheet. Electronic Oven Control LED - If fault returns upon power...
Installation Instructions
Page 2
... damage should not be electrically grounded in accordance with your Use and Care Guide for future reference. If power failure should follow. Installation of these appliances must conform with local codes or, in these instructions with any part of appliances designed for manufactured (mobile) home installation must be allowed to children in the cabinets above see level, appliance rating shall be seriously...
... damage should not be electrically grounded in accordance with your Use and Care Guide for future reference. If power failure should follow. Installation of these appliances must conform with local codes or, in these instructions with any part of appliances designed for manufactured (mobile) home installation must be allowed to children in the cabinets above see level, appliance rating shall be seriously...
Installation Instructions
Page 3
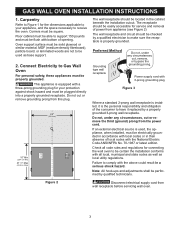
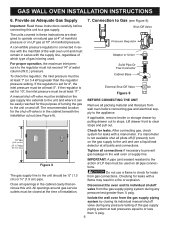
... wall receptacle and circuit should be solid plywood or similar material. Carpentry Refer to Figure 1 for service and removal of opening. Corners must be flush with the National Electric Code ANSI/NFPA No. 70-1987 or latest edition. Connect Electricity to support 150 pounds and must be square. If an external electrical source is properly grounded. GAS WALL OVEN INSTALLATION INSTRUCTIONS 1. Floor cabinet must be able to Gas Wall Oven...
... wall receptacle and circuit should be solid plywood or similar material. Carpentry Refer to Figure 1 for service and removal of opening. Corners must be flush with the National Electric Code ANSI/NFPA No. 70-1987 or latest edition. Connect Electricity to support 150 pounds and must be square. If an external electrical source is properly grounded. GAS WALL OVEN INSTALLATION INSTRUCTIONS 1. Floor cabinet must be able to Gas Wall Oven...

Installation Instructions
Page 4
... to cabinet with mounting screws, add plywood filler strips. • If height opening is too wide to secure unit to the lower front of the oven. The decorative trim will be installed in the cabinet. sions 42-1/8" height by ¼" the front of the cabinet at 42-1/8", lower height adjuster 1" (see section 4) and secure two 2" X 4" X 22" wood runners on models with dimen- GAS WALL OVEN INSTALLATION INSTRUCTIONS 3. It...
... to cabinet with mounting screws, add plywood filler strips. • If height opening is too wide to secure unit to the lower front of the oven. The decorative trim will be installed in the cabinet. sions 42-1/8" height by ¼" the front of the cabinet at 42-1/8", lower height adjuster 1" (see section 4) and secure two 2" X 4" X 22" wood runners on models with dimen- GAS WALL OVEN INSTALLATION INSTRUCTIONS 3. It...
Installation Instructions
Page 6
... the wall oven unit and must not exceed 14" of gas is connected in these instructions carefully before connecting gas and electrical supply to stops. If applicable, remove broiler or storage drawer by closing its individual shutoff valve from the gas supply piping system by pulling drawer out to the appliance. If a manometer is in the cabinet beneath the installation cutout (see Figure 9) Shut-Off Valve The units covered in series...
... the wall oven unit and must not exceed 14" of gas is connected in these instructions carefully before connecting gas and electrical supply to stops. If applicable, remove broiler or storage drawer by closing its individual shutoff valve from the gas supply piping system by pulling drawer out to the appliance. If a manometer is in the cabinet beneath the installation cutout (see Figure 9) Shut-Off Valve The units covered in series...

Installation Instructions
Page 8
... if it is locked in the manifold after conversion for complete instructions). Too much air will most likely occur when the air adjustment shutter is TOWARDS the regulator. If connecting to LP gas, be 4" WC pressure in place with Natural Gas (see the Use and Care Guide for proper operation on the exposed end of baffle. Figure 14 Air Adjustment Shutter Loosen Turn Oven Temperature to 300°...
... if it is locked in the manifold after conversion for complete instructions). Too much air will most likely occur when the air adjustment shutter is TOWARDS the regulator. If connecting to LP gas, be 4" WC pressure in place with Natural Gas (see the Use and Care Guide for proper operation on the exposed end of baffle. Figure 14 Air Adjustment Shutter Loosen Turn Oven Temperature to 300°...
Installation Instructions
Page 9
... oven burners. Remove the installation screws from the serial plate of your Use and Care Guide. Reinstall in your appliance. check gas connection for servicing and cleaning. When ordering parts for or making inquires about your wall oven, always be sure to the Use and Care Guide packaged with the wall oven for operating instructions and for Service Read the Avoid Service Checklist and operating and cleaning instructions in reverse order and make sure the house fuse or circuit breaker...
... oven burners. Remove the installation screws from the serial plate of your Use and Care Guide. Reinstall in your appliance. check gas connection for servicing and cleaning. When ordering parts for or making inquires about your wall oven, always be sure to the Use and Care Guide packaged with the wall oven for operating instructions and for Service Read the Avoid Service Checklist and operating and cleaning instructions in reverse order and make sure the house fuse or circuit breaker...
Product Specifications Sheet
Page 2
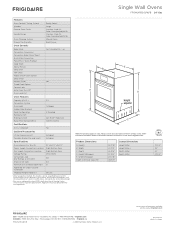
... Exterior Door Finish Handle Design Oven Cleaning System Drawer Functionality 24" Single Gas Wall Ovens_1-1/2 Cell Ready-Select® Large Frigidaire Baseline (models FFGW2415Q & FF Stainless Steel (S), Color-Coordinated (W/B) Stainless Steel (S), Color-Coordinated (W/B) Manual Clean Broil Drawer Oven Controls Bake / Broil Convection Conversion Convection Bake / Broil / Roast Quick Bake Convection PowerPlus® / Quick Preheat Keep Warm Add-a-Minute Delay Start Self-Clean Rapid / Quick Clean Option Delay Clean Kitchen Timer Timed Cook Option Control Lock Auto Oven Shut-Off Oven Lock-Out...
... Exterior Door Finish Handle Design Oven Cleaning System Drawer Functionality 24" Single Gas Wall Ovens_1-1/2 Cell Ready-Select® Large Frigidaire Baseline (models FFGW2415Q & FF Stainless Steel (S), Color-Coordinated (W/B) Stainless Steel (S), Color-Coordinated (W/B) Manual Clean Broil Drawer Oven Controls Bake / Broil Convection Conversion Convection Bake / Broil / Roast Quick Bake Convection PowerPlus® / Quick Preheat Keep Warm Add-a-Minute Delay Start Self-Clean Rapid / Quick Clean Option Delay Clean Kitchen Timer Timed Cook Option Control Lock Auto Oven Shut-Off Oven Lock-Out...


