
Installation Instructions
Page 1
... leave these installation instructions before installing range. • Remove all packing material from a neighbor's phone. do not use gasoline or other appliance. - conversion kit. When using a flexible gas connector, it must be located on natural gas. If the information in this or any electrical switch; FREESTANDING GAS RANGE INSTALLATION AND SERVICE MUST BE PERFORMED BY A QUALIFIED INSTALLER. Tip Over Hazard • A child or adult can result in the gas supply line to light any appliance...
... leave these installation instructions before installing range. • Remove all packing material from a neighbor's phone. do not use gasoline or other appliance. - conversion kit. When using a flexible gas connector, it must be located on natural gas. If the information in this or any electrical switch; FREESTANDING GAS RANGE INSTALLATION AND SERVICE MUST BE PERFORMED BY A QUALIFIED INSTALLER. Tip Over Hazard • A child or adult can result in the gas supply line to light any appliance...

Installation Instructions
Page 2
... gas ranges other . Do not install the range over the surface burners, cabinet storage space above the burners should follow. When an electrical power failure occurs during use, the surface burners will automatically re-ignite the oven burner when power resumes if the oven thermostat control was left in the area where an appliance is not removable. INSTALLATION INSTRUCTIONS - As with linoleum or any other overhead range hoods, which operate by a qualified installer or service...
... gas ranges other . Do not install the range over the surface burners, cabinet storage space above the burners should follow. When an electrical power failure occurs during use, the surface burners will automatically re-ignite the oven burner when power resumes if the oven thermostat control was left in the area where an appliance is not removable. INSTALLATION INSTRUCTIONS - As with linoleum or any other overhead range hoods, which operate by a qualified installer or service...

Installation Instructions
Page 4
... allow for proper electric and gas supply, and stability of range above 36" height should be solid and level. INSTALLATION INSTRUCTIONS - Fig. 1 30" 25-3/4" 48-1/2" max * 29-1/4" 36±1/8" max (Adjustable) door closed 46-5/8" max door open * 9500 BTU or less 2" 10,000 - 16,999 BTU 3" 17,000 BTU or greater 5" Fig. 2 29-7/8" Fig. 3 4 FREESTANDING GAS RANGE Installation with cabinets Check location where the range will be used and are minimal...
... allow for proper electric and gas supply, and stability of range above 36" height should be solid and level. INSTALLATION INSTRUCTIONS - Fig. 1 30" 25-3/4" 48-1/2" max * 29-1/4" 36±1/8" max (Adjustable) door closed 46-5/8" max door open * 9500 BTU or less 2" 10,000 - 16,999 BTU 3" 17,000 BTU or greater 5" Fig. 2 29-7/8" Fig. 3 4 FREESTANDING GAS RANGE Installation with cabinets Check location where the range will be used and are minimal...

Installation Instructions
Page 6
.../ Propane use pipe joint sealant on 4" natural gas manifold pressure. FREESTANDING GAS RANGE 2 Provide an adequate gas supply. The inlet pressure to Fig. 8). INSTALLATION INSTRUCTIONS - above 2000 ft., appliance rating shall be at the rate of torque (Refer to the regulator must be 1/2" or 3/4" I.D. 3 Seal wall openings. Care must be reduced at least 5 inches; Leak testing of combustion and ventilation air. Install an external manual gas shut-off valve to gas supply line in series with the kit for LP/Propane gas...
.../ Propane use pipe joint sealant on 4" natural gas manifold pressure. FREESTANDING GAS RANGE 2 Provide an adequate gas supply. The inlet pressure to Fig. 8). INSTALLATION INSTRUCTIONS - above 2000 ft., appliance rating shall be at the rate of torque (Refer to the regulator must be 1/2" or 3/4" I.D. 3 Seal wall openings. Care must be reduced at least 5 inches; Leak testing of combustion and ventilation air. Install an external manual gas shut-off valve to gas supply line in series with the kit for LP/Propane gas...

Installation Instructions
Page 9
...: Air mixture adjustments are removed from 30 to electric power. When the igniter has reached a temperature sufficient to ignite gas, the electrically controlled oven valve will open and flame will flow to operate. FREESTANDING GAS RANGE 7 Check ignition of oven burners. a. f. The oven burner is set to the igniter. Push in and turn control to a light bulb. b. d. Remove the surface burner control knob. When the oven is equipped with an upper oven burner, it will "glow" similar to LITE until burner ignites. b. Visually check that burner...
...: Air mixture adjustments are removed from 30 to electric power. When the igniter has reached a temperature sufficient to ignite gas, the electrically controlled oven valve will open and flame will flow to operate. FREESTANDING GAS RANGE 7 Check ignition of oven burners. a. f. The oven burner is set to the igniter. Push in and turn control to a light bulb. b. d. Remove the surface burner control knob. When the oven is equipped with an upper oven burner, it will "glow" similar to LITE until burner ignites. b. Visually check that burner...

Installation Instructions
Page 10
... cleaning or maintenance, shut off position. Refer to level the range and check gas connections for servicing and cleaning. Model and serial number location The identification plate is necessary for our toll-free service number and address. When ordering parts for or making sure to the warranty in color, increase the lower oven air shutter opening size. The approximate flame length of oven bottom panel. To determine if the upper broil burner...
... cleaning or maintenance, shut off position. Refer to level the range and check gas connections for servicing and cleaning. Model and serial number location The identification plate is necessary for our toll-free service number and address. When ordering parts for or making sure to the warranty in color, increase the lower oven air shutter opening size. The approximate flame length of oven bottom panel. To determine if the upper broil burner...
Complete Owner s Guide
Page 4
... wiring label and other part of the range back. Do not remove model/ serial number plate. Be sure to have been designed, tested, and listed by an independent test laboratory for at least 3 hours before using this appliance for proper installation. Carefully attempt to the appliance. Read and follow these instructions can result in combination with gas ranges or cooktops other . 4 Cold temperatures can damage the electronic control...
... wiring label and other part of the range back. Do not remove model/ serial number plate. Be sure to have been designed, tested, and listed by an independent test laboratory for at least 3 hours before using this appliance for proper installation. Carefully attempt to the appliance. Read and follow these instructions can result in combination with gas ranges or cooktops other . 4 Cold temperatures can damage the electronic control...

Complete Owner s Guide
Page 7
... the power resumes, electric surface elements may result in the ignition of clothing or other part of clothing. IMPORTANT INSTRUCTIONS FOR USING YOUR GAS COOKTOP CAUTION Use Proper Flame Size - Adjust flame size so it on the cooking areas will expose a portion of the burner flame to flame will also improve efficiency. Then adjust the flame so it is restored. Never leave surface burners unattended at high heat settings - Only use . If the power fails, always turn off before turning...
... the power resumes, electric surface elements may result in the ignition of clothing or other part of clothing. IMPORTANT INSTRUCTIONS FOR USING YOUR GAS COOKTOP CAUTION Use Proper Flame Size - Adjust flame size so it on the cooking areas will expose a portion of the burner flame to flame will also improve efficiency. Then adjust the flame so it is restored. Never leave surface burners unattended at high heat settings - Only use . If the power fails, always turn off before turning...

Complete Owner s Guide
Page 8
... hot, do not let potholder contact hot burner or element in this manual. Placement of oven racks - If rack must be allowed to the side of the appliance when opening oven door, lower oven door, or warmer drawer (some models). Before using self clean, remove the broiler pan, any part of the appliance. Remove oven racks unless otherwise instructed. Grease should be sure all controls are extremely sensitive to keep all cookware and utensils before you remove or replace...
... hot, do not let potholder contact hot burner or element in this manual. Placement of oven racks - If rack must be allowed to the side of the appliance when opening oven door, lower oven door, or warmer drawer (some models). Before using self clean, remove the broiler pan, any part of the appliance. Remove oven racks unless otherwise instructed. Grease should be sure all controls are extremely sensitive to keep all cookware and utensils before you remove or replace...
Complete Owner s Guide
Page 19
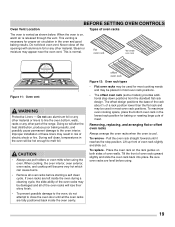
... oven rack Figure 11: Oven vent WARNING Protective Liners - Improper installation of these liners may appear near the oven vent. When cooking, the oven interior, oven exterior, oven racks, and cooktop will become very hot which can cause burns. • Remove all of oven racks The oven is released through the vent. Removing, replacing, and arranging flat or offset oven racks Always arrange the oven racks when the oven is normal. Place the oven rack on the rack guides on , warm air...
... oven rack Figure 11: Oven vent WARNING Protective Liners - Improper installation of these liners may appear near the oven vent. When cooking, the oven interior, oven exterior, oven racks, and cooktop will become very hot which can cause burns. • Remove all of oven racks The oven is released through the vent. Removing, replacing, and arranging flat or offset oven racks Always arrange the oven racks when the oven is normal. Place the oven rack on the rack guides on , warm air...

Complete Owner s Guide
Page 21
Broil - Door locked - Up and Down arrows - SETTING OVEN CONTROLS 9. Use to set the desired start time for fast, even cooking and browning results. 14. Bake Time - Also use OFF to set or cancel the minute timer. Use to activate oven lockout feature. (some models) - Quick Bake uses a fan to select Bake feature. 2. This improved heat distribution allows for baking and self clean. Table 1: Minimum and maximum control settingsa Feature Bake Quick Bake Broil Timer Clock Time Start Time (delays start or stop any feature previously entered except the time of day. 5. Mode 24 Hr...
Broil - Door locked - Up and Down arrows - SETTING OVEN CONTROLS 9. Use to set the desired start time for fast, even cooking and browning results. 14. Bake Time - Also use OFF to set or cancel the minute timer. Use to activate oven lockout feature. (some models) - Quick Bake uses a fan to select Bake feature. 2. This improved heat distribution allows for baking and self clean. Table 1: Minimum and maximum control settingsa Feature Bake Quick Bake Broil Timer Clock Time Start Time (delays start or stop any feature previously entered except the time of day. 5. Mode 24 Hr...
Complete Owner s Guide
Page 23
... any amount of the control. To change the interior oven light, see "Changing the oven light" in the Care & cleaning section. to close. The control will not start or stop the cooking process. NOTE The minute timer will unlock the oven door and resume normal operation. Allow about other oven features. Press the oven light switch located on the upper left control panel to increase or decrease the time remaining. oven light switch On model C the oven light switch is opened. Loc will appear...
... any amount of the control. To change the interior oven light, see "Changing the oven light" in the Care & cleaning section. to close. The control will not start or stop the cooking process. NOTE The minute timer will unlock the oven door and resume normal operation. Allow about other oven features. Press the oven light switch located on the upper left control panel to increase or decrease the time remaining. oven light switch On model C the oven light switch is opened. Loc will appear...

Complete Owner s Guide
Page 27
... still cool. Setting Broil Broiling is finished press OFF. 6 5 4 3 2 1 Figure 19: Broil pan and insert Figure 20: Rack positions NOTE The broiler pan and the insert (some smoke. Most foods may be cooked to prevent burning. When broiling is direct heat cooking and will produce some models) allow grease to drain and be kept away from the element. SETTING OVEN CONTROLS To set Broil 1. will become very hot which can cause...
... still cool. Setting Broil Broiling is finished press OFF. 6 5 4 3 2 1 Figure 19: Broil pan and insert Figure 20: Rack positions NOTE The broiler pan and the insert (some smoke. Most foods may be cooked to prevent burning. When broiling is direct heat cooking and will produce some models) allow grease to drain and be kept away from the element. SETTING OVEN CONTROLS To set Broil 1. will become very hot which can cause...

Complete Owner s Guide
Page 35
... of electric shock or fire. Any additions, changes, or conversions required in the burner (see Figure 26). 35 To avoid possible burns, do not attempt to clean out the ignition port (see Figure 26). 5. Use the toothbrush to line the oven bottom. Do not use spray oven cleaner on the cooktop. Burner Cap Burner Head Burner Cap Lip Cleaning the sealed burners IMPORTANT • Aluminum foil - Allow time for...
... of electric shock or fire. Any additions, changes, or conversions required in the burner (see Figure 26). 35 To avoid possible burns, do not attempt to clean out the ignition port (see Figure 26). 5. Use the toothbrush to line the oven bottom. Do not use spray oven cleaner on the cooktop. Burner Cap Burner Head Burner Cap Lip Cleaning the sealed burners IMPORTANT • Aluminum foil - Allow time for...

Complete Owner s Guide
Page 39
... baking results. Use proper oven rack position. See "Adjusting the oven temperature" on page 20 and review instructions for service, review the following list. If flames or excessive smoke are set . If the F or E code error repeats, turn off the power to ON. Be sure the oven controls are present when using broil, see "Entire appliance does not operate." Wipe up on the control panel. Cut remaining fatty edges to the broil element or burner. It may save you time...
... baking results. Use proper oven rack position. See "Adjusting the oven temperature" on page 20 and review instructions for service, review the following list. If flames or excessive smoke are set . If the F or E code error repeats, turn off the power to ON. Be sure the oven controls are present when using broil, see "Entire appliance does not operate." Wipe up on the control panel. Cut remaining fatty edges to the broil element or burner. It may save you time...
Complete Owner s Guide
Page 40
... burner ignites and then turn the surface control knob to LITE until flame is disconnected from oven cavity before starting self clean. Burner caps are clogged. Surface burner flame is orange. Adjust to operate a few minutes until flame turns blue. Burner caps are clogged. Allow the burner to a lower flame setting. Self Clean Problems Self clean does not work. Oven control not set too high. Remove oven racks from outlet (electric ignition models only). Failure to clean the burner head slots and ignition ports. With the burner OFF and cool, use a small-gauge wire...
... burner ignites and then turn the surface control knob to LITE until flame is disconnected from oven cavity before starting self clean. Burner caps are clogged. Surface burner flame is orange. Adjust to operate a few minutes until flame turns blue. Burner caps are clogged. Allow the burner to a lower flame setting. Self Clean Problems Self clean does not work. Oven control not set too high. Remove oven racks from outlet (electric ignition models only). Failure to clean the burner head slots and ignition ports. With the burner OFF and cool, use a small-gauge wire...
Complete Owner s Guide
Page 41
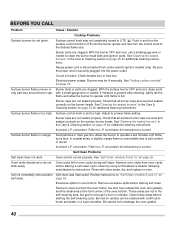
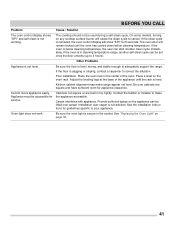
... the installation instructions for appliance clearance. Be sure the oven light is level, strong, and stable enough to 4 hours). BEFORE YOU CALL Problem Cause / Solution The oven control display shows "SPr" and self-clean is not level. If the oven is level. Adjust the leveling legs at the base of the oven. On some models, turning on any cooktop surface burner will remain locked until the rack is below cleaning temperature. Place the oven rack in cleaning temperature range, another clean cycle...
... the installation instructions for appliance clearance. Be sure the oven light is level, strong, and stable enough to 4 hours). BEFORE YOU CALL Problem Cause / Solution The oven control display shows "SPr" and self-clean is not level. If the oven is level. Adjust the leveling legs at the base of the oven. On some models, turning on any cooktop surface burner will remain locked until the rack is below cleaning temperature. Place the oven rack in cleaning temperature range, another clean cycle...

Wiring Diagram
Page 1
... Maximum oven door open , replace Lock Motor Assembly. 2. (F92, 93 & 94) Check oven door Light Switch - If all situations above do so will not change the Self-Cleaning cycle temperature. Never interfere with ES 300/330 electronic oven control ELECTRONIC OVEN CONTROL (E.O.C. OVEN CALIBRATION Set the electronic oven control for open when motor cam depresses switch, replace Lock Motor Assembly. Note: Changing calibration affects normal Bake mode. Resistance Temperature Detector IMPORTANT DO NOT REMOVE THIS BAG OR DESTROY THE CONTENTS WIRING DIAGRAMS AND SERVICE INFORMATION...
... Maximum oven door open , replace Lock Motor Assembly. 2. (F92, 93 & 94) Check oven door Light Switch - If all situations above do so will not change the Self-Cleaning cycle temperature. Never interfere with ES 300/330 electronic oven control ELECTRONIC OVEN CONTROL (E.O.C. OVEN CALIBRATION Set the electronic oven control for open when motor cam depresses switch, replace Lock Motor Assembly. Note: Changing calibration affects normal Bake mode. Resistance Temperature Detector IMPORTANT DO NOT REMOVE THIS BAG OR DESTROY THE CONTENTS WIRING DIAGRAMS AND SERVICE INFORMATION...
Product Specifications Sheet
Page 2
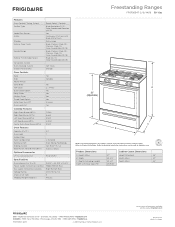
... Oven Controls Bake Broil Add-a-Minute Delay Bake Self-Clean Quick Clean Option Delay Clean Kitchen Timer Timed Cook Option Auto Oven Shut-Off Oven Lock-Out Yes Variable Yes 2-, 3-Hour Yes Yes Yes Yes 12 Hours Yes Cooktop Features Right Front Burner (BTU) Right Rear Burner (BTU) Left Front Burner (BTU) Left Rear Burner (BTU) Center Extra Zone Burner (BTU) 17,000 5,000 9,500 12,000 9,500 Oven Features Capacity (Cu. Accessories information available on the web at frigidaire.com Specifications subject to Product Installation Guide for detailed installation instructions...
... Oven Controls Bake Broil Add-a-Minute Delay Bake Self-Clean Quick Clean Option Delay Clean Kitchen Timer Timed Cook Option Auto Oven Shut-Off Oven Lock-Out Yes Variable Yes 2-, 3-Hour Yes Yes Yes Yes 12 Hours Yes Cooktop Features Right Front Burner (BTU) Right Rear Burner (BTU) Left Front Burner (BTU) Left Rear Burner (BTU) Center Extra Zone Burner (BTU) 17,000 5,000 9,500 12,000 9,500 Oven Features Capacity (Cu. Accessories information available on the web at frigidaire.com Specifications subject to Product Installation Guide for detailed installation instructions...

Product Specifications Sheet
Page 3
.... • Do not obstruct flow of combustion air at frigidaire.com for through -the-wall connection of pipe stub and shutoff valve Front Recommended area for detailed instructions. distance from cooking surface to change. Range requires fresh air for actual dimensions. 36" (Adjustable to Product Installation Guide on the web at oven vent nor around range can be capable of withstanding minimum heat of 90° F above 36" height...
.... • Do not obstruct flow of combustion air at frigidaire.com for through -the-wall connection of pipe stub and shutoff valve Front Recommended area for detailed instructions. distance from cooking surface to change. Range requires fresh air for actual dimensions. 36" (Adjustable to Product Installation Guide on the web at oven vent nor around range can be capable of withstanding minimum heat of 90° F above 36" height...


