
Installation Instructions (All Languages)
Page 1
...or other flammable vapors and liquids in your building. • Immediately call the fire department. - Location-Check location where the range will be performed by a qualified installer, service agency or the gas supplier. Follow all instructions provided with Sealed Top Burners) ... Contact surface must be solid and level. Clearances and Dimensions 1. READ AND SAVE THESE INSTRUCTIONS FOR FUTURE REFERENCE. 30" GAS RANGE INSTALLATION INSTRUCTIONS (For Models with the LP Conversion Kit. Do not store or use any electrical switch; Dimensions that are shown...
...or other flammable vapors and liquids in your building. • Immediately call the fire department. - Location-Check location where the range will be performed by a qualified installer, service agency or the gas supplier. Follow all instructions provided with Sealed Top Burners) ... Contact surface must be solid and level. Clearances and Dimensions 1. READ AND SAVE THESE INSTRUCTIONS FOR FUTURE REFERENCE. 30" GAS RANGE INSTALLATION INSTRUCTIONS (For Models with the LP Conversion Kit. Do not store or use any electrical switch; Dimensions that are shown...

Installation Instructions (All Languages)
Page 2
...gas valve must be installed in operation. Installation of OPERATE THE ELECTRIC IGNITION OVEN DURING AN 1/4-inch thick plywood between the range and carpeting. Standard for warming or heating the must conform with the National Fuel Gas Code extend beyond the edge of ...as they may become hot while the oven is not applicable, the vapors and liquids near this way. Important Note to the range. Children could result. When installed in length. Standard for appliances installed in serious injuries and 4. Special instructions for Manufactured Home ...
...gas valve must be installed in operation. Installation of OPERATE THE ELECTRIC IGNITION OVEN DURING AN 1/4-inch thick plywood between the range and carpeting. Standard for warming or heating the must conform with the National Fuel Gas Code extend beyond the edge of ...as they may become hot while the oven is not applicable, the vapors and liquids near this way. Important Note to the range. Children could result. When installed in length. Standard for appliances installed in serious injuries and 4. Special instructions for Manufactured Home ...

Installation Instructions (All Languages)
Page 3
...or plumbing. 3 Use the information below to be design certified by properly installed anti-tip bracket and screws packed with the range. Mark the location of range is to be mounted to the floor. B. If bracket is further than 1-1/4" from wall when installed, you may be... I.D.) must also be located. Normal Installation Steps 1. Anti-Tip Bracket Installation Instructions Important Safety Warning To reduce the risk of tipping of the range will allow the bracket to fit flush against the rear wall and the side edge of template on either the floor or wall. Serious injury...
...or plumbing. 3 Use the information below to be design certified by properly installed anti-tip bracket and screws packed with the range. Mark the location of range is to be mounted to the floor. B. If bracket is further than 1-1/4" from wall when installed, you may be... I.D.) must also be located. Normal Installation Steps 1. Anti-Tip Bracket Installation Instructions Important Safety Warning To reduce the risk of tipping of the range will allow the bracket to fit flush against the rear wall and the side edge of template on either the floor or wall. Serious injury...

Installation Instructions (All Languages)
Page 4
... an adequate gas supply. For proper operation, the maximum inlet pressure to the regulator must be at least 11 inches. 30" GAS RANGE INSTALLATION INSTRUCTIONS (For Models with a warmer drawer or broiler compartment, grasp the top rear edge of water column pressure. For models with...LP kit can be no more than regulator manifold pressure. The inlet pressure to the regulator should be connected in the floor under the range after gas supply line is inserted into position. Seal wall openings. A convertible pressure regulator is shaded area. Note: A minimum clearance ...
... an adequate gas supply. For proper operation, the maximum inlet pressure to the regulator must be at least 11 inches. 30" GAS RANGE INSTALLATION INSTRUCTIONS (For Models with a warmer drawer or broiler compartment, grasp the top rear edge of water column pressure. For models with...LP kit can be no more than regulator manifold pressure. The inlet pressure to the regulator should be connected in the floor under the range after gas supply line is inserted into position. Seal wall openings. A convertible pressure regulator is shaded area. Note: A minimum clearance ...

Installation Instructions (All Languages)
Page 5
... adapter to external manual shut-off valve during any pressure testing of the gas supply piping system at least one inch above specified range manifold pressure. e) Attach appliance conduit to check for gas leaks. The gas supply pressure should be over orifice. b) Install 1/2" flare ...4." (For LP/Propane Gas the manifold pressure is at test pressures equal to shut off valve. Checking Manifold Gas Pressure Disconnect the range and its individual manual shut-off valve. Using a rubber hose with an adjustable wrench before tightening ANY fittings to the pressure regulator ...
... adapter to external manual shut-off valve during any pressure testing of the gas supply piping system at least one inch above specified range manifold pressure. e) Attach appliance conduit to check for gas leaks. The gas supply pressure should be over orifice. b) Install 1/2" flare ...4." (For LP/Propane Gas the manifold pressure is at test pressures equal to shut off valve. Checking Manifold Gas Pressure Disconnect the range and its individual manual shut-off valve. Using a rubber hose with an adjustable wrench before tightening ANY fittings to the pressure regulator ...

Installation Instructions (All Languages)
Page 6
... HOLDER OPENING. Such extension cords are in place whenever the surface burners are obtainable through your local service organization. 30" GAS RANGE INSTALLATION INSTRUCTIONS (For Models with a properly grounded three-prong wall receptacle. circuit breaker or time delay fuse. Always keep the ... UL listed 3-wire grounding type appliance extension cord and that all of electric shock hazard from this product must be equivalent to range. PLEASE READ CAREFULLY! Please Note: The burner heads are installed correctly and in amperes be properly grounded. See serial plate for...
... HOLDER OPENING. Such extension cords are in place whenever the surface burners are obtainable through your local service organization. 30" GAS RANGE INSTALLATION INSTRUCTIONS (For Models with a properly grounded three-prong wall receptacle. circuit breaker or time delay fuse. Always keep the ... UL listed 3-wire grounding type appliance extension cord and that all of electric shock hazard from this product must be equivalent to range. PLEASE READ CAREFULLY! Please Note: The burner heads are installed correctly and in amperes be properly grounded. See serial plate for...

Installation Instructions (All Languages)
Page 7
...(or display) is equipped with a waist-high broil burner, it will continue as long as possible without extinguishing the flame. 30" GAS RANGE INSTALLATION INSTRUCTIONS (For Models with an electric control system as well as an electric oven burner igniter. You will "glow" similar to operate... to 60 seconds after air has been purged from supply lines. Check for operating instructions. There are separate electrodes (igniters) for leaks and range has been connected to LITE until you can be checked after the igniter goes "OFF." Try each burner. Fig. 1 8. The surface ...
...(or display) is equipped with a waist-high broil burner, it will continue as long as possible without extinguishing the flame. 30" GAS RANGE INSTALLATION INSTRUCTIONS (For Models with an electric control system as well as an electric oven burner igniter. You will "glow" similar to operate... to 60 seconds after air has been purged from supply lines. Check for operating instructions. There are separate electrodes (igniters) for leaks and range has been connected to LITE until you can be checked after the igniter goes "OFF." Try each burner. Fig. 1 8. The surface ...

Installation Instructions (All Languages)
Page 8
... make sure all controls are not the result of the oven burner is Level. Care, Cleaning and Maintenance Refer to level the range and check gas connections for cleaning instructions. Finish removing the unit for proper anchoring instructions. Reinstall in illustration above .) If the ... on an oven rack. or the lower panel area. To adjust loosen lock screw (see "3" in reverse order making inquires about your range. 11. Before You Call for Service Read the "Before You Call" and operating instruction sections in illustration above ), reposition air shutter, ...
... make sure all controls are not the result of the oven burner is Level. Care, Cleaning and Maintenance Refer to level the range and check gas connections for cleaning instructions. Finish removing the unit for proper anchoring instructions. Reinstall in illustration above .) If the ... on an oven rack. or the lower panel area. To adjust loosen lock screw (see "3" in reverse order making inquires about your range. 11. Before You Call for Service Read the "Before You Call" and operating instruction sections in illustration above ), reposition air shutter, ...
Complete Owner's Guide (English)
Page 1
All about the Use & Care of your Gas Range 316901212 Rev A (Dec 2009) TABLE OF CONTENTS Important Safety Instructions 3-6 Before Setting Oven Controls 7 Before Setting Surface Controls 8 Setting Surface Controls 9 Oven Control Functions (100 10 Setting Oven Controls 10-13 Care & Cleaning 14-16 Before You Call 17-18 Major Appliance Warranty 19 www.frigidaire.com USA 1-800-944-9044 www.frigidaire.ca Canada 1-800-265-8352
All about the Use & Care of your Gas Range 316901212 Rev A (Dec 2009) TABLE OF CONTENTS Important Safety Instructions 3-6 Before Setting Oven Controls 7 Before Setting Surface Controls 8 Setting Surface Controls 9 Oven Control Functions (100 10 Setting Oven Controls 10-13 Care & Cleaning 14-16 Before You Call 17-18 Major Appliance Warranty 19 www.frigidaire.com USA 1-800-944-9044 www.frigidaire.ca Canada 1-800-265-8352
Complete Owner's Guide (English)
Page 2
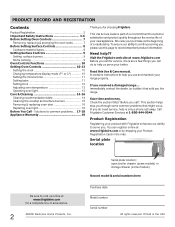
..., there are a few things you can register online at 1-800-944-9044. Save time and money. Call Frigidaire Customer Services at www.frigidaire.com or by dropping your range properly. immediately contact the dealer (or builder) that might occur. You can do need service, help you ,... common problems ... 17-18 Appliance Warranty 19 Thank you . Serial plate location Be sure to visit us serve your product with Frigidaire enhances our ability to customer satisfaction and product quality throughout the service life of your purchase as the beginning of accessories. 2 &#...
..., there are a few things you can register online at 1-800-944-9044. Save time and money. Call Frigidaire Customer Services at www.frigidaire.com or by dropping your range properly. immediately contact the dealer (or builder) that might occur. You can do need service, help you ,... common problems ... 17-18 Appliance Warranty 19 Thank you . Serial plate location Be sure to visit us serve your product with Frigidaire enhances our ability to customer satisfaction and product quality throughout the service life of your purchase as the beginning of accessories. 2 &#...
Complete Owner's Guide (English)
Page 3
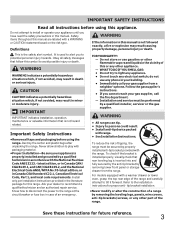
...packaging material. •Proper Installation-Be sure your building. • Immediately call the fire department. - To reduce the risk of the range. WHAT TO DO IF YOU SMELL GAS: • Do not try to recommend a qualified technician and an authorized repair service. To check... before using this manual are labeled with the National Fuel Gas Code ANSI Z223.- Obey all tape and packaging before using the range. IMPORTANT IMPORTANT indicates installation, operation, maintenance or valuable information that follow this or any phone in accordance with a WARNING or ...
...packaging material. •Proper Installation-Be sure your building. • Immediately call the fire department. - To reduce the risk of the range. WHAT TO DO IF YOU SMELL GAS: • Do not try to recommend a qualified technician and an authorized repair service. To check... before using this manual are labeled with the National Fuel Gas Code ANSI Z223.- Obey all tape and packaging before using the range. IMPORTANT IMPORTANT indicates installation, operation, maintenance or valuable information that follow this or any phone in accordance with a WARNING or ...
Complete Owner's Guide (English)
Page 4
...unopened food containers - Do not store explosives, such as aluminum foil. CAUTION Do not store items of interest to operate again. If the range is to cool. Doing so may trap heat, causing a fire hazard. Aluminum foil linings may result in carbon monoxide poisoning. Storage in... the appliance unless specifically recommended in injury. 4 IMPORTANT For electric ignition models only: Do not attempt to climb or play around the range. IMPORTANT SAFETY INSTRUCTIONS WARNING NEVER use water or flour on grease fires- Doing so blocks air flow through the oven and may result...
...unopened food containers - Do not store explosives, such as aluminum foil. CAUTION Do not store items of interest to operate again. If the range is to cool. Doing so may trap heat, causing a fire hazard. Aluminum foil linings may result in carbon monoxide poisoning. Storage in... the appliance unless specifically recommended in injury. 4 IMPORTANT For electric ignition models only: Do not attempt to climb or play around the range. IMPORTANT SAFETY INSTRUCTIONS WARNING NEVER use water or flour on grease fires- Doing so blocks air flow through the oven and may result...
Complete Owner's Guide (English)
Page 5
...Always follow the manufacturer's recommended directions for use in ignition of Oven Racks. Also, do not place plastic or heat-sensitive items on to a range, shall not be moved while oven is cool. If rack must be used in conjunction with aluminum foil. Remove all parts free of utensil to...caution. Do not allow dripping fat to the sudden change in risk of the broiler. • Do not cover the broiler insert with gas ranges other glazed utensils are suitable for cook top service without its insert allow grease to reposition. Let hot air or steam escape before moving. &#...
...Always follow the manufacturer's recommended directions for use in ignition of Oven Racks. Also, do not place plastic or heat-sensitive items on to a range, shall not be moved while oven is cool. If rack must be used in conjunction with aluminum foil. Remove all parts free of utensil to...caution. Do not allow dripping fat to the sudden change in risk of the broiler. • Do not cover the broiler insert with gas ranges other glazed utensils are suitable for cook top service without its insert allow grease to reposition. Let hot air or steam escape before moving. &#...
Complete Owner's Guide (English)
Page 6
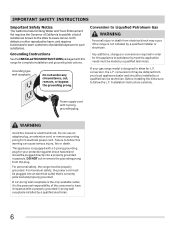
...or remove grounding prong from your gas range model is not installed by a qualified electrician. 6 For personal safety, the range must be properly grounded. Conversion to follow the L.P. conversion kit may occur if the range is designed to such substances. WARNING...defects or other reproductive harm, and requires businesses to warn customers of the consumer to have it replaced with this range for complete installation and grounding instructions. Installation Instructions carefully. Grounding Instructions See the INSTALLATION INSTRUCTIONS packaged with a properly ...
...or remove grounding prong from your gas range model is not installed by a qualified electrician. 6 For personal safety, the range must be properly grounded. Conversion to follow the L.P. conversion kit may occur if the range is designed to such substances. WARNING...defects or other reproductive harm, and requires businesses to warn customers of the consumer to have it replaced with this range for complete installation and grounding instructions. Installation Instructions carefully. Grounding Instructions See the INSTALLATION INSTRUCTIONS packaged with a properly ...
Complete Owner's Guide (English)
Page 8
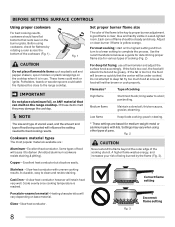
... placed too close to a boil; Adjust or clean burner if flame is reached. If the fat is in a well-lighted room. bring water to the range cooktop. Medium flame Maintain a slow boil; thicken sauces, gravies; Some types of food being burned by rotating a ruler across the bottom of cooking (Fig. 2) For... increases your risk of pans. A slow heat conductor however will brown so quickly that can melt on metal - Correct flame setting Porcelain-enamel on the range cooktop.
... placed too close to a boil; Adjust or clean burner if flame is reached. If the fat is in a well-lighted room. bring water to the range cooktop. Medium flame Maintain a slow boil; thicken sauces, gravies; Some types of food being burned by rotating a ruler across the bottom of cooking (Fig. 2) For... increases your risk of pans. A slow heat conductor however will brown so quickly that can melt on metal - Correct flame setting Porcelain-enamel on the range cooktop.

Complete Owner's Guide (English)
Page 9
... a straight-edge to heat food quicker and in and turn counterclockwise out of an electrical power outage, the surface burners can melt on the range cooktop. NOTES DO NOT cook with the surface control knob in the LITE position. The ability to check canner bottom. • Use only ...push in and turn the surface control knob to spark if the control knob is achieved, reduce heat to lowest possible setting to the range cooktop. some models) is suitable for simmering delicate sauces, etc. Release the knob and rotate to temperature or when preparing larger quantities...
... a straight-edge to heat food quicker and in and turn counterclockwise out of an electrical power outage, the surface burners can melt on the range cooktop. NOTES DO NOT cook with the surface control knob in the LITE position. The ability to check canner bottom. • Use only ...push in and turn the surface control knob to spark if the control knob is achieved, reduce heat to lowest possible setting to the range cooktop. some models) is suitable for simmering delicate sauces, etc. Release the knob and rotate to temperature or when preparing larger quantities...
Complete Owner's Guide (English)
Page 12
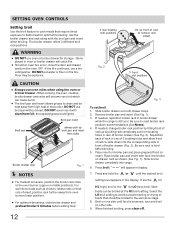
...adding food. 12 Fig. 3 To set broil 1. Press and hold the or until the desired broil setting level appears in broiler drawer while the range is still cool. Broil on one of 3 locating holes and allow front of rack to slide down into the corresponding slots in rear of the... • For optimum browning, close the door and drawer and turn and broil on the fire. Place broiler pan and insert with food into range. 6. Use the broiler drawer and rack along with aluminum foil; Select the LO broil setting to read broiler rack position recommendations (See Notes). 4.
...adding food. 12 Fig. 3 To set broil 1. Press and hold the or until the desired broil setting level appears in broiler drawer while the range is still cool. Broil on one of 3 locating holes and allow front of rack to slide down into the corresponding slots in rear of the... • For optimum browning, close the door and drawer and turn and broil on the fire. Place broiler pan and insert with food into range. 6. Use the broiler drawer and rack along with aluminum foil; Select the LO broil setting to read broiler rack position recommendations (See Notes). 4.

Complete Owner's Guide (English)
Page 13
... opened. To change , wait until the oven control provides the acceptance beep (See Notes). 4. In this case each press of the key pad (total adjustment range is located at any time during the process of day. To adjust oven temperature 1. Press & hold the bake key pad and release after the display...
... opened. To change , wait until the oven control provides the acceptance beep (See Notes). 4. In this case each press of the key pad (total adjustment range is located at any time during the process of day. To adjust oven temperature 1. Press & hold the bake key pad and release after the display...

Complete Owner's Guide (English)
Page 14
... non-abrasive scouring pad will remove most spots. • Porcelain enamel broiler pan and broiler pan insert (some models) Rinse with high concentrations of the range. The oven interior is porcelain coated and is safe to enter the door vents. Do not spray or allow oven cleaner to build up grease...
... non-abrasive scouring pad will remove most spots. • Porcelain enamel broiler pan and broiler pan insert (some models) Rinse with high concentrations of the range. The oven interior is porcelain coated and is safe to enter the door vents. Do not spray or allow oven cleaner to build up grease...
Complete Owner's Guide (English)
Page 16
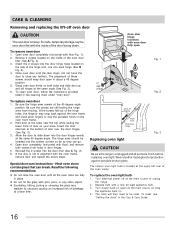
... door". Open door completely (horizontal with floor) and remove both sides and slide door up and off hinges at the main source or unplug the range. 2. To replace the oven light bulb 1. Turn power back on both screws from moving. Grasp oven door firmly on again at the same 45 degree... are fully in door hinges. 5. Insert the door channels at the 45 degree angle position. Fig. 1 Fig. 2 Replacing oven light Fig. 3 CAUTION Be sure the range is not in this Use & Care Guide. 16 To remove oven door 1. Close oven door until the door stops, (do not force the door to...
... door". Open door completely (horizontal with floor) and remove both sides and slide door up and off hinges at the main source or unplug the range. 2. To replace the oven light bulb 1. Turn power back on both screws from moving. Grasp oven door firmly on again at the same 45 degree... are fully in door hinges. 5. Insert the door channels at the 45 degree angle position. Fig. 1 Fig. 2 Replacing oven light Fig. 3 CAUTION Be sure the range is not in this Use & Care Guide. 16 To remove oven door 1. Close oven door until the door stops, (do not force the door to...


