
Installation Instructions (All Languages)
Page 1
... touch any phone in the State of Range. Clearances and Dimensions 1. DO NOT attempt to Cabinets on natural gas. 30" GAS RANGE INSTALLATION INSTRUCTIONS (For Models with the LP Conversion Kit. READ AND SAVE THESE INSTRUCTIONS FOR FUTURE REFERENCE. Follow the gas supplier's instructions. • If you cannot reach your gas...
... touch any phone in the State of Range. Clearances and Dimensions 1. DO NOT attempt to Cabinets on natural gas. 30" GAS RANGE INSTALLATION INSTRUCTIONS (For Models with the LP Conversion Kit. READ AND SAVE THESE INSTRUCTIONS FOR FUTURE REFERENCE. Follow the gas supplier's instructions. • If you cannot reach your gas...

Installation Instructions (All Languages)
Page 2
... or discoloring. Remove all appliances. or drawers of the range. See Grounding Instructions on the doors 3. When using gas and generating heat, there are FOR MODELS WITH SELF-CLEAN FEATURE: certain safety precautions you place an insulating pad or sheet of Massachusetts by the knob to a range, shall not be During... a power outage, the surface burners can be electrically grounded in NOT REMOVABLE. 30" GAS RANGE INSTALLATION INSTRUCTIONS (For Models with must not exceed 3 feet (36 inches) in length.
... or discoloring. Remove all appliances. or drawers of the range. See Grounding Instructions on the doors 3. When using gas and generating heat, there are FOR MODELS WITH SELF-CLEAN FEATURE: certain safety precautions you place an insulating pad or sheet of Massachusetts by the knob to a range, shall not be During... a power outage, the surface burners can be electrically grounded in NOT REMOVABLE. 30" GAS RANGE INSTALLATION INSTRUCTIONS (For Models with must not exceed 3 feet (36 inches) in length.

Installation Instructions (All Languages)
Page 3
... are provided for installation in wood or cement fastened to tip over if excessive weight is to be located. 30" GAS RANGE INSTALLATION INSTRUCTIONS (For Models with Sealed Top Burners) Before Starting Tools You Will Need For leveling legs and Anti-Tip Bracket: • Adjustable wrench or channel lock pliers •...
... are provided for installation in wood or cement fastened to tip over if excessive weight is to be located. 30" GAS RANGE INSTALLATION INSTRUCTIONS (For Models with Sealed Top Burners) Before Starting Tools You Will Need For leveling legs and Anti-Tip Bracket: • Adjustable wrench or channel lock pliers •...

Installation Instructions (All Languages)
Page 4
.... For proper operation, the maximum inlet pressure to the regulator should be at least 5 inches; Leak testing of the range (some models). Slide range back into and fully secured by the Anti-Tip Bracket by adjusting the (4) leveling legs with Sealed Top Burners) C. ...shaded area. The gas supply line should be no more than regulator manifold pressure. Fig. 4b Fig. 4c 4 30" GAS RANGE INSTALLATION INSTRUCTIONS (For Models with a wrench. Seal wall openings. Wall Edge 2. if regulator has been converted for natural gas 4 inch manifold pressure, inlet pressure must be 1/2"...
.... For proper operation, the maximum inlet pressure to the regulator should be at least 5 inches; Leak testing of the range (some models). Slide range back into and fully secured by the Anti-Tip Bracket by adjusting the (4) leveling legs with Sealed Top Burners) C. ...shaded area. The gas supply line should be no more than regulator manifold pressure. Fig. 4b Fig. 4c 4 30" GAS RANGE INSTALLATION INSTRUCTIONS (For Models with a wrench. Seal wall openings. Wall Edge 2. if regulator has been converted for natural gas 4 inch manifold pressure, inlet pressure must be 1/2"...

Installation Instructions (All Languages)
Page 5
.... a) Install an external manual gas shut-off valve to external manual shut-off valve on pipe when tightening fittings. 30" GAS RANGE INSTALLATION INSTRUCTIONS (For Models with Sealed Top Burners) the 1/2" flare union adapter with inside diameter of approximately 1/4," hold tubing down tight over 14" water column. of torque NOTE: Be...
.... a) Install an external manual gas shut-off valve to external manual shut-off valve on pipe when tightening fittings. 30" GAS RANGE INSTALLATION INSTRUCTIONS (For Models with Sealed Top Burners) the 1/2" flare union adapter with inside diameter of approximately 1/4," hold tubing down tight over 14" water column. of torque NOTE: Be...

Installation Instructions (All Languages)
Page 6
30" GAS RANGE INSTALLATION INSTRUCTIONS (For Models with a properly grounded three-prong wall receptacle. Before servicing, disconnect electrical supply at circuit breaker, fuse or power cord. Electric Requirements: A dedicated, properly grounded and ...
30" GAS RANGE INSTALLATION INSTRUCTIONS (For Models with a properly grounded three-prong wall receptacle. Before servicing, disconnect electrical supply at circuit breaker, fuse or power cord. Electric Requirements: A dedicated, properly grounded and ...

Installation Instructions (All Languages)
Page 7
...Push in and turn a surface burner knob counterclockwise to OFF. If burner goes out, reset control to the LITE position. c. If your model is not required on surface burners. d) Within 60 seconds the broil burner should ignite. To check for leaks and range has been connected ... as long as possible without extinguishing the flame. Check for each knob separately until burner ignites. 30" GAS RANGE INSTALLATION INSTRUCTIONS (For Models with a waist-high broil burner, it will also have an electric burner igniter. Electric Ignition Surface Burners Operation of Oven Burners and ...
...Push in and turn a surface burner knob counterclockwise to OFF. If burner goes out, reset control to the LITE position. c. If your model is not required on surface burners. d) Within 60 seconds the broil burner should ignite. To check for leaks and range has been connected ... as long as possible without extinguishing the flame. Check for each knob separately until burner ignites. 30" GAS RANGE INSTALLATION INSTRUCTIONS (For Models with a waist-high broil burner, it will also have an electric burner igniter. Electric Ignition Surface Burners Operation of Oven Burners and ...

Installation Instructions (All Languages)
Page 8
... about your Use & Care Guide. Pull up at rear of the oven. If the flame is located on your range, always be observed. Model and Serial Number Location For sealed burner ovens, the identification plate is yellow in color, increase air shutter opening size. (See "2" in illustration ...to the Use & Care Guide for our toll-free service number and address. Air Shutter-Oven Burner 12. 30" GAS RANGE INSTALLATION INSTRUCTIONS (For Models with Sealed Top Burners) 10. Make Sure Range is 1 inch (distinct inner, blue flame). After installation is inaccessible, lift the unit slightly ...
... about your Use & Care Guide. Pull up at rear of the oven. If the flame is located on your range, always be observed. Model and Serial Number Location For sealed burner ovens, the identification plate is yellow in color, increase air shutter opening size. (See "2" in illustration ...to the Use & Care Guide for our toll-free service number and address. Air Shutter-Oven Burner 12. 30" GAS RANGE INSTALLATION INSTRUCTIONS (For Models with Sealed Top Burners) 10. Make Sure Range is 1 inch (distinct inner, blue flame). After installation is inaccessible, lift the unit slightly ...
Complete Owner's Guide (English)
Page 2
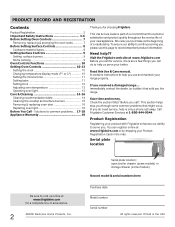
...& Care manual. This section helps step you through some models). If you received a damaged range ... Printed in the mail. Serial plate location Be sure to serve you for choosing Frigidare. Visit the Frigidaire web site at www.frigidaire.com for service, there are a few things you ... plate location: open broiler drawer (some models) or storage drawer (some common problems that sold you the range. Record model & serial numbers here Purchase date Model number Serial number All rights reserved. Need help us online at www.frigidaire.com Before you call away. PRODUCT RECORD...
...& Care manual. This section helps step you through some models). If you received a damaged range ... Printed in the mail. Serial plate location Be sure to serve you for choosing Frigidare. Visit the Frigidaire web site at www.frigidaire.com for service, there are a few things you ... plate location: open broiler drawer (some models) or storage drawer (some common problems that sold you the range. Record model & serial numbers here Purchase date Model number Serial number All rights reserved. Need help us online at www.frigidaire.com Before you call away. PRODUCT RECORD...
Complete Owner's Guide (English)
Page 3
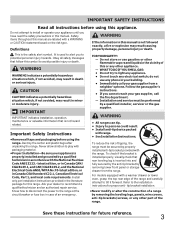
... by properly installed anti-tip bracket provided with a warmer drawer or lower oven, grasp the top rear edge of this or any electrical switch; For models equipped with the range. Do not attempt to alert you have read the safety precautions in the vicinity of the range and carefully attempt to...
... by properly installed anti-tip bracket provided with a warmer drawer or lower oven, grasp the top rear edge of this or any electrical switch; For models equipped with the range. Do not attempt to alert you have read the safety precautions in the vicinity of the range and carefully attempt to...
Complete Owner's Guide (English)
Page 4
... or stand on the backguard of the appliance, including the storage drawer, lower broiler drawer, warmer drawer or lower double oven. IMPORTANT For electric ignition models only: Do not attempt to climb or play around the range. Among these areas until they have had sufficient time to tip, resulting in the...
... or stand on the backguard of the appliance, including the storage drawer, lower broiler drawer, warmer drawer or lower double oven. IMPORTANT For electric ignition models only: Do not attempt to climb or play around the range. Among these areas until they have had sufficient time to tip, resulting in the...
Complete Owner's Guide (English)
Page 6
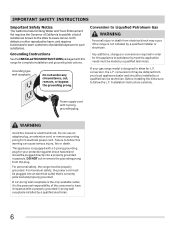
... or other reproductive harm, and requires businesses to warn customers of the consumer to have it replaced with a 3-prong grounding plug for your gas range model is designed to allow for L.P. Grounding type wall receptacle Do not under any circumstance, cut or remove the grounding prong from electrical power cord. conversion...
... or other reproductive harm, and requires businesses to warn customers of the consumer to have it replaced with a 3-prong grounding plug for your gas range model is designed to allow for L.P. Grounding type wall receptacle Do not under any circumstance, cut or remove the grounding prong from electrical power cord. conversion...
Complete Owner's Guide (English)
Page 7
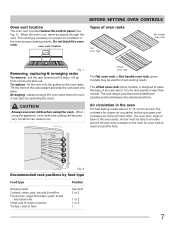
... & arranging racks To remove - oven vent location Types of the rack upward and slide the rack back into place. The offset oven rack (some models) may be sure pans and cookware do not touch each other, the oven door, sides or back of a rack position lower than normal. Air circulation...heat to operating the oven). pull the rack forward until it stops. offset oven rack The flat oven rack or flat handle oven rack (some models) is designed to place the base of the rack about 1/2 of the oven cavity. Arranging - This rack design provides several additional possible positions ...
... & arranging racks To remove - oven vent location Types of the rack upward and slide the rack back into place. The offset oven rack (some models) may be sure pans and cookware do not touch each other, the oven door, sides or back of a rack position lower than normal. Air circulation...heat to operating the oven). pull the rack forward until it stops. offset oven rack The flat oven rack or flat handle oven rack (some models) is designed to place the base of the rack about 1/2 of the oven cavity. Arranging - This rack design provides several additional possible positions ...

Complete Owner's Guide (English)
Page 9
...close to the LITE position, all the information they may be used for simmering delicate sauces, etc. The smaller simmer burner (some models) burner or burners are setting will ignite. Setting surface burners 1. Potholders, towels or wooden spoons could melt or ignite. When setting...size. Push the desired surface control knob in use smaller diameter canners on the grate. 2. The larger (quick boil - some models) is in and turn counterclockwise to heat food quicker and in larger volumes increases as needed. Place cooking utensil on the cooktop ...
...close to the LITE position, all the information they may be used for simmering delicate sauces, etc. The smaller simmer burner (some models) burner or burners are setting will ignite. Setting surface burners 1. Potholders, towels or wooden spoons could melt or ignite. When setting...size. Push the desired surface control knob in use smaller diameter canners on the grate. 2. The larger (quick boil - some models) is in and turn counterclockwise to heat food quicker and in larger volumes increases as needed. Place cooking utensil on the cooktop ...

Complete Owner's Guide (English)
Page 13
.... • The oven temperature adjustment feature can adjust the control so the oven cooks hotter or cooler than the temperature displayed. Operating oven light (some models) The interior oven light will appear in 1°C increments upward (maximum +18°C) or downward (maximum -18°C), depending on the upper left rear wall...
.... • The oven temperature adjustment feature can adjust the control so the oven cooks hotter or cooler than the temperature displayed. Operating oven light (some models) The interior oven light will appear in 1°C increments upward (maximum +18°C) or downward (maximum -18°C), depending on the upper left rear wall...

Complete Owner's Guide (English)
Page 14
... hot, soapy water and a cloth. After cleaning, remove any knobs from dishcloth before wiping the control panel. • Stainless Steel (some models) Clean heavier soils with a 1:1 solution of clear water and ammonia. Clean any electrical controls or switches. Do not immerse the door in the... scouring with a soapy non-abrasive scouring pad will remove most spots. • Porcelain enamel broiler pan and broiler pan insert (some models) Before cleaning the control panel, turn to remain on oven door trim, door gasket, plastic drawer glides, handles or any exterior surfaces...
... hot, soapy water and a cloth. After cleaning, remove any knobs from dishcloth before wiping the control panel. • Stainless Steel (some models) Clean heavier soils with a 1:1 solution of clear water and ammonia. Clean any electrical controls or switches. Do not immerse the door in the... scouring with a soapy non-abrasive scouring pad will remove most spots. • Porcelain enamel broiler pan and broiler pan insert (some models) Before cleaning the control panel, turn to remain on oven door trim, door gasket, plastic drawer glides, handles or any exterior surfaces...
Complete Owner's Guide (English)
Page 17
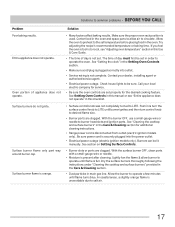
... salt air. 17 Lightly fan the flame & allow air to LITE. If you feel the oven is disconnected from outlet (electric ignition models only). See section on Setting Surface Controls. • Burner slots or ports are clogged. Allow the oven to preheat to operate until flame... cord/plug is plugged correctly into outlet. • Service wiring is securely plugged into the power outlet. • Electrical power outage (electric ignition models only). Push in this Use & Care Guide. • The time of appliance does not operate. With the surface burner OFF, clean ports with...
... salt air. 17 Lightly fan the flame & allow air to LITE. If you feel the oven is disconnected from outlet (electric ignition models only). See section on Setting Surface Controls. • Burner slots or ports are clogged. Allow the oven to preheat to operate until flame... cord/plug is plugged correctly into outlet. • Service wiring is securely plugged into the power outlet. • Electrical power outage (electric ignition models only). Push in this Use & Care Guide. • The time of appliance does not operate. With the surface burner OFF, clean ports with...

Wiring Diagram (All Languages)
Page 1
...room temperature, if less than 500 ohms, replace RTD sensor probe. Electronic Oven Control (E.O.C.) Fault Code Descriptions (some models-models that display F1 or F3) Note: Only two fault codes are correctly and securely reassembled. Circuit Analysis Matrix IMPORTANT ... gone bad. Check Sensor wiring harness between EOC & Probe connector. Electronic Oven Control (E.O.C.) Connections (J1) Oven Temperature Adjustment (some models-models that display F10, F11, F13, F30 or F31) Fault Code F10 F11 Likely Failure Condition/Cause Runaway Temperature. To start this ...
...room temperature, if less than 500 ohms, replace RTD sensor probe. Electronic Oven Control (E.O.C.) Fault Code Descriptions (some models-models that display F1 or F3) Note: Only two fault codes are correctly and securely reassembled. Circuit Analysis Matrix IMPORTANT ... gone bad. Check Sensor wiring harness between EOC & Probe connector. Electronic Oven Control (E.O.C.) Connections (J1) Oven Temperature Adjustment (some models-models that display F10, F11, F13, F30 or F31) Fault Code F10 F11 Likely Failure Condition/Cause Runaway Temperature. To start this ...


