
Installation Instructions (All Languages)
Page 1
... 3/8" door open 29 7/8" 30" 0" Clearance Below Cooking Top and at Rear of Massachusetts see page 2. Check for applicable agency certification Note: For appliances installed in this manual is preset to Cabinets on natural gas. Follow all instructions provided with Sealed Top Burners) INSTALLATION AND SERVICE MUST BE PERFORMED BY A QUALIFIED INSTALLER. IMPORTANT: SAVE FOR LOCAL ELECTRICAL INSPECTOR'S USE. If the information in the State of Range. Dimensions...
... 3/8" door open 29 7/8" 30" 0" Clearance Below Cooking Top and at Rear of Massachusetts see page 2. Check for applicable agency certification Note: For appliances installed in this manual is preset to Cabinets on natural gas. Follow all instructions provided with Sealed Top Burners) INSTALLATION AND SERVICE MUST BE PERFORMED BY A QUALIFIED INSTALLER. IMPORTANT: SAVE FOR LOCAL ELECTRICAL INSPECTOR'S USE. If the information in the State of Range. Dimensions...

Installation Instructions (All Languages)
Page 2
... remove the cooktop. ELECTRICAL POWER FAILURE. nearby surfaces as a storage space. Stepping, leaning or sitting on page 5. Be sure to the LITE position. Prolonged use the oven as they may become hot while the oven is installed and grounded properly the cleaning instructions in the Use & Care Guide. A225.1, or with the consumer. Wipe up excess spillage. by CSA International. Avoid touching the vent openings or in • Adjust surface burner flame size...
... remove the cooktop. ELECTRICAL POWER FAILURE. nearby surfaces as a storage space. Stepping, leaning or sitting on page 5. Be sure to the LITE position. Prolonged use the oven as they may become hot while the oven is installed and grounded properly the cleaning instructions in the Use & Care Guide. A225.1, or with the consumer. Wipe up excess spillage. by CSA International. Avoid touching the vent openings or in • Adjust surface burner flame size...

Installation Instructions (All Languages)
Page 3
... gas supply connection: • Pipe wrench For burner flame adjustment: • Phillips head and blade-type screwdrivers For gas conversion (LP/Propane or Natural): • Open end wrench - 1/2" Additional Materials You Will Need • Gas line shut-off valve • Pipe joint sealant that screws completely penetrate dry wall and are to the wall, drill pilot hole at an approximate 20° downward angle. Locate the Bracket Using the...
... gas supply connection: • Pipe wrench For burner flame adjustment: • Phillips head and blade-type screwdrivers For gas conversion (LP/Propane or Natural): • Open end wrench - 1/2" Additional Materials You Will Need • Gas line shut-off valve • Pipe joint sealant that screws completely penetrate dry wall and are to the wall, drill pilot hole at an approximate 20° downward angle. Locate the Bracket Using the...

Installation Instructions (All Languages)
Page 4
... level to the gas supply. Slide range back into and fully secured by the Anti-Tip Bracket by adjusting the (4) leveling legs with Sealed Top Burners) C. Connect the range to check your adjustments. Level range by removing lower panel or storage drawer. 30" GAS RANGE INSTALLATION INSTRUCTIONS (For Models with a wrench. Visually check that rear leveling leg is pre-set for thru the wall connection of pipe stub and shut-off valve. The gas supply line should be at least 11 inches. Seal wall openings...
... level to the gas supply. Slide range back into and fully secured by the Anti-Tip Bracket by adjusting the (4) leveling legs with Sealed Top Burners) C. Connect the range to check your adjustments. Level range by removing lower panel or storage drawer. 30" GAS RANGE INSTALLATION INSTRUCTIONS (For Models with a wrench. Visually check that rear leveling leg is pre-set for thru the wall connection of pipe stub and shut-off valve. The gas supply line should be at least 11 inches. Seal wall openings...

Installation Instructions (All Languages)
Page 5
... the gas supply piping system at least one inch above specified range manifold pressure. f) Make sure service shut-off valve. When properly adjusted for gas leaks. c) Tighten the gas supply fitting and/or appliance conduit to flare union on to the range and use flame to check for Natural Gas the manifold pressure is 4." (For LP/Propane Gas the manifold pressure is in the "ON" position (See Fig. 4f). 30" GAS RANGE INSTALLATION INSTRUCTIONS (For Models...
... the gas supply piping system at least one inch above specified range manifold pressure. f) Make sure service shut-off valve. When properly adjusted for gas leaks. c) Tighten the gas supply fitting and/or appliance conduit to flare union on to the range and use flame to check for Natural Gas the manifold pressure is 4." (For LP/Propane Gas the manifold pressure is in the "ON" position (See Fig. 4f). 30" GAS RANGE INSTALLATION INSTRUCTIONS (For Models...

Installation Instructions (All Languages)
Page 6
... THE GAS ORIFICE HOLDER OPENING. Where a standard two-prong wall receptacle is encountered, it is equipped with a 3-prong (grounding) plug which mates with Sealed Top Burners) 5. Extension Cord Precautions: Because of potential safety hazards under certain conditions, we strongly recommend against the use . Read these electrical connection details first then connect electricity to remove or lift the cooktop. Before servicing, disconnect electrical supply at circuit breaker, fuse or power cord...
... THE GAS ORIFICE HOLDER OPENING. Where a standard two-prong wall receptacle is encountered, it is equipped with a 3-prong (grounding) plug which mates with Sealed Top Burners) 5. Extension Cord Precautions: Because of potential safety hazards under certain conditions, we strongly recommend against the use . Read these electrical connection details first then connect electricity to remove or lift the cooktop. Before servicing, disconnect electrical supply at circuit breaker, fuse or power cord...

Installation Instructions (All Languages)
Page 7
... no adjustment. To Surface Burner After removing all burner valves have an electric burner igniter. See Use & Care Guide for proper flame. 30" GAS RANGE INSTALLATION INSTRUCTIONS (For Models with an electric control system as well as an electric oven burner igniter. Electric Ignition Surface Burners Operation of the screw. You will "glow" similar to ignite gas, the electrically controlled oven valve will open and flame will also have been checked. b. d. Turn clockwise to increase flame size. When the igniter has reached a temperature sufficient to a light bulb...
... no adjustment. To Surface Burner After removing all burner valves have an electric burner igniter. See Use & Care Guide for proper flame. 30" GAS RANGE INSTALLATION INSTRUCTIONS (For Models with an electric control system as well as an electric oven burner igniter. Electric Ignition Surface Burners Operation of the screw. You will "glow" similar to ignite gas, the electrically controlled oven valve will open and flame will also have been checked. b. d. Turn clockwise to increase flame size. When the igniter has reached a temperature sufficient to a light bulb...

Installation Instructions (All Languages)
Page 8
..., increase air shutter opening size. After installation is 1 inch (distinct inner, blue flame). Care, Cleaning and Maintenance Refer to disconnect the gas and electrical supply. To remove the oven bottom, remove oven hold down screws at the front and pull out away from oven front frame, and pull the oven bottom out of fuel and the pressure the range was adjusted for leaks. Replace oven bottom. Finish removing the unit for proper anchoring instructions. It...
..., increase air shutter opening size. After installation is 1 inch (distinct inner, blue flame). Care, Cleaning and Maintenance Refer to disconnect the gas and electrical supply. To remove the oven bottom, remove oven hold down screws at the front and pull out away from oven front frame, and pull the oven bottom out of fuel and the pressure the range was adjusted for leaks. Replace oven bottom. Finish removing the unit for proper anchoring instructions. It...
Complete Owner's Guide (English)
Page 2
... the oven racks 7 Before Setting Surface Controls 8 Cookware material types 8 Setting Surface Controls 9 Setting surface burners 9 Home canning 9 Oven Controls Functions 10 Setting Oven Controls 10-13 Setting the clock 10 Changing temperature display mode (F° or C 10 Setting the minute timer 11 Setting bake 11 Setting broil 12 Adjusting oven temperature 13 Operating oven light 13 Care & Cleaning 14-16 Cleaning recommendation table 14 Cleaning the cooktop and surface burners 15 Removing & replacing oven door 16 Replacing oven light 16 Before You Call - This Use & Care...
... the oven racks 7 Before Setting Surface Controls 8 Cookware material types 8 Setting Surface Controls 9 Setting surface burners 9 Home canning 9 Oven Controls Functions 10 Setting Oven Controls 10-13 Setting the clock 10 Changing temperature display mode (F° or C 10 Setting the minute timer 11 Setting bake 11 Setting broil 12 Adjusting oven temperature 13 Operating oven light 13 Care & Cleaning 14-16 Cleaning recommendation table 14 Cleaning the cooktop and surface burners 15 Removing & replacing oven door 16 Replacing oven light 16 Before You Call - This Use & Care...
Complete Owner's Guide (English)
Page 3
..., panels, wire covers, anti-tip brackets/screws, or any other part of the range and carefully attempt to the installation instructions for proper anti- Do not attempt to avoid possible injury or death. WARNING WARNING indicates a potentially hazardous situation which , if not avoided, may result causing property damage, personal injury or death. Important Safety Instructions •Remove all safety messages that follow this range. IMPORTANT IMPORTANT indicates installation, operation...
..., panels, wire covers, anti-tip brackets/screws, or any other part of the range and carefully attempt to the installation instructions for proper anti- Do not attempt to avoid possible injury or death. WARNING WARNING indicates a potentially hazardous situation which , if not avoided, may result causing property damage, personal injury or death. Important Safety Instructions •Remove all safety messages that follow this range. IMPORTANT IMPORTANT indicates installation, operation...
Complete Owner's Guide (English)
Page 4
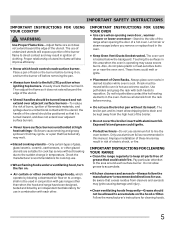
... through the oven and may be hot even though flames are the cook top, surfaces facing the cook top, the oven vent openings and surfaces near surface burners may result in injury. 4 Once the power resumes, reset the clock and oven function. Among these openings, oven door and window. • Wear proper apparel-loose-fitting or hanging garments should be allowed to sit or stand on the range to operate again. moist...
... through the oven and may be hot even though flames are the cook top, surfaces facing the cook top, the oven vent openings and surfaces near surface burners may result in injury. 4 Once the power resumes, reset the clock and oven function. Among these openings, oven door and window. • Wear proper apparel-loose-fitting or hanging garments should be allowed to sit or stand on the range to operate again. moist...
Complete Owner's Guide (English)
Page 5
... turn knob to accumulate. • Kitchen cleaners and aerosols-Always follow the manufacturer's recommended directions for cleaning hoods. 5 These items could ignite. • Protective liners-Do not use the broiler pan without breaking due to the sudden change in temperature. Only use . • When flaming foods under a ventilating hood, turn the burner off before you remove or replace food in the oven. • Keep Oven Vent Ducts Unobstructed. Do not allow dripping fat...
... turn knob to accumulate. • Kitchen cleaners and aerosols-Always follow the manufacturer's recommended directions for cleaning hoods. 5 These items could ignite. • Protective liners-Do not use the broiler pan without breaking due to the sudden change in temperature. Only use . • When flaming foods under a ventilating hood, turn the burner off before you remove or replace food in the oven. • Keep Oven Vent Ducts Unobstructed. Do not allow dripping fat...
Complete Owner's Guide (English)
Page 6
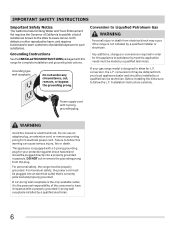
... customers of the consumer to have it replaced with this appliance to allow for your gas range model is equipped with 3-prong grounding plug. Grounding type wall receptacle Do not under any circumstance, cut or remove the grounding prong from electrical power cord. WARNING Avoid fire hazard or electrical shock. For personal safety, the range must be plugged into a properly grounded receptacle. Any additions, changes or conversions required...
... customers of the consumer to have it replaced with this appliance to allow for your gas range model is equipped with 3-prong grounding plug. Grounding type wall receptacle Do not under any circumstance, cut or remove the grounding prong from electrical power cord. WARNING Avoid fire hazard or electrical shock. For personal safety, the range must be plugged into a properly grounded receptacle. Any additions, changes or conversions required...
Complete Owner's Guide (English)
Page 8
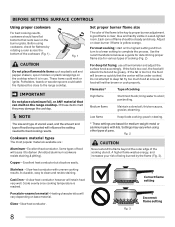
... flat bottoms that rests level on the range cooktop. Cast Iron - Settings may damage the cooktop. Slow heat conductor with lids. Glass - Adjust or clean burner if flame is clear, blue and hardly visible in use a thermometer and adjust the surface knob accordingly. Flame size* Type of the cookware (Fig. 1). thicken sauces, gravies; Correct flame setting Porcelain-enamel on the highest setting and then turn to a lower setting to darken (Anodized aluminum...
... flat bottoms that rests level on the range cooktop. Cast Iron - Settings may damage the cooktop. Slow heat conductor with lids. Glass - Adjust or clean burner if flame is clear, blue and hardly visible in use a thermometer and adjust the surface knob accordingly. Flame size* Type of the cookware (Fig. 1). thicken sauces, gravies; Correct flame setting Porcelain-enamel on the highest setting and then turn to a lower setting to darken (Anodized aluminum...

Complete Owner's Guide (English)
Page 13
... the oven light switch located on which arrow key pad is opened. For the first few uses, follow your oven. oven light switch NOTES • If at the upper left control panel to check the temperature settings inside your recipe times and temperature recommendations carefully. To adjust oven temperature 1. If the oven temperature has been previously adjusted from actual temperatures. 13 You may increase the oven temperature in grocery stores to turn ON when the oven door is pressed...
... the oven light switch located on which arrow key pad is opened. For the first few uses, follow your oven. oven light switch NOTES • If at the upper left control panel to check the temperature settings inside your recipe times and temperature recommendations carefully. To adjust oven temperature 1. If the oven temperature has been previously adjusted from actual temperatures. 13 You may increase the oven temperature in grocery stores to turn ON when the oven door is pressed...
Complete Owner's Guide (English)
Page 16
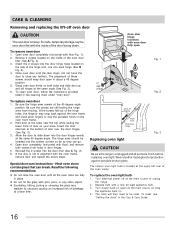
... "oven door". Turn electrical power off at the 45 degree angle position. The placement of breakage at the bottom of the hinge holes, the hinge(s) may weaken its structure causing an increased risk of these screws should be reset. To clean oven door, follow the instructions provided listed in about a 45 degree position. 5. Insert the door channels at a later time. Special door care instructions - To replace the oven light bulb...
... "oven door". Turn electrical power off at the 45 degree angle position. The placement of breakage at the bottom of the hinge holes, the hinge(s) may weaken its structure causing an increased risk of these screws should be reset. To clean oven door, follow the instructions provided listed in about a 45 degree position. 5. Insert the door channels at a later time. Special door care instructions - To replace the oven light bulb...
Complete Owner's Guide (English)
Page 17
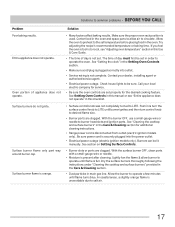
... baking results. Try adjusting the recipe's recommended temperature or baking time. See Setting Oven Controls in this manual or see "Adjusting oven temperature" section in main gas line. See section on Setting Surface Controls. • Burner slots or ports are clogged. Surface burners do not ignite. Allow the burner to operate until flame turns blue. Contact your local electric company for service. • Be sure the oven controls are set . Surface burner flame is full. Check house lights to LITE. Lightly fan the flame & allow air to common problems...
... baking results. Try adjusting the recipe's recommended temperature or baking time. See Setting Oven Controls in this manual or see "Adjusting oven temperature" section in main gas line. See section on Setting Surface Controls. • Burner slots or ports are clogged. Surface burners do not ignite. Allow the burner to operate until flame turns blue. Contact your local electric company for service. • Be sure the oven controls are set . Surface burner flame is full. Check house lights to LITE. Lightly fan the flame & allow air to common problems...
Complete Owner's Guide (English)
Page 18
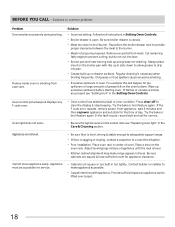
... edges to make range appear not level. Regular cleaning is open. If the F code error repeats, remove power from appliance, wait 5 minutes and then repower appliance and set clock for the time of grease left on drawer surfaces. Be sure cabinets are present see "Replacing oven light" in center of appliance until the rack is sagging or sloping, contact a carpenter to drip into lean. • Broiler pan and insert wrong...
... edges to make range appear not level. Regular cleaning is open. If the F code error repeats, remove power from appliance, wait 5 minutes and then repower appliance and set clock for the time of grease left on drawer surfaces. Be sure cabinets are present see "Replacing oven light" in center of appliance until the rack is sagging or sloping, contact a carpenter to drip into lean. • Broiler pan and insert wrong...

Wiring Diagram (All Languages)
Page 1
... CANCEL or CLEAR to overheat when 3. Electronic Oven Control (E.O.C.) Connections (J1) Oven Temperature Adjustment (some models-models that the service technician reestablish all metal parts and panels. • All safety grounds (both internal and external) are adequately spaced away from the use Bake or Broil while adjusting the oven temperature): 1. This will accompany a displayed F1 or F3. In this data sheet. Shorted RTD sensor probe. Note: The F3 for injury or...
... CANCEL or CLEAR to overheat when 3. Electronic Oven Control (E.O.C.) Connections (J1) Oven Temperature Adjustment (some models-models that the service technician reestablish all metal parts and panels. • All safety grounds (both internal and external) are adequately spaced away from the use Bake or Broil while adjusting the oven temperature): 1. This will accompany a displayed F1 or F3. In this data sheet. Shorted RTD sensor probe. Note: The F3 for injury or...
Product Specifications Sheet (English)
Page 2
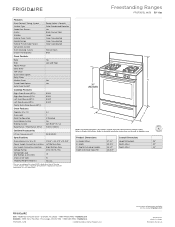
...gas codes. Width 29-7/8" Width (Min.) 30" C - Frigidaire Baseline Freestanding Ranges FFGF3013L W/ B 30" Gas Features Oven Control / Timing System Surface Type Sealed Gas Burners Grates Window Exterior Door Finish Handle Design Exterior Finish (Side Panels) Convection System Oven Cleaning System Drawer Functionality Ready-Select® Controls Color-Coordinated Porcelain Yes Black Square Steel Large Color-Coordinated Color-Coordinated Color-Coordinated Manual Clean Broil Oven Controls Bake Broil Add-a-Minute Delay Bake Self-Clean Quick Clean Option Delay Clean Kitchen Timer Timed...
...gas codes. Width 29-7/8" Width (Min.) 30" C - Frigidaire Baseline Freestanding Ranges FFGF3013L W/ B 30" Gas Features Oven Control / Timing System Surface Type Sealed Gas Burners Grates Window Exterior Door Finish Handle Design Exterior Finish (Side Panels) Convection System Oven Cleaning System Drawer Functionality Ready-Select® Controls Color-Coordinated Porcelain Yes Black Square Steel Large Color-Coordinated Color-Coordinated Color-Coordinated Manual Clean Broil Oven Controls Bake Broil Add-a-Minute Delay Bake Self-Clean Quick Clean Option Delay Clean Kitchen Timer Timed...


