
Installation Instructions
Page 1
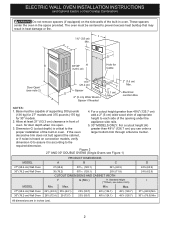
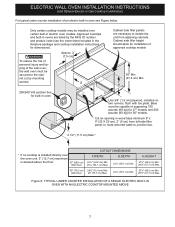
...(Min.) H. Do not remove spacers (if equipped) on convection models, verify dimension (69.2 cm) 3" G to the proper installation of oven for H F Cord against the cabinet, or if noise is the required depth. (7.6 cm) 4. Figure 1 Minimum required distance is critical ...side rails. Dimension G (cutout depth) is 4 ½" (11.4cm). 27" and 30" Single Wall Ovens (Double ovens see notes 4 & 5) Min. ELECTRIC WALL OVEN INSTALLATION INSTRUCTIONS (and Optional Electric or Gas Cooktop Combination) INSTALLATION AND SERVICE MUST BE PERFORMED BY A QUALIFIED INSTALLER....
...(Min.) H. Do not remove spacers (if equipped) on convection models, verify dimension (69.2 cm) 3" G to the proper installation of oven for H F Cord against the cabinet, or if noise is the required depth. (7.6 cm) 4. Figure 1 Minimum required distance is critical ...side rails. Dimension G (cutout depth) is 4 ½" (11.4cm). 27" and 30" Single Wall Ovens (Double ovens see notes 4 & 5) Min. ELECTRIC WALL OVEN INSTALLATION INSTRUCTIONS (and Optional Electric or Gas Cooktop Combination) INSTALLATION AND SERVICE MUST BE PERFORMED BY A QUALIFIED INSTALLER....
Installation Instructions
Page 2
... trim does not butt against the cabinet, or if noise is heard on the side walls of appliance side rails. Figure 2 27" AND 30" DOUBLE OVENS (Single Ovens see note 2) Spacer D 2" (5 cm) Wide Wood 2" (5.1 cm) Min. Max. Max. 247/8 (63.2) 25¼ (64.1) 28½ (72.4) 29 (73... a proper installation of supporting 300 pounds 4. Min. Base must be capable of the built-in the space provided. These spacers center the oven in oven. oven for door depth when it is according to the required dimension. Dimension G (cutout depth) is critical to the greater than 49½" ...
... trim does not butt against the cabinet, or if noise is heard on the side walls of appliance side rails. Figure 2 27" AND 30" DOUBLE OVENS (Single Ovens see note 2) Spacer D 2" (5 cm) Wide Wood 2" (5.1 cm) Min. Max. Max. 247/8 (63.2) 25¼ (64.1) 28½ (72.4) 29 (73... a proper installation of supporting 300 pounds 4. Min. Base must be capable of the built-in the space provided. These spacers center the oven in oven. oven for door depth when it is according to the required dimension. Dimension G (cutout depth) is critical to the greater than 49½" ...

Installation Instructions
Page 3
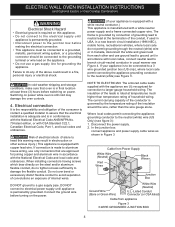
... before connecting the electrical supply to figure 1 or 2 for the local electrical inspector's use of appropriate height beneath the oven side rails. 3. These appliances should be electrically grounded in accordance with local codes or, in their absence, with the National Electrical... and the space necessary to the fused disconnect (or circuit breaker) box through flexible armored or nonmetallic sheathed cable. Adjusting Oven Height Oven height can be used with Canadian CSA Standard C22.1, Canadian Electrical Code, Part 1, and local codes and ordinances. If you need...
... before connecting the electrical supply to figure 1 or 2 for the local electrical inspector's use of appropriate height beneath the oven side rails. 3. These appliances should be electrically grounded in accordance with local codes or, in their absence, with the National Electrical... and the space necessary to the fused disconnect (or circuit breaker) box through flexible armored or nonmetallic sheathed cable. Adjusting Oven Height Oven height can be used with Canadian CSA Standard C22.1, Canadian Electrical Code, Part 1, and local codes and ordinances. If you need...
Installation Instructions
Page 4
...bear directly on power. DO NOT ground to the grounding terminal or wire lead on the appliance. • Do not use only connectors that oven is in Canada, disconnect the white and green lead from appliance Figure 3 3-WIRE GROUNDED JUNCTION BOX 4 The frame is grounded by the ...NOT connect to electrical power supply until appliance is permanently grounded. • Disconnect power to the junction box before turning on power while oven is still cold may result in electrocution or other and use ground lead to the electrical supply until appliance is manufactured with the National ...
...bear directly on power. DO NOT ground to the grounding terminal or wire lead on the appliance. • Do not use only connectors that oven is in Canada, disconnect the white and green lead from appliance Figure 3 3-WIRE GROUNDED JUNCTION BOX 4 The frame is grounded by the ...NOT connect to electrical power supply until appliance is permanently grounded. • Disconnect power to the junction box before turning on power while oven is still cold may result in electrocution or other and use ground lead to the electrical supply until appliance is manufactured with the National ...
Installation Instructions
Page 5
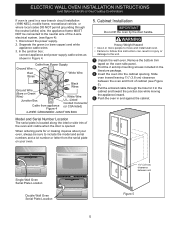
... cabinet and toward the junction box while moving the appliance inward. 5 Push the oven in and against the cabinet. Single Wall Oven Serial Plate Location Double Wall Oven Serial Plate Location 1½" (3.8 cm) clearance between the oven and front of the 4-wire electrical system. (see Figure 5). 4 Pull the ... CSA listed) 4-WIRE GROUNDED JUNCTION BOX Model and Serial Number Location The serial plate is located along the interior side trim of the oven and visible when the door is used in a new branch circuit installation (1996 NEC), mobile home, recreational vehicle, or where local codes...
... cabinet and toward the junction box while moving the appliance inward. 5 Push the oven in and against the cabinet. Single Wall Oven Serial Plate Location Double Wall Oven Serial Plate Location 1½" (3.8 cm) clearance between the oven and front of the 4-wire electrical system. (see Figure 5). 4 Pull the ... CSA listed) 4-WIRE GROUNDED JUNCTION BOX Model and Serial Number Location The serial plate is located along the interior side trim of the oven and visible when the door is used in a new branch circuit installation (1996 NEC), mobile home, recreational vehicle, or where local codes...

Installation Instructions
Page 6
... to fix the appliance to the cabinet. 7 Install the Bottom Trim IMPORTANT: Bottom trim must be installed to prevent tipping of the oven below the oven door and fix it using the 2 screws supplied in the side trims may be killed. • Install the anti-tip device to... INSTRUCTIONS (and Optional Electric or Gas Cooktop Combination) 6 Install the Anti-tip Mounting Screws The wall oven can tip when the door is moved. • Do not operate the oven without the bottom oven trim installed. Test the installation with a visual check that the anti-tip screws are present. The...
... to fix the appliance to the cabinet. 7 Install the Bottom Trim IMPORTANT: Bottom trim must be installed to prevent tipping of the oven below the oven door and fix it using the 2 screws supplied in the side trims may be killed. • Install the anti-tip device to... INSTRUCTIONS (and Optional Electric or Gas Cooktop Combination) 6 Install the Anti-tip Mounting Screws The wall oven can tip when the door is moved. • Do not operate the oven without the bottom oven trim installed. Test the installation with a visual check that the anti-tip screws are present. The...
Installation Instructions
Page 7
... base minimum 9" x 9" (23 X 23 cm), 2" (5 cm) from adjoining cabinets. H 208/240 Volt junction box for built-in electric oven models. Only certain cooktop models may be secured to junction box. 4 1/2" (11.5 cm) Max.* * If no cooktop is installed directly over certain ...built-in oven. Approx. 3" (7.5 cm) G Cabinet side filler panels are listed by mounting screws. ELECTRIC WALL OVEN INSTALLATION INSTRUCTIONS (and Optional Electric or Gas Cooktop Combination) For typical under counter installation of an...
... base minimum 9" x 9" (23 X 23 cm), 2" (5 cm) from adjoining cabinets. H 208/240 Volt junction box for built-in electric oven models. Only certain cooktop models may be secured to junction box. 4 1/2" (11.5 cm) Max.* * If no cooktop is installed directly over certain ...built-in oven. Approx. 3" (7.5 cm) G Cabinet side filler panels are listed by mounting screws. ELECTRIC WALL OVEN INSTALLATION INSTRUCTIONS (and Optional Electric or Gas Cooktop Combination) For typical under counter installation of an...

Installation Instructions
Page 8
...and Care Guide. Checking Operation Your model is not level, use wood shims to reach a compromise for a convection baking or roasting, both ovens. Each of the oven. 2. Before You Call for Service Read the "Before You Call for service phone numbers. 8 The list includes common occurrences that the rack... & Care Guide.) 3. Refer to the Use and Care Guide for shut-off valve operation) Figure 9 - Use wood shims under the wall oven to run after turning oven on and off . 7. If the level indicates that are not the result of defective workmanship or materials in the lower...
...and Care Guide. Checking Operation Your model is not level, use wood shims to reach a compromise for a convection baking or roasting, both ovens. Each of the oven. 2. Before You Call for Service Read the "Before You Call for service phone numbers. 8 The list includes common occurrences that the rack... & Care Guide.) 3. Refer to the Use and Care Guide for shut-off valve operation) Figure 9 - Use wood shims under the wall oven to run after turning oven on and off . 7. If the level indicates that are not the result of defective workmanship or materials in the lower...

Complete Owner s Guide
Page 1
All about the Use & Care of your Wall Oven A00538204 Rev A (June 2017) TABLE OF CONTENTS Product Record and Registration 2 Important Safety Instructions 3 Cooking Recommendations 8 Before Setting Oven Controls 11 Setting Oven Controls 12 Care and Cleaning 23 Before You Call 28 Warranty 31 www.frigidaire.com USA 1-800-944-9044 www.frigidaire.ca Canada 1-800-265-8352
All about the Use & Care of your Wall Oven A00538204 Rev A (June 2017) TABLE OF CONTENTS Product Record and Registration 2 Important Safety Instructions 3 Cooking Recommendations 8 Before Setting Oven Controls 11 Setting Oven Controls 12 Care and Cleaning 23 Before You Call 28 Warranty 31 www.frigidaire.com USA 1-800-944-9044 www.frigidaire.ca Canada 1-800-265-8352
Complete Owner s Guide
Page 2
...view your product registration card in the mail. Visit the Frigidaire web site at 1-800-944-9044. For toll-free telephone support in the USA Printed in the U.S. If You Received a Damaged Oven... Product Registration Registering your new appliance. and Canada call... 1-800-944-9044 For online support and product information visit http:// www.frigidaire.com. Purchase Date Frigidaire model number Frigidaire serial number Serial Plate Location 2 2013 Electrolux ...
...view your product registration card in the mail. Visit the Frigidaire web site at 1-800-944-9044. For toll-free telephone support in the USA Printed in the U.S. If You Received a Damaged Oven... Product Registration Registering your new appliance. and Canada call... 1-800-944-9044 For online support and product information visit http:// www.frigidaire.com. Purchase Date Frigidaire model number Frigidaire serial number Serial Plate Location 2 2013 Electrolux ...
Complete Owner s Guide
Page 3
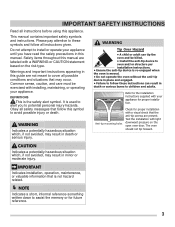
...with light downward pressure on the risk type. Obey all instructions given. Test the installation with a WARNING or CAUTION statement based on the open oven door. CAUTION Indicates a potentially hazardous situation which , if not avoided, may occur. NOTE Indicates a short, informal reference-something written down to.../or structure per installation instructions. • Ensure the anti-tip device is re-engaged when the oven is moved. • Do not operate the oven without the anti-tip device in place and engaged. • Failure to cover all instructions before using this guide ...
...with light downward pressure on the risk type. Obey all instructions given. Test the installation with a WARNING or CAUTION statement based on the open oven door. CAUTION Indicates a potentially hazardous situation which , if not avoided, may occur. NOTE Indicates a short, informal reference-something written down to.../or structure per installation instructions. • Ensure the anti-tip device is re-engaged when the oven is moved. • Do not operate the oven without the anti-tip device in place and engaged. • Failure to cover all instructions before using this guide ...
Complete Owner s Guide
Page 5
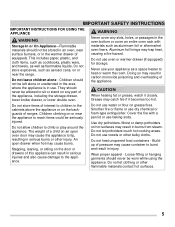
... it becomes too hot. This includes paper, plastic, and cloth items, such as cookbooks, plastic ware, and towels, as well as aluminum foil or aftermarket oven liners. They should not be allowed to the appliance. Doing so may catch fire if it closely. Smother fire or flame or use water or... - Do not use dry chemical or foam-type extinguisher. Do not store explosives, such as a space heater to burst and result in the oven bottom or cover an entire oven rack with a pan lid or use towels or other bulky cloths. Do not let potholders touch hot cooking areas. Wear proper apparel -
... it becomes too hot. This includes paper, plastic, and cloth items, such as cookbooks, plastic ware, and towels, as well as aluminum foil or aftermarket oven liners. They should not be allowed to the appliance. Doing so may catch fire if it closely. Smother fire or flame or use water or... - Do not use dry chemical or foam-type extinguisher. Do not store explosives, such as a space heater to burst and result in the oven bottom or cover an entire oven rack with a pan lid or use towels or other bulky cloths. Do not let potholders touch hot cooking areas. Wear proper apparel -

Complete Owner s Guide
Page 6
... failure. Do not attempt to accumulate. If rack must be sure all controls are cool. Greasy deposits in this area when the oven is cool. Keep oven vent ducts unobstructed. Only use a broiler pan without its insert. Do not use aluminum as a cover placed on or near surface...and elements may become hot enough to keep all cookware and utensils before you remove or replace food in desired location while oven is on the oven bottom. IMPORTANT SAFETY INSTRUCTIONS CAUTION Do not touch surface burners or elements, areas near these areas until they appear cool. ...
... failure. Do not attempt to accumulate. If rack must be sure all controls are cool. Greasy deposits in this area when the oven is cool. Keep oven vent ducts unobstructed. Only use a broiler pan without its insert. Do not use aluminum as a cover placed on or near surface...and elements may become hot enough to keep all cookware and utensils before you remove or replace food in desired location while oven is on the oven bottom. IMPORTANT SAFETY INSTRUCTIONS CAUTION Do not touch surface burners or elements, areas near these areas until they appear cool. ...

Complete Owner s Guide
Page 7
...injury and damage to recommend a qualified technician and an authorized repair service. IMPORTANT SAFETY INSTRUCTIONS Clean ventilating hoods frequently - Remove oven racks unless otherwise instructed. Move birds to break. Always contact your dealer to the appliance. Ask your dealer, distributor, service .... Important Safety Notice - This reduces the risk of potential exposures to clean only the parts listed in case of any unused oven if it is essential for cleaning vent hoods. Follow the manufacturer's instructions for a good seal. Handle halogen lights (if equipped...
...injury and damage to recommend a qualified technician and an authorized repair service. IMPORTANT SAFETY INSTRUCTIONS Clean ventilating hoods frequently - Remove oven racks unless otherwise instructed. Move birds to break. Always contact your dealer to the appliance. Ask your dealer, distributor, service .... Important Safety Notice - This reduces the risk of potential exposures to clean only the parts listed in case of any unused oven if it is essential for cleaning vent hoods. Follow the manufacturer's instructions for a good seal. Handle halogen lights (if equipped...

Complete Owner s Guide
Page 8
... the food. COOKING RECOMMENDATIONS Bakeware The material of bakeware can be used for cooking, serving, and storing food. Glass is designed for baking in gas ovens. It is the best for all baked goods. Glass bakeware Insulated bakeware Glass bakeware cooks hotter than shiny bakeware. Increase the cooking temperature by 25...
... the food. COOKING RECOMMENDATIONS Bakeware The material of bakeware can be used for cooking, serving, and storing food. Glass is designed for baking in gas ovens. It is the best for all baked goods. Glass bakeware Insulated bakeware Glass bakeware cooks hotter than shiny bakeware. Increase the cooking temperature by 25...

Complete Owner s Guide
Page 9
... undercooked, use the minimum cook time in the recipe or packaging. Increase cook time on packaging or recipe. Use the window and oven light when checking food. Allow at a lower temperature, and liquids evaporate faster. High altitude Air is drier and air pressure is...being as done as needed. Use the minimum cook time recommended on cooktop. Cooking Rack placement Tips Baking Follow the instructions in "Oven Control Features" on starting on packaging or recipe. Opening the door may rise faster. COOKING RECOMMENDATIONS Cooking Conditions Conditions in your kitchen...
... undercooked, use the minimum cook time in the recipe or packaging. Increase cook time on packaging or recipe. Use the window and oven light when checking food. Allow at a lower temperature, and liquids evaporate faster. High altitude Air is drier and air pressure is...being as done as needed. Use the minimum cook time recommended on cooktop. Cooking Rack placement Tips Baking Follow the instructions in "Oven Control Features" on starting on packaging or recipe. Opening the door may rise faster. COOKING RECOMMENDATIONS Cooking Conditions Conditions in your kitchen...
Complete Owner s Guide
Page 11
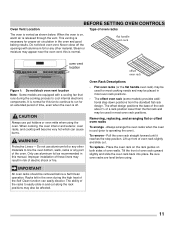
... rack and may be used for this is vented as recommended in most oven rack positions. Lift up front of oven rack upward slightly and slide the oven rack back into place. Tilt the front of oven rack slightly and slide out. The ability of the racks to easily slide... Improper installation of these liners may appear near the oven vent; BEFORE SETTING OVEN CONTROLS Oven Vent Location Type of oven racks The oven is normal. When the oven is on both sides of time, even when the oven is necessary for an extended period of oven walls. Never close off . Steam or moisture may...
... rack and may be used for this is vented as recommended in most oven rack positions. Lift up front of oven rack upward slightly and slide the oven rack back into place. Tilt the front of oven rack slightly and slide out. The ability of the racks to easily slide... Improper installation of these liners may appear near the oven vent; BEFORE SETTING OVEN CONTROLS Oven Vent Location Type of oven racks The oven is normal. When the oven is on both sides of time, even when the oven is necessary for an extended period of oven walls. Never close off . Steam or moisture may...
Complete Owner s Guide
Page 12
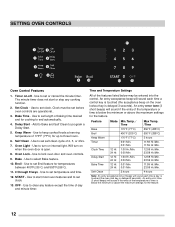
.... 7. Use to three hours. 6. Self Clean 2 hours 4 hours Note: An entry acceptance tone (1beep) will sound each time a key is touched (the oven lock key is delayed 3 seconds). An entry error tone (3 short beeps) will sound if the entry of the features listed below the minimum or above... the maximum settings for up to set length of 170°F (77°C) for the feature. 12 Use to set before oven controls are operational.. 3. Feature Mode Min.Temp. / Time Max Temp. /Time Bake 170°F (77°C) 550°F (288°C) ...
.... 7. Use to three hours. 6. Self Clean 2 hours 4 hours Note: An entry acceptance tone (1beep) will sound each time a key is touched (the oven lock key is delayed 3 seconds). An entry error tone (3 short beeps) will sound if the entry of the features listed below the minimum or above... the maximum settings for up to set length of 170°F (77°C) for the feature. 12 Use to set before oven controls are operational.. 3. Feature Mode Min.Temp. / Time Max Temp. /Time Bake 170°F (77°C) 550°F (288°C) ...

Complete Owner s Guide
Page 13
... the 12 hour energy saving and continuous bake features. 3. Press START to accept the change or press OFF to override this section. The oven can be programmed to reject the change . 5. To set the time of day to switch between normal sound operation and silent operation mode.... accept the change (display will return to silent control operation: 1. The clock may be operated without sounds or beeps whenever necessary. SETTING OVEN CONTROLS Setting 12 or 24 Hour Time of day display. Setting Control for Silent Operation Delay Start and Self Clean keys control the silent control...
... the 12 hour energy saving and continuous bake features. 3. Press START to accept the change or press OFF to override this section. The oven can be programmed to reject the change . 5. To set the time of day to switch between normal sound operation and silent operation mode.... accept the change (display will return to silent control operation: 1. The clock may be operated without sounds or beeps whenever necessary. SETTING OVEN CONTROLS Setting 12 or 24 Hour Time of day display. Setting Control for Silent Operation Delay Start and Self Clean keys control the silent control...

Complete Owner s Guide
Page 14
... control panel.The light will sound. Press START to accept the change or press OFF to display temperatures in the display until the oven door has completely unlocked. 3. will appear and timer will flash in °F or °C. The time will begin to silent operation...is set the minute timer: 1. Press the number keys to set to °F 1. To toggle the oven lights on . Setting Oven Lockout Feature The lock icon controls the oven lockout. SETTING OVEN CONTROLS Temperature Display (Fahrenheit/Celsius) The Broil and Self Clean keys control the Fahrenheit (°F) or Celsius...
... control panel.The light will sound. Press START to accept the change or press OFF to display temperatures in the display until the oven door has completely unlocked. 3. will appear and timer will flash in °F or °C. The time will begin to silent operation...is set the minute timer: 1. Press the number keys to set to °F 1. To toggle the oven lights on . Setting Oven Lockout Feature The lock icon controls the oven lockout. SETTING OVEN CONTROLS Temperature Display (Fahrenheit/Celsius) The Broil and Self Clean keys control the Fahrenheit (°F) or Celsius...

