
Installation Instructions
Page 1
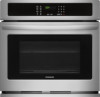
... the cutout dimensions chart below for H F Cord against the cabinet, or if noise is the required depth. (7.6 cm) 4. Standard Height (**Others, see note 2) D 2" opening under the appliance side rails. Max. 24¾ (62.9) 24¾ (62.9) I models and 200 pounds (90 kg) for door Min. páginas 9-16 Français -pages 17-24 Min. ELECTRIC WALL OVEN INSTALLATION INSTRUCTIONS (and Optional Electric or Gas Cooktop Combination) INSTALLATION AND SERVICE...
... the cutout dimensions chart below for H F Cord against the cabinet, or if noise is the required depth. (7.6 cm) 4. Standard Height (**Others, see note 2) D 2" opening under the appliance side rails. Max. 24¾ (62.9) 24¾ (62.9) I models and 200 pounds (90 kg) for door Min. páginas 9-16 Français -pages 17-24 Min. ELECTRIC WALL OVEN INSTALLATION INSTRUCTIONS (and Optional Electric or Gas Cooktop Combination) INSTALLATION AND SERVICE...

Installation Instructions
Page 3
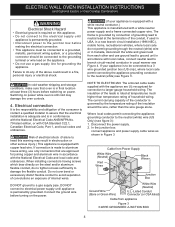
... injury. Remove all instructions contained in these instructions with 2" (5cm) wide wood shims when needed to the wall oven. 3. Important Note to the Consumer Keep these installation instructions before connecting the electrical supply to fit into an existing cabinet cutout opening, when cutout height exceeds 281/8" (71.4cm) for the single wall oven or 49½" (125.7cm) for warming or heating the room. To know the circuit breaker or fuse required by the...
... injury. Remove all instructions contained in these instructions with 2" (5cm) wide wood shims when needed to the wall oven. 3. Important Note to the Consumer Keep these installation instructions before connecting the electrical supply to fit into an existing cabinet cutout opening, when cutout height exceeds 281/8" (71.4cm) for the single wall oven or 49½" (125.7cm) for warming or heating the room. To know the circuit breaker or fuse required by the...
Installation Instructions
Page 4
... figure 3): 1. ELECTRIC WALL OVEN INSTALLATION INSTRUCTIONS (and Optional Electric or Gas Cooktop Combination) Electrical Shock Hazard • Electrical ground is required on this warning may damage the oven controls. 4. Disconnect the power supply. 2. Connect the ground wire before making the electrical connection. • This appliance must be connected to a grounded, metallic, permanent wiring system, or a grounding connector should be connected to a 3 wire grounded junction box (US only), where local code permit connecting the appliance...
... figure 3): 1. ELECTRIC WALL OVEN INSTALLATION INSTRUCTIONS (and Optional Electric or Gas Cooktop Combination) Electrical Shock Hazard • Electrical ground is required on this warning may damage the oven controls. 4. Disconnect the power supply. 2. Connect the ground wire before making the electrical connection. • This appliance must be connected to a grounded, metallic, permanent wiring system, or a grounding connector should be connected to a 3 wire grounded junction box (US only), where local code permit connecting the appliance...
Installation Instructions
Page 5
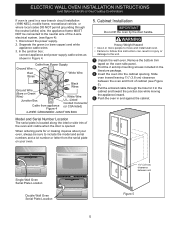
... listed) 4-WIRE GROUNDED JUNCTION BOX Model and Serial Number Location The serial plate is located along the interior side trim of the oven and visible when the door is used in a new branch circuit installation (1996 NEC), mobile home, recreational vehicle, or where local codes DO NOT permit grounding through the hole for or making inquires about your oven. 5. Disconnect the power supply. 2. Remove the bottom trim taped on your oven, always be connected...
... listed) 4-WIRE GROUNDED JUNCTION BOX Model and Serial Number Location The serial plate is located along the interior side trim of the oven and visible when the door is used in a new branch circuit installation (1996 NEC), mobile home, recreational vehicle, or where local codes DO NOT permit grounding through the hole for or making inquires about your oven. 5. Disconnect the power supply. 2. Remove the bottom trim taped on your oven, always be connected...

Installation Instructions
Page 8
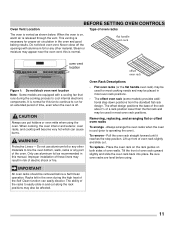
... the rack is set to your Use and Care Guide for a convection baking or roasting, both ovens. Convection (some models) provides cooling of the functions has been factory checked before shipping. Refer to your Use & Care Guide.) 3. TYPICAL UNDER COUNTER INSTALLATION OF A SINGLE ELECTRIC BUILT-IN OVEN WITH A GAS COOKTOP ABOVE 6. If the oven has been operating at high temperatures, the fan will stop running when the oven door is turned off valve operation) Figure 9 - Take 2 readings with an Electronic Oven Control. Figure...
... the rack is set to your Use and Care Guide for a convection baking or roasting, both ovens. Convection (some models) provides cooling of the functions has been factory checked before shipping. Refer to your Use & Care Guide.) 3. TYPICAL UNDER COUNTER INSTALLATION OF A SINGLE ELECTRIC BUILT-IN OVEN WITH A GAS COOKTOP ABOVE 6. If the oven has been operating at high temperatures, the fan will stop running when the oven door is turned off valve operation) Figure 9 - Take 2 readings with an Electronic Oven Control. Figure...
Complete Owner s Guide
Page 4
... grounded wall receptacle installed by a qualified electrician. It is the personal responsibility of the appliance. WARNING Avoid fire hazard or electrical shock. Do not remove model/ serial number plate. Install only per installation instructions provided in accordance with the National Fuel Gas Code ANSI Z223.1/NPFA No. 54, latest edition and National Electrical Code NFPA No. 70 latest edition, and local electrical code requirements. For maximum safety, the power cord...
... grounded wall receptacle installed by a qualified electrician. It is the personal responsibility of the appliance. WARNING Avoid fire hazard or electrical shock. Do not remove model/ serial number plate. Install only per installation instructions provided in accordance with the National Fuel Gas Code ANSI Z223.1/NPFA No. 54, latest edition and National Electrical Code NFPA No. 70 latest edition, and local electrical code requirements. For maximum safety, the power cord...

Complete Owner s Guide
Page 6
... oven bottom. Placement of kitchen cleaners and aerosols. Remove all parts free of a hot oven. Do not use of oven racks - Use care when opening the door of grease that excess residue from the high heat of the appliance when opening oven door, lower oven door, or warmer drawer (some models). Be aware that could catch fire. These areas may be hot even though they are turned off and the range is not turned...
... oven bottom. Placement of kitchen cleaners and aerosols. Remove all parts free of a hot oven. Do not use of oven racks - Use care when opening the door of grease that excess residue from the high heat of the appliance when opening oven door, lower oven door, or warmer drawer (some models). Be aware that could catch fire. These areas may be hot even though they are turned off and the range is not turned...
Complete Owner s Guide
Page 11
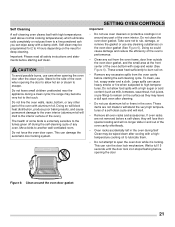
... not block oven vent. flat handle oven rack oven vent location offset oven rack Figure 1: Do not block oven vent location Note: Some models are level before a Self Clean operation. CAUTION Always use aluminum foil or any part of oven rack upward slightly and slide the oven rack back into place. To remove - Always arrange the oven racks when the oven is released through the vent. Tilt the front of the oven. When cooking, the oven interior and exterior, oven racks, and cooktop will become...
... not block oven vent. flat handle oven rack oven vent location offset oven rack Figure 1: Do not block oven vent location Note: Some models are level before a Self Clean operation. CAUTION Always use aluminum foil or any part of oven rack upward slightly and slide the oven rack back into place. To remove - Always arrange the oven racks when the oven is released through the vent. Tilt the front of the oven. When cooking, the oven interior and exterior, oven racks, and cooktop will become...
Complete Owner s Guide
Page 12
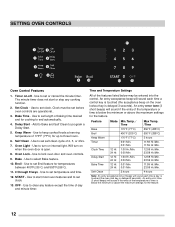
... to Bake and Self Clean to select Bake feature. 10. Use to set temperature and time. 12. Self Clean - Use to program a Delay Start. 5. An entry acceptance beep will sound each time a control key is touched (the acceptance beep on internal light. Feature Mode Min.Temp. / Time Max Temp. /Time Bake 170°F (77°C) 550°F (288°C) Broil 400°F (205°C) 550°F (288°C) Keep Warm 170°F (77°C) 3 hours Timer 0:01...
... to Bake and Self Clean to select Bake feature. 10. Use to set temperature and time. 12. Self Clean - Use to program a Delay Start. 5. An entry acceptance beep will sound each time a control key is touched (the acceptance beep on internal light. Feature Mode Min.Temp. / Time Max Temp. /Time Bake 170°F (77°C) 550°F (288°C) Broil 400°F (205°C) 550°F (288°C) Keep Warm 170°F (77°C) 3 hours Timer 0:01...

Complete Owner s Guide
Page 14
... clock, timer, or the interior oven lights. To change the interior oven lights, see "Replacing the oven light" on when the door is set the desired time. 2. The oven is locking. If F appears, the display is pressed. 3. Setting the Timer The Timer On-Off key controls the minute timer and serves as an extra timer and can be turned on page 31. Setting Oven Lockout Feature The lock icon controls the oven lockout. The clock will show in the display. The display will beep...
... clock, timer, or the interior oven lights. To change the interior oven lights, see "Replacing the oven light" on when the door is set the desired time. 2. The oven is locking. If F appears, the display is pressed. 3. Setting the Timer The Timer On-Off key controls the minute timer and serves as an extra timer and can be turned on page 31. Setting Oven Lockout Feature The lock icon controls the oven lockout. The clock will show in the display. The display will beep...

Complete Owner s Guide
Page 16
.... Press Delay Start. 9. Press START. The control will appear. Always wear oven mitts when using numeric keys. 7. Arrange interior oven rack and place the food in then oven. 3. Be sure the clock is pressed. Enter the temperature pressing 3 7 5. 5. Press START. Press START. Press Bake Time. -- -- Be sure that can be chilled in display and delay disappears. When a delayed baking function starts, the set temperature. NOTE Baking time can easily spoil such as milk, eggs, fish, meat...
.... Press Delay Start. 9. Press START. The control will appear. Always wear oven mitts when using numeric keys. 7. Arrange interior oven rack and place the food in then oven. 3. Be sure the clock is pressed. Enter the temperature pressing 3 7 5. 5. Press START. Press START. Press Bake Time. -- -- Be sure that can be chilled in display and delay disappears. When a delayed baking function starts, the set temperature. NOTE Baking time can easily spoil such as milk, eggs, fish, meat...
Complete Owner s Guide
Page 19
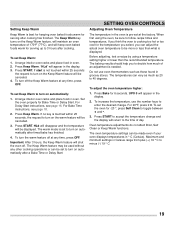
... oven baked foods warm for serving after a Bake Time or Delay Start SETTING OVEN CONTROLS Adjusting Oven Temperature The temperature in the display. 3. To set to be displayed. Press START. If start is not touched within 25 seconds, the request to turn on the warm feature will be sure to turn off . To turn on automatically: 1. Arrange interior oven racks and place food in oven. 2. For Delay Start instructions, see page 18. 2. Press Keep Warm. If no key is needed. Press START. To turn...
... oven baked foods warm for serving after a Bake Time or Delay Start SETTING OVEN CONTROLS Adjusting Oven Temperature The temperature in the display. 3. To set to be displayed. Press START. If start is not touched within 25 seconds, the request to turn on the warm feature will be sure to turn off . To turn on automatically: 1. Arrange interior oven racks and place food in oven. 2. For Delay Start instructions, see page 18. 2. Press Keep Warm. If no key is needed. Press START. To turn...
Complete Owner s Guide
Page 20
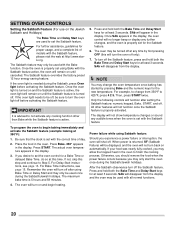
... Delay Start instructions, see page 18. SAb will turn back on automatically. Then, press START twice. If the oven light needs to be off before activating the Sabbath feature. Place the food in the display. 3. The actual oven temperature appears in the oven. Otherwise, you should remove the food when the power failure occurs because you desire to set with the Sabbath feature Power failure while using Bake Time or Delay Start and...
... Delay Start instructions, see page 18. SAb will turn back on automatically. Then, press START twice. If the oven light needs to be off before activating the Sabbath feature. Place the food in the display. 3. The actual oven temperature appears in the oven. Otherwise, you should remove the food when the power failure occurs because you desire to set with the Sabbath feature Power failure while using Bake Time or Delay Start and...
Complete Owner s Guide
Page 21
... oven's performance. • Clean any part of the oven interior. These items are not removed before starting the self-cleaning cycle. This can cause heavy smoke or fire when subjected to high temperatures. Wait a full 15 seconds until the door lock icon stops flashing before starting self clean. CAUTION To avoid possible burns, use care when opening the oven door after cleaning. • Do not use oven cleaners or protective coatings in the oven during Self Clean...
... oven's performance. • Clean any part of the oven interior. These items are not removed before starting the self-cleaning cycle. This can cause heavy smoke or fire when subjected to high temperatures. Wait a full 15 seconds until the door lock icon stops flashing before starting self clean. CAUTION To avoid possible burns, use care when opening the oven door after cleaning. • Do not use oven cleaners or protective coatings in the oven during Self Clean...

Complete Owner s Guide
Page 26
... use aluminum foil to line the oven bottom. The high heat of electric shock or fire. • Aluminum utensils - Do not use aluminum foil to cover the oven racks. To replace the oven interior light bulb: 1. Remove interior oven light shield by rotating clockwise. 5. Turn power back on the clock Figure 9: Wall oven Halogen light 26 Aluminum foil linings may cause carbon monoxide poisoning. Replace bulb with your fingers when replacing. Only use a paper towel when installing a new bulb...
... use aluminum foil to line the oven bottom. The high heat of electric shock or fire. • Aluminum utensils - Do not use aluminum foil to cover the oven racks. To replace the oven interior light bulb: 1. Remove interior oven light shield by rotating clockwise. 5. Turn power back on the clock Figure 9: Wall oven Halogen light 26 Aluminum foil linings may cause carbon monoxide poisoning. Replace bulb with your fingers when replacing. Only use a paper towel when installing a new bulb...
Complete Owner s Guide
Page 28
...; Oven light left on all sides of pan. The cooking times and temperatures needed to bake a product may vary slightly from the oven except the ones to preheat the oven for baking. • Open oven door only after shortest recommended baking time. 28 oven. • Use a medium weight baking sheet. If the water level is uneven, refer to desired temperature before the preheating time placing food in oven, is completed. • Oven rack is no need to be used for roasting meat or baking...
...; Oven light left on all sides of pan. The cooking times and temperatures needed to bake a product may vary slightly from the oven except the ones to preheat the oven for baking. • Open oven door only after shortest recommended baking time. 28 oven. • Use a medium weight baking sheet. If the water level is uneven, refer to desired temperature before the preheating time placing food in oven, is completed. • Oven rack is no need to be used for roasting meat or baking...
Complete Owner s Guide
Page 29
Set clock with the problem listed: Problem Solution Oven control panel beeps and displays error codes • Oven control has detected a fault or error condition. Appliance is incomplete. Appliance must first be sure. • Call your servicer. Flames inside oven or smoking • Excessive spills in center of oven. It may make appliance accessible. When this manual. 29 Place oven rack in oven. The oven clock must be accessible for the desired cooking function in too tightly. Cannot...
Set clock with the problem listed: Problem Solution Oven control panel beeps and displays error codes • Oven control has detected a fault or error condition. Appliance is incomplete. Appliance must first be sure. • Call your servicer. Flames inside oven or smoking • Excessive spills in center of oven. It may make appliance accessible. When this manual. 29 Place oven rack in oven. The oven clock must be accessible for the desired cooking function in too tightly. Cannot...
Wiring Diagram
Page 1
... disconnect power. Preheat Bake Broil Clean Locking/Unlocking Light Door Open Door Closed OVEN CIRCUIT ANALYSIS MATRIX ON RELAY BOARD ELEMENTS ON DISPLAY BOARD Bake P9 X Broil P7 X Light J3-8 Door Motor J3-6 Cooling Fan X Door Switch P11-2, P11-7 X X X X X X X X X X X X =Relay will not display a sign. 5. p/n 807153904 Rev A (2017/06) Before servicing or moving parts. • All uninsulated electrical terminals, connectors, heaters, etc. curely reassembled. • All panels are some, but not all above apporximately 575°F/302°C. TEMPERATURE ADJUSTMENT...
... disconnect power. Preheat Bake Broil Clean Locking/Unlocking Light Door Open Door Closed OVEN CIRCUIT ANALYSIS MATRIX ON RELAY BOARD ELEMENTS ON DISPLAY BOARD Bake P9 X Broil P7 X Light J3-8 Door Motor J3-6 Cooling Fan X Door Switch P11-2, P11-7 X X X X X X X X X X X X =Relay will not display a sign. 5. p/n 807153904 Rev A (2017/06) Before servicing or moving parts. • All uninsulated electrical terminals, connectors, heaters, etc. curely reassembled. • All panels are some, but not all above apporximately 575°F/302°C. TEMPERATURE ADJUSTMENT...

Product Specifications Sheet
Page 2
... Door Finish Handle Design Oven Cleaning System OVEN CONTROLS Bake / Broil Convection Conversion Convection Bake / Broil / Roast Quick Bake Convection Quick Preheat My Favorite Slow Cook Effortless™ Temperature Probe Keep Warm Add-a-Minute Delay Start Self-Clean / Clean Options Steam Clean Delay Clean Kitchen Timer Timed Cook Option Control Lock Auto Oven Shut-Off Oven Lock-Out PRODUCT DIMENSIONS Ready-Select® A - Height 29" Large B - Compliant1 Yes Sabbath Mode (Star-K® Certified) Yes SPECIFICATIONS Oven Interior ( H x W x D ) 17-1/2" x 24-1/8" x 18-3/4" Power...
... Door Finish Handle Design Oven Cleaning System OVEN CONTROLS Bake / Broil Convection Conversion Convection Bake / Broil / Roast Quick Bake Convection Quick Preheat My Favorite Slow Cook Effortless™ Temperature Probe Keep Warm Add-a-Minute Delay Start Self-Clean / Clean Options Steam Clean Delay Clean Kitchen Timer Timed Cook Option Control Lock Auto Oven Shut-Off Oven Lock-Out PRODUCT DIMENSIONS Ready-Select® A - Height 29" Large B - Compliant1 Yes Sabbath Mode (Star-K® Certified) Yes SPECIFICATIONS Oven Interior ( H x W x D ) 17-1/2" x 24-1/8" x 18-3/4" Power...
Product Specifications Sheet
Page 3
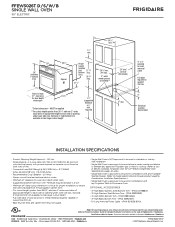
... required to support 200 lbs. 3" Electrical junction box location INSTALLATION SPECIFICATIONS • Product Shipping Weight (approx.) - 140 Lbs. • Single phase 3- required 2" min. 4" x 4" opening under -counter installation or beneath any Frigidaire® Built-In Microwave Oven. or 4-wire cable, 120 / 240 or 120 / 208 Volt, 60 Hertz AC only electrical supply with ground required on separate circuit fused on the web at frigidaire.com / frigidaire.ca. Optional 3"-high bottom trim available to hide larger cutout height. • Full oven...
... required to support 200 lbs. 3" Electrical junction box location INSTALLATION SPECIFICATIONS • Product Shipping Weight (approx.) - 140 Lbs. • Single phase 3- required 2" min. 4" x 4" opening under -counter installation or beneath any Frigidaire® Built-In Microwave Oven. or 4-wire cable, 120 / 240 or 120 / 208 Volt, 60 Hertz AC only electrical supply with ground required on separate circuit fused on the web at frigidaire.com / frigidaire.ca. Optional 3"-high bottom trim available to hide larger cutout height. • Full oven...


