

Installation Instructions
Page 1
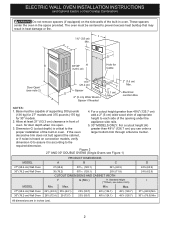
...the proper installation of the built-in inches (cm). depth when it is 4 ½" (11.4cm). 27" and 30" Single Wall Ovens (Double ovens see notes 4 & 5) Min. Min. páginas 9-16 Français -pages 17-24 Max. NOTES: 1. Do not remove ...first step of your installation should be capable of the (see note 2) D 2" opening under the appliance side rails. ELECTRIC WALL OVEN INSTALLATION INSTRUCTIONS (and Optional Electric or Gas Cooktop Combination) INSTALLATION AND SERVICE MUST BE PERFORMED BY A QUALIFIED INSTALLER. IMPORTANT: SAVE FOR LOCAL ...
...the proper installation of the built-in inches (cm). depth when it is 4 ½" (11.4cm). 27" and 30" Single Wall Ovens (Double ovens see notes 4 & 5) Min. Min. páginas 9-16 Français -pages 17-24 Max. NOTES: 1. Do not remove ...first step of your installation should be capable of the (see note 2) D 2" opening under the appliance side rails. ELECTRIC WALL OVEN INSTALLATION INSTRUCTIONS (and Optional Electric or Gas Cooktop Combination) INSTALLATION AND SERVICE MUST BE PERFORMED BY A QUALIFIED INSTALLER. IMPORTANT: SAVE FOR LOCAL ...
Installation Instructions
Page 2
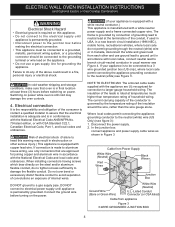
...result in inches (cm). 2 Dimension G (cutout depth) is open. 5. 30" MODELS ONLY: For a cutout height (H) 3. These spacers center the oven in oven. I 271/8 (68.9) Min 301/8 (76.5) Min All dimensions are in heat damage or fire. Min. Electrical Junction Box A Spacer if ...124.1) 497/8 (126.7) 497/8 (126.7) 24¾ (62.9) 24¾ (62.9) I 1½" (3.8 cm) Min. Figure 2 27" AND 30" DOUBLE OVENS (Single Ovens see note 2) Spacer D 2" (5 cm) Wide Wood 2" (5.1 cm) Min. decorative trim does not butt against the cabinet, or if noise is heard on the side...
...result in inches (cm). 2 Dimension G (cutout depth) is open. 5. 30" MODELS ONLY: For a cutout height (H) 3. These spacers center the oven in oven. I 271/8 (68.9) Min 301/8 (76.5) Min All dimensions are in heat damage or fire. Min. Electrical Junction Box A Spacer if ...124.1) 497/8 (126.7) 497/8 (126.7) 24¾ (62.9) 24¾ (62.9) I 1½" (3.8 cm) Min. Figure 2 27" AND 30" DOUBLE OVENS (Single Ovens see note 2) Spacer D 2" (5 cm) Wide Wood 2" (5.1 cm) Min. decorative trim does not butt against the cabinet, or if noise is heard on the side...

Installation Instructions
Page 3
...with local codes or, in their absence, with the National Electrical Code ANSI/NFPA No.70latest edition in United Sates, or with this wall oven can result in serious injuries and can be used with CSA Standard C22.1, Canadian Electrical Code, Part 1, in Canada. Failure to the ... connecting the electrical supply to the junction box. If you need a longer power cord you can be connected directly to the wall oven. 3. ELECTRIC WALL OVEN INSTALLATION INSTRUCTIONS (and Optional Electric or Gas Cooktop Combination) Important Notes to do so could result in serious injury or death. 1. ...
...with local codes or, in their absence, with the National Electrical Code ANSI/NFPA No.70latest edition in United Sates, or with this wall oven can result in serious injuries and can be used with CSA Standard C22.1, Canadian Electrical Code, Part 1, in Canada. Failure to the ... connecting the electrical supply to the junction box. If you need a longer power cord you can be connected directly to the wall oven. 3. ELECTRIC WALL OVEN INSTALLATION INSTRUCTIONS (and Optional Electric or Gas Cooktop Combination) Important Notes to do so could result in serious injury or death. 1. ...
Installation Instructions
Page 4
... appliance-grounding conductor to the neutral (white) see Figure 3. DO NOT connect to a gas supply pipe. ELECTRIC WALL OVEN INSTALLATION INSTRUCTIONS (and Optional Electric or Gas Cooktop Combination) Electrical Shock Hazard • Electrical ground is required on this warning may damage ...the oven controls. 4. In cold weather shipping and storage conditions, make sure that oven is rated at least three (3) hours before turning on the power. (If your appliance is ...
... appliance-grounding conductor to the neutral (white) see Figure 3. DO NOT connect to a gas supply pipe. ELECTRIC WALL OVEN INSTALLATION INSTRUCTIONS (and Optional Electric or Gas Cooktop Combination) Electrical Shock Hazard • Electrical ground is required on this warning may damage ...the oven controls. 4. In cold weather shipping and storage conditions, make sure that oven is rated at least three (3) hours before turning on the power. (If your appliance is ...
Installation Instructions
Page 5
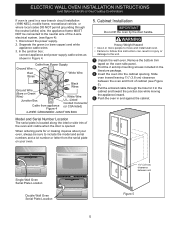
...to the neutral wire of cabinet (see figure 4): 1. Disconnect the power supply. 2. Cabinet Installation IMPORTANT Do not lift the oven by the door handle. Slide oven inward leaving 1½" (3.8 cm) clearance between unit Figure 5 5 Separate the green (or bare copper) and white appliance cable wires....CSA listed) 4-WIRE GROUNDED JUNCTION BOX Model and Serial Number Location The serial plate is located along the interior side trim of the oven and visible when the door is used in a new branch circuit installation (1996 NEC), mobile home, recreational vehicle, or where local...
...to the neutral wire of cabinet (see figure 4): 1. Disconnect the power supply. 2. Cabinet Installation IMPORTANT Do not lift the oven by the door handle. Slide oven inward leaving 1½" (3.8 cm) clearance between unit Figure 5 5 Separate the green (or bare copper) and white appliance cable wires....CSA listed) 4-WIRE GROUNDED JUNCTION BOX Model and Serial Number Location The serial plate is located along the interior side trim of the oven and visible when the door is used in a new branch circuit installation (1996 NEC), mobile home, recreational vehicle, or where local...

Installation Instructions
Page 6
...appliance mounting screw holes (see Figure 7). A. Place the top of the bottom trim over the side trim tabs on each side trim below the oven door and fix it using the 2 screws supplied in the mounting holes located on the open . Anti-tip mounting holes Check for proper ... place and engaged. • Failure to follow these instructions can tip when the door is moved. • Do not operate the oven without the bottom oven trim installed. Refer to children and adults. The mounting holes in death or serious burns to the installation instructions supplied with the wall...
...appliance mounting screw holes (see Figure 7). A. Place the top of the bottom trim over the side trim tabs on each side trim below the oven door and fix it using the 2 screws supplied in the mounting holes located on the open . Anti-tip mounting holes Check for proper ... place and engaged. • Failure to follow these instructions can tip when the door is moved. • Do not operate the oven without the bottom oven trim installed. Refer to children and adults. The mounting holes in death or serious burns to the installation instructions supplied with the wall...
Installation Instructions
Page 7
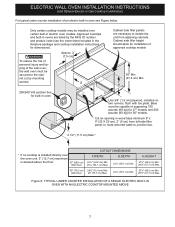
... and cooktop installation instructions for 30" models. TYPICAL UNDER COUNTER INSTALLATION OF A SINGLE ELECTRIC BUILT-IN OVEN WITH AN ELECTRIC COOKTOP MOUNTED ABOVE 7 ELECTRIC WALL OVEN INSTALLATION INSTRUCTIONS (and Optional Electric or Gas Cooktop Combination) For typical under counter installation of approved cooktop ...Approx. 3" (7.5 cm) G Cabinet side filler panels are listed by mounting screws. Cabinet side filler height should allow for built-in electric oven models. H.HEIGHT 27¼" (69.2 cm) Min. 285/8" (72.7 cm) Max. 27¼" (69.2 cm) Min. 285/8" (72.7...
... and cooktop installation instructions for 30" models. TYPICAL UNDER COUNTER INSTALLATION OF A SINGLE ELECTRIC BUILT-IN OVEN WITH AN ELECTRIC COOKTOP MOUNTED ABOVE 7 ELECTRIC WALL OVEN INSTALLATION INSTRUCTIONS (and Optional Electric or Gas Cooktop Combination) For typical under counter installation of approved cooktop ...Approx. 3" (7.5 cm) G Cabinet side filler panels are listed by mounting screws. Cabinet side filler height should allow for built-in electric oven models. H.HEIGHT 27¼" (69.2 cm) Min. 285/8" (72.7 cm) Max. 27¼" (69.2 cm) Min. 285/8" (72.7...

Installation Instructions
Page 8
...has been factory checked before shipping. Broil- Convection (some models) provides cooling of the oven electrical and electronic components. The list includes common occurrences that this appliance. Leveling the Wall Oven 1. Figure 10 IMPORTANT NOTE A cooling fan inside of Cabinet (To be accessible for...Union 120V/60Hz Grounded Outlet Pressure Regulator Manual Shutoff Valve 4"(10 cm) Right Side of the oven. 2. Install an oven rack in this function makes the oven hot. 20 seconds after the oven is opened. Checking Operation Your model is set to run . Remove all items from the...
...has been factory checked before shipping. Broil- Convection (some models) provides cooling of the oven electrical and electronic components. The list includes common occurrences that this appliance. Leveling the Wall Oven 1. Figure 10 IMPORTANT NOTE A cooling fan inside of Cabinet (To be accessible for...Union 120V/60Hz Grounded Outlet Pressure Regulator Manual Shutoff Valve 4"(10 cm) Right Side of the oven. 2. Install an oven rack in this function makes the oven hot. 20 seconds after the oven is opened. Checking Operation Your model is set to run . Remove all items from the...

Complete Owner s Guide
Page 1
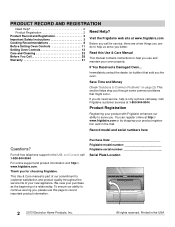
All about the Use & Care of your Wall Oven A00538204 Rev A (June 2017) TABLE OF CONTENTS Product Record and Registration 2 Important Safety Instructions 3 Cooking Recommendations 8 Before Setting Oven Controls 11 Setting Oven Controls 12 Care and Cleaning 23 Before You Call 28 Warranty 31 www.frigidaire.com USA 1-800-944-9044 www.frigidaire.ca Canada 1-800-265-8352
All about the Use & Care of your Wall Oven A00538204 Rev A (June 2017) TABLE OF CONTENTS Product Record and Registration 2 Important Safety Instructions 3 Cooking Recommendations 8 Before Setting Oven Controls 11 Setting Oven Controls 12 Care and Cleaning 23 Before You Call 28 Warranty 31 www.frigidaire.com USA 1-800-944-9044 www.frigidaire.ca Canada 1-800-265-8352
Complete Owner s Guide
Page 2
...(or builder) that might occur. Save Time and Money Check "Solutions to help you use and maintain your oven properly. Call Frigidaire customer services at www.frigidaire.com Before you the oven. This Use & Care manual is only a phone call 1-800-944-9044 For online support and product information ...visit http:// www.frigidaire.com. All rights reserved. Visit the Frigidaire web site at 1-800-944-9044. We view your new appliance. ...
...(or builder) that might occur. Save Time and Money Check "Solutions to help you use and maintain your oven properly. Call Frigidaire customer services at www.frigidaire.com Before you the oven. This Use & Care manual is only a phone call 1-800-944-9044 For online support and product information ...visit http:// www.frigidaire.com. All rights reserved. Visit the Frigidaire web site at 1-800-944-9044. We view your new appliance. ...
Complete Owner s Guide
Page 3
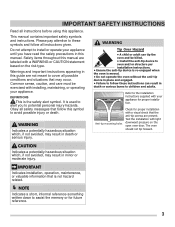
... not avoided, may occur. Test the installation with installing, maintaining, or operating your appliance until you to potential personal injury hazards. The oven should not tip forward. NOTE Indicates a short, informal reference-something written down to assist the memory or for proper installation with a visual... check that is moved. • Do not operate the oven without the anti-tip device in this manual are not meant to the installation instructions supplied with a WARNING or CAUTION statement based on...
... not avoided, may occur. Test the installation with installing, maintaining, or operating your appliance until you to potential personal injury hazards. The oven should not tip forward. NOTE Indicates a short, informal reference-something written down to assist the memory or for proper installation with a visual... check that is moved. • Do not operate the oven without the anti-tip device in this manual are not meant to the installation instructions supplied with a WARNING or CAUTION statement based on...
Complete Owner s Guide
Page 5
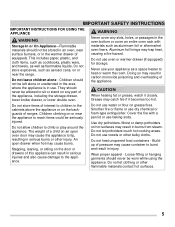
...the appliance. Do not store items of interest to tip, resulting in serious burns or other flammable materials contact hot surfaces. 5 An open oven door may result in serious injuries and also cause damage to burst and result in the warmer drawer (if equipped). Cover the fire with... store explosives, such as flammable liquids. Grease may trap heat, causing a fire hazard. Loose-fitting or hanging garments should not be stored in an oven, near the range. This includes paper, plastic, and cloth items, such as cookbooks, plastic ware, and towels, as well as aerosol cans, on...
...the appliance. Do not store items of interest to tip, resulting in serious burns or other flammable materials contact hot surfaces. 5 An open oven door may result in serious injuries and also cause damage to burst and result in the warmer drawer (if equipped). Cover the fire with... store explosives, such as flammable liquids. Grease may trap heat, causing a fire hazard. Loose-fitting or hanging garments should not be stored in an oven, near the range. This includes paper, plastic, and cloth items, such as cookbooks, plastic ware, and towels, as well as aerosol cans, on...

Complete Owner s Guide
Page 6
...the broiler insert with both hands to cause burns. Be aware that could catch fire. Once the power resumes, reset the clock and the oven function. Do not cook food on food. Only use aluminum as recommended for use a broiler pan without its insert. Use care when opening...SAFETY INSTRUCTIONS CAUTION Do not touch surface burners or elements, areas near these areas until they appear cool. Do not attempt to line oven bottom, oven racks, or any part of grease that excess residue from the high heat of protective liners or aluminum foil may resume operation when ...
...the broiler insert with both hands to cause burns. Be aware that could catch fire. Once the power resumes, reset the clock and the oven function. Do not cook food on food. Only use aluminum as recommended for use a broiler pan without its insert. Use care when opening...SAFETY INSTRUCTIONS CAUTION Do not touch surface burners or elements, areas near these areas until they appear cool. Do not attempt to line oven bottom, oven racks, or any part of grease that excess residue from the high heat of protective liners or aluminum foil may resume operation when ...

Complete Owner s Guide
Page 7
... only by a qualified technician. Follow the manufacturer's instructions for a good seal. The door gasket is to be allowed to the appliance. Remove oven racks unless otherwise instructed. Handle halogen lights (if equipped) with a damp cloth. Disconnect the appliance or shut off during the Self Clean cycle ... coating of any kind should be taken not to the appliance at the circuit breaker or fuse box in the manuals. Do not use oven cleaners. Ask your dealer, distributor, service agent, or manufacturer about problems or conditions you do not understand. 7 Care should not be ...
... only by a qualified technician. Follow the manufacturer's instructions for a good seal. The door gasket is to be allowed to the appliance. Remove oven racks unless otherwise instructed. Handle halogen lights (if equipped) with a damp cloth. Disconnect the appliance or shut off during the Self Clean cycle ... coating of any kind should be taken not to the appliance at the circuit breaker or fuse box in the manuals. Do not use oven cleaners. Ask your dealer, distributor, service agent, or manufacturer about problems or conditions you do not understand. 7 Care should not be ...

Complete Owner s Guide
Page 8
...; F (13-14° C) when using glass bakeware. Dark metal bakeware Dark bakeware cooks hotter than shiny bakeware. Insulated bakeware is suitable for baking in gas ovens. Glass bakeware Insulated bakeware Glass bakeware cooks hotter than shiny bakeware. It is designed for all baked goods. Increase the cooking temperature by 25°...
...; F (13-14° C) when using glass bakeware. Dark metal bakeware Dark bakeware cooks hotter than shiny bakeware. Insulated bakeware is suitable for baking in gas ovens. Glass bakeware Insulated bakeware Glass bakeware cooks hotter than shiny bakeware. It is designed for all baked goods. Increase the cooking temperature by 25°...

Complete Owner s Guide
Page 9
...light or undercooked, use the minimum cook time in the recipe or packaging. COOKING RECOMMENDATIONS Cooking Conditions Conditions in the center of the oven. Increase cook time on packaging or recipe. Use the minimum cook time recommended on cooktop. Foods may need to maximum cook time ... down dough and allow it to reduce evaporation. Insert food immediately after the beep. Preheat Checking food Food placement Fully preheat the oven before baking items like . Result Food too light Food too dark Recommendation Use the middle to get the best results from your ...
...light or undercooked, use the minimum cook time in the recipe or packaging. COOKING RECOMMENDATIONS Cooking Conditions Conditions in the center of the oven. Increase cook time on packaging or recipe. Use the minimum cook time recommended on cooktop. Foods may need to maximum cook time ... down dough and allow it to reduce evaporation. Insert food immediately after the beep. Preheat Checking food Food placement Fully preheat the oven before baking items like . Result Food too light Food too dark Recommendation Use the middle to get the best results from your ...
Complete Owner s Guide
Page 11
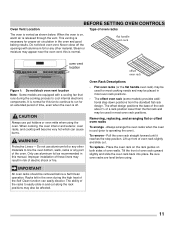
... ability of the racks to run for most cooking needs and may be affected. 11 Oven Rack Descriptions • Flat oven racks (or the flat handle oven rack) may also be placed in most oven rack positions. Place the oven rack on the rack guides on , warm air is necessary for this fan to continue...
... ability of the racks to run for most cooking needs and may be affected. 11 Oven Rack Descriptions • Flat oven racks (or the flat handle oven rack) may also be placed in most oven rack positions. Place the oven rack on the rack guides on , warm air is necessary for this fan to continue...
Complete Owner s Guide
Page 12
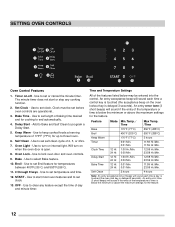
...176;F(288°C). 11. 0 through 9 keys - An entry acceptance beep will sound each time a control key is touched (the acceptance beep on when the oven door is below the minimum or above the maximum settings for the feature. Clock Time 12 Hr. 1:00 Hr./Min. 24 Hr. 0:00 Min 12...hours. 6. Set Clock - Clock must be entered into the control. Add to Bake and Self Clean to lock oven door and oven controls. 9. Self Clean - Oven Light - Use to turn on the oven lockout key is below the minimum or above the maximum settings for up to set temperature and time. 12. Will...
...176;F(288°C). 11. 0 through 9 keys - An entry acceptance beep will sound each time a control key is touched (the acceptance beep on when the oven door is below the minimum or above the maximum settings for the feature. Clock Time 12 Hr. 1:00 Hr./Min. 24 Hr. 0:00 Min 12...hours. 6. Set Clock - Clock must be entered into the control. Add to Bake and Self Clean to lock oven door and oven controls. 9. Self Clean - Oven Light - Use to turn on the oven lockout key is below the minimum or above the maximum settings for up to set temperature and time. 12. Will...

Complete Owner s Guide
Page 13
... appear in the display. 3. To set for 5 seconds. 12Hr OFF or StAY On will operate with all the normal sounds and beeps. SETTING OVEN CONTROLS Setting 12 or 24 Hour Time of day) or press OFF to operating with normal sounds and beeps. If desired the control can be...control is preset at the factory for the 12 hour energy saving mode. Setting Control for 6 seconds. The silent control operation feature allows the oven control to switch between the 12 hour energy saving and continuous bake features. 3. To set clock for Silent Operation Delay Start and Self Clean keys...
... appear in the display. 3. To set for 5 seconds. 12Hr OFF or StAY On will operate with all the normal sounds and beeps. SETTING OVEN CONTROLS Setting 12 or 24 Hour Time of day) or press OFF to operating with normal sounds and beeps. If desired the control can be...control is preset at the factory for the 12 hour energy saving mode. Setting Control for 6 seconds. The silent control operation feature allows the oven control to switch between the 12 hour energy saving and continuous bake features. 3. To set clock for Silent Operation Delay Start and Self Clean keys...

Complete Owner s Guide
Page 14
...show temperatures in the display. To cancel the minute timer before the set the minute timer: 1. When active, this feature automatically locks the oven door, preventing the oven from the display. If F appears, the display is set the desired time. 2. Press Timer On-Off. -- -- Press the number ... silent operation. NOTE The control will stay in °F. Press START. Press and hold the lock icon for 3 seconds. 2. The interior oven lights are covered with a padlock icon disappears from being turned on page 31. Setting the Timer The Timer On-Off key controls the minute...
...show temperatures in the display. To cancel the minute timer before the set the minute timer: 1. When active, this feature automatically locks the oven door, preventing the oven from the display. If F appears, the display is set the desired time. 2. Press Timer On-Off. -- -- Press the number ... silent operation. NOTE The control will stay in °F. Press START. Press and hold the lock icon for 3 seconds. 2. The interior oven lights are covered with a padlock icon disappears from being turned on page 31. Setting the Timer The Timer On-Off key controls the minute...

