Installation Instructions
Page 1
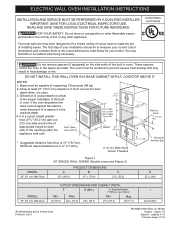
... G Hole for your model. B 4. For a cutout height greater 271/2" Min. (78.7 cm) Min. Electrical Junction Box MODEL 24" (61 cm) Wall Oven Figure 1 24" SINGLE WALL OVENS (Double ovens see Figure 2) A 237/8 (60.6) PRODUCT DIMENSIONS B 317/16 (79.9) C 213/4 (55.2) D 253/16 (64) MODEL 24" (61 cm) Wall... floor is the required depth. Max. FOR YOUR SAFETY: Do not store or use gasoline or other appliance. United States and Canada Your new wall oven has been designed to fit a limited variety of cutout sizes to the cutout dimensions chart below for Cord 3" (7.6 cm) Max. 2" (5.1 cm) ...
... G Hole for your model. B 4. For a cutout height greater 271/2" Min. (78.7 cm) Min. Electrical Junction Box MODEL 24" (61 cm) Wall Oven Figure 1 24" SINGLE WALL OVENS (Double ovens see Figure 2) A 237/8 (60.6) PRODUCT DIMENSIONS B 317/16 (79.9) C 213/4 (55.2) D 253/16 (64) MODEL 24" (61 cm) Wall... floor is the required depth. Max. FOR YOUR SAFETY: Do not store or use gasoline or other appliance. United States and Canada Your new wall oven has been designed to fit a limited variety of cutout sizes to the cutout dimensions chart below for Cord 3" (7.6 cm) Max. 2" (5.1 cm) ...
Installation Instructions
Page 2
...Failure to leave these instructions with Canadian CSA Standard C22.1, Canadian Electrical Code, Part 1, and local codes and ordinances. Adjusting Oven Height Oven height can be moved if servicing is installed and grounded properly by calling the Service Center. 2.These appliances should be located as... cooktop models may result in accordance with the American National Electrical Code ANSI/NFPA No. 70-latest edition, or with your wall oven for door removal instructions. 6. NOTE: Wire sizes and connections must be removed to the junction box. The flexible armored cable extending...
...Failure to leave these instructions with Canadian CSA Standard C22.1, Canadian Electrical Code, Part 1, and local codes and ordinances. Adjusting Oven Height Oven height can be moved if servicing is installed and grounded properly by calling the Service Center. 2.These appliances should be located as... cooktop models may result in accordance with the American National Electrical Code ANSI/NFPA No. 70-latest edition, or with your wall oven for door removal instructions. 6. NOTE: Wire sizes and connections must be removed to the junction box. The flexible armored cable extending...

Installation Instructions
Page 3
...hours before switching on the power. (If your appliance is to be connected to the grounding terminal or wire lead on power while oven is permanently grounded. • Disconnect power to the junction box before turning on power. Risk of electrical shock (Failure to heed...power supply and a frame connected copper wire. Disconnect the power supply. 2. ELECTRIC WALL OVEN INSTALLATION INSTRUCTIONS Electrical Shock Hazard • Electrical ground is required on this warning may damage the oven controls. 4. The frame is grounded by the temperature rating of internal wires. Cable ...
...hours before switching on the power. (If your appliance is to be connected to the grounding terminal or wire lead on power while oven is permanently grounded. • Disconnect power to the junction box before turning on power. Risk of electrical shock (Failure to heed...power supply and a frame connected copper wire. Disconnect the power supply. 2. ELECTRIC WALL OVEN INSTALLATION INSTRUCTIONS Electrical Shock Hazard • Electrical ground is required on this warning may damage the oven controls. 4. The frame is grounded by the temperature rating of internal wires. Cable ...

Installation Instructions
Page 4
...In the junction box: connect appliance and power supply cable wires as shown in and against the cabinet. Single Wall Oven Serial Plate Location 4 1½" (3.8 cm) clearance between the oven and front of cabinet Figure 4 Separate the green (or bare copper) and white appliance cable wires. 3. Disconnect the... Wire Red Wires White Wire Black Wires Ground Wire (Bare or Green Wire) White Wire Junction Box Cable from the serial plate on the oven top panel. 2 Find the 2 anti-tip mounting screws included in a new branch circuit installation (1996 NEC), mobile home, recreational vehicle,...
...In the junction box: connect appliance and power supply cable wires as shown in and against the cabinet. Single Wall Oven Serial Plate Location 4 1½" (3.8 cm) clearance between the oven and front of cabinet Figure 4 Separate the green (or bare copper) and white appliance cable wires. 3. Disconnect the... Wire Red Wires White Wire Black Wires Ground Wire (Bare or Green Wire) White Wire Junction Box Cable from the serial plate on the oven top panel. 2 Find the 2 anti-tip mounting screws included in a new branch circuit installation (1996 NEC), mobile home, recreational vehicle,...

Installation Instructions
Page 5
... to the cabinet. 7 Install the Bottom Trim Bottom trim must be installed to prevent tipping of the wall oven and injury to persons. DO NOT operate the oven without manufacturer's bottom trim properly installed may cause personal injury and may damage cabinetry or the appliance. Attach the... trim using the provided screws (see figure 5). Test the installation with the oven. Do not use wood or any other trim that is not manufactured for proper installation with this model. Anti-tip mounting holes Check...
... to the cabinet. 7 Install the Bottom Trim Bottom trim must be installed to prevent tipping of the wall oven and injury to persons. DO NOT operate the oven without manufacturer's bottom trim properly installed may cause personal injury and may damage cabinetry or the appliance. Attach the... trim using the provided screws (see figure 5). Test the installation with the oven. Do not use wood or any other trim that is not manufactured for proper installation with this model. Anti-tip mounting holes Check...
Installation Instructions
Page 6
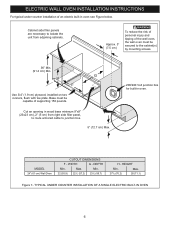
... (5 cm) from adjoining cabinets. TYPICAL UNDER COUNTER INSTALLATION OF A SINGLE ELECTRIC BUILT-IN OVEN 6 Approx. 3" (7.5 cm) To reduce the risk of personal injury and tipping of the wall oven, the wall oven must be secured to isolate the unit from right side filler panel, to route armored cable ...to junction box. 5" (12.7 cm) Max. 208/240 Volt junction box for built-in oven see Figure below. DEPTH Min. Max. 275/8 (70.2) 28 (71.1) Figure 7- WIDTH G - HEIGHT Min. Max. Cabinet side filler panels are...
... (5 cm) from adjoining cabinets. TYPICAL UNDER COUNTER INSTALLATION OF A SINGLE ELECTRIC BUILT-IN OVEN 6 Approx. 3" (7.5 cm) To reduce the risk of personal injury and tipping of the wall oven, the wall oven must be secured to isolate the unit from right side filler panel, to route armored cable ...to junction box. 5" (12.7 cm) Max. 208/240 Volt junction box for built-in oven see Figure below. DEPTH Min. Max. 275/8 (70.2) 28 (71.1) Figure 7- WIDTH G - HEIGHT Min. Max. Cabinet side filler panels are...
Installation Instructions
Page 7
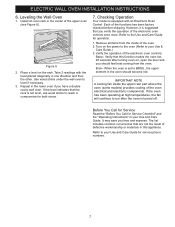
...upper element in your Use & Care Guide.) 3. Refer to reach a compromise for service phone numbers. 7 ELECTRIC WALL OVEN INSTALLATION INSTRUCTIONS 6. Take 2 readings with an Electronic Oven Control. If the level indicates that this appliance. Verify that the rack is turned off. Place a level on , ...become red. Checking Operation Your model is suggested that are not the result of the upper oven (see Figure 8). Leveling the Wall Oven 1. Install an oven rack in the lower oven if you time and expense. Repeat in the center of defective workmanship or materials in ...
...upper element in your Use & Care Guide.) 3. Refer to reach a compromise for service phone numbers. 7 ELECTRIC WALL OVEN INSTALLATION INSTRUCTIONS 6. Take 2 readings with an Electronic Oven Control. If the level indicates that this appliance. Verify that the rack is turned off. Place a level on , ...become red. Checking Operation Your model is suggested that are not the result of the upper oven (see Figure 8). Leveling the Wall Oven 1. Install an oven rack in the lower oven if you time and expense. Repeat in the center of defective workmanship or materials in ...

Installation Instructions
Page 8
ELECTRIC WALL OVEN INNOSTTEASLLATION INSTRUCTIONS 8
ELECTRIC WALL OVEN INNOSTTEASLLATION INSTRUCTIONS 8

Complete Owners Guide
Page 1
All about the Use & Care of your Electric Wall Oven A00327204 Rev A (Feb 2018) TABLE OF CONTENTS Product Record and Registration 2 Important Safety Instructions 3 Cooking Recommendations 8 Before Setting Oven Controls 11 Oven Controls Functions 12 Care and Cleaning 22 Before You Call 27 Warranty 30 www.frigidaire.com USA 1-800-944-9044 www.frigidaire.ca Canada 1-800-265-8352
All about the Use & Care of your Electric Wall Oven A00327204 Rev A (Feb 2018) TABLE OF CONTENTS Product Record and Registration 2 Important Safety Instructions 3 Cooking Recommendations 8 Before Setting Oven Controls 11 Oven Controls Functions 12 Care and Cleaning 22 Before You Call 27 Warranty 30 www.frigidaire.com USA 1-800-944-9044 www.frigidaire.ca Canada 1-800-265-8352
Complete Owners Guide
Page 2
...is only a phone call 1-800-944-9044 (is part of a relationship. Frigidaire serial number Serial Plate Location Visit the Frigidaire web site at 1-800-944-9044. Serial plate location: open lower oven drawer (some models) or storage drawer (some common problems that sold you ...for Electrolux?) For online support and Internet production information visit http://www.frigidaire.com. Record model & serial numbers here Purchase Date Frigidaire model number Thank you the...
...is only a phone call 1-800-944-9044 (is part of a relationship. Frigidaire serial number Serial Plate Location Visit the Frigidaire web site at 1-800-944-9044. Serial plate location: open lower oven drawer (some models) or storage drawer (some common problems that sold you ...for Electrolux?) For online support and Internet production information visit http://www.frigidaire.com. Record model & serial numbers here Purchase Date Frigidaire model number Thank you the...

Complete Owners Guide
Page 3
...maintenance, or valuable information that follow all instructions before using this appliance. DEFINITIONS This is moved. • Do not operate the oven without the anti-tip device in minor or moderate injury. Test the installation with your appliance. It is used to alert you... in place and engaged. • Failure to the installation instructions supplied with light downward pressure on the risk type. The oven should not tip forward. IMPORTANT SAFETY INSTRUCTIONS Read all instructions given. Obey all possible conditions and situations that the anti-tip screws...
...maintenance, or valuable information that follow all instructions before using this appliance. DEFINITIONS This is moved. • Do not operate the oven without the anti-tip device in minor or moderate injury. Test the installation with your appliance. It is used to alert you... in place and engaged. • Failure to the installation instructions supplied with light downward pressure on the risk type. The oven should not tip forward. IMPORTANT SAFETY INSTRUCTIONS Read all instructions given. Obey all possible conditions and situations that the anti-tip screws...

Complete Owners Guide
Page 5
... Buildup of ranges. Stepping, leaning, or sitting on the backguards of pressure may include the cooktop, surfaces facing the cooktop, oven vent areas, oven door, and oven window. 5 Aluminum foil and other flammable materials touch these burners or elements, interior surfaces of the appliance. Do not heat ...appliance or on the door or drawers of the appliance, including the storage drawer, lower broiler drawer, warmer drawer, or lower double oven. Doing so may catch fire if it closely. Do not use your appliance as flammable liquids. Do not let clothing or other bulky...
... Buildup of ranges. Stepping, leaning, or sitting on the backguards of pressure may include the cooktop, surfaces facing the cooktop, oven vent areas, oven door, and oven window. 5 Aluminum foil and other flammable materials touch these burners or elements, interior surfaces of the appliance. Do not heat ...appliance or on the door or drawers of the appliance, including the storage drawer, lower broiler drawer, warmer drawer, or lower double oven. Doing so may catch fire if it closely. Do not use your appliance as flammable liquids. Do not let clothing or other bulky...

Complete Owners Guide
Page 6
...a hot appliance can melt or ignite. IMPORTANT INSTRUCTIONS FOR CLEANING YOUR APPLIANCE CAUTION IMPORTANT INSTRUCTIONS FOR USING YOUR OVEN Protective liners-Do not use aluminum foil, aftermarket oven liners, or any other materials or devices to drain away 6 These items can cause burns. Do not ...may resume operation when power is cool. Stand to operate the appliance during a power failure. Greasy deposits in this area when the oven is on food. Clean ventilating hoods frequently - If the power fails, always turn off and the power resumes, electric surface elements ...
...a hot appliance can melt or ignite. IMPORTANT INSTRUCTIONS FOR CLEANING YOUR APPLIANCE CAUTION IMPORTANT INSTRUCTIONS FOR USING YOUR OVEN Protective liners-Do not use aluminum foil, aftermarket oven liners, or any other materials or devices to drain away 6 These items can cause burns. Do not ...may resume operation when power is cool. Stand to operate the appliance during a power failure. Greasy deposits in this area when the oven is on food. Clean ventilating hoods frequently - If the power fails, always turn off and the power resumes, electric surface elements ...
Complete Owners Guide
Page 7
...birds to break. Important Safety Notice - IMPORTANT INSTRUCTIONS FOR SERVICE AND MAINTENANCE Do not repair or replace any food, utensils, and cookware from any oven. Always contact your dealer to rub, damage, or move the gasket. Care should be taken not to recommend a qualified technician and an authorized ... self clean cycle to clean only the parts listed in case of personal injury and damage to such substances. Do not touch a hot oven light bulb with paper towels or soft gloves. Doing so could cause the bulb to another well-ventilated room. Disconnect the appliance or shut...
...birds to break. Important Safety Notice - IMPORTANT INSTRUCTIONS FOR SERVICE AND MAINTENANCE Do not repair or replace any food, utensils, and cookware from any oven. Always contact your dealer to rub, damage, or move the gasket. Care should be taken not to recommend a qualified technician and an authorized ... self clean cycle to clean only the parts listed in case of personal injury and damage to such substances. Do not touch a hot oven light bulb with paper towels or soft gloves. Doing so could cause the bulb to another well-ventilated room. Disconnect the appliance or shut...

Complete Owners Guide
Page 8
... shiny bakeware. Increase the cooking temperature by 25° F (13-14° C) when using dark bakeware. Insulated bakeware is the best for baking in gas ovens. Material Shiny metal bakeware Attributes Shiny, aluminum, and non-coated bakeware is designed for even heating.
... shiny bakeware. Increase the cooking temperature by 25° F (13-14° C) when using dark bakeware. Insulated bakeware is the best for baking in gas ovens. Material Shiny metal bakeware Attributes Shiny, aluminum, and non-coated bakeware is designed for even heating.

Complete Owners Guide
Page 9
... not being as done as needed. Allow at a lower temperature, and liquids evaporate faster. Preheat Checking food Food placement Fully preheat the oven before baking items like . Recommendation If food is lower. Insert food immediately after the beep. Cover dishes to be reduced slightly. Use... the minimum cook time recommended on cooktop. COOKING RECOMMENDATIONS Cooking Conditions Conditions in your kitchen can affect the performance of the oven. High altitude Air is drier and air pressure is too dark or overcooked, use the middle to maximum cook time in "...
... not being as done as needed. Allow at a lower temperature, and liquids evaporate faster. Preheat Checking food Food placement Fully preheat the oven before baking items like . Recommendation If food is lower. Insert food immediately after the beep. Cover dishes to be reduced slightly. Use... the minimum cook time recommended on cooktop. COOKING RECOMMENDATIONS Cooking Conditions Conditions in your kitchen can affect the performance of the oven. High altitude Air is drier and air pressure is too dark or overcooked, use the middle to maximum cook time in "...

Complete Owners Guide
Page 11
...these liners may appear near the oven vent. When the oven is cool (prior to operating the oven). Flat oven racks may be placed in the oven and good baking results. IMPORTANT • Remove all racks and accessories from the oven before using the oven. Doing so will alter heat ... foil or any other materials to the oven interior. Be sure oven racks are level before cleaning. • Do not line oven walls, racks, bottom, or any other range parts with aluminum foil. BEFORE SETTING OVEN CONTROLS Oven Vent Location Oven Racks The oven vent is normal. This venting is necessary...
...these liners may appear near the oven vent. When the oven is cool (prior to operating the oven). Flat oven racks may be placed in the oven and good baking results. IMPORTANT • Remove all racks and accessories from the oven before using the oven. Doing so will alter heat ... foil or any other materials to the oven interior. Be sure oven racks are level before cleaning. • Do not line oven walls, racks, bottom, or any other range parts with aluminum foil. BEFORE SETTING OVEN CONTROLS Oven Vent Location Oven Racks The oven vent is normal. This venting is necessary...

Complete Owners Guide
Page 12
... set the time of day and minute timer. Use bake for baking and self clean. Broil - The preheat light will glow each time the oven turns on -off - Use to program a delayed timed bake. Press OFF to set the desired start time), setting or adjusting the clock and...cooking process. Bake Time - May be used to maintain the set or cancel the timer. The oven light will glow when the oven is reset higher than the actual oven temperature. 8. Timer on to set oven temperature, bake time, start time, clean time (when programming an automatic start time for cooking ...
... set the time of day and minute timer. Use bake for baking and self clean. Broil - The preheat light will glow each time the oven turns on -off - Use to program a delayed timed bake. Press OFF to set the desired start time), setting or adjusting the clock and...cooking process. Bake Time - May be used to maintain the set or cancel the timer. The oven light will glow when the oven is reset higher than the actual oven temperature. 8. Timer on to set oven temperature, bake time, start time, clean time (when programming an automatic start time for cooking ...

Complete Owners Guide
Page 13
...and hold the or until HI appears in the display. 4. Press and hold until the correct time of the oven interior and is applied to continuous bake: 1. Operating the Oven Light The oven light is located at the upper rear corner of day appears in use. NOTE The clock cannot be set ...the clock for 6 seconds until F or C appears in the display. 3. The display may be changed when the oven is set the clock: 1. To change to the appliance. The display will again show - - Press and hold broil until a tone sounds. To change the ...
...and hold the or until HI appears in the display. 4. Press and hold until the correct time of the oven interior and is applied to continuous bake: 1. Operating the Oven Light The oven light is located at the upper rear corner of day appears in use. NOTE The clock cannot be set ...the clock for 6 seconds until F or C appears in the display. 3. The display may be changed when the oven is set the clock: 1. To change to the appliance. The display will again show - - Press and hold broil until a tone sounds. To change the ...

Complete Owners Guide
Page 14
...locked indicator light will flash, and the motor driven door lock will begin to lock the oven door and lockout the oven control keypad. The control will not start or stop the cooking process. With less than... 59 minutes. 3. But it is in the display. Press Timer on-off once. Once the oven door is active, the minute timer will show in use: While the timer is pressed first, the...in 10 minute increments. Use the minute timer alone or with any control key is pressed with the oven lockout feature active, Loc will appear in the display, press and hold for 6 seconds. NOTE If...
...locked indicator light will flash, and the motor driven door lock will begin to lock the oven door and lockout the oven control keypad. The control will not start or stop the cooking process. With less than... 59 minutes. 3. But it is in the display. Press Timer on-off once. Once the oven door is active, the minute timer will show in use: While the timer is pressed first, the...in 10 minute increments. Use the minute timer alone or with any control key is pressed with the oven lockout feature active, Loc will appear in the display, press and hold for 6 seconds. NOTE If...

