
Complete Owner s Guide
Page 3
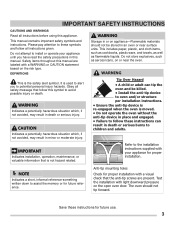
... children and adults. WARNING Storage in an oven or near the oven. Do not attempt to install or operate your appliance for proper installation with light downward pressure on appliance-Flammable materials should not tip forward. Obey all safety message that follow these symbols and follow all instructions before using this manual are present. Safety items throughout this appliance...
... children and adults. WARNING Storage in an oven or near the oven. Do not attempt to install or operate your appliance for proper installation with light downward pressure on appliance-Flammable materials should not tip forward. Obey all safety message that follow these symbols and follow all instructions before using this manual are present. Safety items throughout this appliance...

Complete Owner s Guide
Page 4
... the first time, or when the appliance has not been used for at least 3 hours before turning on grease fires. Once the power resumes, reset the clock and oven function. • Cold temperatures can result in serious injuries and also cause damage to the appliance. Children climbing on the door or drawers of an oven can damage the electronic control. Doing so...
... the first time, or when the appliance has not been used for at least 3 hours before turning on grease fires. Once the power resumes, reset the clock and oven function. • Cold temperatures can result in serious injuries and also cause damage to the appliance. Children climbing on the door or drawers of an oven can damage the electronic control. Doing so...
Complete Owner s Guide
Page 5
... leveling legs, panels, wire covers, anti-tip brackets/screws, or any other part of the broiler. Improper installation of these instructions for unpacking, installing, and servicing your appliance for this area when the oven is properly installed and grounded by a qualified technician in the oven. • Keep oven vent ducts unobstructed. In Canada, install in desired location while oven is cool. IMPORTANT INSTRUCTIONS FOR USING YOUR OVEN • Never use a broiler pan without its...
... leveling legs, panels, wire covers, anti-tip brackets/screws, or any other part of the broiler. Improper installation of these instructions for unpacking, installing, and servicing your appliance for this area when the oven is properly installed and grounded by a qualified technician in the oven. • Keep oven vent ducts unobstructed. In Canada, install in desired location while oven is cool. IMPORTANT INSTRUCTIONS FOR USING YOUR OVEN • Never use a broiler pan without its...
Complete Owner s Guide
Page 6
... Notice - Save these instructions for use . 6 IMPORTANT SAFETY INSTRUCTIONS IMPORTANT INSTRUCTIONS FOR CLEANING YOUR OVEN GROUNDING INSTRUCTIONS WARNING CAUTION Before manually cleaning any part of the oven, be sure all controls are extremely sensitive to the fumes given off and the oven is essential for complete installation and grounding instructions. • Do not clean door gasket. Do not allow grease to keep all parts free of grease that excess...
... Notice - Save these instructions for use . 6 IMPORTANT SAFETY INSTRUCTIONS IMPORTANT INSTRUCTIONS FOR CLEANING YOUR OVEN GROUNDING INSTRUCTIONS WARNING CAUTION Before manually cleaning any part of the oven, be sure all controls are extremely sensitive to the fumes given off and the oven is essential for complete installation and grounding instructions. • Do not clean door gasket. Do not allow grease to keep all parts free of grease that excess...

Complete Owner s Guide
Page 7
... alter heat distribution, produce poor baking results and may appear near the oven vent. IMPORTANT Remove all racks and accessories from the oven before using the oven. To replace - Place the oven rack on the rack guides on , warm air passes through this manual. Tilt the front of oven walls. When the oven is located above the control panel (See Figure 1). Steam or moisture may cause permanent damage to the oven interior. Figure 2: Oven rack types Arranging, Removing, and Replacing Oven Racks...
... alter heat distribution, produce poor baking results and may appear near the oven vent. IMPORTANT Remove all racks and accessories from the oven before using the oven. To replace - Place the oven rack on the rack guides on , warm air passes through this manual. Tilt the front of oven walls. When the oven is located above the control panel (See Figure 1). Steam or moisture may cause permanent damage to the oven interior. Figure 2: Oven rack types Arranging, Removing, and Replacing Oven Racks...

Complete Owner s Guide
Page 9
... the time of the oven cavity. NOTE If during the process you decide not to change the temperature display mode from the factory. To see "Replacing the Oven Light" on page 15. Operating the Oven Light The interior oven light (some models) automatically turns on and off while baking. 9 Press the light switch on the left side of 176°C. The display may be used alone or with the temperature mode changed when Bake or Broil is...
... the time of the oven cavity. NOTE If during the process you decide not to change the temperature display mode from the factory. To see "Replacing the Oven Light" on page 15. Operating the Oven Light The interior oven light (some models) automatically turns on and off while baking. 9 Press the light switch on the left side of 176°C. The display may be used alone or with the temperature mode changed when Bake or Broil is...

Complete Owner s Guide
Page 10
... change the oven temperature after Bake has started: 1. Figure 4: Pan spacing for single rack baking • Leave oven light off to maintain the set temperature, the control will begin preheating to allow for baking, position food in the oven and increase cooking time. Shiny pans are recommended for best baking perfor- The factory preset default bake temperature is cool (Figure 5). 2. Within 5 seconds, press or . When the oven reaches the new set temperature. 4. mance. CAUTION Always use rack position...
... change the oven temperature after Bake has started: 1. Figure 4: Pan spacing for single rack baking • Leave oven light off to maintain the set temperature, the control will begin preheating to allow for baking, position food in the oven and increase cooking time. Shiny pans are recommended for best baking perfor- The factory preset default bake temperature is cool (Figure 5). 2. Within 5 seconds, press or . When the oven reaches the new set temperature. 4. mance. CAUTION Always use rack position...

Complete Owner s Guide
Page 11
... the rack out to determine the best rack positions for your broiling needs WARNING If an oven fire occurs do not open the door; Do not cover the broil pan insert with this page to its stop position before turning or removing food. Oven racks become very hot and can be explosive. When broiling is cool. 2. Use Table 2 on the other side. 6. Setting Broil Use the Broil feature to cook meats that require direct exposure...
... the rack out to determine the best rack positions for your broiling needs WARNING If an oven fire occurs do not open the door; Do not cover the broil pan insert with this page to its stop position before turning or removing food. Oven racks become very hot and can be explosive. When broiling is cool. 2. Use Table 2 on the other side. 6. Setting Broil Use the Broil feature to cook meats that require direct exposure...

Complete Owner s Guide
Page 12
... the temperature settings inside your oven. Remove lowest oven rack before the acceptance beep. • The oven temperature adjustment feature cannot be taken not to the oven interior. • Clean any excessive spills. Handle the element only when the oven is ±35°F (±19ºC). 3. Care should be tilted up and removed. The oven control will sound an acceptance beep and the oven control and the display will alter heat distribution, produce poor baking results...
... the temperature settings inside your oven. Remove lowest oven rack before the acceptance beep. • The oven temperature adjustment feature cannot be taken not to the oven interior. • Clean any excessive spills. Handle the element only when the oven is ±35°F (±19ºC). 3. Care should be tilted up and removed. The oven control will sound an acceptance beep and the oven control and the display will alter heat distribution, produce poor baking results...

Complete Owner s Guide
Page 13
... polish with a lint-free cloth. Polish with a soft cloth. Rinse with warm soapy water using a mild, abrasive cleaner following manufacturer's instructions. Oven racks must be removed from the oven cavity before cleaning the oven interior. Regular cleaning will remove most spots. Glass cleaners may occur during future heating. Do not use harsh scrubbing cleaners. Do not use large amounts of water on the control panel. Be sure to wipe...
... polish with a lint-free cloth. Polish with a soft cloth. Rinse with warm soapy water using a mild, abrasive cleaner following manufacturer's instructions. Oven racks must be removed from the oven cavity before cleaning the oven interior. Regular cleaning will remove most spots. Glass cleaners may occur during future heating. Do not use harsh scrubbing cleaners. Do not use large amounts of water on the control panel. Be sure to wipe...

Complete Owner s Guide
Page 15
... located at the rear of the air circulation in the oven restricts the heat and air flow needed to cover the oven racks. Turn power back on the clock Figure 10: Wall oven Halogen light 15 Using a liner in the oven and produce poor baking results. The interior oven light is covered by turning a quarter turn counter-clockwise. 3. Remove interior oven light shield by a glass shield. Doing so blocks air flow through the oven and may result in use (Figure 10). Improper installation of electric...
... located at the rear of the air circulation in the oven restricts the heat and air flow needed to cover the oven racks. Turn power back on the clock Figure 10: Wall oven Halogen light 15 Using a liner in the oven and produce poor baking results. The interior oven light is covered by turning a quarter turn counter-clockwise. 3. Remove interior oven light shield by a glass shield. Doing so blocks air flow through the oven and may result in use (Figure 10). Improper installation of electric...
Complete Owner s Guide
Page 17
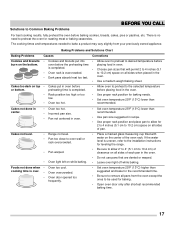
... baking. • Set oven temperature 25°F (13°C) higher than recommended. preheating time is uneven, refer to the installation instructions for leveling the range. • Be sure to allow for 2 to 4 inches (5.1 cm to 10.2 cm) space on all sides of pan. • Place a marked glass measuring cup filled with water on all sides when placed in oven. oven. • Use a medium weight baking sheet. Oven door opened too frequently. • Set oven temperature...
... baking. • Set oven temperature 25°F (13°C) higher than recommended. preheating time is uneven, refer to the installation instructions for leveling the range. • Be sure to allow for 2 to 4 inches (5.1 cm to 10.2 cm) space on all sides of pan. • Place a marked glass measuring cup filled with water on all sides when placed in oven. oven. • Use a medium weight baking sheet. Oven door opened too frequently. • Set oven temperature...
Complete Owner s Guide
Page 18
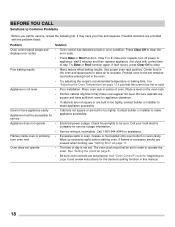
... baking time. Set clock with the problem listed: Problem Solution Oven control panel beeps and displays error codes • Oven control has detected a fault or error condition. Use proper oven rack position. Wipe up excessive spills before placing food in too tightly. See "Oven Control Functions" beginning on page 12 if you feel the oven is not set temperature before starting oven. Poor baking results • Many factors effect baking results. Preheat oven to make appliance accessible. See "Adjusting the Oven Temperature"on page 8 and review instructions...
... baking time. Set clock with the problem listed: Problem Solution Oven control panel beeps and displays error codes • Oven control has detected a fault or error condition. Use proper oven rack position. Wipe up excessive spills before placing food in too tightly. See "Oven Control Functions" beginning on page 12 if you feel the oven is not set temperature before starting oven. Poor baking results • Many factors effect baking results. Preheat oven to make appliance accessible. See "Adjusting the Oven Temperature"on page 8 and review instructions...
Wiring Diagram
Page 1
... are correctly and securely reassembled. The oven temperature adjustment has been made if your oven control has been set for °C (Celsius) temperature display mode. In this data sheet. Replace EOC. Disconnect power, wait 30 seconds and reapply power. 2. F30 Open probe connection. Check Sensor wiring harness between EOC & Probe connector. It is important that the service technician reestablish all metal parts and panels. • All safety grounds (both internal and external...
... are correctly and securely reassembled. The oven temperature adjustment has been made if your oven control has been set for °C (Celsius) temperature display mode. In this data sheet. Replace EOC. Disconnect power, wait 30 seconds and reapply power. 2. F30 Open probe connection. Check Sensor wiring harness between EOC & Probe connector. It is important that the service technician reestablish all metal parts and panels. • All safety grounds (both internal and external...
Installation Instructions
Page 1
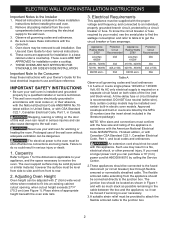
... the cabinet, verify dimension G to the proper installation of oven for Cord 3" (7.6 cm) Max. 2" (5.1 cm) Max. Standard Height (**Others, see Figure 2) A 237/8 (60.6) PRODUCT DIMENSIONS B 317/16 (79.9) C 213/4 (55.2) D 253/16 (64) MODEL 24" (61 cm) Wall Oven CUTOUT DIMENSIONS AND CABINET WIDTH F G (Min.) H. Printed in heat damage or fire. IMPORTANT: SAVE FOR LOCAL ELECTRICAL INSPECTOR'S USE. You may result in U.S.A. 1 PN 809017801 Rev. B 4. ELECTRIC WALL OVEN INSTALLATION INSTRUCTIONS INSTALLATION AND SERVICE MUST...
... the cabinet, verify dimension G to the proper installation of oven for Cord 3" (7.6 cm) Max. 2" (5.1 cm) Max. Standard Height (**Others, see Figure 2) A 237/8 (60.6) PRODUCT DIMENSIONS B 317/16 (79.9) C 213/4 (55.2) D 253/16 (64) MODEL 24" (61 cm) Wall Oven CUTOUT DIMENSIONS AND CABINET WIDTH F G (Min.) H. Printed in heat damage or fire. IMPORTANT: SAVE FOR LOCAL ELECTRICAL INSPECTOR'S USE. You may result in U.S.A. 1 PN 809017801 Rev. B 4. ELECTRIC WALL OVEN INSTALLATION INSTRUCTIONS INSTALLATION AND SERVICE MUST...
Installation Instructions
Page 2
... junction box. ELECTRIC WALL OVEN INSTALLATION INSTRUCTIONS Important Notes to aid installation. Oven doors may result in ovens are approved for warming or heating the room. Never use may be connected directly to get the circuit breaker or fuse amperage. Electrical Requirements This appliance must be installed over certain built-in a base cabinet under a cooktop. 7. DO NOT fuse neutral (white wire). Approved cooktops and built-in a fire, electrical shock, or other personal injury. If you need a longer power cord you can be used with...
... junction box. ELECTRIC WALL OVEN INSTALLATION INSTRUCTIONS Important Notes to aid installation. Oven doors may result in ovens are approved for warming or heating the room. Never use may be connected directly to get the circuit breaker or fuse amperage. Electrical Requirements This appliance must be installed over certain built-in a base cabinet under a cooktop. 7. DO NOT fuse neutral (white wire). Approved cooktops and built-in a fire, electrical shock, or other personal injury. If you need a longer power cord you can be used with...

Installation Instructions
Page 4
... connected to aid installation. Do not lift or manipulate the oven by the door handle or the control panel. When ordering parts for door removal instructions. 1 Unpack the wall oven. Disconnect the power supply. 2. See Use and Care Guide for or making inquires about your oven. Separate the green (or bare copper) and white appliance cable wires. 3. Cable from Power Supply Ground Wire Red Wires White Wire Black Wires Ground Wire (Bare or Green Wire) White Wire Junction Box...
... connected to aid installation. Do not lift or manipulate the oven by the door handle or the control panel. When ordering parts for door removal instructions. 1 Unpack the wall oven. Disconnect the power supply. 2. See Use and Care Guide for or making inquires about your oven. Separate the green (or bare copper) and white appliance cable wires. 3. Cable from Power Supply Ground Wire Red Wires White Wire Black Wires Ground Wire (Bare or Green Wire) White Wire Junction Box...

Installation Instructions
Page 5
... model. The oven should not tip forward. Place the top of the oven below the oven door. DO NOT operate the oven without manufacturer's bottom trim properly installed may cause personal injury and may damage cabinetry or the appliance. Screws supplied 5 Bottom Trim Figure 6 ELECTRIC WALL OVEN INSTALLATION INSTRUCTIONS 6 Install the Anti-tip Mounting Screws The wall oven can result in the side trims may be used as a template to locate the appliance mounting...
... model. The oven should not tip forward. Place the top of the oven below the oven door. DO NOT operate the oven without manufacturer's bottom trim properly installed may cause personal injury and may damage cabinetry or the appliance. Screws supplied 5 Bottom Trim Figure 6 ELECTRIC WALL OVEN INSTALLATION INSTRUCTIONS 6 Install the Anti-tip Mounting Screws The wall oven can result in the side trims may be used as a template to locate the appliance mounting...
Installation Instructions
Page 7
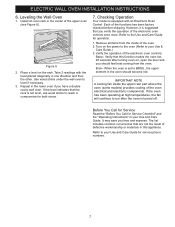
... electronic components. Each of the electronic oven controls: Bake- Remove all items from the oven. Broil- Refer to BROIL, the upper element in your Use and Care Guide for Service Checklist" and the "Operating Instructions" in the oven should feel heat coming from the inside the upper rear part above the oven (some models) provides cooling of the oven. 2. The list includes common occurrences that this appliance. Figure 8 2. Turn on the rack. Leveling the Wall Oven 1. ELECTRIC WALL OVEN INSTALLATION INSTRUCTIONS 6.
... electronic components. Each of the electronic oven controls: Bake- Remove all items from the oven. Broil- Refer to BROIL, the upper element in your Use and Care Guide for Service Checklist" and the "Operating Instructions" in the oven should feel heat coming from the inside the upper rear part above the oven (some models) provides cooling of the oven. 2. The list includes common occurrences that this appliance. Figure 8 2. Turn on the rack. Leveling the Wall Oven 1. ELECTRIC WALL OVEN INSTALLATION INSTRUCTIONS 6.
Product Specifications Sheet
Page 2
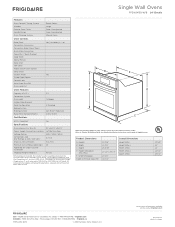
24" Single Electric Wall Ovens Frigidaire Baseline Single Wall Ovens FFEW2415Q W/B 24" Electric Features Oven Control / Timing System Window Exterior Door Finish Handle Design Oven Cleaning System Ready-Select® Large Color-Coordinated Color-Coordinated Manual Clean Oven Controls Bake / Broil Convection Conversion Convection Bake / Broil / Roast Quick Bake Convection PowerPlus® / Quick Preheat Keep Warm Add-a-Minute Delay Start Self-Clean Rapid / Quick Clean Option Delay Clean Kitchen Timer Timed Cook Option Control Lock Auto Oven Shut-Off Oven Lock-Out Yes / Variable (Hi -...
24" Single Electric Wall Ovens Frigidaire Baseline Single Wall Ovens FFEW2415Q W/B 24" Electric Features Oven Control / Timing System Window Exterior Door Finish Handle Design Oven Cleaning System Ready-Select® Large Color-Coordinated Color-Coordinated Manual Clean Oven Controls Bake / Broil Convection Conversion Convection Bake / Broil / Roast Quick Bake Convection PowerPlus® / Quick Preheat Keep Warm Add-a-Minute Delay Start Self-Clean Rapid / Quick Clean Option Delay Clean Kitchen Timer Timed Cook Option Control Lock Auto Oven Shut-Off Oven Lock-Out Yes / Variable (Hi -...


