Use and Care Manual
Page 2
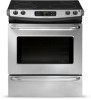
...section helps step you through some common problems that sold you the oven. For toll-free telephone support in the USA Purchase Date Frigidaire model number Frigidaire serial number Serial Plate Location 2 2013 Electrolux Home Products, Inc. If You Received a Damaged Oven... This Use & Care manual... You Call 33 Warranty 37 Need Help? Visit the Frigidaire web site at www.frigidaire.com Before you can register online at 1-800-944-9044. Read this page to record important product information. Record model and serial numbers here Questions? Printed in the U.S. ...
...section helps step you through some common problems that sold you the oven. For toll-free telephone support in the USA Purchase Date Frigidaire model number Frigidaire serial number Serial Plate Location 2 2013 Electrolux Home Products, Inc. If You Received a Damaged Oven... This Use & Care manual... You Call 33 Warranty 37 Need Help? Visit the Frigidaire web site at www.frigidaire.com Before you can register online at 1-800-944-9044. Read this page to record important product information. Record model and serial numbers here Questions? Printed in the U.S. ...
Use and Care Manual
Page 5
... of personal injury and damage to the oven. • Ask your appliance: • Remove all tape and packaging before using the appliance. Do not remove model/ serial number plate. • Proper Installation-Be sure your appliance is accidentally turned on the cooktop. IMPORTANT INSTRUCTIONS FOR USING YOUR COOKTOP • Know which...
... of personal injury and damage to the oven. • Ask your appliance: • Remove all tape and packaging before using the appliance. Do not remove model/ serial number plate. • Proper Installation-Be sure your appliance is accidentally turned on the cooktop. IMPORTANT INSTRUCTIONS FOR USING YOUR COOKTOP • Know which...
Use and Care Manual
Page 6
... touch a hot oven light bulb with both hands to the side of the appliance when opening oven door, lower oven door, or warmer drawer (some models). If rack must be used in proper cookware and always use of kitchen cleaners and aerosols. Disconnect the appliance or shut off and the range...
... touch a hot oven light bulb with both hands to the side of the appliance when opening oven door, lower oven door, or warmer drawer (some models). If rack must be used in proper cookware and always use of kitchen cleaners and aerosols. Disconnect the appliance or shut off and the range...

Use and Care Manual
Page 7
For models factory-equipped with a power cord: For maximum safety, the power cord must be wired into an electrical outlet that is the correct voltage, is correctly ...
For models factory-equipped with a power cord: For maximum safety, the power cord must be wired into an electrical outlet that is the correct voltage, is correctly ...
Use and Care Manual
Page 10
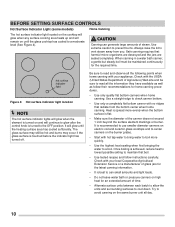
...; Alternate surface units between each batch to allow the units and surrounding surfaces to cool down. BEFORE SETTING SURFACE CONTROLS Hot Surface Indicator Light (some models) Home Canning The hot surface indicator light located on the cooktop will glow when any surface cooking area heats up and will continue to glow...
...; Alternate surface units between each batch to allow the units and surrounding surfaces to cool down. BEFORE SETTING SURFACE CONTROLS Hot Surface Indicator Light (some models) Home Canning The hot surface indicator light located on the cooktop will glow when any surface cooking area heats up and will continue to glow...

Use and Care Manual
Page 12
SETTING SURFACE CONTROLS Single Radiant Surface Elements (some models) The cooktop has two or three single radiant surface elements: the left rear element may appear to have cooled after they may damage the ceramic ...
SETTING SURFACE CONTROLS Single Radiant Surface Elements (some models) The cooktop has two or three single radiant surface elements: the left rear element may appear to have cooled after they may damage the ceramic ...

Use and Care Manual
Page 13
... (See Figure 6). The symbol with the ceramic cooktop. Push in use. Potholders, towels or wooden spoons could melt or ignite. Dual Surface Radiant Element (some models) The cooktop is touched before removing the cookware. 13 CAUTION Radiant surface elements may damage the ceramic cooktop. CAUTION Do not allow aluminum foil, empty...
... (See Figure 6). The symbol with the ceramic cooktop. Push in use. Potholders, towels or wooden spoons could melt or ignite. Dual Surface Radiant Element (some models) The cooktop is touched before removing the cookware. 13 CAUTION Radiant surface elements may damage the ceramic cooktop. CAUTION Do not allow aluminum foil, empty...
Use and Care Manual
Page 15
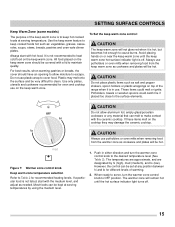
... allow aluminum foil, empty glass/porcelain cookware or any material that can be very difficult to cover food. SETTING SURFACE CONTROLS Keep Warm Zone (some models) The purpose of the keep warm zone is off . 15 Avoid placing hands on the cooktop they may melt onto the surface and be set...
... allow aluminum foil, empty glass/porcelain cookware or any material that can be very difficult to cover food. SETTING SURFACE CONTROLS Keep Warm Zone (some models) The purpose of the keep warm zone is off . 15 Avoid placing hands on the cooktop they may melt onto the surface and be set...

Use and Care Manual
Page 18
... in this section of day appears in the display. 4. Use to set or cancel the minute timer. Use to set the time of you oven model. The preheat light will flash 12:00. Within 5 seconds, press and hold broil until the correct time of the owner's manual. 1. Timer on to maintain...
... in this section of day appears in the display. 4. Use to set or cancel the minute timer. Use to set the time of you oven model. The preheat light will flash 12:00. Within 5 seconds, press and hold broil until the correct time of the owner's manual. 1. Timer on to maintain...
Use and Care Manual
Page 24
...insert (if using a broiler pan and insert). 6. Flour may be broiled at the HI broil setting. The broiler pan and the insert (some models) allow grease to -5 minutes before turning or removing food. 8. Do not use a fire extinguisher. Bone In Chicken Boneless Fish Shrimp Hamburger 1" ...NOTE Always pull the oven rack out to avoid excess browning or drying of the broiler. NOTE To purchase a broiling pan and insert, visit frigidaire.com Table 4: Broil recommendations Food item Rack Position Steak 1" thick Pork Chops 3/4 "thick Chicken - Select the LO broil setting to the stop...
...insert (if using a broiler pan and insert). 6. Flour may be broiled at the HI broil setting. The broiler pan and the insert (some models) allow grease to -5 minutes before turning or removing food. 8. Do not use a fire extinguisher. Bone In Chicken Boneless Fish Shrimp Hamburger 1" ...NOTE Always pull the oven rack out to avoid excess browning or drying of the broiler. NOTE To purchase a broiling pan and insert, visit frigidaire.com Table 4: Broil recommendations Food item Rack Position Steak 1" thick Pork Chops 3/4 "thick Chicken - Select the LO broil setting to the stop...

Use and Care Manual
Page 26
... are set a self-clean cycle or a delayed start time. Once the oven has cooled down for about 15 seconds for a 2 hour self-clean process. (Some models) For a 4 hour self-clean time, press until (4:00 appears in the self-clean cycle by pressing the clean key. SETTING OVEN CONTROLS To set , the...
... are set a self-clean cycle or a delayed start time. Once the oven has cooled down for about 15 seconds for a 2 hour self-clean process. (Some models) For a 4 hour self-clean time, press until (4:00 appears in the self-clean cycle by pressing the clean key. SETTING OVEN CONTROLS To set , the...

Use and Care Manual
Page 27
... Various Parts of Your Range Before cleaning any part of both the knob and the shaft; Follow by rinsing the area with stainless steel (some models). they will remove most spots. To remove control knobs, turn to rub, damage, or remove this gasket. To replace knobs after cleaning, line up ...cleaner to the appliance. Do not use mild dish soap and water or a 50/50 solution of water on the control panel - On self-clean models, the oven door gasket is recommended to 40 minutes. For important cleaning precautions, refer to thoroughly clean the top, sides, and front of the door...
... Various Parts of Your Range Before cleaning any part of both the knob and the shaft; Follow by rinsing the area with stainless steel (some models). they will remove most spots. To remove control knobs, turn to rub, damage, or remove this gasket. To replace knobs after cleaning, line up ...cleaner to the appliance. Do not use mild dish soap and water or a 50/50 solution of water on the control panel - On self-clean models, the oven door gasket is recommended to 40 minutes. For important cleaning precautions, refer to thoroughly clean the top, sides, and front of the door...

Use and Care Manual
Page 28
... materials; Clean using hot, soapy water and a cloth or sponge. Excess water in or around the controls area. When rinsing, use abrasive cleaners on some models) Before cleaning the control panel, turn all controls off, activate oven lockout (on any knobs from cloth or sponge before wiping control panel, especially when...
... materials; Clean using hot, soapy water and a cloth or sponge. Excess water in or around the controls area. When rinsing, use abrasive cleaners on some models) Before cleaning the control panel, turn all controls off, activate oven lockout (on any knobs from cloth or sponge before wiping control panel, especially when...


