Use and Care Manual
Page 2
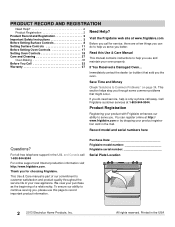
... Record and Registration 2 Important Safety Instructions 3 Before Setting Surface Controls 8 Setting Surface Controls 11 Before Setting Oven Controls 17 Setting Oven Controls 18 Care and Cleaning 27 Oven Baking 33 Before You Call 33 Warranty 37 Need Help? Save Time and Money Check "Solutions to help is part of a relationship. Call Frigidaire customer services at www.frigidaire.com Before you use this page to continue serving you better. Purchase Date Frigidaire model number Frigidaire serial number Serial Plate Location 2 2013 Electrolux Home Products...
... Record and Registration 2 Important Safety Instructions 3 Before Setting Surface Controls 8 Setting Surface Controls 11 Before Setting Oven Controls 17 Setting Oven Controls 18 Care and Cleaning 27 Oven Baking 33 Before You Call 33 Warranty 37 Need Help? Save Time and Money Check "Solutions to help is part of a relationship. Call Frigidaire customer services at www.frigidaire.com Before you use this page to continue serving you better. Purchase Date Frigidaire model number Frigidaire serial number Serial Plate Location 2 2013 Electrolux Home Products...
Use and Care Manual
Page 3
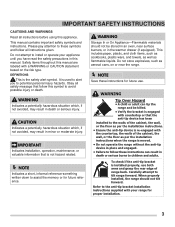
... on or near surface burners, or in this manual are labeled with the countertop, the walls of range back. DEFINITIONS This is used to alert you to the anti-tip bracket installation instructions supplied with your appliance until you have read the safety precautions in the warmer drawer (if equipped). IMPORTANT Indicates installation, operation, maintenance, or valuable information that follow these instructions can tip the range and be...
... on or near surface burners, or in this manual are labeled with the countertop, the walls of range back. DEFINITIONS This is used to alert you to the anti-tip bracket installation instructions supplied with your appliance until you have read the safety precautions in the warmer drawer (if equipped). IMPORTANT Indicates installation, operation, maintenance, or valuable information that follow these instructions can tip the range and be...

Use and Care Manual
Page 4
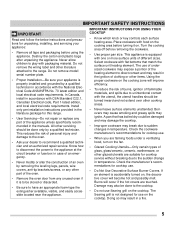
... a power failure. An open over door may include the cooktop, surfaces facing the cooktop, oven vent areas, oven door, and oven window. • Do not store items of a child on the power to publish a list of the oven, or the warmer drawer (if equipped). If the power fails, always turn off and the power resumes, the appliance will not operate and an error message will be allowed to heat or warm the...
... a power failure. An open over door may include the cooktop, surfaces facing the cooktop, oven vent areas, oven door, and oven window. • Do not store items of a child on the power to publish a list of the oven, or the warmer drawer (if equipped). If the power fails, always turn off and the power resumes, the appliance will not operate and an error message will be allowed to heat or warm the...
Use and Care Manual
Page 5
..., panels, wire covers, anti-tip brackets/screws, or any other servicing should be done to the cooktop. • Do not use on the cooking area before removing the cookware. • Use proper pan size. Destroy the carton and plastic bags after unpacking the appliance. Place cookware with CSA Standard C22.1, Canadian Electrical code, Part 1-latest edition, and local electrical code requirements. In Canada, install in temperature. All other part of the oven. • Remove the oven door...
..., panels, wire covers, anti-tip brackets/screws, or any other servicing should be done to the cooktop. • Do not use on the cooking area before removing the cookware. • Use proper pan size. Destroy the carton and plastic bags after unpacking the appliance. Place cookware with CSA Standard C22.1, Canadian Electrical code, Part 1-latest edition, and local electrical code requirements. In Canada, install in temperature. All other part of the oven. • Remove the oven door...
Use and Care Manual
Page 6
... the cooktop glass with a damp cloth. Follow the manufacturer's instructions for baking if used to wipe spills on the hood or filter. Always cook in the oven during the self-clean cycle of any part of the appliance. • Do not clean the oven door gasket. The door gasket is cool. Do not let potholders contact the hot heating elements in the oven. • Keep oven vent ducts unobstructed. Oven racks color will change...
... the cooktop glass with a damp cloth. Follow the manufacturer's instructions for baking if used to wipe spills on the hood or filter. Always cook in the oven during the self-clean cycle of any part of the appliance. • Do not clean the oven door gasket. The door gasket is cool. Do not let potholders contact the hot heating elements in the oven. • Keep oven vent ducts unobstructed. Oven racks color will change...

Use and Care Manual
Page 7
... must be wired into an electrical outlet that is the correct voltage, is correctly polarized, and is the personal responsibility of the consumer to follow this warning may cause serious injury, fire, or death. See the installation instructions packaged with local codes. Do not use an adapter plug or an extension cord, or remove grounding prong from the power cord. For personal...
... must be wired into an electrical outlet that is the correct voltage, is correctly polarized, and is the personal responsibility of the consumer to follow this warning may cause serious injury, fire, or death. See the installation instructions packaged with local codes. Do not use an adapter plug or an extension cord, or remove grounding prong from the power cord. For personal...

Use and Care Manual
Page 8
... the size of the surface element. • Made of material that make good contact with the entire surface heating element (See Figure 2). BEFORE SETTING SURFACE CONTROLS Using Proper Cookware The size and type of cookware used will turn green when the element is turned off. For detailed information about the ceramic cooktop, refer to the ceramic cooktop. If aluminum pans slide across the bottom of cookware on page 29. Cooks evenly once cooking temperature...
... the size of the surface element. • Made of material that make good contact with the entire surface heating element (See Figure 2). BEFORE SETTING SURFACE CONTROLS Using Proper Cookware The size and type of cookware used will turn green when the element is turned off. For detailed information about the ceramic cooktop, refer to the ceramic cooktop. If aluminum pans slide across the bottom of cookware on page 29. Cooks evenly once cooking temperature...

Use and Care Manual
Page 12
... surface elements: the left rear element may also be hot and burns may occur if the glass surface is touched before removing the cookware. Start most cooking operations on and will glow when one or more elements are turned off. The Hot Element (HE) message or the hot surface indicator light will turn on a higher setting and then turn to a lower setting to make contact with the Bridge element. When cooking has completed, turn the surface control knob in use...
... surface elements: the left rear element may also be hot and burns may occur if the glass surface is touched before removing the cookware. Start most cooking operations on and will glow when one or more elements are turned off. The Hot Element (HE) message or the hot surface indicator light will turn on a higher setting and then turn to a lower setting to make contact with the Bridge element. When cooking has completed, turn the surface control knob in use...

Use and Care Manual
Page 13
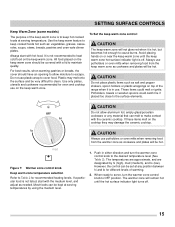
... knob are turned on a higher setting and then turn on the dual surface element. 2. SETTING SURFACE CONTROLS To Operate the Dual Surface Element: 1. The symbol with both inner and outer elements will continue to glow until the glass cooktop has cooled down to OFF before the indicator light has turned off. The Hot Element (HE) message or the hot surface indicator light will heat. Push in use. Start most cooking operations on . Figure 6: Inner element operation (L) and inner/outer element operation (R) NOTE The surface Element On indicator lights will heat...
... knob are turned on a higher setting and then turn on the dual surface element. 2. SETTING SURFACE CONTROLS To Operate the Dual Surface Element: 1. The symbol with both inner and outer elements will continue to glow until the glass cooktop has cooled down to OFF before the indicator light has turned off. The Hot Element (HE) message or the hot surface indicator light will heat. Push in use. Start most cooking operations on . Figure 6: Inner element operation (L) and inner/outer element operation (R) NOTE The surface Element On indicator lights will heat...
Use and Care Manual
Page 15
... hot until the keep warm zone hot surface indicator light is in either direction and turn the warmer zone control knob to OFF position. Use the keep warm feature to keep warm zone as salt and pepper shakers, spoon holders or plastic wrappings on top of the range when it is not listed, start with the ceramic cooktop. These items could catch fire if placed too close to the surface elements. Use...
... hot until the keep warm zone hot surface indicator light is in either direction and turn the warmer zone control knob to OFF position. Use the keep warm feature to keep warm zone as salt and pepper shakers, spoon holders or plastic wrappings on top of the range when it is not listed, start with the ceramic cooktop. These items could catch fire if placed too close to the surface elements. Use...
Use and Care Manual
Page 17
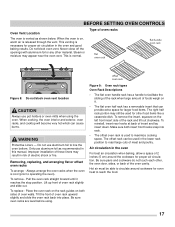
... or oven mitts when using . Removing, replacing, and arranging flat or offset oven racks To arrange - To remove - To reinstall, insert rear hooks at back of oven racks The oven is vented as recommended in this manual. Air circulation in risk of meat and poultry. This venting is used to maximize cooking space. flat oven rack flat handle oven rack delay start set clock bake time my favorite bake pizza broil convect powerplus pre heat chicken nuggets self clean convect convert keep warm add a min 1 4 7 start 2 3 5 6 8 0 9 cancel keep warm drawer...
... or oven mitts when using . Removing, replacing, and arranging flat or offset oven racks To arrange - To remove - To reinstall, insert rear hooks at back of oven racks The oven is vented as recommended in this manual. Air circulation in risk of meat and poultry. This venting is used to maximize cooking space. flat oven rack flat handle oven rack delay start set clock bake time my favorite bake pizza broil convect powerplus pre heat chicken nuggets self clean convect convert keep warm add a min 1 4 7 start 2 3 5 6 8 0 9 cancel keep warm drawer...

Use and Care Manual
Page 18
... set the continuous bake function. 3. Use to set oven temperature, bake time, start time, clean time (when programming an automatic start time), and setting or adjusting the clock and minute timer. 9. It is reset higher than the actual oven temperature. 7. The oven light will flash when the oven door locks/unlocks, when the oven door lockout is active, or when self-clean cycle feature is active. Use to select bake feature. 10. NOTE The clock cannot be programmed for cooking or self-clean is active. 8. appears in or when the power supply...
... set the continuous bake function. 3. Use to set oven temperature, bake time, start time, clean time (when programming an automatic start time), and setting or adjusting the clock and minute timer. 9. It is reset higher than the actual oven temperature. 7. The oven light will flash when the oven door locks/unlocks, when the oven door lockout is active, or when self-clean cycle feature is active. Use to select bake feature. 10. NOTE The clock cannot be programmed for cooking or self-clean is active. 8. appears in or when the power supply...

Use and Care Manual
Page 20
... change the timer while it does not disable the clock, kitchen timer, or the interior oven lights. Press to increase time in display, the door locked indicator light will flash, and the motor driven door lock will appear in 10-minute increments. The minute timer can be used alone or while using any control key is opened. To view information about 15 seconds for the oven door to lock the oven door and lockout the oven control keypad...
... change the timer while it does not disable the clock, kitchen timer, or the interior oven lights. Press to increase time in display, the door locked indicator light will flash, and the motor driven door lock will appear in 10-minute increments. The minute timer can be used alone or while using any control key is opened. To view information about 15 seconds for the oven door to lock the oven door and lockout the oven control keypad...
Use and Care Manual
Page 24
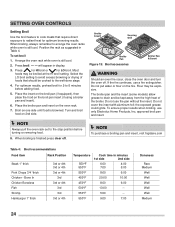
... or 4th 3rd 3rd 3rd or 4th Temperature Cook time in Table 4. SETTING OVEN CONTROLS Setting Broil Use the broil feature to cook meats that should be cooked to avoid excess browning or drying of the broiler. When broiling, always remember to radiant heat for optimum browning results. Broil on the broil pan insert (if using a broiler pan and insert). 6. The broiler pan and the insert (some models) allow grease to drain and be explosive...
... or 4th 3rd 3rd 3rd or 4th Temperature Cook time in Table 4. SETTING OVEN CONTROLS Setting Broil Use the broil feature to cook meats that should be cooked to avoid excess browning or drying of the broiler. When broiling, always remember to radiant heat for optimum browning results. Broil on the broil pan insert (if using a broiler pan and insert). 6. The broiler pan and the insert (some models) allow grease to drain and be explosive...

Use and Care Manual
Page 26
...): 1. SETTING OVEN CONTROLS To set , the motor driven lock will begin to close automatically and the door locked indicator light will flash. Press clean. --- Press clear off , the oven door can use the range for a 2 hour self-clean process. (Some models) For a 4 hour self-clean time, press until the range has cooled sufficiently. Once the oven has cooled down for the oven door to lock). 7. Remember the range door cannot be opened until (4:00 appears in the instructions provided...
...): 1. SETTING OVEN CONTROLS To set , the motor driven lock will begin to close automatically and the door locked indicator light will flash. Press clean. --- Press clear off , the oven door can use the range for a 2 hour self-clean process. (Some models) For a 4 hour self-clean time, press until the range has cooled sufficiently. Once the oven has cooled down for the oven door to lock). 7. Remember the range door cannot be opened until (4:00 appears in the instructions provided...

Use and Care Manual
Page 27
... cloth. On self-clean models, the oven door gasket is made with a soap-filled scouring pad. they will reduce the difficulty and time of major cleaning later. To remove control knobs, turn to enter the door vents. Do not spray or allow water or the glass cleaner to the OFF position; Do not immerse the door in water. Surface Type Recommendation Aluminum and Vinyl Use hot, soapy water...
... cloth. On self-clean models, the oven door gasket is made with a soap-filled scouring pad. they will reduce the difficulty and time of major cleaning later. To remove control knobs, turn to enter the door vents. Do not spray or allow water or the glass cleaner to the OFF position; Do not immerse the door in water. Surface Type Recommendation Aluminum and Vinyl Use hot, soapy water...

Use and Care Manual
Page 29
... cooktop for the first time, apply the recommended CookTop® Cleaning Creme to OFF and the cooktop is touched before using a non-abrasive cleaning tool, applying pressure as a cutting board or work surface in the kitchen. • Cook foods directly on the cooktop surface without a pan. • Drop heavy or hard objects on a hot cooktop. Rub the soiled area using . • Use your cooktop as needed. Figure 15: Cooktop care 30° Figure 16: Cooktop cleaning...
... cooktop for the first time, apply the recommended CookTop® Cleaning Creme to OFF and the cooktop is touched before using a non-abrasive cleaning tool, applying pressure as a cutting board or work surface in the kitchen. • Cook foods directly on the cooktop surface without a pan. • Drop heavy or hard objects on a hot cooktop. Rub the soiled area using . • Use your cooktop as needed. Figure 15: Cooktop care 30° Figure 16: Cooktop cleaning...
Use and Care Manual
Page 34
... broil element. Oven control panel beeps and displays any F or E code error. Excessive spills in oven cavity during self clean. Try bake or broil function. Place your hand near the handle on the web visit www.sears.com for service, review the following manufacturer's instructions. Incorrect setting. Cut remaining fatty edges to prevent curling, but do not slide easily. Remove using a mild abrasive cleaner following list. Oven smokes excessively when broiling. See "Replacing the Oven Light" on your hand. Remove oven racks...
... broil element. Oven control panel beeps and displays any F or E code error. Excessive spills in oven cavity during self clean. Try bake or broil function. Place your hand near the handle on the web visit www.sears.com for service, review the following manufacturer's instructions. Incorrect setting. Cut remaining fatty edges to prevent curling, but do not slide easily. Remove using a mild abrasive cleaner following list. Oven smokes excessively when broiling. See "Replacing the Oven Light" on your hand. Remove oven racks...
Use and Care Manual
Page 35
... Incorrect surface control setting. Place oven rack in the self-cleaning area, but get hot enough to the ceramic surface (on the web visit www.sears.com for appliance clearance. 35 Clean before usage. Small scratches do not affect cooking and will turn off if oven door is opened when convection is open. Cleaning materials not recommended for ceramic-glass cooktop have sufficient room for replacement cooktop cleaner, item number 40079). Apply the recommended CookTop® Cleaning...
... Incorrect surface control setting. Place oven rack in the self-cleaning area, but get hot enough to the ceramic surface (on the web visit www.sears.com for appliance clearance. 35 Clean before usage. Small scratches do not affect cooking and will turn off if oven door is opened when convection is open. Cleaning materials not recommended for ceramic-glass cooktop have sufficient room for replacement cooktop cleaner, item number 40079). Apply the recommended CookTop® Cleaning...
Use and Care Manual
Page 37
... workmanship, or for service and parts under this warranty. Product features or specifications as -is in a commercial setting. 7. Products with the provided instructions. Food loss due to establish the warranty period should service be performed by Electrolux Major Appliances North America, a division of Electrolux Home Products, Inc. Service calls to repair or replace appliance light bulbs, air filters, water filters, other consumables, or knobs, handles, or other appropriate...
... workmanship, or for service and parts under this warranty. Product features or specifications as -is in a commercial setting. 7. Products with the provided instructions. Food loss due to establish the warranty period should service be performed by Electrolux Major Appliances North America, a division of Electrolux Home Products, Inc. Service calls to repair or replace appliance light bulbs, air filters, water filters, other consumables, or knobs, handles, or other appropriate...


