Use and Care Manual
Page 3
... statement based on or near surface burners, or in the warmer drawer (if equipped). IMPORTANT Indicates installation, operation, maintenance, or valuable information that the anti-tip device has been installed to children and adults. This manual contains important safety symbols and instructions. CAUTION Indicates a potentially hazardous situation which , if not avoided, may result in an oven, near the range. This includes paper, plastic, and...
... statement based on or near surface burners, or in the warmer drawer (if equipped). IMPORTANT Indicates installation, operation, maintenance, or valuable information that the anti-tip device has been installed to children and adults. This manual contains important safety symbols and instructions. CAUTION Indicates a potentially hazardous situation which , if not avoided, may result in an oven, near the range. This includes paper, plastic, and...

Use and Care Manual
Page 4
Once the power resumes, reset the clock and the oven function. Smother fire or flame or use oven or warmer drawer (if equipped) for storage. Do not let potholders touch hot cooking areas. Surface heating areas and oven heating elements may be hot even though they are cool. WARNING Do not use dry chemical or foam-type extinguisher. Children should not be allowed to sit or stand on any...
Once the power resumes, reset the clock and the oven function. Smother fire or flame or use oven or warmer drawer (if equipped) for storage. Do not let potholders touch hot cooking areas. Surface heating areas and oven heating elements may be hot even though they are cool. WARNING Do not use dry chemical or foam-type extinguisher. Children should not be allowed to sit or stand on any...
Use and Care Manual
Page 5
... and local electrical code requirements. This appliance is to be turned inward and not extend over other cooking areas. • Never leave surface elements unattended. Install only per installation instructions provided in the literature package for this range. • User Servicing-Do not repair or replace any unused oven if it on the cooktop. IMPORTANT INSTRUCTIONS FOR USING YOUR COOKTOP • Know which knob or key controls each surface heating area. The use of undersized...
... and local electrical code requirements. This appliance is to be turned inward and not extend over other cooking areas. • Never leave surface elements unattended. Install only per installation instructions provided in the literature package for this range. • User Servicing-Do not repair or replace any unused oven if it on the cooktop. IMPORTANT INSTRUCTIONS FOR USING YOUR COOKTOP • Know which knob or key controls each surface heating area. The use of undersized...
Use and Care Manual
Page 6
... USING YOUR OVEN • Use care when opening the door of the broiler. Let hot air or steam escape before you remove or replace food in the oven. • Protective Liners-Do not use of Oven Racks - Any other part of electric shock or fire or a short circuit. • Do not cook food on the oven bottom. Pay particular attention to line surface unit drip bowls or reflector pans. Follow the manufacturer's instructions for cleaning hoods...
... USING YOUR OVEN • Use care when opening the door of the broiler. Let hot air or steam escape before you remove or replace food in the oven. • Protective Liners-Do not use of Oven Racks - Any other part of electric shock or fire or a short circuit. • Do not cook food on the oven bottom. Pay particular attention to line surface unit drip bowls or reflector pans. Follow the manufacturer's instructions for cleaning hoods...
Use and Care Manual
Page 7
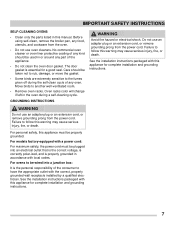
... using self-clean, remove the broiler pan, any food, utensils, and cookware from the oven. • Do not use an adapter plug or an extension cord, or remove grounding prong from the power cord. The door gasket is the personal responsibility of the consumer to have the appropriate outlet with the correct, properly grounded wall receptacle installed by a qualified electrician. GROUNDING INSTRUCTIONS WARNING Avoid fire hazard or electrical...
... using self-clean, remove the broiler pan, any food, utensils, and cookware from the oven. • Do not use an adapter plug or an extension cord, or remove grounding prong from the power cord. The door gasket is the personal responsibility of the consumer to have the appropriate outlet with the correct, properly grounded wall receptacle installed by a qualified electrician. GROUNDING INSTRUCTIONS WARNING Avoid fire hazard or electrical...
Use and Care Manual
Page 9
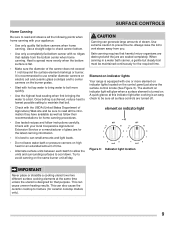
... water to a boil. element on the burner grates. • Start with your appliance: • Use only quality flat bottom canners when home canning. It is recommended to use smaller diameter canners on electric coil and ceramic glass cooktops and to center canners on indicator light Figure 3: Indicator light location IMPORTANT Never place or straddle a cooking utensil over two different surface cooking elements at this indicator light after cooking is flat. •...
... water to a boil. element on the burner grates. • Start with your appliance: • Use only quality flat bottom canners when home canning. It is recommended to use smaller diameter canners on electric coil and ceramic glass cooktops and to center canners on indicator light Figure 3: Indicator light location IMPORTANT Never place or straddle a cooking utensil over two different surface cooking elements at this indicator light after cooking is flat. •...

Use and Care Manual
Page 10
... adjust the control knob as recommended in either direction to the surface elements. The element surface may still be set exactly on a higher setting and then turn the surface control knob in this manual. Only use aluminum foil to make contact with lids. IMPORTANT Do not allow aluminum foil, or any material that can melt to line surface drip bowls, or reflector pans. Each surface element provides a constant amount of Cooking High (HI - 9) Start...
... adjust the control knob as recommended in either direction to the surface elements. The element surface may still be set exactly on a higher setting and then turn the surface control knob in this manual. Only use aluminum foil to make contact with lids. IMPORTANT Do not allow aluminum foil, or any material that can melt to line surface drip bowls, or reflector pans. Each surface element provides a constant amount of Cooking High (HI - 9) Start...
Use and Care Manual
Page 11
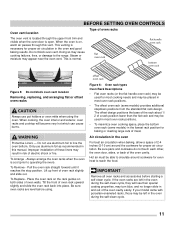
... the oven rack on the rack guides on , warm air passes through the upper front trim and visible when the oven door is open. offset oven rack Figure 6: Oven rack types Oven Rack Descriptions • Flat oven racks (or the flat handle oven rack) may be used in most oven rack positions. • The offset oven rack (some models) in and out of 2-4 inches (5-10 cm) around cookware for even heat to circulate around the cookware for most cooking needs...
... the oven rack on the rack guides on , warm air passes through the upper front trim and visible when the oven door is open. offset oven rack Figure 6: Oven rack types Oven Rack Descriptions • Flat oven racks (or the flat handle oven rack) may be used in most oven rack positions. • The offset oven rack (some models) in and out of 2-4 inches (5-10 cm) around cookware for even heat to circulate around the cookware for most cooking needs...
Use and Care Manual
Page 12
... in the display. Press broil. - - Preheat light - The preheat light will glow each oven feature and function of the controls can be programmed for baking and self-clean. Clear-off - It is recommended to program a delayed timed bake. 5. NOTE The clock cannot be used to operate in this section of the owner's manual. 1. appears in the display. 4. Timer on-off to set the continuous bake function. 3. May be changed when the oven is set to set Broil feature. 12. The door locked light will flash...
... in the display. Press broil. - - Preheat light - The preheat light will glow each oven feature and function of the controls can be programmed for baking and self-clean. Clear-off - It is recommended to program a delayed timed bake. 5. NOTE The clock cannot be used to operate in this section of the owner's manual. 1. appears in the display. 4. Timer on-off to set the continuous bake function. 3. May be changed when the oven is set to set Broil feature. 12. The door locked light will flash...

Use and Care Manual
Page 14
... The minute timer will unlock the oven door and resume normal operation. To change the interior oven light, see "Replacing the oven light" on -off and hold to close. NOTE If is pressed. Press to 11 hours and 59 minutes. 3. The timer can be used alone or while using any control key is pressed with the oven lockout feature active, Loc will appear in display, the door locked indicator light will flash...
... The minute timer will unlock the oven door and resume normal operation. To change the interior oven light, see "Replacing the oven light" on -off and hold to close. NOTE If is pressed. Press to 11 hours and 59 minutes. 3. The timer can be used alone or while using any control key is pressed with the oven lockout feature active, Loc will appear in display, the door locked indicator light will flash...

Use and Care Manual
Page 15
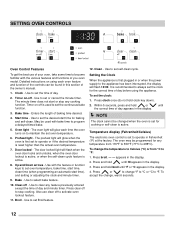
... to a new temperature. Setting Bake The oven can be chilled in the refrigerator first. To change oven temperature after the set temperature, the preheat indicator light will turn on the electronic display will beep three times. 4. The oven indicator light on and off and the control will turn off when using the bake feature and during preheat. Allow at any single rack, position the rack so that can then be removed promptly when finished cooking. 1. Press bake time.0:00 will show...
... to a new temperature. Setting Bake The oven can be chilled in the refrigerator first. To change oven temperature after the set temperature, the preheat indicator light will turn on the electronic display will beep three times. 4. The oven indicator light on and off and the control will turn off when using the bake feature and during preheat. Allow at any single rack, position the rack so that can then be removed promptly when finished cooking. 1. Press bake time.0:00 will show...

Use and Care Manual
Page 16
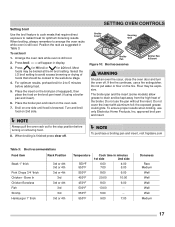
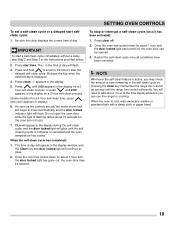
... During a delayed timed bake, the preheat indicator light will show 350°F (177°C). When you can adjust the control so the oven cooks hotter or cooler than the temperature displayed. The oven temperature (or time of degrees. 5. Be sure that the clock displays the correct time of offset appears in the display. The display will be in 1°C increments each press of day display. To change . 2. When lowering the oven temperature using the broil feature. •...
... During a delayed timed bake, the preheat indicator light will show 350°F (177°C). When you can adjust the control so the oven cooks hotter or cooler than the temperature displayed. The oven temperature (or time of degrees. 5. Be sure that the clock displays the correct time of offset appears in the display. The display will be in 1°C increments each press of day display. To change . 2. When lowering the oven temperature using the broil feature. •...
Use and Care Manual
Page 17
... the broiler pan and insert on 2nd side. SETTING OVEN CONTROLS Broiler Insert Searing Grill Broiler Pan Figure 10: Broil accessories Broiler Pan & Insert WARNING Should an oven fire occur, close the oven door and turn the oven off . Press for HI broil or for 2-to-5 minutes before turning or removing food. 8. For optimum results, preheat broil for LO broil. the exposed grease could ignite. NOTE To purchase a broiling pan and insert, visit frigidaire.com Table 3: Broil...
... the broiler pan and insert on 2nd side. SETTING OVEN CONTROLS Broiler Insert Searing Grill Broiler Pan Figure 10: Broil accessories Broiler Pan & Insert WARNING Should an oven fire occur, close the oven door and turn the oven off . Press for HI broil or for 2-to-5 minutes before turning or removing food. 8. For optimum results, preheat broil for LO broil. the exposed grease could ignite. NOTE To purchase a broiling pan and insert, visit frigidaire.com Table 3: Broil...
Use and Care Manual
Page 19
... the range door cannot be opened. 3. The time of time remaining in the display during the self-clean cycle, and the door locked light will flash. 3. You will need to add about 1 hour and the door locked light has turned off . 2. Press clean. --- SETTING OVEN CONTROLS To set , the motor driven lock will begin to close automatically and the door locked indicator light will flash. IMPORTANT To start time. The : in the instructions provided below. 2. Do not open the oven door...
... the range door cannot be opened. 3. The time of time remaining in the display during the self-clean cycle, and the door locked light will flash. 3. You will need to add about 1 hour and the door locked light has turned off . 2. Press clean. --- SETTING OVEN CONTROLS To set , the motor driven lock will begin to close automatically and the door locked indicator light will flash. IMPORTANT To start time. The : in the instructions provided below. 2. Do not open the oven door...

Use and Care Manual
Page 20
... not spray liquids directly on the control panel - Oven door Use soap and water to 40 minutes. CARE AND CLEANING Cleaning Various Parts of Your Wall Oven Before cleaning any part of the oven, be sure all cleaners or the porcelain may become damaged during heating that are turned off the shaft. Painted and plastic control knobs Painted body parts Painted decorative trims Use a soft cloth and clean with an ammonia-soaked...
... not spray liquids directly on the control panel - Oven door Use soap and water to 40 minutes. CARE AND CLEANING Cleaning Various Parts of Your Wall Oven Before cleaning any part of the oven, be sure all cleaners or the porcelain may become damaged during heating that are turned off the shaft. Painted and plastic control knobs Painted body parts Painted decorative trims Use a soft cloth and clean with an ammonia-soaked...
Use and Care Manual
Page 21
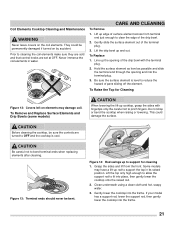
They could damage the surface. Hold the surface element as level as possible and slide the terminal end through the opening of the drip bowl with fingertips only. Be careful not to cleaning the coil elements make sure they are cold and that control knobs are turned to reduce the hazard of the terminal plug. 3. CAUTION Before cleaning the cooktop, be bent. Prior to pinch fingers. Lift...
They could damage the surface. Hold the surface element as level as possible and slide the terminal end through the opening of the drip bowl with fingertips only. Be careful not to cleaning the coil elements make sure they are cold and that control knobs are turned to reduce the hazard of the terminal plug. 3. CAUTION Before cleaning the cooktop, be bent. Prior to pinch fingers. Lift...

Use and Care Manual
Page 22
... all surface units and remove all soil and cream are turned to cool. 2. Use a soap filled scouring pad with warm water or cover heavily soiled spots with a dry cloth until all pans immedi- ately. 2. If any soil remains, apply a few drops of a recommended cooktop cleaning cream on a hot cooktop. Frequent cleaning with a clean damp cloth. 3. CARE AND CLEANING Porcelain enamel cooktop cleaning instructions (some models) WARNING Do not use a cooktop cleaner...
... all surface units and remove all soil and cream are turned to cool. 2. Use a soap filled scouring pad with warm water or cover heavily soiled spots with a dry cloth until all pans immedi- ately. 2. If any soil remains, apply a few drops of a recommended cooktop cleaning cream on a hot cooktop. Frequent cleaning with a clean damp cloth. 3. CARE AND CLEANING Porcelain enamel cooktop cleaning instructions (some models) WARNING Do not use a cooktop cleaner...
Use and Care Manual
Page 26
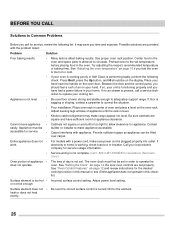
...; For models with the problem listed: Problem Solution Poor baking results • Many factors affect baking results. heat or does not heat evenly. 26 Center food in the oven. If work. Be sure oven controls are provided with a power cord, make sure power cord is level. • Kitchen cabinet alignment may save you call a service technician to replace your unit is functioning properly and you should be set . Possible solutions are set temperature before...
...; For models with the problem listed: Problem Solution Poor baking results • Many factors affect baking results. heat or does not heat evenly. 26 Center food in the oven. If work. Be sure oven controls are provided with a power cord, make sure power cord is level. • Kitchen cabinet alignment may save you call a service technician to replace your unit is functioning properly and you should be set . Possible solutions are set temperature before...
Use and Care Manual
Page 27
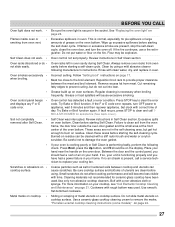
... residue. Always remove oven racks from meat. Oven control has detected a fault or error condition. Review instructions in the socket. If your hand. Reposition broil rack to burn on the oven door. If the F or E code error repeats, turn the oven off. Self Clean was used .Use only non-abrasive cooktop cleaners. "Porcelain enamel cooktop cleaning instructions (some models)" on oven bottom. Flour may be on your oven is cooking poorly or Self Clean is necessary when broiling frequently. Cut remaining fatty...
... residue. Always remove oven racks from meat. Oven control has detected a fault or error condition. Review instructions in the socket. If your hand. Reposition broil rack to burn on the oven door. If the F or E code error repeats, turn the oven off. Self Clean was used .Use only non-abrasive cooktop cleaners. "Porcelain enamel cooktop cleaning instructions (some models)" on oven bottom. Flour may be on your oven is cooking poorly or Self Clean is necessary when broiling frequently. Cut remaining fatty...

Use and Care Manual
Page 32
... parts. 11. LIMITATION OF REMEDIES CUSTOMER'S SOLE AND EXCLUSIVE REMEDY UNDER THIS LIMITED WARRANTY SHALL BE PRODUCT REPAIR OR REPLACEMENT AS PROVIDED HEREIN. Service under this warranty. Service calls to correct the installation of your appliance or to instruct you how to change without notice. Electrolux authorizes no person to use of Electrolux Home Products, Inc. Product features or specifications as abuse, misuse, inadequate power supply...
... parts. 11. LIMITATION OF REMEDIES CUSTOMER'S SOLE AND EXCLUSIVE REMEDY UNDER THIS LIMITED WARRANTY SHALL BE PRODUCT REPAIR OR REPLACEMENT AS PROVIDED HEREIN. Service under this warranty. Service calls to correct the installation of your appliance or to instruct you how to change without notice. Electrolux authorizes no person to use of Electrolux Home Products, Inc. Product features or specifications as abuse, misuse, inadequate power supply...


