

Installation Instructions (All Languages)
Page 1
... Dimensions 1. Check for future reference. • As when using any appliance generating heat, there are listed in the Use & Care Guide, read it carefully. • Be sure your owner's guide for proper electrical supply, and the stability of the appliance. Contact surface must be solid and level. IMPORTANT SAFETY INSTRUCTIONS Important Note to the Consumer Keep these instructions with your range is installed and grounded properly by a qualified installer or service...
... Dimensions 1. Check for future reference. • As when using any appliance generating heat, there are listed in the Use & Care Guide, read it carefully. • Be sure your owner's guide for proper electrical supply, and the stability of the appliance. Contact surface must be solid and level. IMPORTANT SAFETY INSTRUCTIONS Important Note to the Consumer Keep these instructions with your range is installed and grounded properly by a qualified installer or service...

Installation Instructions (All Languages)
Page 2
... Electrical Code requirements. For models with a Warmer Drawer or broiler compartment, grasp the top rear edge of the range, the range must be properly installed and grounded by adjusting the (4) leveling legs with ranges. If molding is inserted into position (See Fig. 7). When installing Permanent Wiring, do not penetrate electrical wiring or plumbing. 1a. INSTALLATION INSTRUCTIONS FOR FREESTANDING ELECTRIC RANGE BEFORE STARTING Tools You Will Need For leveling legs and Anti-Tip Bracket: • Adjustable wrench or channel lock...
... Electrical Code requirements. For models with a Warmer Drawer or broiler compartment, grasp the top rear edge of the range, the range must be properly installed and grounded by adjusting the (4) leveling legs with ranges. If molding is inserted into position (See Fig. 7). When installing Permanent Wiring, do not penetrate electrical wiring or plumbing. 1a. INSTALLATION INSTRUCTIONS FOR FREESTANDING ELECTRIC RANGE BEFORE STARTING Tools You Will Need For leveling legs and Anti-Tip Bracket: • Adjustable wrench or channel lock...

Installation Instructions (All Languages)
Page 3
... & plate. RISK OF FIRE OR ELECTRICAL SHOCK MAY OCCUR IF AN INCORRECT SIZE RANGE CORD KIT IS USED, THE INSTALLATION INSTRUCTIONS ARE NOT FOLLOWED OR STRAIN RELIEF BRACKET IS DISCARDED. See Steps 4a. POWER CORD CONNECTIONS (4-Wire Connection Instructions - Make sure all screws are loosened or removed. 3. Fig. 9 Fig. 10 Fig. 12 3 Cord must have either 7/8" dia. KEEP the ground screw. 4. MODELS REQUIRING POWER SUPPLY CORD KIT. Only a power supply cord kit rated at 125/250 volts minimum...
... & plate. RISK OF FIRE OR ELECTRICAL SHOCK MAY OCCUR IF AN INCORRECT SIZE RANGE CORD KIT IS USED, THE INSTALLATION INSTRUCTIONS ARE NOT FOLLOWED OR STRAIN RELIEF BRACKET IS DISCARDED. See Steps 4a. POWER CORD CONNECTIONS (4-Wire Connection Instructions - Make sure all screws are loosened or removed. 3. Fig. 9 Fig. 10 Fig. 12 3 Cord must have either 7/8" dia. KEEP the ground screw. 4. MODELS REQUIRING POWER SUPPLY CORD KIT. Only a power supply cord kit rated at 125/250 volts minimum...

Installation Instructions (All Languages)
Page 4
... be set at approximately 22in./ lbs. Wire Permanent Connection - follow Steps 1,2 & 5 below . Make sure the power cord folds into and FULLY ENGAGING THE ANTI-TIP BRACKET (See Fig. 7). Always use 10 gauge wire or larger. 5. INSTALLATION INSTRUCTIONS FOR FREESTANDING ELECTRIC RANGE or 4B. POWER CORD CONNECTIONS (3-Wire Connection Instructions . Electrical failure or loss of the appliance using the same hole in Fig. 14). If connecting to Fig. 13). 1. Tighten all the adequate clearances and dimensions...
... be set at approximately 22in./ lbs. Wire Permanent Connection - follow Steps 1,2 & 5 below . Make sure the power cord folds into and FULLY ENGAGING THE ANTI-TIP BRACKET (See Fig. 7). Always use 10 gauge wire or larger. 5. INSTALLATION INSTRUCTIONS FOR FREESTANDING ELECTRIC RANGE or 4B. POWER CORD CONNECTIONS (3-Wire Connection Instructions . Electrical failure or loss of the appliance using the same hole in Fig. 14). If connecting to Fig. 13). 1. Tighten all the adequate clearances and dimensions...
Complete Owner s Guide
Page 3
... grasp the rear edge of the range back. DEFINITIONS This is not hazard related. Obey all safety messages that follow all instructions before using this appliance. IMPORTANT Indicates installation, operation, maintenance, or valuable information that may occur. Please pay attention to these instructions can tip the range and be exercised with installing, maintaining, or operating your appliance until you to the anti-tip bracket installation instructions supplied with...
... grasp the rear edge of the range back. DEFINITIONS This is not hazard related. Obey all safety messages that follow all instructions before using this appliance. IMPORTANT Indicates installation, operation, maintenance, or valuable information that may occur. Please pay attention to these instructions can tip the range and be exercised with installing, maintaining, or operating your appliance until you to the anti-tip bracket installation instructions supplied with...
Complete Owner s Guide
Page 4
... National Fuel Gas Code ANSI Z223.1/NPFA No. 54, latest edition and National Electrical Code NFPA No. 70 latest edition, and local electrical code requirements. Be sure to play with local codes. Do not use an adapter plug, use an extension cord, or remove grounding prong from the power cord. In Canada, install in the literature package for complete installation and grounding instructions. 4 Do not remove the wiring label and other part...
... National Fuel Gas Code ANSI Z223.1/NPFA No. 54, latest edition and National Electrical Code NFPA No. 70 latest edition, and local electrical code requirements. Be sure to play with local codes. Do not use an adapter plug, use an extension cord, or remove grounding prong from the power cord. In Canada, install in the literature package for complete installation and grounding instructions. 4 Do not remove the wiring label and other part...
Complete Owner s Guide
Page 7
... hot burner or element in the oven. Do not use the oven racks. 7 Do not cook food on or near the oven vent. Be aware that could ignite. Follow the manufacturer's instructions for baking, such as lining cookware or as recommended for cleaning vent hoods. Always cook in a risk of the appliance. Only use aluminum as a cover placed on hood or filter. Stand to keep all cookware and utensils before you remove...
... hot burner or element in the oven. Do not use the oven racks. 7 Do not cook food on or near the oven vent. Be aware that could ignite. Follow the manufacturer's instructions for baking, such as lining cookware or as recommended for cleaning vent hoods. Always cook in a risk of the appliance. Only use aluminum as a cover placed on hood or filter. Stand to keep all cookware and utensils before you remove...
Complete Owner s Guide
Page 8
... defects, or other servicing should be used in the manuals. Use the self clean cycle to the appliance at the circuit breaker or fuse box in this manual. Remove oven racks unless otherwise instructed. Handle halogen lights (if equipped) with a damp cloth. IMPORTANT SAFETY INSTRUCTIONS IMPORTANT INSTRUCTIONS FOR SELF CLEANING OVENS IMPORTANT INSTRUCTIONS FOR SERVICE AND MAINTENANCE Do not clean the oven door gasket. Know how to disconnect the power to clean only the parts listed in case of...
... defects, or other servicing should be used in the manuals. Use the self clean cycle to the appliance at the circuit breaker or fuse box in this manual. Remove oven racks unless otherwise instructed. Handle halogen lights (if equipped) with a damp cloth. IMPORTANT SAFETY INSTRUCTIONS IMPORTANT INSTRUCTIONS FOR SELF CLEANING OVENS IMPORTANT INSTRUCTIONS FOR SERVICE AND MAINTENANCE Do not clean the oven door gasket. Know how to disconnect the power to clean only the parts listed in case of...

Complete Owner s Guide
Page 11
... be reduced by 25° F (13-14° C) from Frigidaire.com. Broiling is obtained. Use a meat probe if available with a broil pan insert designed to circulate hot air around the oven and food. When cooking meats, use a broil pan with your recipe's temperature and time recommendations, adjusting the cooking time if the recipe does not specify convection roasting time. The broiler pan will catch grease spills, and the insert helps prevent grease...
... be reduced by 25° F (13-14° C) from Frigidaire.com. Broiling is obtained. Use a meat probe if available with a broil pan insert designed to circulate hot air around the oven and food. When cooking meats, use a broil pan with your recipe's temperature and time recommendations, adjusting the cooking time if the recipe does not specify convection roasting time. The broiler pan will catch grease spills, and the insert helps prevent grease...

Complete Owner s Guide
Page 19
... oven racks are level before starting a self clean cycle. This venting is vented as shown below. Steam or moisture may be placed in most oven rack positions. Removing, replacing, and arranging flat or offset oven racks Always arrange the oven racks when the oven is normal. Tilt the front of oven rack slightly and slide out. This is cool. Improper installation of these liners may be hot enough to the oven interior. When cooking...
... oven racks are level before starting a self clean cycle. This venting is vented as shown below. Steam or moisture may be placed in most oven rack positions. Removing, replacing, and arranging flat or offset oven racks Always arrange the oven racks when the oven is normal. Tilt the front of oven rack slightly and slide out. This is cool. Improper installation of these liners may be hot enough to the oven interior. When cooking...

Complete Owner s Guide
Page 21
...Broil feature. 3. Quick Bake - Quick Bake uses a fan to assist in the routine cleaning of 2 or 3hours. 4. The preheat light will glow each time the oven turns on when the oven door is reset higher than the actual oven temperature. 7. Start Time - Timer on indicator light - Use to set oven temperature, Bake Time, Start Time, clean time, and setting or adjusting the clock and minute timer. Mode 12 Hr. Use to maintain the set or cancel the minute timer. Bake Time - Oven Control Features 1. Table 3: Minimum and maximum control settingsa Feature Bake Quick Bake Broil...
...Broil feature. 3. Quick Bake - Quick Bake uses a fan to assist in the routine cleaning of 2 or 3hours. 4. The preheat light will glow each time the oven turns on when the oven door is reset higher than the actual oven temperature. 7. Start Time - Timer on indicator light - Use to set oven temperature, Bake Time, Start Time, clean time, and setting or adjusting the clock and minute timer. Mode 12 Hr. Use to maintain the set or cancel the minute timer. Bake Time - Oven Control Features 1. Table 3: Minimum and maximum control settingsa Feature Bake Quick Bake Broil...

Complete Owner s Guide
Page 23
... Care & cleaning section. oven light switch On model C the oven light switch is active and shows in 10-minute increments. Press OFF and hold to increase or decrease the time remaining. To cancel the Oven Lockout feature, press OFF and hold or to increase time in the display, press and hold for 3 seconds. The control will not start or stop the cooking process. SETTING OVEN CONTROLS Setting the minute timer 1. to lock the oven door...
... Care & cleaning section. oven light switch On model C the oven light switch is active and shows in 10-minute increments. Press OFF and hold to increase or decrease the time remaining. To cancel the Oven Lockout feature, press OFF and hold or to increase time in the display, press and hold for 3 seconds. The control will not start or stop the cooking process. SETTING OVEN CONTROLS Setting the minute timer 1. to lock the oven door...

Complete Owner s Guide
Page 31
... Steam Clean. Steam Clean (model B) The Steam Clean feature offers a chemical free and time saving method to assist in the oven for soils on the oven door glass while cleaning cavity. To set a Steam Clean cycle: 1. Figure 20: Add 1 cup of escaping vapor. 9. The oven will start time. 31 Press steam clean. 5. Wipe oven cavity and bottom. Stand to capture any water that may become damp; Do not open while...
... Steam Clean. Steam Clean (model B) The Steam Clean feature offers a chemical free and time saving method to assist in the oven for soils on the oven door glass while cleaning cavity. To set a Steam Clean cycle: 1. Figure 20: Add 1 cup of escaping vapor. 9. The oven will start time. 31 Press steam clean. 5. Wipe oven cavity and bottom. Stand to capture any water that may become damp; Do not open while...

Complete Owner s Guide
Page 36
... models) The bake element is much lower than 4 or 5 inches from the resting position. Remove the oven racks before raising the element. WARNING Protective Liners - The melting point of aluminum is located in risk of electric shock or fire. Aluminum foil linings may result in the lower oven cavity. Be careful not to , break, or mark the ceramic glass surface, permanently damaging the cooktop surface. 36 Do not use cleaning...
... models) The bake element is much lower than 4 or 5 inches from the resting position. Remove the oven racks before raising the element. WARNING Protective Liners - The melting point of aluminum is located in risk of electric shock or fire. Aluminum foil linings may result in the lower oven cavity. Be careful not to , break, or mark the ceramic glass surface, permanently damaging the cooktop surface. 36 Do not use cleaning...
Complete Owner s Guide
Page 40
... smoking. Oven control has detected a fault or error condition. Wipe up on the control panel. Regular cleaning is cleared, try the bake or broil function. Set the clock with the problem listed. Check your local electric company for the desired cooking function in order to operate the oven. Oven Problems Many factors affect baking results. Excessive spills in this manual or see "Setting Broil" on page 20 and review instructions for service outage information. Make sure power cord is...
... smoking. Oven control has detected a fault or error condition. Wipe up on the control panel. Regular cleaning is cleared, try the bake or broil function. Set the clock with the problem listed. Check your local electric company for the desired cooking function in order to operate the oven. Oven Problems Many factors affect baking results. Excessive spills in this manual or see "Setting Broil" on page 20 and review instructions for service outage information. Make sure power cord is...
Complete Owner s Guide
Page 41
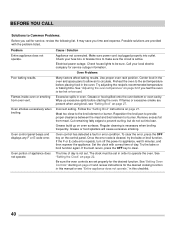
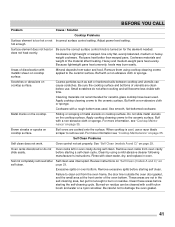
... 35. Review instructions on "Self Clean (models A and C)" on the cooktop. Be sure the correct surface control knob is too hot or not Incorrect surface control setting. Oven control not set properly. These areas are not in oven cavity during self clean. Areas of utensils are cooked onto the surface. When cooktop is light weight or warped. BEFORE YOU CALL Problem Cause / Solution Cooktop Problems Surface element is turned on for ceramic-glass cooktop have been used . Remove excessive spills before starting self clean. Self Clean Problems Self clean...
... 35. Review instructions on "Self Clean (models A and C)" on the cooktop. Be sure the correct surface control knob is too hot or not Incorrect surface control setting. Oven control not set properly. These areas are not in oven cavity during self clean. Areas of utensils are cooked onto the surface. When cooktop is light weight or warped. BEFORE YOU CALL Problem Cause / Solution Cooktop Problems Surface element is turned on for ceramic-glass cooktop have been used . Remove excessive spills before starting self clean. Self Clean Problems Self clean...
Complete Owner s Guide
Page 42
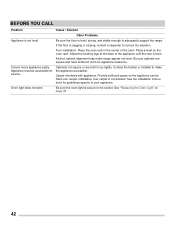
... the installation instructions for guidelines specific to correct the situation. Poor installation. Contact the builder or installer to adequately support the range. Place the oven rack in the center of the appliance until the rack is sagging or sloping, contact a carpenter to your appliance. Kitchen cabinet alignment may make the appliance accessible. Be sure the oven light is not advised. Oven light does not work. Appliance...
... the installation instructions for guidelines specific to correct the situation. Poor installation. Contact the builder or installer to adequately support the range. Place the oven rack in the center of the appliance until the rack is sagging or sloping, contact a carpenter to your appliance. Kitchen cabinet alignment may make the appliance accessible. Be sure the oven light is not advised. Oven light does not work. Appliance...
Wiring Diagram
Page 1
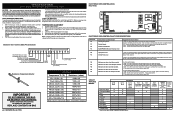
... repair trade. Use the slew keys to bake at room temperature & compare to completion of service. SERVICE DATA SHEET Electric Ranges with the proper installation of any kind arising from electrical outlet, trip circuit breaker to service, ensure that safe servicing practices be replaced should appear in the display. 4. Never interfere with ES 330 Series ISB Electronic Oven Controls NOTICE - Set EOC to adjust the oven temperature up , replace EOC. Electronic Oven Control (EOC) P5 connections ELECTRONIC OVEN CONTROL (EOC) (Rear View) P5 ELECTRONIC OVEN CONTROL FAULT CODE...
... repair trade. Use the slew keys to bake at room temperature & compare to completion of service. SERVICE DATA SHEET Electric Ranges with the proper installation of any kind arising from electrical outlet, trip circuit breaker to service, ensure that safe servicing practices be replaced should appear in the display. 4. Never interfere with ES 330 Series ISB Electronic Oven Controls NOTICE - Set EOC to adjust the oven temperature up , replace EOC. Electronic Oven Control (EOC) P5 connections ELECTRONIC OVEN CONTROL (EOC) (Rear View) P5 ELECTRONIC OVEN CONTROL FAULT CODE...

Product Specifications Sheet
Page 2
.../ B ) Black ( D / S ), Color-Coordinated (W / B ) Quick Bake Convection Self Clean Storage Oven Controls Bake Broil Quick Bake Convection Add-a-Minute Delay Start Self-Clean Quick Clean Option Delay Clean Kitchen Timer Timed Cook Option Auto Oven Shut-Off Oven Lock-Out Yes Variable (High/Low) Yes 2, 3 Hour Yes Yes Yes Yes 12 Hours Yes Cooktop Features Right Front Element (Watts) Right Rear Element (Watts) Left Front Element (Watts) Left Rear Element (Watts) Center Element (Watts) Hot Surface Indicator Light Element "On" Indicator Light Coil Cooktop / Drip Bowls SpaceWise® Expandable...
.../ B ) Black ( D / S ), Color-Coordinated (W / B ) Quick Bake Convection Self Clean Storage Oven Controls Bake Broil Quick Bake Convection Add-a-Minute Delay Start Self-Clean Quick Clean Option Delay Clean Kitchen Timer Timed Cook Option Auto Oven Shut-Off Oven Lock-Out Yes Variable (High/Low) Yes 2, 3 Hour Yes Yes Yes Yes 12 Hours Yes Cooktop Features Right Front Element (Watts) Right Rear Element (Watts) Left Front Element (Watts) Left Rear Element (Watts) Center Element (Watts) Hot Surface Indicator Light Element "On" Indicator Light Coil Cooktop / Drip Bowls SpaceWise® Expandable...

Product Specifications Sheet
Page 3
... of fire when using overhead cabinetry, install range hood that projects horizontally a recommended minimum of 5" beyond bottom of range. Frigidaire Baseline Freestanding Ranges FFEF3056T D / S/ W / B 30" Electric Minimum 1" clearance required to nearest combustible wall on either side of unprotected wood or metal overhead cabinet; Side 29 1/4" 25 3/4" Power cord location (middle bottom rear*) *when viewed from edge of rear wall electrical outlet. (All dimensions for detailed instructions. USA • 10200...
... of fire when using overhead cabinetry, install range hood that projects horizontally a recommended minimum of 5" beyond bottom of range. Frigidaire Baseline Freestanding Ranges FFEF3056T D / S/ W / B 30" Electric Minimum 1" clearance required to nearest combustible wall on either side of unprotected wood or metal overhead cabinet; Side 29 1/4" 25 3/4" Power cord location (middle bottom rear*) *when viewed from edge of rear wall electrical outlet. (All dimensions for detailed instructions. USA • 10200...


