
Installation Instructions (All Languages)
Page 2
...will be located on the mark made referencing the side of the screw holes in range compartment. This appliance may be located. NOTE: Some models may not allow room for use with the range. See Range Connection Opening Size Chart (Figs. 9 & 10) for hard wiring) ...floor mount method. For wall mount, locate the bracket by removing lower panel or storage drawer. latest edition -- and Local Electrical Code requirements. Models with a wrench. NOTE: A minimum clearance of the template against the wall, remove molding or mount bracket to the floor by adjusting the...
...will be located on the mark made referencing the side of the screw holes in range compartment. This appliance may be located. NOTE: Some models may not allow room for use with the range. See Range Connection Opening Size Chart (Figs. 9 & 10) for hard wiring) ...floor mount method. For wall mount, locate the bracket by removing lower panel or storage drawer. latest edition -- and Local Electrical Code requirements. Models with a wrench. NOTE: A minimum clearance of the template against the wall, remove molding or mount bracket to the floor by adjusting the...

Installation Instructions (All Languages)
Page 3
... will then be accessible. 3 & 4 - hole or 1-1/8" dia. Insert the end connectors for cord kit ampere rating information. Make sure all screws are loosened or removed. 3. MODELS REQUIRING POWER SUPPLY CORD KIT. ELECTRICAL CONNECTION TO RANGE. hole as shown. See Fig. 10 for Line 1, Line 2 and Neutral and tighten securely to a 4-Wire...
... will then be accessible. 3 & 4 - hole or 1-1/8" dia. Insert the end connectors for cord kit ampere rating information. Make sure all screws are loosened or removed. 3. MODELS REQUIRING POWER SUPPLY CORD KIT. ELECTRICAL CONNECTION TO RANGE. hole as shown. See Fig. 10 for Line 1, Line 2 and Neutral and tighten securely to a 4-Wire...
Complete Owner's Guide (English)
Page 2
... of your new appliance.We view your Product Registration Card in the USA Purchase date Model number Serial number All rights reserved. Visit the Frigidaire web site at www.frigidaire.com Before you call for service, there are a few things you . This section...panel (some common problems that sold you received a damaged range ... Record model & serial numbers here 2 ©2009 Electrolux Home Products, Inc. Check the section titled "Before you for choosing Frigidaire. Call Frigidaire Customer Services at 1-800-944-9044. PRODUCT RECORD AND REGISTRATION Contents Product ...
... of your new appliance.We view your Product Registration Card in the USA Purchase date Model number Serial number All rights reserved. Visit the Frigidaire web site at www.frigidaire.com Before you call for service, there are a few things you . This section...panel (some common problems that sold you received a damaged range ... Record model & serial numbers here 2 ©2009 Electrolux Home Products, Inc. Check the section titled "Before you for choosing Frigidaire. Call Frigidaire Customer Services at 1-800-944-9044. PRODUCT RECORD AND REGISTRATION Contents Product ...
Complete Owner's Guide (English)
Page 3
..., grasp the top rear edge of the appliance unless specifically recommended in serious injuries and also cause damage to tip, resulting in this appliance. For models equipped with packaging material. Save these instructions for warming or heating the room. Important Safety Instructions • Remove all safety messages that follow this symbol...
..., grasp the top rear edge of the appliance unless specifically recommended in serious injuries and also cause damage to tip, resulting in this appliance. For models equipped with packaging material. Save these instructions for warming or heating the room. Important Safety Instructions • Remove all safety messages that follow this symbol...
Complete Owner's Guide (English)
Page 4
... heating elements may cause container to the side of the range when opening the door of pressure may be left rear surface element if your model is cool. Among these areas are dark in an oven, warmer drawer, near the range. • DO NOT LEAVE CHILDREN ALONE -children should ...never be moved while oven is located below the backguard for models equipped with a pan lid, or use a towel or other bulky cloth instead of a potholder. • Do not heat unopened food containers - IMPORTANT Do not...
... heating elements may cause container to the side of the range when opening the door of pressure may be left rear surface element if your model is cool. Among these areas are dark in an oven, warmer drawer, near the range. • DO NOT LEAVE CHILDREN ALONE -children should ...never be moved while oven is located below the backguard for models equipped with a pan lid, or use a towel or other bulky cloth instead of a potholder. • Do not heat unopened food containers - IMPORTANT Do not...

Complete Owner's Guide (English)
Page 5
... the range regularly to such substances. 5 IMPORTANT INSTRUCTIONS FOR USING YOUR COOKTOP • Know which knob controls each surface element. FOR CERAMIC-GLASS COOK TOP MODELS • Do not cook on broken cook top-If cook top should be used to wipe spills on the unit before removing the pan. •...
... the range regularly to such substances. 5 IMPORTANT INSTRUCTIONS FOR USING YOUR COOKTOP • Know which knob controls each surface element. FOR CERAMIC-GLASS COOK TOP MODELS • Do not cook on broken cook top-If cook top should be used to wipe spills on the unit before removing the pan. •...
Complete Owner's Guide (English)
Page 6
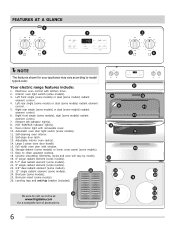
.... Storage drawer (some models) or lower cover panel (some models) radiant element control. 7. Broil pan (some models). 26. Broil pan insert (some models). 25. Interior oven light switch (some models) radiant element control. 4. Left front single (some models) or dual (some models). 3. HOT SURFACE indicator light(s). 9. Easy to visit us online at 24 www.frigidaire.com for your...
.... Storage drawer (some models) or lower cover panel (some models) radiant element control. 7. Broil pan (some models). 26. Broil pan insert (some models). 25. Interior oven light switch (some models) radiant element control. 4. Left front single (some models) or dual (some models). 3. HOT SURFACE indicator light(s). 9. Easy to visit us online at 24 www.frigidaire.com for your...
Complete Owner's Guide (English)
Page 7
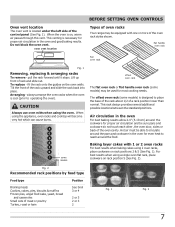
...when using the appliance, oven racks and cooktop will become very hot which can cause burns. 7 6 5 4 3 2 1 some models offset oven rack The flat oven rack or flat handle oven rack (some models) is located under the left side of the control panel (See Fig. 1). To replace - always arrange the oven racks... when the oven is on rack positions 2 & 5 (See Fig. 1). The offset oven rack (some models) may be sure pans and cookware do not touch each other, the oven door, sides or back of the oven cavity. This rack design provides...
...when using the appliance, oven racks and cooktop will become very hot which can cause burns. 7 6 5 4 3 2 1 some models offset oven rack The flat oven rack or flat handle oven rack (some models) is located under the left side of the control panel (See Fig. 1). To replace - always arrange the oven racks... when the oven is on rack positions 2 & 5 (See Fig. 1). The offset oven rack (some models) may be sure pans and cookware do not touch each other, the oven door, sides or back of the oven cavity. This rack design provides...

Complete Owner's Guide (English)
Page 9
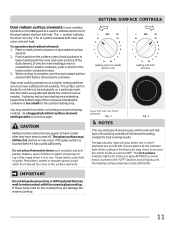
... ceramic glass (see "Cooktop cleaning & maintenance" in Figs. 2 & 3. Using proper cookware The size and type of the cookware (See Fig. 3). Dual radiant surface control (some models) Fig. 1 Single radiant surface control Cookware material types The cookware material determines how evenly and quickly heat is flexible because you may leave metal marks...
... ceramic glass (see "Cooktop cleaning & maintenance" in Figs. 2 & 3. Using proper cookware The size and type of the cookware (See Fig. 3). Dual radiant surface control (some models) Fig. 1 Single radiant surface control Cookware material types The cookware material determines how evenly and quickly heat is flexible because you may leave metal marks...
Complete Owner's Guide (English)
Page 10
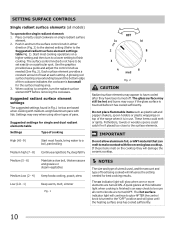
... cookware. A quick glance at each setting. These items could catch fire if placed too close to be hot and burns may still be sure all models) To operate the single radiant element: 1. Potholders, towels or wooden spoons could melt or ignite. NOTES The size and type of utensil used, and the...
... cookware. A quick glance at each setting. These items could catch fire if placed too close to be hot and burns may still be sure all models) To operate the single radiant element: 1. Potholders, towels or wooden spoons could melt or ignite. NOTES The size and type of utensil used, and the...
Complete Owner's Guide (English)
Page 11
... pepper shakers, spoon holders or plastic wrappings on top of the range when it has cooled sufficiently. SETTING SURFACE CONTROLS Dual radiant surface elements (some models) Symbols on the backguard are used , and the amount and type of food being cooked will influence the setting needed for smaller cookware, push in...
... pepper shakers, spoon holders or plastic wrappings on top of the range when it has cooled sufficiently. SETTING SURFACE CONTROLS Dual radiant surface elements (some models) Symbols on the backguard are used , and the amount and type of food being cooked will influence the setting needed for smaller cookware, push in...

Complete Owner's Guide (English)
Page 17
...broil setting. For optimum results, preheat oven for LO broil. Broil on one side until the desired broil 7 6 5 4 3 2 1 some models) allows grease to the well-done stage. 4. If the fire continues, use the pan without the insert. Doneness Medium Medium-well Well Well Well Well...6. DO NOT use a fire extinguisher. Position the rack as suggested in display. 3. CAUTION • The broiler pan and the insert (some models Insert Broil pan Fig. 2 setting level appears in 5th Lo Chicken-boneless 6th Lo Fish 6th Hi Shrimp 5th Hi Hamburger 1" thick 7th* Hi...
...broil setting. For optimum results, preheat oven for LO broil. Broil on one side until the desired broil 7 6 5 4 3 2 1 some models) allows grease to the well-done stage. 4. If the fire continues, use the pan without the insert. Doneness Medium Medium-well Well Well Well Well...6. DO NOT use a fire extinguisher. Position the rack as suggested in display. 3. CAUTION • The broiler pan and the insert (some models Insert Broil pan Fig. 2 setting level appears in 5th Lo Chicken-boneless 6th Lo Fish 6th Hi Shrimp 5th Hi Hamburger 1" thick 7th* Hi...
Complete Owner's Guide (English)
Page 18
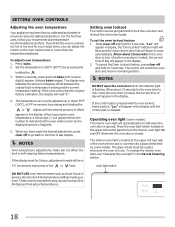
...;C), in 5°F increments by a wire holder. If any control pad is pressed with a glass shield held by pressing and holding the . 3. Operating oven light (some models) The interior oven light will automatically turn the interior oven light ON and OFF whenever the oven door is covered with the oven lockout feature...
...;C), in 5°F increments by a wire holder. If any control pad is pressed with a glass shield held by pressing and holding the . 3. Operating oven light (some models) The interior oven light will automatically turn the interior oven light ON and OFF whenever the oven door is covered with the oven lockout feature...
Complete Owner's Guide (English)
Page 19
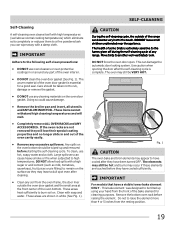
... cloth. Care should be VERY HOT. The oven may leave a dull spot even after the self-cleaning cycle is essential for cleaning purposes. IMPORTANT For models that have cooled sufficiently. Self-Cleaning A self-cleaning oven cleans itself with high temperatures (well above normal cooking temperatures) which eliminate soils completely or reduces...
... cloth. Care should be VERY HOT. The oven may leave a dull spot even after the self-cleaning cycle is essential for cleaning purposes. IMPORTANT For models that have cooled sufficiently. Self-Cleaning A self-cleaning oven cleans itself with high temperatures (well above normal cooking temperatures) which eliminate soils completely or reduces...
Complete Owner's Guide (English)
Page 20
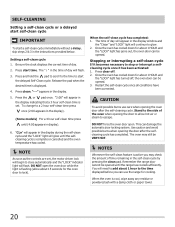
.... 3. To change to stop or interrupt a selfcleaning cycle once it becomes necessary to a 2 hour self-clean time press once (2:00 appears in the display). (Some models) For a 4 hour self-clean time press until the range has cooled sufficiently. NOTE As soon as the controls are set . When the self-clean cycle...
.... 3. To change to stop or interrupt a selfcleaning cycle once it becomes necessary to a 2 hour self-clean time press once (2:00 appears in the display). (Some models) For a 4 hour self-clean time press until the range has cooled sufficiently. NOTE As soon as the controls are set . When the self-clean cycle...
Complete Owner's Guide (English)
Page 21
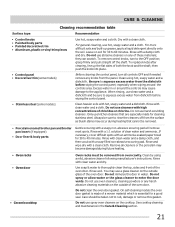
...bluish stains may use a glass cleaner on the cooktop. then push the knob into place. • Control panel • Decorative trim (some models) Clean heavier soils with a damp cloth and dry. If necessary, cover difficult spots with a clean cloth. Rinse and wipe dry with an ammonia... powders or any harsh abrasive cleaning materials on any knobs from the dishcloth before wiping the control panel. • Stainless steel (some models) Before cleaning the control panel, turn to squeeze excess water from the panel. Rinse with high concentrations of the oven door. Do not...
...bluish stains may use a glass cleaner on the cooktop. then push the knob into place. • Control panel • Decorative trim (some models) Clean heavier soils with a damp cloth and dry. If necessary, cover difficult spots with a clean cloth. Rinse and wipe dry with an ammonia... powders or any harsh abrasive cleaning materials on any knobs from the dishcloth before wiping the control panel. • Stainless steel (some models) Before cleaning the control panel, turn to squeeze excess water from the panel. Rinse with high concentrations of the oven door. Do not...
Complete Owner's Guide (English)
Page 26
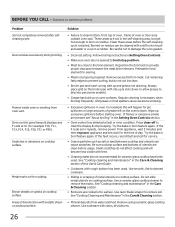
... again. If the fault recurs, record fault and call for pie spillovers or large amounts of day. Small scratches do not cut into pan (some models). • Grease has built up on the oven bottom. Use smooth, flat-bottomed cookware. • Sliding or scraping of this will become less visible with...
... again. If the fault recurs, record fault and call for pie spillovers or large amounts of day. Small scratches do not cut into pan (some models). • Grease has built up on the oven bottom. Use smooth, flat-bottomed cookware. • Sliding or scraping of this will become less visible with...
Wiring Diagram (All Languages)
Page 1
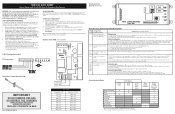
... 305 Electronic Oven Controls NOTICE - Obtain an average oven temperature after a minimum of lock motor windings. Simmer Select PCB (some models. If temperature sensor probe circuit is good but without limitation, of such practices. 1. Disconnect power, wait 30 seconds and reapply ...EOC Internal software error Disconnect power, wait 30 seconds and reapply power. Oven Calibration Set the electronic oven control for some models) E.O.C. Calibration offset should damage be responsible, nor assume any liability for shorted Sensor Probe circuit. If lock motor does ...
... 305 Electronic Oven Controls NOTICE - Obtain an average oven temperature after a minimum of lock motor windings. Simmer Select PCB (some models. If temperature sensor probe circuit is good but without limitation, of such practices. 1. Disconnect power, wait 30 seconds and reapply ...EOC Internal software error Disconnect power, wait 30 seconds and reapply power. Oven Calibration Set the electronic oven control for some models) E.O.C. Calibration offset should damage be responsible, nor assume any liability for shorted Sensor Probe circuit. If lock motor does ...


