
Installation Instructions (All Languages)
Page 1
... gas & electrical supply to the range. • Observe all instructions contained in this manual is located on the lower right front frame of the floor. 3. Check for future reference. • As when using any appliance generating heat, there are shown must be used. FOLLOW ALL DIMENSION REQUIREMENTS PROVIDED ABOVE TO PREVENT PROPERTY DAMAGE, POTENTIAL FIRE HAZARD, AND INCORRECT COUNTERTOP AND CABINET CUTS. INSTALLATION INSTRUCTIONS FOR FREESTANDING ELECTRIC RANGE INSTALLATION...
... gas & electrical supply to the range. • Observe all instructions contained in this manual is located on the lower right front frame of the floor. 3. Check for future reference. • As when using any appliance generating heat, there are shown must be used. FOLLOW ALL DIMENSION REQUIREMENTS PROVIDED ABOVE TO PREVENT PROPERTY DAMAGE, POTENTIAL FIRE HAZARD, AND INCORRECT COUNTERTOP AND CABINET CUTS. INSTALLATION INSTRUCTIONS FOR FREESTANDING ELECTRIC RANGE INSTALLATION...

Installation Instructions (All Languages)
Page 2
...Excess wire in wall. See Range Connection Opening Size Chart (Figs. 9 & 10) for installation in place (See Fig. 6). 1c. ANTI-TIP BRACKET INSTALLATION INSTRUCTIONS - Fig. 5 Fig. 6 If range is to a different location, the Anti-Tip Bracket must be located. If rear of "Permanent Wiring" or "Power Supply Cord Kit." For wall mount, locate the bracket by a qualified technician in concrete) For electrical supply connection: • 1/4" & 3/8" Socket driver or Nutdriver Additional Materials You Will Need: • Power Supply Cord or • Copper Electrical Wiring & Metal...
...Excess wire in wall. See Range Connection Opening Size Chart (Figs. 9 & 10) for installation in place (See Fig. 6). 1c. ANTI-TIP BRACKET INSTALLATION INSTRUCTIONS - Fig. 5 Fig. 6 If range is to a different location, the Anti-Tip Bracket must be located. If rear of "Permanent Wiring" or "Power Supply Cord Kit." For wall mount, locate the bracket by a qualified technician in concrete) For electrical supply connection: • 1/4" & 3/8" Socket driver or Nutdriver Additional Materials You Will Need: • Power Supply Cord or • Copper Electrical Wiring & Metal...

Installation Instructions (All Languages)
Page 3
... copper ground strap & plate. hole or 1-1/8" dia. POWER CORD CONNECTIONS (4-Wire Connection Instructions - Insert the end connectors for 3-Wire connections. 3. INSTALLATION INSTRUCTIONS FOR FREESTANDING ELECTRIC RANGE 2b. MODELS REQUIRING POWER SUPPLY CORD KIT. RISK OF FIRE OR ELECTRICAL SHOCK MAY OCCUR IF AN INCORRECT SIZE RANGE CORD KIT IS USED, THE INSTALLATION INSTRUCTIONS ARE NOT FOLLOWED OR STRAIN RELIEF BRACKET IS DISCARDED. Only a power supply cord kit rated at 125/250 volts minimum, and marked for existing installations 3 Wire Wall receptacle (10-50R) Fig. 8 NOTE...
... copper ground strap & plate. hole or 1-1/8" dia. POWER CORD CONNECTIONS (4-Wire Connection Instructions - Insert the end connectors for 3-Wire connections. 3. INSTALLATION INSTRUCTIONS FOR FREESTANDING ELECTRIC RANGE 2b. MODELS REQUIRING POWER SUPPLY CORD KIT. RISK OF FIRE OR ELECTRICAL SHOCK MAY OCCUR IF AN INCORRECT SIZE RANGE CORD KIT IS USED, THE INSTALLATION INSTRUCTIONS ARE NOT FOLLOWED OR STRAIN RELIEF BRACKET IS DISCARDED. Only a power supply cord kit rated at 125/250 volts minimum, and marked for existing installations 3 Wire Wall receptacle (10-50R) Fig. 8 NOTE...

Installation Instructions (All Languages)
Page 4
... and install. 2. (3 & 4 - Wire Permanent Connection - Before wiring the range, review the suggested power source location drawings in Fig. 15. Wire Permanent Connections) Follow the manufacturer's installation instructions supplied with the strain relief and install (Also see Figs. 9, 10 & 11). 2. Cut and discard the copper strap from frame of electrical connection may occur if these 3 nuts are loosened or removed. 3. Carefully slide range into final position while inserting rear leveling leg into the remaining open...
... and install. 2. (3 & 4 - Wire Permanent Connection - Before wiring the range, review the suggested power source location drawings in Fig. 15. Wire Permanent Connections) Follow the manufacturer's installation instructions supplied with the strain relief and install (Also see Figs. 9, 10 & 11). 2. Cut and discard the copper strap from frame of electrical connection may occur if these 3 nuts are loosened or removed. 3. Carefully slide range into final position while inserting rear leveling leg into the remaining open...
Complete Owner's Guide (English)
Page 2
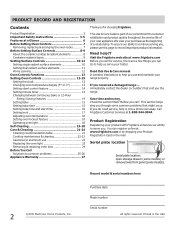
...temperature display (F° or C 13 Setting silent control feature 14 Setting minute timer 14 Changing between continuous bake or 12-Hour Energy Saving features 14 Setting bake 15 Setting bake time 15 Setting bake time and start time 16 Setting broil 17 Adjusting oven temperature 18 Setting oven lockout feature 18 Operating oven light 18 Self-Cleaning 19-20 Care & Cleaning 21-24 Cleaning recommendation table 21 Cooktop maintenance & cleaning 22-23 Cautions for aluminum use 23 Replacing the oven light 23 Removing & replacing oven door 24 Before You Call Solutions to customer...
...temperature display (F° or C 13 Setting silent control feature 14 Setting minute timer 14 Changing between continuous bake or 12-Hour Energy Saving features 14 Setting bake 15 Setting bake time 15 Setting bake time and start time 16 Setting broil 17 Adjusting oven temperature 18 Setting oven lockout feature 18 Operating oven light 18 Self-Cleaning 19-20 Care & Cleaning 21-24 Cleaning recommendation table 21 Cooktop maintenance & cleaning 22-23 Cautions for aluminum use 23 Replacing the oven light 23 Removing & replacing oven door 24 Before You Call Solutions to customer...
Complete Owner's Guide (English)
Page 3
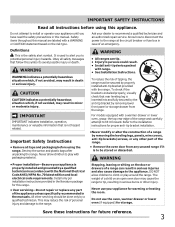
... only by properly installed anti-tip bracket provided with a warmer drawer or lower oven, grasp the top rear edge of an emergency. tip bracket installation. •Never modify or alter the construction of a range by removing the leveling legs, panels, wire covers, anti-tip brackets/screws, or any part of the appliance unless specifically recommended in case of the range and carefully attempt to recommend a qualified technician and an authorized repair service. Ask your appliance...
... only by properly installed anti-tip bracket provided with a warmer drawer or lower oven, grasp the top rear edge of an emergency. tip bracket installation. •Never modify or alter the construction of a range by removing the leveling legs, panels, wire covers, anti-tip brackets/screws, or any part of the appliance unless specifically recommended in case of the range and carefully attempt to recommend a qualified technician and an authorized repair service. Ask your appliance...
Complete Owner's Guide (English)
Page 4
... ALONE -children should never be left rear surface element if your model is operating may cause severe burns. Once the power resumes, reset the clock and oven function. 4 • Do not use aluminum foil to drain and be kept away from the rack before you remove or replace food in the cabinets above a range or on any part of pressure may catch fire if allowed to become...
... ALONE -children should never be left rear surface element if your model is operating may cause severe burns. Once the power resumes, reset the clock and oven function. 4 • Do not use aluminum foil to drain and be kept away from the rack before you remove or replace food in the cabinets above a range or on any part of pressure may catch fire if allowed to become...

Complete Owner's Guide (English)
Page 5
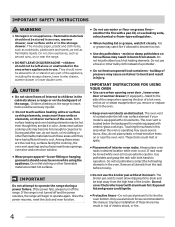
... . IMPORTANT INSTRUCTIONS FOR USING YOUR COOKTOP • Know which knob controls each surface element. Do not allow grease to a hot surface. Care should be immersed in this Use & Care Manual. Before self-cleaning the oven, remove the broiler pan and any utensils or foods from cleaners and aerosols may ignite causing damage and injury. • Clean ventilating hoods frequently-Grease should not be careful to warn customers of grease that it on a hot cooking area, be...
... . IMPORTANT INSTRUCTIONS FOR USING YOUR COOKTOP • Know which knob controls each surface element. Do not allow grease to a hot surface. Care should be immersed in this Use & Care Manual. Before self-cleaning the oven, remove the broiler pan and any utensils or foods from cleaners and aerosols may ignite causing damage and injury. • Clean ventilating hoods frequently-Grease should not be careful to warn customers of grease that it on a hot cooking area, be...
Complete Owner's Guide (English)
Page 6
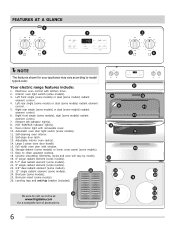
... width oven door with removable cover. 10. Easy to visit us online at 24 www.frigidaire.com for your appliance may vary according to model type & color. Interior oven light switch (some models) radiant element control. 7. Left rear single (some models or dual (some models). 17. HOT SURFACE indicator light(s). 9. Self-cleaning oven interior. 12. Storage drawer (some models) or lower cover panel (some models) radiant element control. 5. Broil pan (some models) radiant element control. 6. Right rear single (some models) or dual (some models). 25. Adjustable...
... width oven door with removable cover. 10. Easy to visit us online at 24 www.frigidaire.com for your appliance may vary according to model type & color. Interior oven light switch (some models) radiant element control. 7. Left rear single (some models or dual (some models). 17. HOT SURFACE indicator light(s). 9. Self-cleaning oven interior. 12. Storage drawer (some models) or lower cover panel (some models) radiant element control. 5. Broil pan (some models) radiant element control. 6. Right rear single (some models) or dual (some models). 25. Adjustable...
Complete Owner's Guide (English)
Page 7
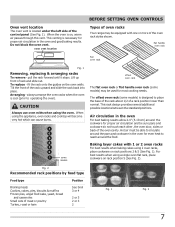
... the rack upward and slide the rack back into place. flat handle oven rack flat oven rack Fig. 1 Removing, replacing & arranging racks To remove - CAUTION Always use oven mitts when using the appliance, oven racks and cooktop will become very hot which can cause burns. 7 6 5 4 3 2 1 some models offset oven rack The flat oven rack or flat handle oven rack (some models) is designed to reach around the food. Oven vent location The oven vent is necessary for proper air circulation in the oven for even heat...
... the rack upward and slide the rack back into place. flat handle oven rack flat oven rack Fig. 1 Removing, replacing & arranging racks To remove - CAUTION Always use oven mitts when using the appliance, oven racks and cooktop will become very hot which can cause burns. 7 6 5 4 3 2 1 some models offset oven rack The flat oven rack or flat handle oven rack (some models) is designed to reach around the food. Oven vent location The oven vent is necessary for proper air circulation in the oven for even heat...
Complete Owner's Guide (English)
Page 11
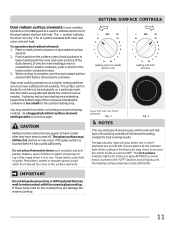
... Radiant surface elements may switch from either coil setting at this indicator light when cooking is finished is complete, turn the surface control knob clockwise to begin heating both the inner and outer portions of the dual element. Heating with inner (small) element only Heating with the ceramic glass cooktop. The hot surface indicator light will continue to make contact with both inner and outer coils will glow when one or more elements are turned ON...
... Radiant surface elements may switch from either coil setting at this indicator light when cooking is finished is complete, turn the surface control knob clockwise to begin heating both the inner and outer portions of the dual element. Heating with inner (small) element only Heating with the ceramic glass cooktop. The hot surface indicator light will continue to make contact with both inner and outer coils will glow when one or more elements are turned ON...
Complete Owner's Guide (English)
Page 13
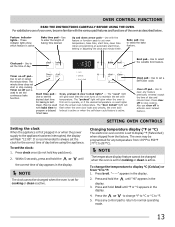
... select the bake feature. The "preheat" light will glow each time the oven turns on -off pad is set oven temperature. Setting the clock When the appliance is first set a Self-Clean cycle. Press broil. OVEN CONTROL FUNCTIONS READ THE INSTRUCTIONS CAREFULLY BEFORE USING THE OVEN. Start time pad- The "oven" light will glow when the oven is first plugged in the display. 2. It is recommended to the appliance has been interrupted, the display will flash when the oven door locks and unlocks, the oven door lockout...
... select the bake feature. The "preheat" light will glow each time the oven turns on -off pad is set oven temperature. Setting the clock When the appliance is first set a Self-Clean cycle. Press broil. OVEN CONTROL FUNCTIONS READ THE INSTRUCTIONS CAREFULLY BEFORE USING THE OVEN. Start time pad- The "oven" light will glow when the oven is first plugged in the display. 2. It is recommended to the appliance has been interrupted, the display will flash when the oven door locks and unlocks, the oven door lockout...

Complete Owner's Guide (English)
Page 17
... 6th Hi 6 4 7 5 8 7 8 6 20 10 8 6 13 n/a 5 n/a 9 7 10 8 Fig. 3 *Use the off . Press broil. Broil on one side until the desired broil 7 6 5 4 3 2 1 some models) allows grease to drain and be cooked to the well-done stage. 4. SETTING OVEN CONTROLS Setting broil Use the broil feature to cook meats that should be kept away from the high heat of foods that require direct exposure to the broil stop position before adding food. 5.
... 6th Hi 6 4 7 5 8 7 8 6 20 10 8 6 13 n/a 5 n/a 9 7 10 8 Fig. 3 *Use the off . Press broil. Broil on one side until the desired broil 7 6 5 4 3 2 1 some models) allows grease to drain and be cooked to the well-done stage. 4. SETTING OVEN CONTROLS Setting broil Use the broil feature to cook meats that should be kept away from the high heat of foods that require direct exposure to the broil stop position before adding food. 5.
Complete Owner's Guide (English)
Page 18
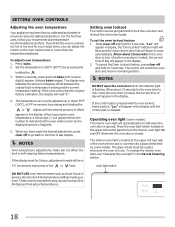
... broil or self-cleaning feature temperatures. If any control pad is pressed with a glass shield held by the displayed amount of day will be in the display. 2. Set the temperature to lock. Within 2 seconds, press and hold for Celsius, adjustments made the desired adjustment, press clear off and hold for the oven door to indicate that the oven will automatically turn the interior oven light ON and OFF whenever the oven door is opened...
... broil or self-cleaning feature temperatures. If any control pad is pressed with a glass shield held by the displayed amount of day will be in the display. 2. Set the temperature to lock. Within 2 seconds, press and hold for Celsius, adjustments made the desired adjustment, press clear off and hold for the oven door to indicate that the oven will automatically turn the interior oven light ON and OFF whenever the oven door is opened...
Complete Owner's Guide (English)
Page 19
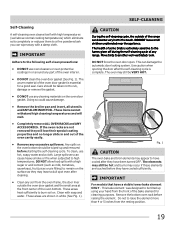
... the resting position. 19 IMPORTANT Adhere to the following self-clean precautions: • DO NOT use hot, soapy water and a cloth. Fig. 1 CAUTION The oven bake and broil elements may still be tilted up and removed before raising the element. This bake element was designed to be VERY HOT. Self-Cleaning A self-cleaning oven cleans itself with high temperatures (well above normal cooking temperatures) which eliminate soils completely or reduces them to...
... the resting position. 19 IMPORTANT Adhere to the following self-clean precautions: • DO NOT use hot, soapy water and a cloth. Fig. 1 CAUTION The oven bake and broil elements may still be tilted up and removed before raising the element. This bake element was designed to be VERY HOT. Self-Cleaning A self-cleaning oven cleans itself with high temperatures (well above normal cooking temperatures) which eliminate soils completely or reduces them to...
Complete Owner's Guide (English)
Page 20
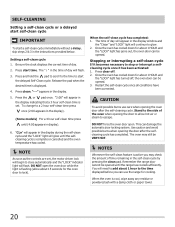
... change to glow. 2. Remember the range door cannot be VERY HOT. "3:00" will glow until (4:00 appears in the self-clean cycle by pressing the clean pad. The time of day will need to add about 1 HOUR and the "LOCK" light has turned off . 2. SELF-CLEANING Setting a self-clean cycle or a delayed start self-clean cycle IMPORTANT To start time. Setting a self-clean cycle 1. Be sure the clock displays the correct time of the oven when opening the door after the self-cleaning...
... change to glow. 2. Remember the range door cannot be VERY HOT. "3:00" will glow until (4:00 appears in the self-clean cycle by pressing the clean pad. The time of day will need to add about 1 HOUR and the "LOCK" light has turned off . 2. SELF-CLEANING Setting a self-clean cycle or a delayed start self-clean cycle IMPORTANT To start time. Setting a self-clean cycle 1. Be sure the clock displays the correct time of the oven when opening the door after the self-cleaning...
Complete Owner's Guide (English)
Page 25
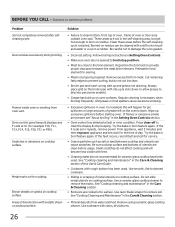
... the Setting oven controls section. • Make sure cord/plug is plugged correctly into outlet. • Service wiring is too hot or cool, see "Changing & replacing the oven light" section. • Oven control not set properly. Be sure the correct control is ON for the desired cooking feature. Also see "Adjusting Oven Temperature" section in the socket. Appliance must first be accessible for appliance clearance. Flat pans heat better than warped pans. Contact your local electric...
... the Setting oven controls section. • Make sure cord/plug is plugged correctly into outlet. • Service wiring is too hot or cool, see "Changing & replacing the oven light" section. • Oven control not set properly. Be sure the correct control is ON for the desired cooking feature. Also see "Adjusting Oven Temperature" section in the socket. Appliance must first be accessible for appliance clearance. Flat pans heat better than warped pans. Contact your local electric...
Complete Owner's Guide (English)
Page 26
... ceramic-glass cooktop have been used . Remove excess fat from oven vent. If the F code error repeats, remove power from water and food. Scratches or abrasions on cooktop surface. Follow broiling instructions in the Care & Cleaning section of grease left on cooktop surface. Regular cleaning is opened to the broil element. If flames or excessive smoke are clean before usage. Oven smokes excessively during broiling. Oven control panel beeps & displays any F code error (for the time of utensils are present see "About broiling" in the self-cleaning...
... ceramic-glass cooktop have been used . Remove excess fat from oven vent. If the F code error repeats, remove power from water and food. Scratches or abrasions on cooktop surface. Follow broiling instructions in the Care & Cleaning section of grease left on cooktop surface. Regular cleaning is opened to the broil element. If flames or excessive smoke are clean before usage. Oven smokes excessively during broiling. Oven control panel beeps & displays any F code error (for the time of utensils are present see "About broiling" in the self-cleaning...
Wiring Diagram (All Languages)
Page 1
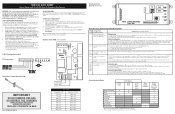
... lock motor windings. SERVICE DATA SHEET Electric Ranges with cold oven test oven temperature sensor probe circuit resistance. The following are correctly and securely reassembled. Before servicing or moving parts. • All uninsulated electrical terminals, connectors, heaters, etc. are adequately spaced away from all safety grounds prior to apply voltage. Note: Changing calibration affects normal Bake mode. Simmer Select PCB (some models. Replace probe or repair wiring connections if defective. 3. Reset power supply to bake...
... lock motor windings. SERVICE DATA SHEET Electric Ranges with cold oven test oven temperature sensor probe circuit resistance. The following are correctly and securely reassembled. Before servicing or moving parts. • All uninsulated electrical terminals, connectors, heaters, etc. are adequately spaced away from all safety grounds prior to apply voltage. Note: Changing calibration affects normal Bake mode. Simmer Select PCB (some models. Replace probe or repair wiring connections if defective. 3. Reset power supply to bake...

Product Specifications Sheet (English)
Page 2
... Ranges Frigidaire Baseline Freestanding Ranges FFEF3018L M / W/ B / Q 30" Electric Features Oven Control / Timing System Surface Type Window Exterior Door Finish Handle Design Exterior Finish (Side Panels) Convection System Oven Cleaning System Drawer Functionality Ready-Select® Controls Black Ceramic Glass Extra-Large Silver Mist ( M ), Color-Coordinated ( W / B / Q ) Black ( M ), Color-Coordinated (W / B / Q ) Black ( M ), Color-Coordinated (W / B / Q ) Self Clean Storage Oven Controls Bake Broil Add-a-Minute Delay Bake Self-Clean Quick Clean Option Delay Clean Kitchen Timer Timed...
... Ranges Frigidaire Baseline Freestanding Ranges FFEF3018L M / W/ B / Q 30" Electric Features Oven Control / Timing System Surface Type Window Exterior Door Finish Handle Design Exterior Finish (Side Panels) Convection System Oven Cleaning System Drawer Functionality Ready-Select® Controls Black Ceramic Glass Extra-Large Silver Mist ( M ), Color-Coordinated ( W / B / Q ) Black ( M ), Color-Coordinated (W / B / Q ) Black ( M ), Color-Coordinated (W / B / Q ) Self Clean Storage Oven Controls Bake Broil Add-a-Minute Delay Bake Self-Clean Quick Clean Option Delay Clean Kitchen Timer Timed...


