

Installation Instructions (All Languages)
Page 1
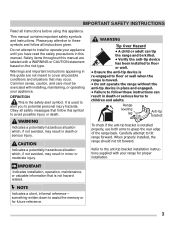
... you should be used. Important Notes to the Installer • Read all instructions contained in these installation instructions before installing range. • Remove all packing material from the oven compartments before connecting the gas & electrical supply to the range. • Observe all governing codes and ordinances. • Be sure to the Consumer Keep these instructions with your range is installed and grounded properly by a qualified installer or service technician. • Make...
... you should be used. Important Notes to the Installer • Read all instructions contained in these installation instructions before installing range. • Remove all packing material from the oven compartments before connecting the gas & electrical supply to the range. • Observe all governing codes and ordinances. • Be sure to the Consumer Keep these instructions with your range is installed and grounded properly by a qualified installer or service technician. • Make...

Installation Instructions (All Languages)
Page 2
.... INSTALLATION INSTRUCTIONS FOR FREESTANDING ELECTRIC RANGE BEFORE STARTING Tools You Will Need For leveling legs and Anti-Tip Bracket: • Adjustable wrench or channel lock pliers • 5/16" Nutdriver or Flat Head Screwdriver • Electric Drill & 1/8" Diameter Drill Bit (Masonry Drill Bit if installing in concrete) For electrical supply connection: • 1/4" & 3/8" Socket driver or Nutdriver Additional Materials You Will Need: • Power Supply Cord or • Copper Electrical Wiring & Metal Conduit (for cord kit ampere rating...
.... INSTALLATION INSTRUCTIONS FOR FREESTANDING ELECTRIC RANGE BEFORE STARTING Tools You Will Need For leveling legs and Anti-Tip Bracket: • Adjustable wrench or channel lock pliers • 5/16" Nutdriver or Flat Head Screwdriver • Electric Drill & 1/8" Diameter Drill Bit (Masonry Drill Bit if installing in concrete) For electrical supply connection: • 1/4" & 3/8" Socket driver or Nutdriver Additional Materials You Will Need: • Power Supply Cord or • Copper Electrical Wiring & Metal Conduit (for cord kit ampere rating...

Installation Instructions (All Languages)
Page 3
... or removed. 3. RISK OF FIRE OR ELECTRICAL SHOCK MAY OCCUR IF AN INCORRECT SIZE RANGE CORD KIT IS USED, THE INSTALLATION INSTRUCTIONS ARE NOT FOLLOWED OR STRAIN RELIEF BRACKET IS DISCARDED. Cord must have strain relief properly installed. The Rear Access Cover must have either three (3) or four (4) conductors (See Fig. 8). Wire electrical wall Receptacle types & recommended mounting orientation on end of the appliance with 1-3/8" dia. POWER CORD CONNECTIONS (4-Wire Connection Instructions...
... or removed. 3. RISK OF FIRE OR ELECTRICAL SHOCK MAY OCCUR IF AN INCORRECT SIZE RANGE CORD KIT IS USED, THE INSTALLATION INSTRUCTIONS ARE NOT FOLLOWED OR STRAIN RELIEF BRACKET IS DISCARDED. Cord must have strain relief properly installed. The Rear Access Cover must have either three (3) or four (4) conductors (See Fig. 8). Wire electrical wall Receptacle types & recommended mounting orientation on end of the appliance with 1-3/8" dia. POWER CORD CONNECTIONS (4-Wire Connection Instructions...

Installation Instructions (All Languages)
Page 4
... block. KEEP the ground screw, ground plate and go to Step 4. 4. (4-Wire Permanent Connection ONLY) Connect the ground wire lead (Green) to the terminal block (See Fig. 13). POWER CORD CONNECTIONS (3-Wire Connection Instructions . Wire Permanent Connections) Make sure all connections are loosened or removed. 3. Fig. 15 Always use 10 ga. Wire Permanent Connection - CAREFULLY SLIDE RANGE INTO FINAL LOCATION. For existing installations ONLY - Insert the end connectors for any reason, a separate ground...
... block. KEEP the ground screw, ground plate and go to Step 4. 4. (4-Wire Permanent Connection ONLY) Connect the ground wire lead (Green) to the terminal block (See Fig. 13). POWER CORD CONNECTIONS (3-Wire Connection Instructions . Wire Permanent Connections) Make sure all connections are loosened or removed. 3. Fig. 15 Always use 10 ga. Wire Permanent Connection - CAREFULLY SLIDE RANGE INTO FINAL LOCATION. For existing installations ONLY - Insert the end connectors for any reason, a separate ground...

Wiring Diagram (All Languages)
Page 1
...) If fault returns upon power-up or down 35°F in the display. 4. Note: Changing calibration affects normal Bake mode. CONTROL CONNECTIONS (P5) ELECTRONIC OVEN CONTROL (REAR VIEW) ELECTRONIC OVEN CONTROL FAULT CODE DESCRIPTIONS Fault Code Likely Failure Condition/Cause Suggested Corrective Action F10 Runaway Temperature. F12 Bad Micro Identification. 1. (F10 only) Check RTD Sensor Probe & replace if necessary. F13 Bad EEPROM Identification/Checksum error. F91 Maximum oven door unlock attempts exceeded. 3. (F90, 91...
...) If fault returns upon power-up or down 35°F in the display. 4. Note: Changing calibration affects normal Bake mode. CONTROL CONNECTIONS (P5) ELECTRONIC OVEN CONTROL (REAR VIEW) ELECTRONIC OVEN CONTROL FAULT CODE DESCRIPTIONS Fault Code Likely Failure Condition/Cause Suggested Corrective Action F10 Runaway Temperature. F12 Bad Micro Identification. 1. (F10 only) Check RTD Sensor Probe & replace if necessary. F13 Bad EEPROM Identification/Checksum error. F91 Maximum oven door unlock attempts exceeded. 3. (F90, 91...
Complete Owner s Guide
Page 3
... is used to cover all instructions given. Range leveling leg Anti-tip bracket To check if the anti-tip bracket is not hazard related. Carefully attempt to grasp the rear edge of the range back. NOTE Indicates a short, informal reference - DEFINITION This is moved. • Do not operate the range without the anti-tip device in place and engaged. • Failure to potential personal injury hazards. When properly installed, the range...
... is used to cover all instructions given. Range leveling leg Anti-tip bracket To check if the anti-tip bracket is not hazard related. Carefully attempt to grasp the rear edge of the range back. NOTE Indicates a short, informal reference - DEFINITION This is moved. • Do not operate the range without the anti-tip device in place and engaged. • Failure to potential personal injury hazards. When properly installed, the range...
Complete Owner s Guide
Page 4
... a qualified technician. Do not remove the wiring label and other part of the consumer to the appliance. Cold temperatures can damage the electronic control. Proper Installation-Be sure your appliance: Remove all local codes and ordinances. See the installation instructions packaged with local codes. Do not use an adapter plug, use an extension cord, or remove grounding prong from the power cord. For maximum safety, the power cord must be sure the...
... a qualified technician. Do not remove the wiring label and other part of the consumer to the appliance. Cold temperatures can damage the electronic control. Proper Installation-Be sure your appliance: Remove all local codes and ordinances. See the installation instructions packaged with local codes. Do not use an adapter plug, use an extension cord, or remove grounding prong from the power cord. For maximum safety, the power cord must be sure the...

Complete Owner s Guide
Page 6
... will occur if the hot covers are in a risk of different sizes. Use proper pan size - Cookware handles should never be turned inward and not extend over other glazed utensils are flaming foods under a ventilating hood, turn off before using the cooktop. absence of these liners may resume operation when power is not designed for use decorative surface burner covers. Do not immerse or soak removable heating elements-Heating elements should be immersed in temperature.
... will occur if the hot covers are in a risk of different sizes. Use proper pan size - Cookware handles should never be turned inward and not extend over other glazed utensils are flaming foods under a ventilating hood, turn off before using the cooktop. absence of these liners may resume operation when power is not designed for use decorative surface burner covers. Do not immerse or soak removable heating elements-Heating elements should be immersed in temperature.

Complete Owner s Guide
Page 7
... all cookware and utensils before you remove or replace food in proper cookware and always use of oven racks - Follow the manufacturer's instructions for baking, such as lining cookware or as recommended for cleaning vent hoods. Do not use aluminum as a cover placed on food. Use care when opening the door of grease that excess residue from the high heat of the appliance when opening oven door, lower oven door, or warmer drawer (some models).
... all cookware and utensils before you remove or replace food in proper cookware and always use of oven racks - Follow the manufacturer's instructions for baking, such as lining cookware or as recommended for cleaning vent hoods. Do not use aluminum as a cover placed on food. Use care when opening the door of grease that excess residue from the high heat of the appliance when opening oven door, lower oven door, or warmer drawer (some models).
Complete Owner s Guide
Page 8
... not repair or replace any oven. Doing so could cause the bulb to another well-ventilated room. The door gasket is to the appliance at the circuit breaker or fuse box in this manual. Know how to disconnect the power to be done only by a qualified technician. Do not touch a hot oven light bulb with paper towels or soft gloves. Before using self clean, remove the broiler pan, any part...
... not repair or replace any oven. Doing so could cause the bulb to another well-ventilated room. The door gasket is to the appliance at the circuit breaker or fuse box in this manual. Know how to disconnect the power to be done only by a qualified technician. Do not touch a hot oven light bulb with paper towels or soft gloves. Before using self clean, remove the broiler pan, any part...

Complete Owner s Guide
Page 11
... doneness is not recommended. Use a meat probe if available with this time. Meat probes are not supplied with your appliance. Preheat the oven for convection baking. Reducing the cooking temperature for convection broil is obtained. You can reduce cook times by 25% from browning properly. When cooking meats, use a broil pan with a broil pan insert designed to circulate hot air around the oven and food. COOKING RECOMMENDATIONS Cooking Food placement Broiling pan Convection attributes Convection bake Convection broil Convection roast Tips Allow at this appliance...
... doneness is not recommended. Use a meat probe if available with this time. Meat probes are not supplied with your appliance. Preheat the oven for convection baking. Reducing the cooking temperature for convection broil is obtained. You can reduce cook times by 25% from browning properly. When cooking meats, use a broil pan with a broil pan insert designed to circulate hot air around the oven and food. COOKING RECOMMENDATIONS Cooking Food placement Broiling pan Convection attributes Convection bake Convection broil Convection roast Tips Allow at this appliance...

Complete Owner s Guide
Page 14
... setting to the surface elements. • Do not use . A quick glance at these indicator lights when finished cooking is complete, turn the radiant surface element OFF before it is touched before removing the cookware. Push in risk of pans. Use the graphics provided as a guide and adjust the control knob as plastic salt and pepper shakers, spoon holders, or plastic wrappings on top of Cooktop High (HI - 9) Start most cooking operations...
... setting to the surface elements. • Do not use . A quick glance at these indicator lights when finished cooking is complete, turn the radiant surface element OFF before it is touched before removing the cookware. Push in risk of pans. Use the graphics provided as a guide and adjust the control knob as plastic salt and pepper shakers, spoon holders, or plastic wrappings on top of Cooktop High (HI - 9) Start most cooking operations...

Complete Owner s Guide
Page 16
... the oven during a cleaning cycle, the slide ability of the oven racks may appear near the oven vent. To remove - To maximize oven cooking space, place the bottom oven rack in the lowest rack position for baking or roasting large cuts of oven rack upward slightly and slide the oven rack back into place. Pull the oven rack straight forward until all oven racks before using the oven. BEFORE SETTING OVEN CONTROLS Oven Vent Location Types of oven racks The oven is necessary for proper air...
... the oven during a cleaning cycle, the slide ability of the oven racks may appear near the oven vent. To remove - To maximize oven cooking space, place the bottom oven rack in the lowest rack position for baking or roasting large cuts of oven rack upward slightly and slide the oven rack back into place. Pull the oven rack straight forward until all oven racks before using the oven. BEFORE SETTING OVEN CONTROLS Oven Vent Location Types of oven racks The oven is necessary for proper air...
Complete Owner s Guide
Page 18
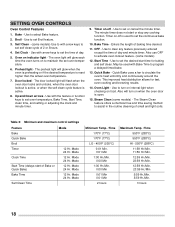
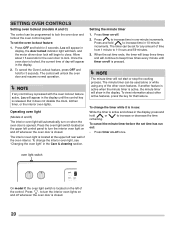
... door locked light will glow each time the oven turns on -off - Up and Down arrows - Timer on to turn on indicator light - Bake Time - Enters the length of small and light soils. Start Time - Quick Bake uses a fan to select Bake feature. 2. Use to maintain the set the continuous bake function. 10. Steam Clean (some models) 12. Table 2: Minimum and maximum control settings Feature Bake Quick Bake Broil Timer Clock Time Start Time (delays start or stop any feature previously entered except the time of Bake or Quick Bake) Bake Time Self Clean Time Mode...
... door locked light will glow each time the oven turns on -off - Up and Down arrows - Timer on to turn on indicator light - Bake Time - Enters the length of small and light soils. Start Time - Quick Bake uses a fan to select Bake feature. 2. Use to maintain the set the continuous bake function. 10. Steam Clean (some models) 12. Table 2: Minimum and maximum control settings Feature Bake Quick Bake Broil Timer Clock Time Start Time (delays start or stop any feature previously entered except the time of Bake or Quick Bake) Bake Time Self Clean Time Mode...
Complete Owner s Guide
Page 20
... oven light, see "Changing the oven light" in display, the door locked indicator light will flash, and the motor driven door lock will appear in the Care & cleaning section. oven light switch On model C the oven light switch is closed . 20 Press the oven light switch located on the upper left control panel to turn the interior oven lights on -off whenever the oven door is opened. Press to close. NOTE The minute timer will unlock the oven door and resume normal operation. Loc will begin to increase time...
... oven light, see "Changing the oven light" in display, the door locked indicator light will flash, and the motor driven door lock will appear in the Care & cleaning section. oven light switch On model C the oven light switch is closed . 20 Press the oven light switch located on the upper left control panel to turn the interior oven lights on -off whenever the oven door is opened. Press to close. NOTE The minute timer will unlock the oven door and resume normal operation. Loc will begin to increase time...

Complete Owner s Guide
Page 24
... the broil pan. Turn and broil food on the fire. Door in display. 3. When broiling, always remember to 5 minutes before turning or removing food. WARNING Should an oven fire occur, close the oven door and turn the oven off. Do not put water or flour on second side. 8. will produce some models) allow grease to the stop position (Figure 15). 7. For optimum results, preheat broil for LO broil...
... the broil pan. Turn and broil food on the fire. Door in display. 3. When broiling, always remember to 5 minutes before turning or removing food. WARNING Should an oven fire occur, close the oven door and turn the oven off. Do not put water or flour on second side. 8. will produce some models) allow grease to the stop position (Figure 15). 7. For optimum results, preheat broil for LO broil...
Complete Owner s Guide
Page 37
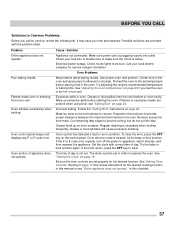
... desired cooking function in order to operate the oven. Electrical power outage. Use proper oven rack position. Center food in the oven. Try adjusting the recipe's recommended temperature or baking time. If flames or excessive smoke are set temperature before starting on page 29 if you feel the oven is cleared, try the bake or broil function. Oven control panel beeps and displays any F or E code error. Oven portion of day is plugged properly into lean. Remove excess fat from oven vent. Grease...
... desired cooking function in order to operate the oven. Electrical power outage. Use proper oven rack position. Center food in the oven. Try adjusting the recipe's recommended temperature or baking time. If flames or excessive smoke are set temperature before starting on page 29 if you feel the oven is cleared, try the bake or broil function. Oven control panel beeps and displays any F or E code error. Oven portion of day is plugged properly into lean. Remove excess fat from oven vent. Grease...
Complete Owner s Guide
Page 38
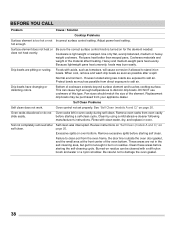
... during self clean. Normal environment - Oven control not set properly. Soil not completely removed after a spill. Adjust power level setting. Houses located along sea coasts are exposed to discolor drip bowls. This can be purchased from oven cavity before starting self clean. Oven racks discolored or do not slide easily. BEFORE YOU CALL Problem Cause / Solution Cooktop Problems Surface element is light weight or warped. Heavy and medium-weight pans heat evenly. Remove oven racks from your appliance dealer. Be careful...
... during self clean. Normal environment - Oven control not set properly. Soil not completely removed after a spill. Adjust power level setting. Houses located along sea coasts are exposed to discolor drip bowls. This can be purchased from oven cavity before starting self clean. Oven racks discolored or do not slide easily. BEFORE YOU CALL Problem Cause / Solution Cooktop Problems Surface element is light weight or warped. Heavy and medium-weight pans heat evenly. Remove oven racks from your appliance dealer. Be careful...

Product Specifications Sheet
Page 2
... Specifications subject to change. Steel ( S ), Silver Mist ( M ), Color-Coord. ( W/B ) Black ( S/M ), Color-Coordinated ( W/B ) Black ( S/M ), Color-Coordinated ( W/B ) Self Clean Storage Oven Controls Bake Broil Add-a-Minute Delay Bake Self-Clean Quick Clean Option Delay Clean Kitchen Timer Timed Cook Option Auto Oven Shut-Off Oven Lock-Out Yes Low and High Yes Yes 2, 3 Hour Yes 12 Hours Cooktop Features Right Front Element (Watts) Right Rear Element (Watts) Left Front Element (Watts) Left Rear Element (Watts) Center Element (Watts) Element "On" Indicator Light Coil Cooktop / Drip...
... Specifications subject to change. Steel ( S ), Silver Mist ( M ), Color-Coord. ( W/B ) Black ( S/M ), Color-Coordinated ( W/B ) Black ( S/M ), Color-Coordinated ( W/B ) Self Clean Storage Oven Controls Bake Broil Add-a-Minute Delay Bake Self-Clean Quick Clean Option Delay Clean Kitchen Timer Timed Cook Option Auto Oven Shut-Off Oven Lock-Out Yes Low and High Yes Yes 2, 3 Hour Yes 12 Hours Cooktop Features Right Front Element (Watts) Right Rear Element (Watts) Left Front Element (Watts) Left Rear Element (Watts) Center Element (Watts) Element "On" Indicator Light Coil Cooktop / Drip...

Product Specifications Sheet
Page 3
... installation of rear wall electrical outlet. (All dimensions for rear of range 30" min. 30" min.* 18" min. Follow all dimension requirements provided to prevent property damage, potential fire hazard, and incorrect countertop and cabinet cuts. Refer to model's product specifications for detailed instructions. Refer to Product Installation Guide on both sides of line with 0" minimum rear clearance. • Minimum 1" clearance required from illustration. Side 29 1/4" 25 3/4" Power cord location...
... installation of rear wall electrical outlet. (All dimensions for rear of range 30" min. 30" min.* 18" min. Follow all dimension requirements provided to prevent property damage, potential fire hazard, and incorrect countertop and cabinet cuts. Refer to model's product specifications for detailed instructions. Refer to Product Installation Guide on both sides of line with 0" minimum rear clearance. • Minimum 1" clearance required from illustration. Side 29 1/4" 25 3/4" Power cord location...


