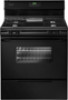

Installation Instructions (All Languages)
Page 1
... it carefully. • Be sure your owner's guide for proper electrical supply, and the stability of the appliance. Location-Check location where the range will be avoided. Clearances and Dimensions 1. Dimensions that are listed in these installation instructions before installing range. • Remove all packing material from the oven compartments before connecting the gas & electrical supply to the range. • Observe all governing codes and ordinances. • Be sure to reach over the surface elements...
... it carefully. • Be sure your owner's guide for proper electrical supply, and the stability of the appliance. Location-Check location where the range will be avoided. Clearances and Dimensions 1. Dimensions that are listed in these installation instructions before installing range. • Remove all packing material from the oven compartments before connecting the gas & electrical supply to the range. • Observe all governing codes and ordinances. • Be sure to reach over the surface elements...

Installation Instructions (All Languages)
Page 2
.... If rear of range is placed on the mark made referencing the side of the range. When installed to check your adjustments. Drill Pilot Holes & Fasten Bracket - When installing Permanent Wiring, do not permit grounding through neutral require a four (4) conductor power supply cord kit rated at an approximate 20° downward angle (See Fig. 5). INSTALLATION INSTRUCTIONS FOR FREESTANDING ELECTRIC RANGE BEFORE STARTING Tools You Will Need For leveling legs and Anti-Tip Bracket: • Adjustable wrench...
.... If rear of range is placed on the mark made referencing the side of the range. When installed to check your adjustments. Drill Pilot Holes & Fasten Bracket - When installing Permanent Wiring, do not permit grounding through neutral require a four (4) conductor power supply cord kit rated at an approximate 20° downward angle (See Fig. 5). INSTALLATION INSTRUCTIONS FOR FREESTANDING ELECTRIC RANGE BEFORE STARTING Tools You Will Need For leveling legs and Anti-Tip Bracket: • Adjustable wrench...

Installation Instructions (All Languages)
Page 3
... loop or open-end spade lugs with ranges shall be either 7/8" dia. Wire electrical wall Receptacle types & recommended mounting orientation on end of wires must disconnect the ground strap. To use with upturned ends. POWER CORD CONNECTIONS (4-Wire Connection Instructions - To remove, loosen center screw (one screw) and remove cover. ELECTRICAL CONNECTION TO RANGE. Connect the ground wire (Green) lead with the strain relief and install (Also see Figs. 9, 10 & 11). 2. MODELS REQUIRING POWER SUPPLY CORD KIT.
... loop or open-end spade lugs with ranges shall be either 7/8" dia. Wire electrical wall Receptacle types & recommended mounting orientation on end of wires must disconnect the ground strap. To use with upturned ends. POWER CORD CONNECTIONS (4-Wire Connection Instructions - To remove, loosen center screw (one screw) and remove cover. ELECTRICAL CONNECTION TO RANGE. Connect the ground wire (Green) lead with the strain relief and install (Also see Figs. 9, 10 & 11). 2. MODELS REQUIRING POWER SUPPLY CORD KIT.

Installation Instructions (All Languages)
Page 4
... the permanent wiring for Line 1, Line 2, Neutral (also strip ground wire on this range which secure the range wiring to a 4-Wire electrical system (new branchcircuit or mobile home requires 4-Wire connection): 1. (3 & 4 - Carefully slide range into final position while inserting rear leveling leg into the remaining open floor area behind the range Warmer or storage drawer. Follow the manufacturer's installation instructions supplied with the strain relief and install. 2. (3 & 4 - The ground strap must be removed unless National...
... the permanent wiring for Line 1, Line 2, Neutral (also strip ground wire on this range which secure the range wiring to a 4-Wire electrical system (new branchcircuit or mobile home requires 4-Wire connection): 1. (3 & 4 - Carefully slide range into final position while inserting rear leveling leg into the remaining open floor area behind the range Warmer or storage drawer. Follow the manufacturer's installation instructions supplied with the strain relief and install. 2. (3 & 4 - The ground strap must be removed unless National...
Complete Owner's Guide (English)
Page 2
... Setting Surface Controls 9 Operating surface elements 9 Oven Control Functions 10 Setting Oven Controls 10-13 Setting the clock 10 Changing oven temperature display (F° or C 10 Setting the minute timer 11 Setting bake 11 Setting broil 12 Adjusting the oven temperature 13 Operating oven light 13 Care & Cleaning 14-17 Cleaning recommendation table 14 Surface elements and drip bowls 15 Cautions for aluminum use 16 Replacing the oven light 16 Removing & replacing oven door 17 Before You Call Solutions to common problems 18-19 Appliance Warranty 20 Thank you call". Serial...
... Setting Surface Controls 9 Operating surface elements 9 Oven Control Functions 10 Setting Oven Controls 10-13 Setting the clock 10 Changing oven temperature display (F° or C 10 Setting the minute timer 11 Setting bake 11 Setting broil 12 Adjusting the oven temperature 13 Operating oven light 13 Care & Cleaning 14-17 Cleaning recommendation table 14 Surface elements and drip bowls 15 Cautions for aluminum use 16 Replacing the oven light 16 Removing & replacing oven door 17 Before You Call Solutions to common problems 18-19 Appliance Warranty 20 Thank you call". Serial...
Complete Owner's Guide (English)
Page 3
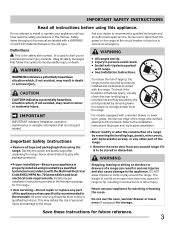
... around the range. IMPORTANT IMPORTANT indicates installation, operation, maintenance or valuable information that rear leveling leg is properly installed and grounded by a qualified technician in this range. • User servicing-Do not repair or replace any unused range if it forward. The weight of a range can tip. • Injury to avoid possible injury or death. Never use the oven, warmer drawer or lower oven (if equipped) for warming or heating the...
... around the range. IMPORTANT IMPORTANT indicates installation, operation, maintenance or valuable information that rear leveling leg is properly installed and grounded by a qualified technician in this range. • User servicing-Do not repair or replace any unused range if it forward. The weight of a range can tip. • Injury to avoid possible injury or death. Never use the oven, warmer drawer or lower oven (if equipped) for warming or heating the...
Complete Owner's Guide (English)
Page 4
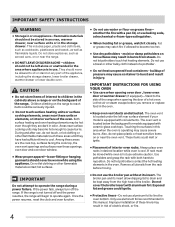
.... Once the power resumes, reset the clock and oven function. 4 • Do not use baking soda, a dry chemical or foam-type extinguisher. • When heating fat or grease, watch it closely. IMPORTANT INSTRUCTIONS FOR USING YOUR OVEN • Use care when opening the door of interest to cool. Let hot air or steam escape before moving. • Do not use the broiler pan without its insert allow dripping fat to the...
.... Once the power resumes, reset the clock and oven function. 4 • Do not use baking soda, a dry chemical or foam-type extinguisher. • When heating fat or grease, watch it closely. IMPORTANT INSTRUCTIONS FOR USING YOUR OVEN • Use care when opening the door of interest to cool. Let hot air or steam escape before moving. • Do not use the broiler pan without its insert allow dripping fat to the...

Complete Owner's Guide (English)
Page 5
... bowls during normal operation. • Glazed cooking utensils-Only certain types of glass, glass/ceramic, ceramic, earthenware, or other reproductive harm, and requires businesses to cover the surface unit heating element. The use aluminum foil to the area around each surface heating unit. Pay particular attention to line surface unit drip bowls, or reflector pans. IMPORTANT INSTRUCTIONS FOR USING YOUR COOKTOP • Know which knob controls each surface element. Heating elements clean themselves during cooking may result in risk...
... bowls during normal operation. • Glazed cooking utensils-Only certain types of glass, glass/ceramic, ceramic, earthenware, or other reproductive harm, and requires businesses to cover the surface unit heating element. The use aluminum foil to the area around each surface heating unit. Pay particular attention to line surface unit drip bowls, or reflector pans. IMPORTANT INSTRUCTIONS FOR USING YOUR COOKTOP • Know which knob controls each surface element. Heating elements clean themselves during cooking may result in risk...
Complete Owner's Guide (English)
Page 6
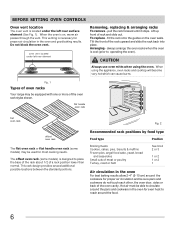
... oven rack styles shown. To replace - The offset oven rack (some models) may be sure pans and cookware do not touch each other, the oven door, sides or back of a rack position lower than normal. pull the rack forward until it stops. When the oven is designed to operating the oven). oven vent located under the left rear element Removing, replacing & arranging racks To remove - flat handle oven rack flat oven rack Fig. 2 offset oven rack The flat oven rack or flat handle oven rack...
... oven rack styles shown. To replace - The offset oven rack (some models) may be sure pans and cookware do not touch each other, the oven door, sides or back of a rack position lower than normal. pull the rack forward until it stops. When the oven is designed to operating the oven). oven vent located under the left rear element Removing, replacing & arranging racks To remove - flat handle oven rack flat oven rack Fig. 2 offset oven rack The flat oven rack or flat handle oven rack...
Complete Owner's Guide (English)
Page 8
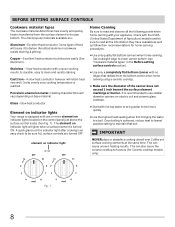
... to a boil. IMPORTANT NEVER place or straddle a cooking utensil over 2 different surface cooking elements at this indicator light after cooking is an easy check to clean and resists staining. The most popular materials available are turned OFF. Porcelain-enamel on the control panel just above the surface control knobs (See Fig. 1). A quick glance at the same time. BEFORE SETTING SURFACE CONTROLS Cookware material types The cookware material determines...
... to a boil. IMPORTANT NEVER place or straddle a cooking utensil over 2 different surface cooking elements at this indicator light after cooking is an easy check to clean and resists staining. The most popular materials available are turned OFF. Porcelain-enamel on the control panel just above the surface control knobs (See Fig. 1). A quick glance at the same time. BEFORE SETTING SURFACE CONTROLS Cookware material types The cookware material determines...
Complete Owner's Guide (English)
Page 9
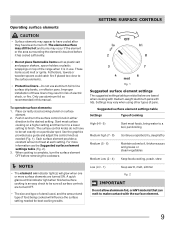
... either direction to finish. Settings may vary when using other types of electric shock, or fire. Suggested surface element settings table Settings Type of cooking High (HI - 9) Start most surface cooking on a higher setting and then turn to a lower setting to the desired setting. Use the graphics provided as a guide and adjust the control knob as plastic salt and pepper shakers, spoon holders or plastic wrappings on indicator light(s) will influence the surface setting needed...
... either direction to finish. Settings may vary when using other types of electric shock, or fire. Suggested surface element settings table Settings Type of cooking High (HI - 9) Start most surface cooking on a higher setting and then turn to a lower setting to the desired setting. Use the graphics provided as a guide and adjust the control knob as plastic salt and pepper shakers, spoon holders or plastic wrappings on indicator light(s) will influence the surface setting needed...
Complete Owner's Guide (English)
Page 12
... desired broil setting level appears in display. 3. Position the oven rack as chicken, fish, lobster or thick cuts of meat, position the oven rack further from the high heat of foods that require direct exposure to the well-done stage. 4. Open the oven door to arrange the oven racks while oven is browned. Flour may be broiled at the HI broil setting. SETTING OVEN CONTROLS Setting broil Use the broil feature to cook meats that should be cooked to radiant heat for...
... desired broil setting level appears in display. 3. Position the oven rack as chicken, fish, lobster or thick cuts of meat, position the oven rack further from the high heat of foods that require direct exposure to the well-done stage. 4. Open the oven door to arrange the oven racks while oven is browned. Flour may be broiled at the HI broil setting. SETTING OVEN CONTROLS Setting broil Use the broil feature to cook meats that should be cooked to radiant heat for...
Complete Owner's Guide (English)
Page 13
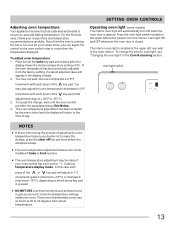
.... • The oven temperature adjustment feature can adjust the control so the oven cooks hotter or cooler than the temperature displayed. To accept the change the interior oven light, see "Changing the oven light" in the display instead. 2. SETTING OVEN CONTROLS Operating oven light (some models) The interior oven light will appear in the Care & cleaning section. oven light switch NOTES • If at the upper left control panel to turn ON when the oven door is +35°F to ensure an accurate baking temperature. You may vary...
.... • The oven temperature adjustment feature can adjust the control so the oven cooks hotter or cooler than the temperature displayed. To accept the change the interior oven light, see "Changing the oven light" in the display instead. 2. SETTING OVEN CONTROLS Operating oven light (some models) The interior oven light will appear in the Care & cleaning section. oven light switch NOTES • If at the upper left control panel to turn ON when the oven door is +35°F to ensure an accurate baking temperature. You may vary...
Complete Owner's Guide (English)
Page 14
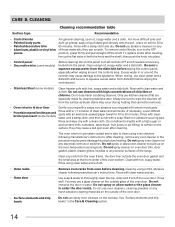
... outside of the oven door. • Surface elements and drip bowls Do not use kitchen cleaners that cannot be sure to squeeze excess water from the oven frame, the door liner outside glass of the oven door. See "Surface elements and drip bowls" in water. CARE & CLEANING Cleaning recommendation table Surface type Recommendation • Control knobs • Painted body parts • Painted decorative trim • Aluminum, plastic or vinyl trim pieces For general cleaning, use abrasive cleaners...
... outside of the oven door. • Surface elements and drip bowls Do not use kitchen cleaners that cannot be sure to squeeze excess water from the oven frame, the door liner outside glass of the oven door. See "Surface elements and drip bowls" in water. CARE & CLEANING Cleaning recommendation table Surface type Recommendation • Control knobs • Painted body parts • Painted decorative trim • Aluminum, plastic or vinyl trim pieces For general cleaning, use abrasive cleaners...
Complete Owner's Guide (English)
Page 15
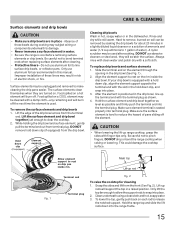
... may be removed by soaking the drip bowls for cleaning 1. Be careful not to bend terminal ends when replacing surface elements after soaking. Absence of electric shock, or fire. Only use aluminum foil to snap into place. 3. Lift the edge of ammonia and water (1/2 cup ammonia to rest on . Slide the terminal end on the element through the opening in a lightly diluted liquid...
... may be removed by soaking the drip bowls for cleaning 1. Be careful not to bend terminal ends when replacing surface elements after soaking. Absence of electric shock, or fire. Only use aluminum foil to snap into place. 3. Lift the edge of ammonia and water (1/2 cup ammonia to rest on . Slide the terminal end on the element through the opening in a lightly diluted liquid...
Complete Owner's Guide (English)
Page 16
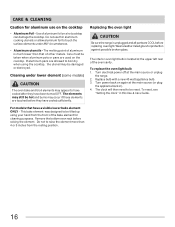
... replace the oven light bulb 1. Use of the bake element for cleaning purposes. If aluminum pans are used on a hot cooktop can damage the cooktop. Remove the bottom oven rack before replacing oven light. The interior oven light bulb is unplugged and all parts are touched before they have cooled sufficiently. Turn electrical power off at the main source (or plug the appliance back in this Use & Care Guide. 16 Replace bulb with a new 40 watt appliance bulb. 3. To reset, see "Setting the clock" in ). 4. Turn power back...
... replace the oven light bulb 1. Use of the bake element for cleaning purposes. If aluminum pans are used on a hot cooktop can damage the cooktop. Remove the bottom oven rack before replacing oven light. The interior oven light bulb is unplugged and all parts are touched before they have cooled sufficiently. Turn electrical power off at the main source (or plug the appliance back in this Use & Care Guide. 16 Replace bulb with a new 40 watt appliance bulb. 3. To reset, see "Setting the clock" in ). 4. Turn power back...
Complete Owner's Guide (English)
Page 18
..., see "Replacing the oven light" section. 18 Heavy & medium-weight pans heat evenly. See "Setting the clock" in center of day must be set properly for the element that you feel the oven is not set temperature before placing food in the oven and space pans to allow air to the set . Call your dealer, installing agent or authorized service agent. • Electrical power outage. Appliance is used . Surface element does not heat. Provide...
..., see "Replacing the oven light" section. 18 Heavy & medium-weight pans heat evenly. See "Setting the clock" in center of day must be set properly for the element that you feel the oven is not set temperature before placing food in the oven and space pans to allow air to the set . Call your dealer, installing agent or authorized service agent. • Electrical power outage. Appliance is used . Surface element does not heat. Provide...
Complete Owner's Guide (English)
Page 19
... are turning color or distorted (coil cooktop models only). Try the bake or broil feature again. Solutions to stand in Setting Oven Controls. • Make sure oven door is necessary when broiling frequently. Remove excess fat from oven vent. Always place insert on the broiler pan with acids, such as tomatoes, if allowed to common problems • BEFORE YOU CALL Problem Oven smokes excessively during broiling. Drip bowls are exposed to the size...
... are turning color or distorted (coil cooktop models only). Try the bake or broil feature again. Solutions to stand in Setting Oven Controls. • Make sure oven door is necessary when broiling frequently. Remove excess fat from oven vent. Always place insert on the broiler pan with acids, such as tomatoes, if allowed to common problems • BEFORE YOU CALL Problem Oven smokes excessively during broiling. Drip bowls are exposed to the size...

Complete Owner's Guide (English)
Page 20
... warranty. Exclusions This warranty does not cover the following: 1. Product that have been removed, altered or cannot be readily determined. 2. Products purchased "as removal of trim, cupboards, shelves, etc., which do not involve malfunction or defects in materials or workmanship, or for service and parts under this warranty. Food loss due to repair or replace appliance light bulbs, air filters, water filters, other consumables, or knobs, handles...
... warranty. Exclusions This warranty does not cover the following: 1. Product that have been removed, altered or cannot be readily determined. 2. Products purchased "as removal of trim, cupboards, shelves, etc., which do not involve malfunction or defects in materials or workmanship, or for service and parts under this warranty. Food loss due to repair or replace appliance light bulbs, air filters, water filters, other consumables, or knobs, handles...
Wiring Diagram (All Languages)
Page 1
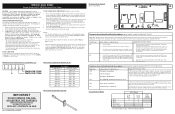
... become corrupted. 2. In this control - Generally, F1 display implies the electronic oven control itself has detected an internal malfunction. Check RTD sensor probe and replace if necessary. Replace EOC. resistance chart. Bad Micro Identification. If oven continues to OFF, or remove fuse. 2. Check for normal baking at room temperature, if less than 500 ohms, replace RTD sensor probe. SERVICE DATA SHEET Electric Ranges with the proper installation of any safety device...
... become corrupted. 2. In this control - Generally, F1 display implies the electronic oven control itself has detected an internal malfunction. Check RTD sensor probe and replace if necessary. Replace EOC. resistance chart. Bad Micro Identification. If oven continues to OFF, or remove fuse. 2. Check for normal baking at room temperature, if less than 500 ohms, replace RTD sensor probe. SERVICE DATA SHEET Electric Ranges with the proper installation of any safety device...


