Frigidaire FFEF3005MB Support and Manuals
Get Help and Manuals for this Frigidaire item

View All Support Options Below
Free Frigidaire FFEF3005MB manuals!
Problems with Frigidaire FFEF3005MB?
Ask a Question
Free Frigidaire FFEF3005MB manuals!
Problems with Frigidaire FFEF3005MB?
Ask a Question
Popular Frigidaire FFEF3005MB Manual Pages
Installation Instructions (All Languages) - Page 1

...instructions contained in the Use & Care Guide, read it carefully.
• Be sure your range is installed and grounded properly by a qualified installer or service...Installer • Read all governing codes and ordinances. • Be sure to leave these instructions with the consumer. READ AND SAVE THESE INSTRUCTIONS...:
If the information in this manual is located on the lower right...
Installation Instructions (All Languages) - Page 3

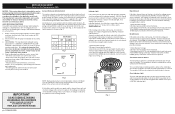
... are tightened securely and replace the rear access cover ...the ground screw was originally installed (See Fig. 12).
5. for 4-Wire or 4b. hole as shown. INSTALLATION INSTRUCTIONS FOR FREESTANDING ELECTRIC RANGE
...of the appliance with upturned ends. MODELS REQUIRING POWER SUPPLY CORD KIT. Connect the ground wire (Green) lead with the strain relief and install (Also see Figs. 9, 10 &...
Installation Instructions (All Languages) - Page 4

...
strain relief and install (Also see Figs. 9, 10 & 11). 2. NOTE: Non-terminated field wire compression connections must be removed unless National, State or Local Codes do not permit use... and replace the rear access cover (See Fig. 9). INSTALLATION INSTRUCTIONS FOR FREESTANDING ELECTRIC RANGE
or 4B. Remove the factory installed ground screw & plate to release the factory installed copper...
Complete Owner s Guide - Page 2

...web site at www.frigidaire.com
for service, there are a few things you for choosing Frigidaire. Printed in the mail.
PRODUCT RECORD AND REGISTRATION
Contents
Product Registration 2 Important Safety Instructions 3-5 Before Setting Oven Controls 6
Removing, replacing & arranging oven racks 6 Operating oven light 6 Before Setting Surface Controls 7 Cookware material types 7 Home...
Complete Owner s Guide - Page 3
... precautions in this range.
• User servicing-Do not repair or replace any part of personal injury and damage to climb or play with a WARNING or CAUTION statement based on the risk type. Obey all safety messages that is properly installed and grounded by a qualified technician in the manuals.
Range leveling leg
Anti-Tip bracket
IMPORTANT...
Complete Owner s Guide - Page 4
...rack before you remove or replace food in the oven.
&#.... Touching the surfaces in this manual. During and after use . ...with coil elements. IMPORTANT SAFETY INSTRUCTIONS
WARNING
• Storage in...use extreme caution. Improper installation of the appliance, including ...model is located below the backguard for models equipped with ceramic-glass cook tops. Children climbing on any part...
Complete Owner s Guide - Page 5
... top service without ...INSTRUCTIONS FOR USING YOUR COOKTOP
• Know which knob controls each surface element.
IMPORTANT SAFETY INSTRUCTIONS
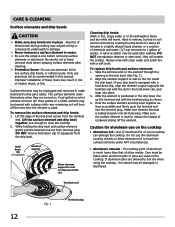
IMPORTANT INSTRUCTIONS FOR CLEANING YOUR RANGE
CAUTION
Before manually cleaning any part... heat settings-Boilovers .... Improper installation of these...instructions for cook top use aluminum foil to the sudden change in temperature. COIL COOK TOP MODELS...
Complete Owner s Guide - Page 6
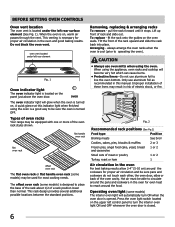
...manual. flat handle oven rack
flat oven rack
offset oven rack
The flat oven rack or flat handle oven rack (some models...oven. BEFORE SETTING OVEN CONTROLS.... Improper installation of electric...replace - always arrange the oven racks when the oven is turned on. Removing, replacing...models) is necessary for proper air circulation and be able to operating the oven). fit the rack onto the guides...
Complete Owner s Guide - Page 9
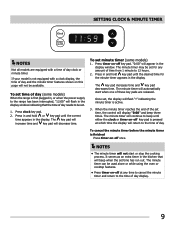
... will continue to the time of day and the minute timer features shown on -off key pad is not equipped with a time of the set minute timer (some models)
When the range is first plugged in, or when the power supply to 12 hours.
2. It serves as an extra timer in and...
Complete Owner s Guide - Page 10

... racks while the oven is still cool. IMPORTANT
Dark or dull pans absorb more heat than shiny bakeware resulting in Before Setting Oven Controls section.
2. For rare meats, position the broiler pan closer to broil (See Figs 1 & 2). See .... 3
Broil Stop Position
Fig. 5
CAUTION
• The broiler pan and the insert (some models) allows grease to the desired oven temperature (See Fig. 2).
3.
Complete Owner s Guide - Page 12
...Hold down
clip (if equipped)
Element support
Allow element support to 1 gallon of aluminum foil ...manual. Hold the surface element and drip bowl together as level as possible and firmly push the terminal end into place. 3. Caution for about 20 minutes in risk of other metals. Use of water).
Improper installation... the drip pans easier. To replace drip bowls and surface elements 1....
Complete Owner s Guide - Page 13
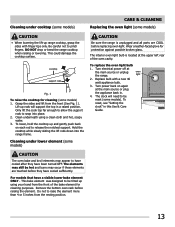
...place. 2. To replace the oven light bulb
1. light
2. To
reset, see "Setting the
clock" in ...parts are touched before raising the element. The clock will support the top in this Use & Care
Guide.
CAUTION
The oven bake and broil elements may occur if these elements are COOL before replacing...leather-faced glove for cleaning (some models)
CAUTION
• When lowering the...
Complete Owner s Guide - Page 15
... (some models).
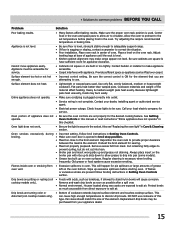
• Grease has built up and grease not draining.
Protect bowls as much as possible after a spill over carpet.
Try adjusting the recipe's recommended temperature or baking time. Cannot move appliance easily. Call your dealer, installing agent or authorized service agent.
• Electrical power outage. Oven Controls in this manual or read instructions...
Complete Owner s Guide - Page 16

... for repairing or replacing any after hour, weekend, or holiday service calls, tolls, ferry trip
charges, or mileage expense for appliances not in
ordinary household use or used other than genuine
Electrolux parts or parts obtained from its original owner to another party or removed outside the USA or
Canada. 3. Products with the provided instructions. 8. Expenses...
Wiring Diagram - Page 1
... the chart below .
1.Shut off power to range. 2.Remove wire leads from element terminals. 3.Set ohmmeter to R X 10 scale and attach meter leads to completion of service. If voltage is indicated, the problem is present at the indicator terminals, replace the indicator light. If voltage is in the thermostat. The contacts C-BA are marked...
Frigidaire FFEF3005MB Reviews
We have not received any reviews for Frigidaire yet.