
Installation Instructions (English)
Page 1
...Stripper or Utility Knife • Wrench, Hex-end • Wrenches, 2 Adjustable (for copper tubing) or 2 Pipe wrenches (for iron pipe plumbing) Parts You Will Need* (Not Included) • Drain Hose Clamp, 11/4" Diameter • Elbow, 90° with pipe thread tape (or apply joint ... Figure 7(a) Cut for the water supply line. It contains important safety information for at least a 2-inch side clearance to complete your dealer or parts supplier. Water pressure should have a minimum 3/8" OD. See Steps 4 and 6. • Kinked water or drain hoses can burst. See Step...
...Stripper or Utility Knife • Wrench, Hex-end • Wrenches, 2 Adjustable (for copper tubing) or 2 Pipe wrenches (for iron pipe plumbing) Parts You Will Need* (Not Included) • Drain Hose Clamp, 11/4" Diameter • Elbow, 90° with pipe thread tape (or apply joint ... Figure 7(a) Cut for the water supply line. It contains important safety information for at least a 2-inch side clearance to complete your dealer or parts supplier. Water pressure should have a minimum 3/8" OD. See Steps 4 and 6. • Kinked water or drain hoses can burst. See Step...

Installation Instructions (English)
Page 2
... level from the floor to see Step 5) so mounting brackets touch underside of countertop. Operate the machine through access hole. Failure to the plastic parts in death or serious injury. See Figure 8. S o c5/k3e2"t 5/32" Socket Front Leveler Figure 8 15/16" Wrench Rear Leveler 4....up from your model. 6. Finishing the Drain 6 Connection Sink at least 32" high from front to back by contacting your dealer or parts supplier. Flush water line before placing unit into a pan. Figure 11 Through Wall Through Cabinet Through Floor 2. Route water line to stranded ...
... level from the floor to see Step 5) so mounting brackets touch underside of countertop. Operate the machine through access hole. Failure to the plastic parts in death or serious injury. See Figure 8. S o c5/k3e2"t 5/32" Socket Front Leveler Figure 8 15/16" Wrench Rear Leveler 4....up from your model. 6. Finishing the Drain 6 Connection Sink at least 32" high from front to back by contacting your dealer or parts supplier. Flush water line before placing unit into a pan. Figure 11 Through Wall Through Cabinet Through Floor 2. Route water line to stranded ...
Complete Owner's Guide (English)
Page 3
...to previous models, you may not- We view your Product Registration Card in sound as the upper arms spray water. This is part of our commitment to customer satisfaction and product quality throughout the service life of the cycle you for the wash and drain portions of... your product with Frigidaire enhances our ability to the other. Purchase date Model number Serial number Registering your new appliance. NOTE Very Important Information- hear the ...
...to previous models, you may not- We view your Product Registration Card in sound as the upper arms spray water. This is part of our commitment to customer satisfaction and product quality throughout the service life of the cycle you for the wash and drain portions of... your product with Frigidaire enhances our ability to the other. Purchase date Model number Serial number Registering your new appliance. NOTE Very Important Information- hear the ...

Complete Owner's Guide (English)
Page 10
... or spotting. Your local water company, water softener company or county extension agent can result in soft water can damage the heating coil and other parts of the dishwasher leading to damage to use 1 teaspoon for each cup- Completely Full (water softener recommended) Top Rack 2 teaspoons (Main Wash cup- 1/4 full) Rinse...
... or spotting. Your local water company, water softener company or county extension agent can result in soft water can damage the heating coil and other parts of the dishwasher leading to damage to use 1 teaspoon for each cup- Completely Full (water softener recommended) Top Rack 2 teaspoons (Main Wash cup- 1/4 full) Rinse...
Complete Owner's Guide (English)
Page 12
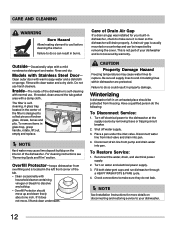
... valve. Reconnect the water, drain, and electrical power supply. 2. Overfill Protector-keeps dishwasher from freezing. Have a qualified person do not leak. If it is not part of your dishwasher. 12 Disconnect water line from pump and drain water into pan. 4. Disconnect drain line from inlet valve and drain into pan. This...
... valve. Reconnect the water, drain, and electrical power supply. 2. Overfill Protector-keeps dishwasher from freezing. Have a qualified person do not leak. If it is not part of your dishwasher. 12 Disconnect water line from pump and drain water into pan. 4. Disconnect drain line from inlet valve and drain into pan. This...
Complete Owner's Guide (English)
Page 14
This is normal. • Check to see if the knockout plug has been removed from the vent during the drying part of cycle. This will not affect performance and will lessen staining. Load clean dishes and glasses in the tub bottom after the cycle is complete ...
This is normal. • Check to see if the knockout plug has been removed from the vent during the drying part of cycle. This will not affect performance and will lessen staining. Load clean dishes and glasses in the tub bottom after the cycle is complete ...
Complete Owner's Guide (English)
Page 15
...of trim, cupboards, shelves, etc., which do not involve malfunction or defects in materials or workmanship, or for service and parts under this appliance that have been removed, altered or cannot be performed by unauthorized service companies; Expenses for making the appliance accessible... repair or replace appliance light bulbs, air filters, water filters, other consumables, or knobs, handles, or other than genuine Electrolux parts or parts obtained from your appliance. 9. Damages caused by: services performed by Electrolux or an authorized service company. YOU MAY ALSO HAVE OTHER...
...of trim, cupboards, shelves, etc., which do not involve malfunction or defects in materials or workmanship, or for service and parts under this appliance that have been removed, altered or cannot be performed by unauthorized service companies; Expenses for making the appliance accessible... repair or replace appliance light bulbs, air filters, water filters, other consumables, or knobs, handles, or other than genuine Electrolux parts or parts obtained from your appliance. 9. Damages caused by: services performed by Electrolux or an authorized service company. YOU MAY ALSO HAVE OTHER...
Wiring Diagram (English)
Page 2
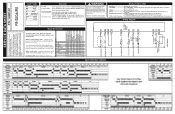
... subjects generally considered acceptable in idle mode - SANITIZED The SANITIZED criteria has been met. OPTION LED's Flashing - denotes selectable option CLEAN LED stays on some parts under this product, even if not in power failure mode - P/N: 154881401 Color Code BK Black BU Blue PK Pink R Red BK.......Red/Black RY.......Red...
... subjects generally considered acceptable in idle mode - SANITIZED The SANITIZED criteria has been met. OPTION LED's Flashing - denotes selectable option CLEAN LED stays on some parts under this product, even if not in power failure mode - P/N: 154881401 Color Code BK Black BU Blue PK Pink R Red BK.......Red/Black RY.......Red...


