
Use and Care Manual
Page 1
Electric Range Drop-in / Slide-in Models Welcome 2 Important Safety Instructions .. 3-5 Features at a Glance 6 Setting Surface Controls.. 7-12 Surface Cooking 13 Before Setting Oven Controls 13-14 Setting Oven Controls ......... 14 Setting Warmer Drawer Controls ...... 15 Cooking Informations ..... 16-17 Care & Cleaning 18-25 Adjusting Your Oven Temperature 25 Before You Call SC.oo.lm.u.tm.io.on.n.s..Pt.or.o.b.l.e.m..s 26-27 Warranty Back Cover 318203824 (0703) Rev. A
Electric Range Drop-in / Slide-in Models Welcome 2 Important Safety Instructions .. 3-5 Features at a Glance 6 Setting Surface Controls.. 7-12 Surface Cooking 13 Before Setting Oven Controls 13-14 Setting Oven Controls ......... 14 Setting Warmer Drawer Controls ...... 15 Cooking Informations ..... 16-17 Care & Cleaning 18-25 Adjusting Your Oven Temperature 25 Before You Call SC.oo.lm.u.tm.io.on.n.s..Pt.or.o.b.l.e.m..s 26-27 Warranty Back Cover 318203824 (0703) Rev. A

Use and Care Manual
Page 3
... as cookbooks, plasticware and towels, as well as aerosol cans, on an open drawer, when hot, may explode and result in Canada with National Electrical Code ANSI/NFPA No. 70-latest edition and local code requirements, and in fire or property damage. appliance is a brief explanation of these symbols....Save these symbols and follow all tape and packaging wrap before using the appliance. SLIDE-IN MODELS ONLY To reduce • All ranges the risk of tipping of a child on or near surface units or in - range, the range must be allowed to sit or stand on the door or drawer of the...
... as cookbooks, plasticware and towels, as well as aerosol cans, on an open drawer, when hot, may explode and result in Canada with National Electrical Code ANSI/NFPA No. 70-latest edition and local code requirements, and in fire or property damage. appliance is a brief explanation of these symbols....Save these symbols and follow all tape and packaging wrap before using the appliance. SLIDE-IN MODELS ONLY To reduce • All ranges the risk of tipping of a child on or near surface units or in - range, the range must be allowed to sit or stand on the door or drawer of the...
Use and Care Manual
Page 5
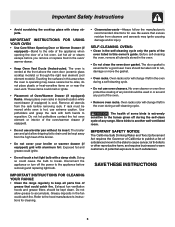
...on or near the oven vent. These items could catch fire. Remove all parts free of a hot oven. IMPORTANT INSTRUCTIONS FOR CLEANING YOUR RANGE • Clean the range regularly to the side of the appliance when opening the door of grease that excess residue from the rack before removing rack. Refer to... the appliance before you remove or replace food in the oven during the self-clean cycle of any range. No oven cleaner or oven liner protective coating of any kind should be used in this area when the oven is cool. SAVE THESE ...
...on or near the oven vent. These items could catch fire. Remove all parts free of a hot oven. IMPORTANT INSTRUCTIONS FOR CLEANING YOUR RANGE • Clean the range regularly to the side of the appliance when opening the door of grease that excess residue from the rack before removing rack. Refer to... the appliance before you remove or replace food in the oven during the self-clean cycle of any range. No oven cleaner or oven liner protective coating of any kind should be used in this area when the oven is cool. SAVE THESE ...
Use and Care Manual
Page 6
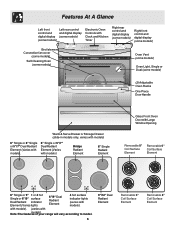
...models) Oven Light, Single or Dual (some models) (2) Adjustable Oven Racks One Piece Door Handle Warm & Serve Drawer or Storage Drawer (slide-in models only, varies with models) 6" Single or 8" Single or 5"/7" Dual Radiant Element (Varies with models). 6" Single or 5"/7" Dual...Dual Radiant indicator Element (Varies lights 6"/9" Dual Radiant Element 4 hot surface indicator lights (varies with Note:The featurmesodoeflys)o.ur range will vary according to model. 6 9"/12" Dual Radiant Element Removable 6" Coil Surface Element Removable 8" Coil Surface Element with models). (varies ...
...models) Oven Light, Single or Dual (some models) (2) Adjustable Oven Racks One Piece Door Handle Warm & Serve Drawer or Storage Drawer (slide-in models only, varies with models) 6" Single or 8" Single or 5"/7" Dual Radiant Element (Varies with models). 6" Single or 5"/7" Dual...Dual Radiant indicator Element (Varies lights 6"/9" Dual Radiant Element 4 hot surface indicator lights (varies with Note:The featurmesodoeflys)o.ur range will vary according to model. 6 9"/12" Dual Radiant Element Removable 6" Coil Surface Element Removable 8" Coil Surface Element with models). (varies ...
Use and Care Manual
Page 8
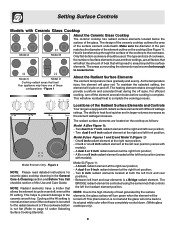
... are all factors that will affect the amount of heat generated by the surface elements, the glass surface will turn off . A 6 inch radiant element at the right rear position; - Setting Surface Controls Models with models); The areas surrounding the elements may have a limiter that... cooktop has radiant surface elements located below the surface of the Radiant Surface Elements and Controls Your range is complete. Model B (see Figures 1 and 2) and Model C (Figure 1): - Two dual 5 or 7 inch radiant element at the right and left front and rear positions. - Locations of the glass....
... are all factors that will affect the amount of heat generated by the surface elements, the glass surface will turn off . A 6 inch radiant element at the right rear position; - Setting Surface Controls Models with models); The areas surrounding the elements may have a limiter that... cooktop has radiant surface elements located below the surface of the Radiant Surface Elements and Controls Your range is complete. Model B (see Figures 1 and 2) and Model C (Figure 1): - Two dual 5 or 7 inch radiant element at the right and left front and rear positions. - Locations of the glass....
Use and Care Manual
Page 9
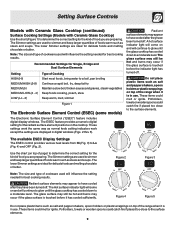
... determine the correct setting for the kind of foods warm such as salt and pepper shakers, spoon holders or plastic wrappings on top of the range when it is in digital windows (Figs. 2 thru 5). Do not place plastic items such as stews and soups. Use the chart (on top of page... items such as normal knob setting indicators work the same way as salt and pepper shakers, spoon holders or plastic wrappings on top of the range when it has cooled sufficiently.
... determine the correct setting for the kind of foods warm such as salt and pepper shakers, spoon holders or plastic wrappings on top of the range when it is in digital windows (Figs. 2 thru 5). Do not place plastic items such as stews and soups. Use the chart (on top of page... items such as normal knob setting indicators work the same way as salt and pepper shakers, spoon holders or plastic wrappings on top of the range when it has cooled sufficiently.
Use and Care Manual
Page 14
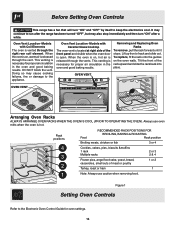
... Cookies, cakes, pies, biscuits &muffins 1 rack Multiple racks 2 or 3 2 & 4 Frozen pies, angel food cake, yeast, bread, casseroles, small cuts of the rack upward and slide the rack back into place. Removing and Replacing Oven Racks To remove, pull the rack forward until it stops. It may continue to keep the...ham 1 Note: Always use oven mitts when the oven is located at right side of rack and slide out. Before Setting Oven Controls This range has a fan that will turn "ON" after the range has been turned "OFF", but may cause cooking failures, fire or damage to the Electronic Oven ...
... Cookies, cakes, pies, biscuits &muffins 1 rack Multiple racks 2 or 3 2 & 4 Frozen pies, angel food cake, yeast, bread, casseroles, small cuts of the rack upward and slide the rack back into place. Removing and Replacing Oven Racks To remove, pull the rack forward until it stops. It may continue to keep the...ham 1 Note: Always use oven mitts when the oven is located at right side of rack and slide out. Before Setting Oven Controls This range has a fan that will turn "ON" after the range has been turned "OFF", but may cause cooking failures, fire or damage to the Electronic Oven ...
Use and Care Manual
Page 16
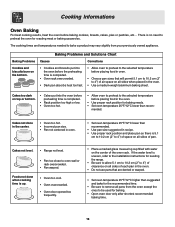
... too hot. • Allow oven to preheat to the selected temperature before the preheating time is no need to preheat the oven for leveling the range. • Be sure to allow 5.1 cm to 10.2 cm (2" to 4") of clearance on all sides of each pan in the oven. • Do not ...the ones to be used for the recommended time. • Be sure to remove all pans from your previously owned appliance. Cakes not level. • Range not level. • Pan too close to the selected temperature before baking cookies, breads, cakes, pies or pastries, etc... Cooking Informations Oven Baking For best...
... too hot. • Allow oven to preheat to the selected temperature before the preheating time is no need to preheat the oven for leveling the range. • Be sure to allow 5.1 cm to 10.2 cm (2" to 4") of clearance on all sides of each pan in the oven. • Do not ...the ones to be used for the recommended time. • Be sure to remove all pans from your previously owned appliance. Cakes not level. • Range not level. • Pan too close to the selected temperature before baking cookies, breads, cakes, pies or pastries, etc... Cooking Informations Oven Baking For best...
Use and Care Manual
Page 18
...the porcelain may become damaged during future heating. To replace knobs after soaking. The surface elements clean themselves when they are turned OFF and the range is used. A nylon scrubber may be unplugged and removed to use spray oven cleaners on a soft cloth first. Rinse with mild dish ... NOT use ANY store bought cleaners like Stainless Steel cleaners or any abrasive, chlorides, chlorines or ammonia. Follow by soaking the drip bowls for 30 to the appliance. It is may cause damage to 40 minutes. To clean drip bowls, wash in hot, soapy water or in a slightly...
...the porcelain may become damaged during future heating. To replace knobs after soaking. The surface elements clean themselves when they are turned OFF and the range is used. A nylon scrubber may be unplugged and removed to use spray oven cleaners on a soft cloth first. Rinse with mild dish ... NOT use ANY store bought cleaners like Stainless Steel cleaners or any abrasive, chlorides, chlorines or ammonia. Follow by soaking the drip bowls for 30 to the appliance. It is may cause damage to 40 minutes. To clean drip bowls, wash in hot, soapy water or in a slightly...

Use and Care Manual
Page 20
...the lift-up rod will support the top in place under the front of clear water and ammonia. DO NOT drop or bend the range top when raising or lowering. If food spills and grease spatters are turned to rest in its raised position. Turn off the cleaners ... DO NOT use a soapy steel wool pad or other mild household cleaners. 4. Correct and consistent cleaning is essential to your cooktop surface. A lift-up range top, grasp the sides with warm, soapy water. 3. This could damage the surface. COOKTOP CLEANING / POLISHING CREAM can be hazardous to maintaining your porcelain enamel...
...the lift-up rod will support the top in place under the front of clear water and ammonia. DO NOT drop or bend the range top when raising or lowering. If food spills and grease spatters are turned to rest in its raised position. Turn off the cleaners ... DO NOT use a soapy steel wool pad or other mild household cleaners. 4. Correct and consistent cleaning is essential to your cooktop surface. A lift-up range top, grasp the sides with warm, soapy water. 3. This could damage the surface. COOKTOP CLEANING / POLISHING CREAM can be hazardous to maintaining your porcelain enamel...
Use and Care Manual
Page 23
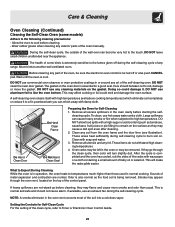
... Clean Frame Do Not Hand Clean Seal Preparing the Oven for a good seal. The gasket on . cleaning cycle. NOTE: A smoke eliminator in or around any range. Doing so could melt and damage the oven surface. DO NOT clean the oven door gasket. Care & Cleaning Oven Cleaning (Continued) Cleaning the Self-Clean...
... Clean Frame Do Not Hand Clean Seal Preparing the Oven for a good seal. The gasket on . cleaning cycle. NOTE: A smoke eliminator in or around any range. Doing so could melt and damage the oven surface. DO NOT clean the oven door gasket. Care & Cleaning Oven Cleaning (Continued) Cleaning the Self-Clean...
Use and Care Manual
Page 24
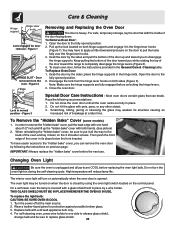
... the oven door. Then push the front edge of the cover in its structure causing an increased risk of the door toward the range to one hand about 1/2" inch and lift up the "hidden bake" cover with a glass shield held in the hinge lever hooks (Figure 1). High temperature will turn the oven...
... the oven door. Then push the front edge of the cover in its structure causing an increased risk of the door toward the range to one hand about 1/2" inch and lift up the "hidden bake" cover with a glass shield held in the hinge lever hooks (Figure 1). High temperature will turn the oven...
Use and Care Manual
Page 25
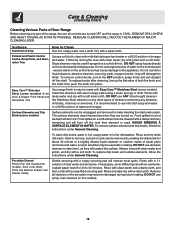
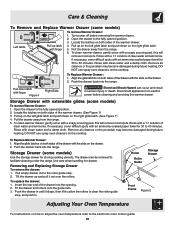
...Left Glide Pull up and pull it stops, then lift to allow the rollers to 40 minutes. Rinse with an ammonia-soaked paper towel for 30 to clear the roller guide stop . 2. To Replace Warmer Drawer: Latch 1. If necessary, cover difficult spots with a 1:1 solution of clear...on the cooktop. Pull down on both sides of the warmer drawer. Open the drawer to facilitate cleaning under the range. Rinse with finger Figure 1 Right Glide Electrical Shock Hazard can de removed to the fully opened position. 3. Use care when handling the drawer. with clean water...
...Left Glide Pull up and pull it stops, then lift to allow the rollers to 40 minutes. Rinse with an ammonia-soaked paper towel for 30 to clear the roller guide stop . 2. To Replace Warmer Drawer: Latch 1. If necessary, cover difficult spots with a 1:1 solution of clear...on the cooktop. Pull down on both sides of the warmer drawer. Open the drawer to facilitate cleaning under the range. Rinse with finger Figure 1 Right Glide Electrical Shock Hazard can de removed to the fully opened position. 3. Use care when handling the drawer. with clean water...
Use and Care Manual
Page 26
...warped pans. Contact a carpenter to correct sagging or sloping floor. (3) Kitchen cabinet misalignment may make appliance accessible. (3) Carpeting interferes with range. Call your own home or is normal operating characteristic of utensils are all operating correctly. See Changing Oven Light in this appliance. ... on the oven rack. Before you call Solutions to Common Problems Before you call while the appliance is in your local electric company for ceramic-glass cooktop have sufficient room for service, review this list. This list is not level. (1) Poor installation....
...warped pans. Contact a carpenter to correct sagging or sloping floor. (3) Kitchen cabinet misalignment may make appliance accessible. (3) Carpeting interferes with range. Call your own home or is normal operating characteristic of utensils are all operating correctly. See Changing Oven Light in this appliance. ... on the oven rack. Before you call Solutions to Common Problems Before you call while the appliance is in your local electric company for ceramic-glass cooktop have sufficient room for service, review this list. This list is not level. (1) Poor installation....

Use and Care Manual
Page 27
... enough to provide proper clearance between the meat and the element. Use cookware with strap and fasten the range to Common Problems POSSIBLE CAUSE/SOLUTION (1) Sliding or scraping of grease on residue. If you call Solutions to it is necessary when broiling frequently. These... from the oven, and from vent. Use a ceramic-glass cooktop cleaning cream to the side panels. It is started. Also attach the electric power cord in oven. "Cooktop Cleaning - "Cooktop Cleaning - Ceramic Glass Cooktop Models" section under "Oven Cleaning" in the levelling legs ...
... enough to provide proper clearance between the meat and the element. Use cookware with strap and fasten the range to Common Problems POSSIBLE CAUSE/SOLUTION (1) Sliding or scraping of grease on residue. If you call Solutions to it is necessary when broiling frequently. These... from the oven, and from vent. Use a ceramic-glass cooktop cleaning cream to the side panels. It is started. Also attach the electric power cord in oven. "Cooktop Cleaning - "Cooktop Cleaning - Ceramic Glass Cooktop Models" section under "Oven Cleaning" in the levelling legs ...


