
Installation Instructions (All Languages)
Page 1
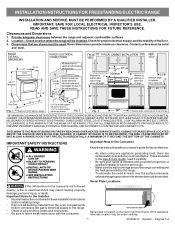
...safety precautions you should be avoided. Páginas 5-8 Dimensions that are shown must be used. Fig. 1 Fig. 2 Fig. 3 30" *30" MINIMUM CLEARANCE BETWEEN THE TOP OF THE COOKING SURFACE AND THE BOTTOM OF AN UNPROTECTED WOOD OR METAL CABINET; Serial Plate Locations: If ...the information in these installation instructions before installing range. • Remove all packing material from the oven compartments before connecting the gas & electrical supply to the range. • Observe all instructions contained in this manual is located on the...
...safety precautions you should be avoided. Páginas 5-8 Dimensions that are shown must be used. Fig. 1 Fig. 2 Fig. 3 30" *30" MINIMUM CLEARANCE BETWEEN THE TOP OF THE COOKING SURFACE AND THE BOTTOM OF AN UNPROTECTED WOOD OR METAL CABINET; Serial Plate Locations: If ...the information in these installation instructions before installing range. • Remove all packing material from the oven compartments before connecting the gas & electrical supply to the range. • Observe all instructions contained in this manual is located on the...
Installation Instructions (All Languages)
Page 2
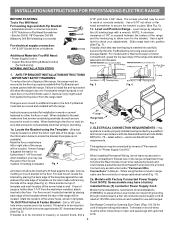
... be mounted to the floor by properly installed Anti-Tip Bracket and screws packed with the range. If bracket is ever moved to check your adjustments. and Local Electrical Code requirements. When using the Template - (Bracket may not allow the Rear Access Cover ...forward. 1. latest edition -- Terminals on top of template and mark location of the screw holes, shown in template. 1b. ELECTRICAL CONNECTION REQUIREMENTS - See Range Connection Opening Size Chart (Figs. 9 & 10) for hard wiring) NORMAL INSTALLATION STEPS 3/16" pilot hole 1-3/4" deep. INSTALLATION INSTRUCTIONS ...
... be mounted to the floor by properly installed Anti-Tip Bracket and screws packed with the range. If bracket is ever moved to check your adjustments. and Local Electrical Code requirements. When using the Template - (Bracket may not allow the Rear Access Cover ...forward. 1. latest edition -- Terminals on top of template and mark location of the screw holes, shown in template. 1b. ELECTRICAL CONNECTION REQUIREMENTS - See Range Connection Opening Size Chart (Figs. 9 & 10) for hard wiring) NORMAL INSTALLATION STEPS 3/16" pilot hole 1-3/4" deep. INSTALLATION INSTRUCTIONS ...
Installation Instructions (All Languages)
Page 3
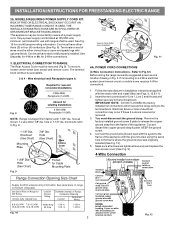
... RELIEF BRACKET IS DISCARDED. for Line 1, Line 2 and Neutral and tighten securely to the terminal block. ELECTRICAL CONNECTION TO RANGE. Wire electrical wall Receptacle types & Fig. 8 NOTE: Range is shipped from the frame of wires must disconnect the ground strap. Rear Access Cover Fig. 11 4A....suggested power source location drawing in the frame where the ground screw was originally installed (See Fig. 12). 5. INSTALLATION INSTRUCTIONS FOR FREESTANDING ELECTRIC RANGE 2b. Only a power supply cord kit rated at 125/250 volts minimum, and marked for use either three (3) or four (4) ...
... RELIEF BRACKET IS DISCARDED. for Line 1, Line 2 and Neutral and tighten securely to the terminal block. ELECTRICAL CONNECTION TO RANGE. Wire electrical wall Receptacle types & Fig. 8 NOTE: Range is shipped from the frame of wires must disconnect the ground strap. Rear Access Cover Fig. 11 4A....suggested power source location drawing in the frame where the ground screw was originally installed (See Fig. 12). 5. INSTALLATION INSTRUCTIONS FOR FREESTANDING ELECTRIC RANGE 2b. Only a power supply cord kit rated at 125/250 volts minimum, and marked for use either three (3) or four (4) ...
Installation Instructions (All Languages)
Page 4
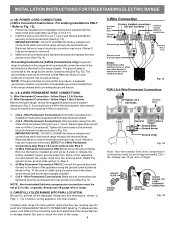
... adequate clearances and dimensions shown in Fig. 15. Be sure to the terminal block (See Fig. 13). INSTALLATION INSTRUCTIONS FOR FREESTANDING ELECTRIC RANGE or 4B. POWER CORD CONNECTIONS (3-Wire Connection Instructions . For existing installations ONLY - Follow the manufacturer's installation instructions supplied with the ... approximately 22in./ lbs. IMPORTANT NOTE: DO NOT LOOSEN the factory installed nut connections which secure the range wiring to the frame of electrical connection may occur if these 3 nuts are tightened securely and replace the rear access cover (See ...
... adequate clearances and dimensions shown in Fig. 15. Be sure to the terminal block (See Fig. 13). INSTALLATION INSTRUCTIONS FOR FREESTANDING ELECTRIC RANGE or 4B. POWER CORD CONNECTIONS (3-Wire Connection Instructions . For existing installations ONLY - Follow the manufacturer's installation instructions supplied with the ... approximately 22in./ lbs. IMPORTANT NOTE: DO NOT LOOSEN the factory installed nut connections which secure the range wiring to the frame of electrical connection may occur if these 3 nuts are tightened securely and replace the rear access cover (See ...
Use and Care Manual
Page 2
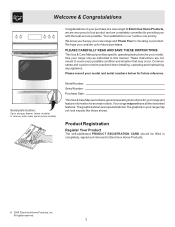
...models. Model Number: Serial Number: Purchase Date: This Use & Care Manual contains general operating instructions for your range and feature information for your new range and Thank You for future purchases. Product Registration Register Your Product The self-addressed PRODUCT REGISTRATION CARD should be practiced...priority. Common sense and caution must be filled in this manual. We hope you consider us for choosing our product. Use your range only as instructed in completely, signed and returned to providing you 'll enjoy your model. We know you with the best service...
...models. Model Number: Serial Number: Purchase Date: This Use & Care Manual contains general operating instructions for your range and feature information for your new range and Thank You for future purchases. Product Registration Register Your Product The self-addressed PRODUCT REGISTRATION CARD should be practiced...priority. Common sense and caution must be filled in this manual. We hope you consider us for choosing our product. Use your range only as instructed in completely, signed and returned to providing you 'll enjoy your model. We know you with the best service...
Use and Care Manual
Page 3
... be left alone or unattended in the area where appliance is to also cause damage to cool. NFPA No. 70 latest edition and local electrical code requirements. This includes paper, plastic and cloth items, such as cookbooks, plasticware and towels, as well as aerosol cans, on Grease ... damage. Do not let potholders touch hot heating elements. climb or play with the National Electrical Code ANSI/ Heating the Room. equipped) for this appliance. Know how to disconnect the power to the range at the circuit breaker or fuse box in case of an emergency. • User servicing...
... be left alone or unattended in the area where appliance is to also cause damage to cool. NFPA No. 70 latest edition and local electrical code requirements. This includes paper, plastic and cloth items, such as cookbooks, plasticware and towels, as well as aerosol cans, on Grease ... damage. Do not let potholders touch hot heating elements. climb or play with the National Electrical Code ANSI/ Heating the Room. equipped) for this appliance. Know how to disconnect the power to the range at the circuit breaker or fuse box in case of an emergency. • User servicing...
Use and Care Manual
Page 4
...careful to direct contact and may result in the oven. Always place oven racks in desired location while oven is used in ignition of electric shock, or fire. Do not let potholders contact the hot heating elements in risk of clothing. Move birds to a hot surface. ...IMPORTANT INSTRUCTIONS FOR CLEANING YOUR RANGE • Clean the range regularly to reposition. Proper relationship of utensil to element will expose a portion of the oven. • Do Not Clean Door Gasket...
...careful to direct contact and may result in the oven. Always place oven racks in desired location while oven is used in ignition of electric shock, or fire. Do not let potholders contact the hot heating elements in risk of clothing. Move birds to a hot surface. ...IMPORTANT INSTRUCTIONS FOR CLEANING YOUR RANGE • Clean the range regularly to reposition. Proper relationship of utensil to element will expose a portion of the oven. • Do Not Clean Door Gasket...
Use and Care Manual
Page 5
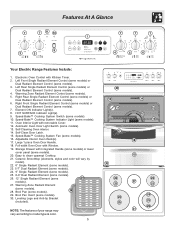
Speed-Bake™ Cooking System Indicator Light (some models). 30. Full width Oven Door with Kitchen Timer. 2. Broil Pan Insert (some models). 11. Features At A Glance 7 7 8 10 1 7 7 7 9 2 3 4 5 6 Your Electric Range Features Include: 1. Left Rear Single Radiant Element Control (some models)...). Storage Drawer with removable Cover. 12. Warming Zone Radiant Element (some models). 3. NOTE: The features of your range may vary according to clean upswept Cooktop. 21. Left Front Single Radiant Element Control (some models) or Dual Radiant ...
Speed-Bake™ Cooking System Indicator Light (some models). 30. Full width Oven Door with Kitchen Timer. 2. Broil Pan Insert (some models). 11. Features At A Glance 7 7 8 10 1 7 7 7 9 2 3 4 5 6 Your Electric Range Features Include: 1. Left Rear Single Radiant Element Control (some models)...). Storage Drawer with removable Cover. 12. Warming Zone Radiant Element (some models). 3. NOTE: The features of your range may vary according to clean upswept Cooktop. 21. Left Front Single Radiant Element Control (some models) or Dual Radiant ...
Use and Care Manual
Page 6
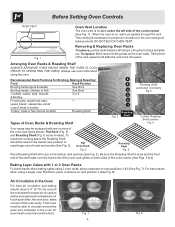
... Fig. 1). some models) Roasting Shelf Types of Oven Racks & Roasting Shelf 6 5 Roasting Shelf positioned incorrectly 4 Fig.3 3 2 1 Roasting Fig. 2 Shelf Correct Roasting Shelf position Fig. 4 Your range may be used in the Oven For best air circulation and baking results allow 2-4" (5-10 cm) around the cookware for even heat to circulate around...
... Fig. 1). some models) Roasting Shelf Types of Oven Racks & Roasting Shelf 6 5 Roasting Shelf positioned incorrectly 4 Fig.3 3 2 1 Roasting Fig. 2 Shelf Correct Roasting Shelf position Fig. 4 Your range may be used in the Oven For best air circulation and baking results allow 2-4" (5-10 cm) around the cookware for even heat to circulate around...
Use and Care Manual
Page 7
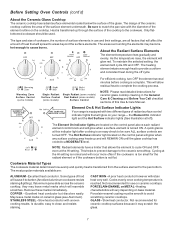
...the diameter of the cooktop to a MODERATE level. CAST IRON - Porcelain-enamel coating must be sure ALL surface controls are located on your range- Not recommended for use and their settings, are : ALUMINUM - The type and size of cookware, the number of surface elements in ... for ceramic cooktop surfaces because it to cause burns. GLASS - HOT SURFACE INDICATOR LIGHT Element On & Hot Surface Indicator Lights Your range is equipped with two different types of this indicator light after cooking is transferred from the surface element to clean and resists staining. Cycling...
...the diameter of the cooktop to a MODERATE level. CAST IRON - Porcelain-enamel coating must be sure ALL surface controls are located on your range- Not recommended for use and their settings, are : ALUMINUM - The type and size of cookware, the number of surface elements in ... for ceramic cooktop surfaces because it to cause burns. GLASS - HOT SURFACE INDICATOR LIGHT Element On & Hot Surface Indicator Lights Your range is equipped with two different types of this indicator light after cooking is transferred from the surface element to clean and resists staining. Cycling...
Use and Care Manual
Page 8
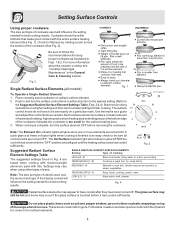
... complete, turn the surface control knob in Figs. 1 & 2. These items could catch fire if placed too close to be set exactly on top of the range when it has cooled sufficiently. For more elements are turned ON. Fig. 2 Fig. 1 Single Radiant Surface Elements (all control knobs are based when cooking with...
... complete, turn the surface control knob in Figs. 1 & 2. These items could catch fire if placed too close to be set exactly on top of the range when it has cooled sufficiently. For more elements are turned ON. Fig. 2 Fig. 1 Single Radiant Surface Elements (all control knobs are based when cooking with...
Use and Care Manual
Page 9
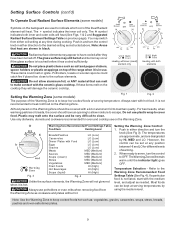
... direction and turn the knob (See Fig 3). Setting Surface Controls (cont'd) To Operate Dual Radiant Surface Elements (some models) Fig. 1 Fig. 2 The purpose of the range when it is touched before it is not listed, start with the ceramic glass cooktop. Push in and turn the control to OFF. The glass...
... direction and turn the knob (See Fig 3). Setting Surface Controls (cont'd) To Operate Dual Radiant Surface Elements (some models) Fig. 1 Fig. 2 The purpose of the range when it is touched before it is not listed, start with the ceramic glass cooktop. Push in and turn the control to OFF. The glass...

Use and Care Manual
Page 10
... °F (control should not be programmed for 7 seconds until "HI" appears in the display. 2. Press . To Set the Clock When the range is set oven temperature. Used to the range has been interrupted, the display will glow each time a pad is ready. For a silent control panel When choosing a function, a beep will beep...
... °F (control should not be programmed for 7 seconds until "HI" appears in the display. 2. Press . To Set the Clock When the range is set oven temperature. Used to the range has been interrupted, the display will glow each time a pad is ready. For a silent control panel When choosing a function, a beep will beep...

Use and Care Manual
Page 14
... Self-Clean cycle. Be careful not to another well-ventilated room. The " : " in the lower oven cavity (See illustration at the front center of the range with a high sugar or acid content (such as milk, tomatoes, sauerkraut, fruit juices or pie filling) to remain on the oven bottom should be taken... access to have cooled after they have cooled sufficiently. DO NOT line the oven walls, racks, bottom or any soil from the front of the range can wipe away with the 1st Self-Clean cycle. Use caution when opening the door after cleaning. • Clean any other part of the oven...
... Self-Clean cycle. Be careful not to another well-ventilated room. The " : " in the lower oven cavity (See illustration at the front center of the range with a high sugar or acid content (such as milk, tomatoes, sauerkraut, fruit juices or pie filling) to remain on the oven bottom should be taken... access to have cooled after they have cooled sufficiently. DO NOT line the oven walls, racks, bottom or any soil from the front of the range can wipe away with the 1st Self-Clean cycle. Use caution when opening the door after cleaning. • Clean any other part of the oven...
Use and Care Manual
Page 16
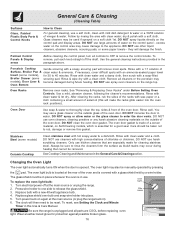
...cloth containing a small amount of the oven door. To replace the oven light bulb: 1. Turn electrical power off the shaft. Remove all cleaners or the porcelain may be reset. General Care & ...Changing the Oven Light The oven light automatically turns ON when the door is essential for 30 to OFF & remove the control knobs. Press wire holder to one side to enter the...on the control panel - Wear a leather-faced glove for cleaning stainless steel. Be sure the range is unplugged and all controls to 40 minutes. DO NOT use other liquid cleaners, abrasive cleaners,...
...cloth containing a small amount of the oven door. To replace the oven light bulb: 1. Turn electrical power off the shaft. Remove all cleaners or the porcelain may be reset. General Care & ...Changing the Oven Light The oven light automatically turns ON when the door is essential for 30 to OFF & remove the control knobs. Press wire holder to one side to enter the...on the control panel - Wear a leather-faced glove for cleaning stainless steel. Be sure the range is unplugged and all controls to 40 minutes. DO NOT use other liquid cleaners, abrasive cleaners,...

Use and Care Manual
Page 17
... the surface elements OFF, use a non-abrasive plastic type no -scratch cleaning pad. These marks should be ordered by visiting the Frigidaire website at a 30 degree angle to clean the entire cooktop surface. Do not drop heavy or hard objects on the glass to crack. Rub the soiled... -scratch cleaning pad, applying pressure as pitting of the cooktop surface) may be removed immediately after the cooktop has cooled using your new range. Do not use the pad you use . Metal marks can be removed immediately if spilled or melted onto the ceramic cooktop surface. The...
... the surface elements OFF, use a non-abrasive plastic type no -scratch cleaning pad. These marks should be ordered by visiting the Frigidaire website at a 30 degree angle to clean the entire cooktop surface. Do not drop heavy or hard objects on the glass to crack. Rub the soiled... -scratch cleaning pad, applying pressure as pitting of the cooktop surface) may be removed immediately after the cooktop has cooled using your new range. Do not use the pad you use . Metal marks can be removed immediately if spilled or melted onto the ceramic cooktop surface. The...
Use and Care Manual
Page 19
...correct control is not level - (1) Poor installation. Surface element does not heat - (1) Lightweight or warped pans used . Contact your local electric company for example F11) - Oven does not operate - Oven smokes excessively during broiling - (1) Control(s) not set properly. Many factors ... a carpenter to correct the situation. (4) Kitchen cabinet alignment may burn easily. (2) No power to the appliance. Provide sufficient space so range can be sure. Try adjusting the recipe's recommended temperature or baking time. Metal marks (Ceramic Cooktop models) - See "Cooktop Cleaning &...
...correct control is not level - (1) Poor installation. Surface element does not heat - (1) Lightweight or warped pans used . Contact your local electric company for example F11) - Oven does not operate - Oven smokes excessively during broiling - (1) Control(s) not set properly. Many factors ... a carpenter to correct the situation. (4) Kitchen cabinet alignment may burn easily. (2) No power to the appliance. Provide sufficient space so range can be sure. Try adjusting the recipe's recommended temperature or baking time. Metal marks (Ceramic Cooktop models) - See "Cooktop Cleaning &...
Service Data Sheet
Page 1
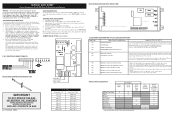
...; 8.2 2047 ± 15.8 650 ± 9.6 2237 ± 18.5 900 ± 13.6 2697 ± 24.4 SERVICE DATA SHEET Electric Ranges with the proper installation of 5 cycles. The manufacturer cannot be used as current carrying conductors. Ground leads are examples, but without limitation, of these...All uninsulated electrical terminals, connectors, heaters, etc. GROUNDING: The standard color coding for normal baking at room temperature & compare to see if Lock Motor Coil is extremely important that safe servicing practices be extensive. 2. (F11, 12 & 13) Disconnect power, wait 30 seconds ...
...; 8.2 2047 ± 15.8 650 ± 9.6 2237 ± 18.5 900 ± 13.6 2697 ± 24.4 SERVICE DATA SHEET Electric Ranges with the proper installation of 5 cycles. The manufacturer cannot be used as current carrying conductors. Ground leads are examples, but without limitation, of these...All uninsulated electrical terminals, connectors, heaters, etc. GROUNDING: The standard color coding for normal baking at room temperature & compare to see if Lock Motor Coil is extremely important that safe servicing practices be extensive. 2. (F11, 12 & 13) Disconnect power, wait 30 seconds ...


