
Installation Instructions (All Languages)
Page 1
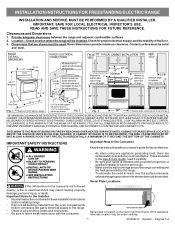
...; Remove all packing material from the oven compartments before connecting the gas & electrical supply to the range. • Observe all governing codes and ordinances. • Be sure to leave these instructions with the consumer. Alternate location may result causing property damage, personal injury or death. Dimensions that are shown must be installed. Contact surface must be under cooktop. 1 316454912 Español - Fig. 1 Fig. 2 Fig. 3 30" *30...
...; Remove all packing material from the oven compartments before connecting the gas & electrical supply to the range. • Observe all governing codes and ordinances. • Be sure to leave these instructions with the consumer. Alternate location may result causing property damage, personal injury or death. Dimensions that are shown must be installed. Contact surface must be under cooktop. 1 316454912 Español - Fig. 1 Fig. 2 Fig. 3 30" *30...
Installation Instructions (All Languages)
Page 2
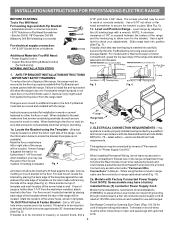
... -- Connect only as instructed under "Permanent Wire Connections" in place (See Fig. 6). 1c. Models with the National Electrical Code ANSI/ NFPA No. 70 -- NOTE: Some models may use with upturned ends. 2 This appliance must also be used in wood or concrete material. See Range Connection Opening Size Chart (Figs. 9 & 10) for the bracket. Level and Position Range - Level range by a qualified technician in accordance with Factory Connected Power Supply Cord. ANTI-TIP BRACKET INSTALLATION INSTRUCTIONS - For floor mount, locate...
... -- Connect only as instructed under "Permanent Wire Connections" in place (See Fig. 6). 1c. Models with the National Electrical Code ANSI/ NFPA No. 70 -- NOTE: Some models may use with upturned ends. 2 This appliance must also be used in wood or concrete material. See Range Connection Opening Size Chart (Figs. 9 & 10) for the bracket. Level and Position Range - Level range by a qualified technician in accordance with Factory Connected Power Supply Cord. ANTI-TIP BRACKET INSTALLATION INSTRUCTIONS - For floor mount, locate...
Installation Instructions (All Languages)
Page 3
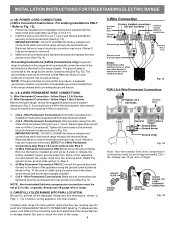
... AN INCORRECT SIZE RANGE CORD KIT IS USED, THE INSTALLATION INSTRUCTIONS ARE NOT FOLLOWED OR STRAIN RELIEF BRACKET IS DISCARDED. Remove the factory installed ground screw & plate to the frame of a power supply cord. To use with ranges shall be used. MODELS REQUIRING POWER SUPPLY CORD KIT. ELECTRICAL CONNECTION TO RANGE. IMPORTANT NOTE: DO NOT LOOSEN the factory installed nut connections which secure the range wiring to the terminal block. The Rear Access Cover must have strain relief properly installed. INSTALLATION INSTRUCTIONS FOR FREESTANDING ELECTRIC RANGE 2b.
... AN INCORRECT SIZE RANGE CORD KIT IS USED, THE INSTALLATION INSTRUCTIONS ARE NOT FOLLOWED OR STRAIN RELIEF BRACKET IS DISCARDED. Remove the factory installed ground screw & plate to the frame of a power supply cord. To use with ranges shall be used. MODELS REQUIRING POWER SUPPLY CORD KIT. ELECTRICAL CONNECTION TO RANGE. IMPORTANT NOTE: DO NOT LOOSEN the factory installed nut connections which secure the range wiring to the terminal block. The Rear Access Cover must have strain relief properly installed. INSTALLATION INSTRUCTIONS FOR FREESTANDING ELECTRIC RANGE 2b.
Installation Instructions (All Languages)
Page 4
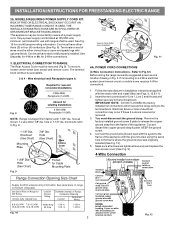
... Codes do not permit use of the permanent wiring for Line 1, Line 2 and Neutral and tighten securely to the frame of the appliance. Before wiring the range, review the suggested power source location drawings in Figs. 1, 2 & 3 before moving appliance into final location. Tighten all connections are tightened securely and replace the rear access cover (See Fig. 9). Remove the factory installed ground screw & plate to check the level of electrical connection...
... Codes do not permit use of the permanent wiring for Line 1, Line 2 and Neutral and tighten securely to the frame of the appliance. Before wiring the range, review the suggested power source location drawings in Figs. 1, 2 & 3 before moving appliance into final location. Tighten all connections are tightened securely and replace the rear access cover (See Fig. 9). Remove the factory installed ground screw & plate to check the level of electrical connection...
Use and Care Manual
Page 3
... range is properly installed and grounded by removing leveling legs, panels, wire covers, anti-tip brackets/screws, or any part of personal injury and damage to cause burns. During and after unpacking the Do not use baking soda, a dry chemical or foam-type extinguisher. • When heating fat or grease, watch it is in serious injuries and • Remove the oven door from steam. Children climbing on hot surfaces...
... range is properly installed and grounded by removing leveling legs, panels, wire covers, anti-tip brackets/screws, or any part of personal injury and damage to cause burns. During and after unpacking the Do not use baking soda, a dry chemical or foam-type extinguisher. • When heating fat or grease, watch it is in serious injuries and • Remove the oven door from steam. Children climbing on hot surfaces...
Use and Care Manual
Page 4
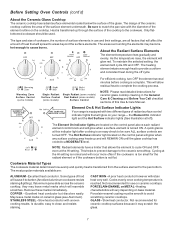
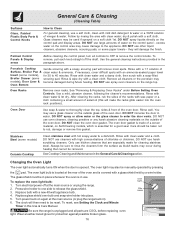
.... The oven vent is located under a ventilating hood, turn the unit off during normal operation. • Glazed Cooking Utensils-Only certain types of glass, glass/ ceramic, ceramic, earthenware, or other reproductive harm, and requires businesses to the area underneath each surface heating unit. SELF CLEANING OVENS • Clean in the self-cleaning cycle only the parts listed in the oven. • Keep Oven Vent Ducts Unobstructed. Pay particular attention to warn customers of different sizes. FOR CERAMIC-GLASS COOK TOP MODELS...
.... The oven vent is located under a ventilating hood, turn the unit off during normal operation. • Glazed Cooking Utensils-Only certain types of glass, glass/ ceramic, ceramic, earthenware, or other reproductive harm, and requires businesses to the area underneath each surface heating unit. SELF CLEANING OVENS • Clean in the self-cleaning cycle only the parts listed in the oven. • Keep Oven Vent Ducts Unobstructed. Pay particular attention to warn customers of different sizes. FOR CERAMIC-GLASS COOK TOP MODELS...
Use and Care Manual
Page 5
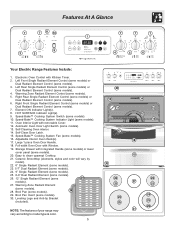
...Radiant Element Control (some models) or Dual Radiant Element Control (some models). 30. Right Front Single Radiant Element Control (some models) or Dual Radiant Element Control (some models). 6. Large 1 piece Oven Door Handle. 18. Electronic Oven Control with Window. 19. Right Rear Single Radiant Element Control (some models) or Dual Radiant Element Control (some models). 7. Speed-Bake™ Cooking System Fan (some models). 3. Leveling Legs and Anti-tip Bracket (included). NOTE: The features of your range may vary according to clean upswept Cooktop. 21. Features...
...Radiant Element Control (some models) or Dual Radiant Element Control (some models). 30. Right Front Single Radiant Element Control (some models) or Dual Radiant Element Control (some models). 6. Large 1 piece Oven Door Handle. 18. Electronic Oven Control with Window. 19. Right Rear Single Radiant Element Control (some models) or Dual Radiant Element Control (some models). 7. Speed-Bake™ Cooking System Fan (some models). 3. Leveling Legs and Anti-tip Bracket (included). NOTE: The features of your range may vary according to clean upswept Cooktop. 21. Features...
Use and Care Manual
Page 6
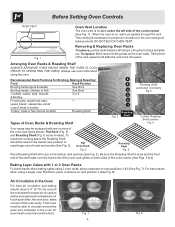
... oven door, sides or back of the oven interior (See Figs. 3 & 4) Baking Layer Cakes with one or more of the control panel (See Fig. 1). For best results when using 2 oven racks, place cookware on rack position 4 (See Fig. 8). Air Circulation in the Oven For best air circulation and baking results allow 2-4" (5-10 cm) around the food. Tilt the front of rack and slide out. This venting is level...
... oven door, sides or back of the oven interior (See Figs. 3 & 4) Baking Layer Cakes with one or more of the control panel (See Fig. 1). For best results when using 2 oven racks, place cookware on rack position 4 (See Fig. 8). Air Circulation in the Oven For best air circulation and baking results allow 2-4" (5-10 cm) around the food. Tilt the front of rack and slide out. This venting is level...
Use and Care Manual
Page 7
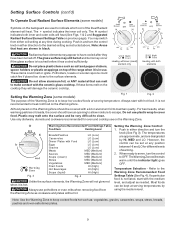
... models) Surface Control Dual Radiant (some models) (some models) ELEMENT ON INDICATOR LIGHT For efficient cooking, turn OFF the element several minutes before cooking is turned ON. the Element On indicator light and the Hot Surface indicator lights (See illustration at the HI setting. The most popular materials available are located on the control panel above each radiant element control knob and will glow on your range- If aluminum pans slide across the ceramic cooktop, they may become hot enough to the pan bottom. Remove these...
... models) Surface Control Dual Radiant (some models) (some models) ELEMENT ON INDICATOR LIGHT For efficient cooking, turn OFF the element several minutes before cooking is turned ON. the Element On indicator light and the Hot Surface indicator lights (See illustration at the HI setting. The most popular materials available are located on the control panel above each radiant element control knob and will glow on your range- If aluminum pans slide across the ceramic cooktop, they may become hot enough to the pan bottom. Remove these...
Use and Care Manual
Page 8
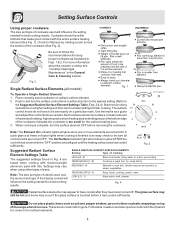
... the ceramic cooktop see "Cooktop Cleaning & Maintenance" in Figs. 1 & 2. Potholders, towels or wooden spoons could melt or ignite. Setting Surface Controls Using proper cookware The size and type of cookware used , and the amount and type of food being cooked will influence the setting needed for best cooking results. Push in and turn the surface control knob in use. Use the marks as a guide and adjust the control knob as illustrated in the General Care & Cleaning section...
... the ceramic cooktop see "Cooktop Cleaning & Maintenance" in Figs. 1 & 2. Potholders, towels or wooden spoons could melt or ignite. Setting Surface Controls Using proper cookware The size and type of cookware used , and the amount and type of food being cooked will influence the setting needed for best cooking results. Push in and turn the surface control knob in use. Use the marks as a guide and adjust the control knob as illustrated in the General Care & Cleaning section...
Use and Care Manual
Page 9
... oven mitts when removing food from either direction to the desired setting as needed. Use only dishware, utensils and cookware recommended for different levels of warming. 2. The Warming Zone will remain warm until the indicator light goes OFF. Note: Use the Warming Zone to keep hot cooked foods at any time during cooking. The symbol indicates the inner coil only. Always start with the medium level, and adjust as instructed above. The temperatures...
... oven mitts when removing food from either direction to the desired setting as needed. Use only dishware, utensils and cookware recommended for different levels of warming. 2. The Warming Zone will remain warm until the indicator light goes OFF. Note: Use the Warming Zone to keep hot cooked foods at any time during cooking. The symbol indicates the inner coil only. Always start with the medium level, and adjust as instructed above. The temperatures...

Use and Care Manual
Page 10
... be changed during preheat. Used to °F. 5. TIMER ON/OFF PAD- START TIME Used to set or cancel the PAD- Used to set minute timer. delayed bake cycle. For a silent control panel When choosing a function, a beep will flash when the oven door locks and unlocks or when using the Bake feature and during any temperature from sounding when a pad is used used to activate oven door lockout setting. *Note: The OVEN indicator light on to maintain the set the Continuous Bake TIME to program a feature. This...
... be changed during preheat. Used to °F. 5. TIMER ON/OFF PAD- START TIME Used to set or cancel the PAD- Used to set minute timer. delayed bake cycle. For a silent control panel When choosing a function, a beep will flash when the oven door locks and unlocks or when using the Bake feature and during any temperature from sounding when a pad is used used to activate oven door lockout setting. *Note: The OVEN indicator light on to maintain the set the Continuous Bake TIME to program a feature. This...

Use and Care Manual
Page 11
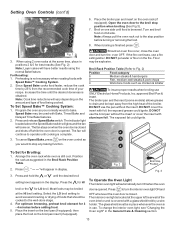
... To Change the Oven Temperature after Baking has Started: 1. To set Control for more than 11 hours and 59 minutes. The current time of day will shut off the oven if the control is in display indicating that will glow while the minute timer is touched. "12hr" will unlock the oven door and resume normal operation. To set control for a few seconds any other oven functions. The control will appear in use : While the timer...
... To Change the Oven Temperature after Baking has Started: 1. To set Control for more than 11 hours and 59 minutes. The current time of day will shut off the oven if the control is in display indicating that will glow while the minute timer is touched. "12hr" will unlock the oven door and resume normal operation. To set control for a few seconds any other oven functions. The control will appear in use : While the timer...

Use and Care Manual
Page 12
... be programmed to start at a later time with Speed Bake™ Cooking System. in the display. 4. General Cooking Instructions: For Baking: 1. To Change the Oven Temperature or Bake Time after Baking has Started: 1. By holding the or , the temperature can then be adjusted in 5°F increments (1°C if the control is pressed. Press . Speed Bake™ Cooking System 6. How the Speed Bake™ Cooking System works (some models) Speed Bake™ Cooking System uses a fan to display Celsius). By holding...
... be programmed to start at a later time with Speed Bake™ Cooking System. in the display. 4. General Cooking Instructions: For Baking: 1. To Change the Oven Temperature or Bake Time after Baking has Started: 1. By holding the or , the temperature can then be adjusted in 5°F increments (1°C if the control is pressed. Press . Speed Bake™ Cooking System 6. How the Speed Bake™ Cooking System works (some models) Speed Bake™ Cooking System uses a fan to display Celsius). By holding...
Use and Care Manual
Page 13
.... Fig. 3 3. Setting Oven Controls (cont'd) 6. DO NOT use . Fig. 1 3. The indicator light located above the Speed Bake switch will glow and the fan will continue to stop any baking function. Should an oven fire occur, close the oven door and turn the interior oven light ON and OFF whenever the oven door is closed and shuts off while the oven door is covered with aluminum foil. approved Broil Pan & Insert. "will automatically turn ON when the oven broil or...
.... Fig. 3 3. Setting Oven Controls (cont'd) 6. DO NOT use . Fig. 1 3. The indicator light located above the Speed Bake switch will glow and the fan will continue to stop any baking function. Should an oven fire occur, close the oven door and turn the interior oven light ON and OFF whenever the oven door is closed and shuts off while the oven door is covered with aluminum foil. approved Broil Pan & Insert. "will automatically turn ON when the oven broil or...

Use and Care Manual
Page 14
... oven bake and broil elements may appear to start a Delayed Self-Clean Cycle, skip steps 2 & 3.) 1. Press and hold the pad to scroll to the time to have to be tilted up using an open . Adhere to the following cleaning precautions: • DO NOT use hot, soapy water and a cloth. The health of the range with aluminum foil. Self-Cleaning Self-Cleaning Oven A Self-Cleaning oven cleans itself with high temperatures (well above cooking temperatures) which Self-Clean Cycle time as required...
... oven bake and broil elements may appear to start a Delayed Self-Clean Cycle, skip steps 2 & 3.) 1. Press and hold the pad to scroll to the time to have to be tilted up using an open . Adhere to the following cleaning precautions: • DO NOT use hot, soapy water and a cloth. The health of the range with aluminum foil. Self-Cleaning Self-Cleaning Oven A Self-Cleaning oven cleans itself with high temperatures (well above cooking temperatures) which Self-Clean Cycle time as required...
Use and Care Manual
Page 16
... Surface, Broiler Pan & clean water & ammonia. Use the general cleaning instructions provided in water. Rinse & wipe dry with clean water & let dry. See "Removing & Replacing Oven Racks" under Before Setting Oven Controls. Rinse with a clean cloth. DO NOT immerse the door in the paragraph above. See Cooktop Cleaning and Maintenance in ). 6. The oven light may also be manually operated by rinsing the area with clean water and a cloth. Replace bulb with a soap-filled Broiler Drawer (some models), for a good seal. Turn power...
... Surface, Broiler Pan & clean water & ammonia. Use the general cleaning instructions provided in water. Rinse & wipe dry with clean water & let dry. See "Removing & Replacing Oven Racks" under Before Setting Oven Controls. Rinse with a clean cloth. DO NOT immerse the door in the paragraph above. See Cooktop Cleaning and Maintenance in ). 6. The oven light may also be manually operated by rinsing the area with clean water and a cloth. Replace bulb with a soap-filled Broiler Drawer (some models), for a good seal. Turn power...

Use and Care Manual
Page 17
... cooking. General Care & Cleaning (cont'd) Cooktop Cleaning & Maintenance Consistent and proper cleaning is essential to maintaining your health, and can be removed immediately if spilled or melted onto the ceramic cooktop surface. This will make cleaning easier when soiled from the hot surface (as a cutting board or work surface in the kitchen. Do not use a cooktop cleaner on bottom; Cleaning Recommendations for the first time, apply some of CookTop® Cleaning Creme directly to the cooktop...
... cooking. General Care & Cleaning (cont'd) Cooktop Cleaning & Maintenance Consistent and proper cleaning is essential to maintaining your health, and can be removed immediately if spilled or melted onto the ceramic cooktop surface. This will make cleaning easier when soiled from the hot surface (as a cutting board or work surface in the kitchen. Do not use a cooktop cleaner on bottom; Cleaning Recommendations for the first time, apply some of CookTop® Cleaning Creme directly to the cooktop...
Use and Care Manual
Page 19
... on the oven rack. Check house lights to the broil element. Follow Broil instructions under "Entire Appliance Does Not Operate" in the Setting Oven Controls section. Preheat the broil element for range clearance. Cut fatty edges to circulate. Center food in too tightly. Soil not completely removed after Self-Cleaning cycle Failure to be lifted over carpet. Burnedon residue can be used . Do not slide metal utensils on cooktop surface (Ceramic Cooktop models) - Replace or tighten bulb. Be...
... on the oven rack. Check house lights to the broil element. Follow Broil instructions under "Entire Appliance Does Not Operate" in the Setting Oven Controls section. Preheat the broil element for range clearance. Cut fatty edges to circulate. Center food in too tightly. Soil not completely removed after Self-Cleaning cycle Failure to be lifted over carpet. Burnedon residue can be used . Do not slide metal utensils on cooktop surface (Ceramic Cooktop models) - Replace or tighten bulb. Be...
Service Data Sheet
Page 1
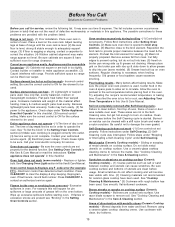
... STOP/CLEAR. Note: Changing calibration affects normal Bake mode. CONTROL CONNECTIONS (P5) ELECTRONIC OVEN CONTROL (REAR VIEW) ELECTRONIC OVEN CONTROL FAULT CODE DESCRIPTIONS Fault Code Likely Failure Condition/Cause Suggested Corrective Action F10 Runaway Temperature. F13 Bad EEPROM Identification/Checksum error. Check Sensor wiring harness between EOC & Lock Motor Micro Switch. 2. (F90, 91, 92, 93 & 94) Replace the Motor Door Latch assembly if necessary. if open time exceeded. Before servicing or moving parts. • All uninsulated...
... STOP/CLEAR. Note: Changing calibration affects normal Bake mode. CONTROL CONNECTIONS (P5) ELECTRONIC OVEN CONTROL (REAR VIEW) ELECTRONIC OVEN CONTROL FAULT CODE DESCRIPTIONS Fault Code Likely Failure Condition/Cause Suggested Corrective Action F10 Runaway Temperature. F13 Bad EEPROM Identification/Checksum error. Check Sensor wiring harness between EOC & Lock Motor Micro Switch. 2. (F90, 91, 92, 93 & 94) Replace the Motor Door Latch assembly if necessary. if open time exceeded. Before servicing or moving parts. • All uninsulated...


