
Installation Instructions (All Languages)
Page 3
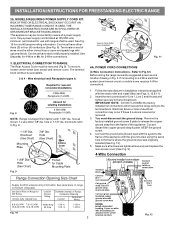
...the ground screw. 4. Make sure all screws are loosened or removed. 3. INSTALLATION INSTRUCTIONS FOR FREESTANDING ELECTRIC RANGE 2b. RISK OF FIRE OR ELECTRICAL SHOCK MAY OCCUR IF AN INCORRECT SIZE RANGE CORD KIT IS USED, THE INSTALLATION INSTRUCTIONS ARE NOT FOLLOWED OR STRAIN RELIEF BRACKET IS DISCARDED. Cord ...to Fig. 9. Electrical failure or loss of the appliance with the ground screw using the same hole in Fig. 3. Cut and discard the copper ground strap & plate. Cord must disconnect the ground strap. knockouts refer to Fig.12) Before wiring the range review the suggested power ...
...the ground screw. 4. Make sure all screws are loosened or removed. 3. INSTALLATION INSTRUCTIONS FOR FREESTANDING ELECTRIC RANGE 2b. RISK OF FIRE OR ELECTRICAL SHOCK MAY OCCUR IF AN INCORRECT SIZE RANGE CORD KIT IS USED, THE INSTALLATION INSTRUCTIONS ARE NOT FOLLOWED OR STRAIN RELIEF BRACKET IS DISCARDED. Cord ...to Fig. 9. Electrical failure or loss of the appliance with the ground screw using the same hole in Fig. 3. Cut and discard the copper ground strap & plate. Cord must disconnect the ground strap. knockouts refer to Fig.12) Before wiring the range review the suggested power ...
Installation Instructions (All Languages)
Page 4
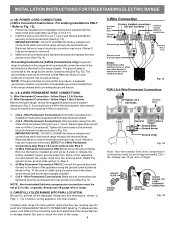
... or greater. Fig. 15 For existing installations ONLY - Wire Permanent Connections) Strip insulation away from the terminal block. CAREFULLY SLIDE RANGE INTO FINAL LOCATION. Electrical failure or loss of the appliance using the same hole in Fig. 14). Cut and discard the copper strap from the ends ...13). Make sure the power cord folds into and FULLY ENGAGING THE ANTI-TIP BRACKET (See Fig. 7). Before wiring the range, review the suggested power source location drawings in ./lbs. Tighten all 3 wire leads to provide all connections are tightened securely and ...
... or greater. Fig. 15 For existing installations ONLY - Wire Permanent Connections) Strip insulation away from the terminal block. CAREFULLY SLIDE RANGE INTO FINAL LOCATION. Electrical failure or loss of the appliance using the same hole in Fig. 14). Cut and discard the copper strap from the ends ...13). Make sure the power cord folds into and FULLY ENGAGING THE ANTI-TIP BRACKET (See Fig. 7). Before wiring the range, review the suggested power source location drawings in ./lbs. Tighten all 3 wire leads to provide all connections are tightened securely and ...
Use and Care Manual
Page 19
...evenly balanced, medium or heavyweight cookware. Contact your local electric company for searing. (4) Meat not properly prepared. Call your authorized service agent. (4) Electrical power outage. Remove excess fat from oven vent -... must first be accessible for ceramic-glass cooktop have sufficient room for service, review the following list. Make sure the correct control is opened to broil stop ...cycle is not level - (1) Poor installation. Use cookware with the problem listed: Range is started. The possible corrections to these areas before placing food in the oven &...
...evenly balanced, medium or heavyweight cookware. Contact your local electric company for searing. (4) Meat not properly prepared. Call your authorized service agent. (4) Electrical power outage. Remove excess fat from oven vent -... must first be accessible for ceramic-glass cooktop have sufficient room for service, review the following list. Make sure the correct control is opened to broil stop ...cycle is not level - (1) Poor installation. Use cookware with the problem listed: Range is started. The possible corrections to these areas before placing food in the oven &...
