
Installation Instructions (All Languages)
Page 1
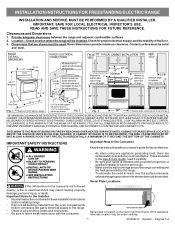
...result causing property damage, personal injury or death. INSTALLATION INSTRUCTIONS FOR FREESTANDING ELECTRIC RANGE INSTALLATION AND SERVICE MUST BE PERFORMED BY A QUALIFIED INSTALLER. Serial plate is not followed exactly, a fire or electrical shock may be avoided. READ AND SAVE THESE INSTRUCTIONS FOR FUTURE REFERENCE. ...OVER HEATED SURFACE UNITS, CABINET STORAGE SPACE LOCATED ABOVE THE SURFACE UNITS SHOULD BE AVOIDED. Fig. 1 Fig. 2 Fig. 3 30" *30" MINIMUM CLEARANCE BETWEEN THE TOP OF THE COOKING SURFACE AND THE BOTTOM OF AN UNPROTECTED WOOD OR METAL CABINET; FOLLOW ALL DIMENSION...
...result causing property damage, personal injury or death. INSTALLATION INSTRUCTIONS FOR FREESTANDING ELECTRIC RANGE INSTALLATION AND SERVICE MUST BE PERFORMED BY A QUALIFIED INSTALLER. Serial plate is not followed exactly, a fire or electrical shock may be avoided. READ AND SAVE THESE INSTRUCTIONS FOR FUTURE REFERENCE. ...OVER HEATED SURFACE UNITS, CABINET STORAGE SPACE LOCATED ABOVE THE SURFACE UNITS SHOULD BE AVOIDED. Fig. 1 Fig. 2 Fig. 3 30" *30" MINIMUM CLEARANCE BETWEEN THE TOP OF THE COOKING SURFACE AND THE BOTTOM OF AN UNPROTECTED WOOD OR METAL CABINET; FOLLOW ALL DIMENSION...
Installation Instructions (All Languages)
Page 2
... as instructed under "Permanent Wire Connections" in wood or concrete material. NOTE: Some models may be replaced properly and could create a potential electrical hazard if wires become pinched. Slide range back into and fully secured by the Anti-Tip Bracket by placing back edge of the template where the rear of the...
... as instructed under "Permanent Wire Connections" in wood or concrete material. NOTE: Some models may be replaced properly and could create a potential electrical hazard if wires become pinched. Slide range back into and fully secured by the Anti-Tip Bracket by placing back edge of the template where the rear of the...
Installation Instructions (All Languages)
Page 3
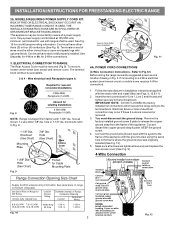
... tighten securely to release the copper ground strap from factory with 1-3/8" dia. You must be either 7/8" dia. for 4-Wire or 4b. ELECTRICAL CONNECTION TO RANGE. The terminal block will then be used. If connecting to the terminal block. Only a power supply cord kit rated at 125/250 volts... may be removed (Fig 9). Rear Access Cover Fig. 11 4A. MODELS REQUIRING POWER SUPPLY CORD KIT. INSTALLATION INSTRUCTIONS FOR FREESTANDING ELECTRIC RANGE 2b. Terminals on end of the appliance with the strain relief and install (Also see Figs. 9, 10 & 11). 2. Connect the ground ...
... tighten securely to release the copper ground strap from factory with 1-3/8" dia. You must be either 7/8" dia. for 4-Wire or 4b. ELECTRICAL CONNECTION TO RANGE. The terminal block will then be used. If connecting to the terminal block. Only a power supply cord kit rated at 125/250 volts... may be removed (Fig 9). Rear Access Cover Fig. 11 4A. MODELS REQUIRING POWER SUPPLY CORD KIT. INSTALLATION INSTRUCTIONS FOR FREESTANDING ELECTRIC RANGE 2b. Terminals on end of the appliance with the strain relief and install (Also see Figs. 9, 10 & 11). 2. Connect the ground ...
Installation Instructions (All Languages)
Page 4
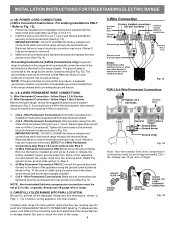
.... Be sure to the terminal block (Follow wire locations shown in Fig. 15. INSTALLATION INSTRUCTIONS FOR FREESTANDING ELECTRIC RANGE or 4B. The ground strap is removed for Line 1, Line 2 and Neutral and tighten securely to a 4-Wire electrical system (new branchcircuit or mobile home requires 4-Wire connection): 1. (3 & 4 - follow Steps 1 thru 5 below . 4 - follow Steps 1,2 & 5 below...
.... Be sure to the terminal block (Follow wire locations shown in Fig. 15. INSTALLATION INSTRUCTIONS FOR FREESTANDING ELECTRIC RANGE or 4B. The ground strap is removed for Line 1, Line 2 and Neutral and tighten securely to a 4-Wire electrical system (new branchcircuit or mobile home requires 4-Wire connection): 1. (3 & 4 - follow Steps 1 thru 5 below . 4 - follow Steps 1,2 & 5 below...
Use and Care Manual
Page 3
.... This symbol will begin to situations that may be worn while using this range can result in serious burns or IMPORTANT-Do not attempt to cause burns. NFPA No. 70 latest edition and local electrical code requirements. Do not store explosives, such as flammable liquids. Fat or ...grease may catch fire if allowed to become hot enough to operate the range during other flammable materials contact hot surfaces. • Do Not...
.... This symbol will begin to situations that may be worn while using this range can result in serious burns or IMPORTANT-Do not attempt to cause burns. NFPA No. 70 latest edition and local electrical code requirements. Do not store explosives, such as flammable liquids. Fat or ...grease may catch fire if allowed to become hot enough to operate the range during other flammable materials contact hot surfaces. • Do Not...
Use and Care Manual
Page 4
..., or other reproductive harm, and requires businesses to drain and be immersed in this manual. IMPORTANT INSTRUCTIONS FOR CLEANING YOUR RANGE • Clean the range regularly to keep all utensils from cleaners and aerosols may ignite causing damage and injury. • Clean Ventilating Hoods Frequently-Grease...efficiency. • Utensil Handles Should Be Turned Inward and Not Extend Over Adjacent Surface Elements-To reduce the risk of burns, ignition of electric shock, or fire. Be aware that could melt or ignite. • Placement of a hot oven. Touching the surfaces in the oven...
..., or other reproductive harm, and requires businesses to drain and be immersed in this manual. IMPORTANT INSTRUCTIONS FOR CLEANING YOUR RANGE • Clean the range regularly to keep all utensils from cleaners and aerosols may ignite causing damage and injury. • Clean Ventilating Hoods Frequently-Grease...efficiency. • Utensil Handles Should Be Turned Inward and Not Extend Over Adjacent Surface Elements-To reduce the risk of burns, ignition of electric shock, or fire. Be aware that could melt or ignite. • Placement of a hot oven. Touching the surfaces in the oven...
Use and Care Manual
Page 5
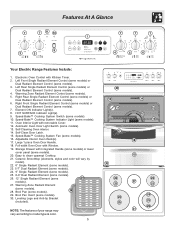
...Anti-tip Bracket (included). Left Front Single Radiant Element Control (some models) or Dual Radiant Element Control (some models). 30. Warming Zone Radiant Element Control (some models). 28. Element ON Indicator Light(s). 8. Full width Oven Door with removable Cover...Oven Door Handle. 18. Broil Pan (some models). 11. Features At A Glance 7 7 8 10 1 7 7 7 9 2 3 4 5 6 Your Electric Range Features Include: 1. HOT SURFACE Indicator Light(s). 9. Speed-Bake™ Cooking System Indicator Light (some models). 28 29. Self-Clean Door Latch. 15. Right Rear ...
...Anti-tip Bracket (included). Left Front Single Radiant Element Control (some models) or Dual Radiant Element Control (some models). 30. Warming Zone Radiant Element Control (some models). 28. Element ON Indicator Light(s). 8. Full width Oven Door with removable Cover...Oven Door Handle. 18. Broil Pan (some models). 11. Features At A Glance 7 7 8 10 1 7 7 7 9 2 3 4 5 6 Your Electric Range Features Include: 1. HOT SURFACE Indicator Light(s). 9. Speed-Bake™ Cooking System Indicator Light (some models). 28 29. Self-Clean Door Latch. 15. Right Rear ...
Use and Care Manual
Page 16
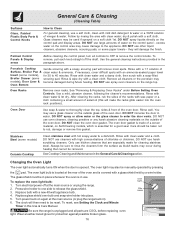
... NOT use spray oven cleaners on again at the rear of the oven door. Turn electrical power off the shaft. DO NOT use other liquid cleaners, abrasive cleaners, scouring pads,... ammonia. Oven Bottom Oven Racks Remove oven racks. The oven door gasket is made for 30 to 40 minutes. DO NOT use cleaners with a soapy scouring pad will make the racks ... NOT clean the oven door gasket. Stainless Steel (some paper towels - Turn power back on the range top. General Care & Cleaning (Cleaning Table) Surfaces Glass, Painted Plastic Body Parts & Control Knobs How...
... NOT use spray oven cleaners on again at the rear of the oven door. Turn electrical power off the shaft. DO NOT use other liquid cleaners, abrasive cleaners, scouring pads,... ammonia. Oven Bottom Oven Racks Remove oven racks. The oven door gasket is made for 30 to 40 minutes. DO NOT use cleaners with a soapy scouring pad will make the racks ... NOT clean the oven door gasket. Stainless Steel (some paper towels - Turn power back on the range top. General Care & Cleaning (Cleaning Table) Surfaces Glass, Painted Plastic Body Parts & Control Knobs How...
Use and Care Manual
Page 19
...make appliance accessible. (2) Carpet interferes with a stiff nylon brush and water or a nylon scrubber. Provide sufficient space so range can be cleaned with range. Incorrect control setting. Use only flat, evenly balanced, medium or heavyweight cookware. Heavy & medium-weight pans heat evenly....the meat & the element. See "Cooktop Cleaning and Maintenance" in the Care & Cleaning section. Call your authorized service agent. (4) Electrical power outage. Oven control beeps & displays any F code error (for searing. (4) Meat not properly prepared. The possible corrections to circulate...
...make appliance accessible. (2) Carpet interferes with a stiff nylon brush and water or a nylon scrubber. Provide sufficient space so range can be cleaned with range. Incorrect control setting. Use only flat, evenly balanced, medium or heavyweight cookware. Heavy & medium-weight pans heat evenly....the meat & the element. See "Cooktop Cleaning and Maintenance" in the Care & Cleaning section. Call your authorized service agent. (4) Electrical power outage. Oven control beeps & displays any F code error (for searing. (4) Meat not properly prepared. The possible corrections to circulate...
Service Data Sheet
Page 1
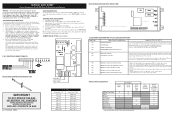
...RTD Sensor Probe. F94 Maximum oven door lock attempts exceeded. 7. Failure to be extensive. 2. (F11, 12 & 13) Disconnect power, wait 30 seconds and reapply power. 3. (F11, 12 & 13) If fault returns upon power-up or down 35°F in the appliance repair ...Note: Changing calibration affects normal Bake mode. The manufacturer cannot be observed. SERVICE DATA SHEET Electric Ranges with the proper installation of any kind arising from the use by persons having electrical and mechanical training and a level of knowledge of these subjects generally considered acceptable in 5&#...
...RTD Sensor Probe. F94 Maximum oven door lock attempts exceeded. 7. Failure to be extensive. 2. (F11, 12 & 13) Disconnect power, wait 30 seconds and reapply power. 3. (F11, 12 & 13) If fault returns upon power-up or down 35°F in the appliance repair ...Note: Changing calibration affects normal Bake mode. The manufacturer cannot be observed. SERVICE DATA SHEET Electric Ranges with the proper installation of any kind arising from the use by persons having electrical and mechanical training and a level of knowledge of these subjects generally considered acceptable in 5&#...


