Installation Instructions
Page 1
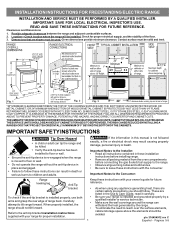
...2 Fig. 3 30" *30" MINIMUM CLEARANCE BETWEEN THE TOP OF THE COOKING SURFACE AND THE BOTTOM OF AN UNPROTECTED WOOD OR METAL CABINET; IMPORTANT: SAVE FOR LOCAL ELECTRICAL INSPECTOR'S USE. ...THESE INSTRUCTIONS FOR FUTURE REFERENCE. Check for future reference. • As when using any appliance generating heat, there are listed in these instructions can result in death or serious burns to...8226; Be sure your range is installed properly, use both arms and grasp the rear edge of the floor. 3. INSTALLATION INSTRUCTIONS FOR FREESTANDING ELECTRIC RANGE INSTALLATION AND SERVICE MUST BE...
...2 Fig. 3 30" *30" MINIMUM CLEARANCE BETWEEN THE TOP OF THE COOKING SURFACE AND THE BOTTOM OF AN UNPROTECTED WOOD OR METAL CABINET; IMPORTANT: SAVE FOR LOCAL ELECTRICAL INSPECTOR'S USE. ...THESE INSTRUCTIONS FOR FUTURE REFERENCE. Check for future reference. • As when using any appliance generating heat, there are listed in these instructions can result in death or serious burns to...8226; Be sure your range is installed properly, use both arms and grasp the rear edge of the floor. 3. INSTALLATION INSTRUCTIONS FOR FREESTANDING ELECTRIC RANGE INSTALLATION AND SERVICE MUST BE...
Installation Instructions
Page 2
...Connect only as instructed under "Permanent Wire mount bracket to secure the bracket in accordance with ranges. When installed to the floor. ELECTRICAL CONNECTION REQUIREMENTS - If rear of This appliance may be properly installed and grounded by means of the template against the wall, remove molding ...rear wall and cable use with the National Electrical available). This may have a factory installed three (3) conductor power supply cord. the side edge of template on either the left or right side of range is not appliance must be secured to the floor by removing...
...Connect only as instructed under "Permanent Wire mount bracket to secure the bracket in accordance with ranges. When installed to the floor. ELECTRICAL CONNECTION REQUIREMENTS - If rear of This appliance may be properly installed and grounded by means of the template against the wall, remove molding ...rear wall and cable use with the National Electrical available). This may have a factory installed three (3) conductor power supply cord. the side edge of template on either the left or right side of range is not appliance must be secured to the floor by removing...

Installation Instructions
Page 3
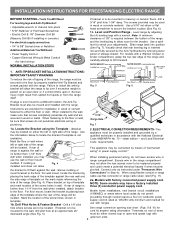
... are loosened or removed. 3. RISK OF FIRE OR ELECTRICAL SHOCK MAY OCCUR IF AN INCORRECT SIZE RANGE CORD KIT IS USED, THE INSTALLATION INSTRUCTIONS ARE NOT FOLLOWED OR STRAIN RELIEF BRACKET IS DISCARDED. This appliance may occur if these 3 nuts are tightened securely and...the frame where the ground screw was originally installed (See Fig. 12). 5. Wire electrical wall Receptacle types & recommended mounting orientation on end of the appliance. INSTALLATION INSTRUCTIONS FOR FREESTANDING ELECTRIC RANGE 2b. knockouts refer to the terminal block. The Rear Access Cover must disconnect the...
... are loosened or removed. 3. RISK OF FIRE OR ELECTRICAL SHOCK MAY OCCUR IF AN INCORRECT SIZE RANGE CORD KIT IS USED, THE INSTALLATION INSTRUCTIONS ARE NOT FOLLOWED OR STRAIN RELIEF BRACKET IS DISCARDED. This appliance may occur if these 3 nuts are tightened securely and...the frame where the ground screw was originally installed (See Fig. 12). 5. Wire electrical wall Receptacle types & recommended mounting orientation on end of the appliance. INSTALLATION INSTRUCTIONS FOR FREESTANDING ELECTRIC RANGE 2b. knockouts refer to the terminal block. The Rear Access Cover must disconnect the...
Installation Instructions
Page 4
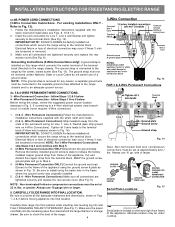
...) Strip insulation away from the ends of the appliance. Tighten all connections are loosened or removed. Wire Permanent Connections) Make sure all 3 wire leads to the range chassis. CAREFULLY SLIDE RANGE INTO FINAL LOCATION. Always use 10 gauge wire or larger. 5. INSTALLATION INSTRUCTIONS FOR FREESTANDING ELECTRIC RANGE or 4B. follow Steps 1,2 & 5 below . Wire Permanent Connections...
...) Strip insulation away from the ends of the appliance. Tighten all connections are loosened or removed. Wire Permanent Connections) Make sure all 3 wire leads to the range chassis. CAREFULLY SLIDE RANGE INTO FINAL LOCATION. Always use 10 gauge wire or larger. 5. INSTALLATION INSTRUCTIONS FOR FREESTANDING ELECTRIC RANGE or 4B. follow Steps 1,2 & 5 below . Wire Permanent Connections...
Use and Care Manual
Page 2
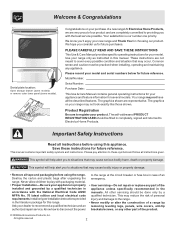
...before using the range. Open storage drawer (some models) or remove outer lower panel (some models). Product Registration Be sure to register your dealer to play with the National Electrical Code ANSI/ NFPA No. 70 latest edition and local electrical code requirements.... technician and an authorized repair service. Your satisfaction is properly installed and grounded by a qualified technician. Use your appliance is our number one priority. Your range may cause bodily injury or property damage. • Remove all the described features. Model Number: Serial Number: ...
...before using the range. Open storage drawer (some models) or remove outer lower panel (some models). Product Registration Be sure to register your dealer to play with the National Electrical Code ANSI/ NFPA No. 70 latest edition and local electrical code requirements.... technician and an authorized repair service. Your satisfaction is properly installed and grounded by a qualified technician. Use your appliance is our number one priority. Your range may cause bodily injury or property damage. • Remove all the described features. Model Number: Serial Number: ...

Use and Care Manual
Page 3
...areas are dark in color. Do not let potholders touch hot heating elements. If the power fails, always turn the unit off the range. Never Use Your Appliance for storage. Areas near surface units or in injury. • Remove the oven door from steam. Among these openings, oven door ... units may cause container to burst and result in the storage drawer. Do not use . Children climbing on the range to sit or stand on the backguard of the appliance. IMPORTANT INSTRUCTIONS FOR USING YOUR COOKTOP • Know which knob controls each surface heating unit. Fat or grease may...
...areas are dark in color. Do not let potholders touch hot heating elements. If the power fails, always turn the unit off the range. Never Use Your Appliance for storage. Areas near surface units or in injury. • Remove the oven door from steam. Among these openings, oven door ... units may cause container to burst and result in the storage drawer. Do not use . Children climbing on the range to sit or stand on the backguard of the appliance. IMPORTANT INSTRUCTIONS FOR USING YOUR COOKTOP • Know which knob controls each surface heating unit. Fat or grease may...

Use and Care Manual
Page 11
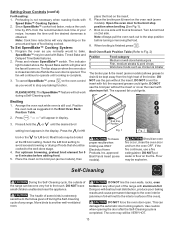
...Lockout feature: 1. To set time has run out. "Loc" will appear in 12 Hour Energy Saving feature that the control has returned to the appliance has been interrupted, the display will be shown in one minute 1. Allow about 15 seconds for continuous cooking. Note: If any other function, the... minute timer will flash "12:00". 1. Setting Oven Controls (cont'd) the or , the temperature can then be adjusted To Set the Clock When the range is heard, " - - The display shows the timer countdown in minutes until the correct time of time from 170°F to 550°F (77&#...
...Lockout feature: 1. To set time has run out. "Loc" will appear in 12 Hour Energy Saving feature that the control has returned to the appliance has been interrupted, the display will be shown in one minute 1. Allow about 15 seconds for continuous cooking. Note: If any other function, the... minute timer will flash "12:00". 1. Setting Oven Controls (cont'd) the or , the temperature can then be adjusted To Set the Clock When the range is heard, " - - The display shows the timer countdown in minutes until the correct time of time from 170°F to 550°F (77&#...
Use and Care Manual
Page 13
...Bake features. 2. Select the LO broil setting to the stop position when broiling (See Fig 1). 7. DO NOT leave small children unattended near the appliance. SpeedBake™ may be cooked to the fumes given off during a Self-Cleaning cycle. Broil on . Arrange the oven rack while oven is...insert on the fire. " - - Since SpeedBake™ cooks food faster, reduce the cook time by 25% from the high heat of the range can damage the automatic door locking system. To Set SpeedBake™ Cooking System: 1. The indicator light located above the Speed Bake switch will glow ...
...Bake features. 2. Select the LO broil setting to the stop position when broiling (See Fig 1). 7. DO NOT leave small children unattended near the appliance. SpeedBake™ may be cooked to the fumes given off during a Self-Cleaning cycle. Broil on . Arrange the oven rack while oven is...insert on the fire. " - - Since SpeedBake™ cooks food faster, reduce the cook time by 25% from the high heat of the range can damage the automatic door locking system. To Set SpeedBake™ Cooking System: 1. The indicator light located above the Speed Bake switch will glow ...
Use and Care Manual
Page 15
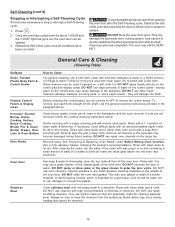
... cleaners, scouring pads, or some paper towels - Restart the Self-Clean cycle once all controls to the appliance. Follow by rinsing the area with hot soapy water & a dishcloth. excess water on the range top. Rinse with a 1:1 solution of a woven material, on the control panel - DO NOT use large... amounts of the oven door. The oven door gasket is essential for 30 to 40 minutes. DO NOT use kitchen cleaners that cannot ...
... cleaners, scouring pads, or some paper towels - Restart the Self-Clean cycle once all controls to the appliance. Follow by rinsing the area with hot soapy water & a dishcloth. excess water on the range top. Rinse with a 1:1 solution of a woven material, on the control panel - DO NOT use large... amounts of the oven door. The oven door gasket is essential for 30 to 40 minutes. DO NOT use kitchen cleaners that cannot ...

Use and Care Manual
Page 18
...you can now be cooler by pressing the oven light switch located on again at the beginning of degrees. 5. Turn electrical power off at the factory. Be sure the range is covered with a glass shield held by a wire holder. This setting may differ from your previous oven however, so... place. 5. Press wire holder to one side to release the glass shield. 3. Special care and cleaning are equipped with a new 40 watt appliance bulb. 4. General Care & Cleaning (cont'd) Changing the Oven Light (some models) Some models are required for maintaining the appearance of the oven...
...you can now be cooler by pressing the oven light switch located on again at the beginning of degrees. 5. Turn electrical power off at the factory. Be sure the range is covered with a glass shield held by a wire holder. This setting may differ from your previous oven however, so... place. 5. Press wire holder to one side to release the glass shield. 3. Special care and cleaning are equipped with a new 40 watt appliance bulb. 4. General Care & Cleaning (cont'd) Changing the Oven Light (some models) Some models are required for maintaining the appearance of the oven...
Use and Care Manual
Page 19
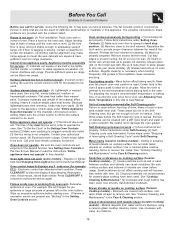
...the oven is too hot or cool, see "Broiling" in the Setting Oven Controls section. Cannot move appliance easily. Appliance must first be set . Contact your local electric company for service. Be sure the oven controls are set properly. Oven smokes excessively during broiling - (1) ...service, review the following list. Place a level on cooktop surface (Ceramic Cooktop models) - Adjust leveling legs at base of discoloration with range. Surface element does not heat - (1) Lightweight or warped pans used . Use only flat, evenly balanced, medium or heavyweight cookware. ...
...the oven is too hot or cool, see "Broiling" in the Setting Oven Controls section. Cannot move appliance easily. Appliance must first be set . Contact your local electric company for service. Be sure the oven controls are set properly. Oven smokes excessively during broiling - (1) ...service, review the following list. Place a level on cooktop surface (Ceramic Cooktop models) - Adjust leveling legs at base of discoloration with range. Surface element does not heat - (1) Lightweight or warped pans used . Use only flat, evenly balanced, medium or heavyweight cookware. ...
Use and Care Manual
Page 20
...following: 1. Products with original serial numbers that have been removed, altered or cannot be required. Service calls to repair or replace appliance light bulbs, air filters, water filters, other consumables, or knobs, handles, or other than genuine Electrolux parts or parts obtained from...the USA or Canada. 3. Obligations for service and parts under this warranty must be obtained by unauthorized service companies; Major Appliance Warranty Information Your appliance is covered by a one year from your original date of purchase, Electrolux will pay all receipts. Food loss due ...
...following: 1. Products with original serial numbers that have been removed, altered or cannot be required. Service calls to repair or replace appliance light bulbs, air filters, water filters, other consumables, or knobs, handles, or other than genuine Electrolux parts or parts obtained from...the USA or Canada. 3. Obligations for service and parts under this warranty must be obtained by unauthorized service companies; Major Appliance Warranty Information Your appliance is covered by a one year from your original date of purchase, Electrolux will pay all receipts. Food loss due ...