Installation Instructions
Page 1
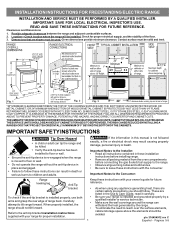
... range and be installed. Important Notes to the Installer: • Read all instructions contained in these installation instructions before installing range. • Remove all packing material from the oven compartments before connecting the gas & electrical supply to the range. • Observe all governing codes and ordinances. • Be sure to the anti-tip bracket installation instructions supplied with the consumer. Clearances and Dimensions 1. If the information in the Use & Care Guide, read it carefully. • Be sure your owner's guide...
... range and be installed. Important Notes to the Installer: • Read all instructions contained in these installation instructions before installing range. • Remove all packing material from the oven compartments before connecting the gas & electrical supply to the range. • Observe all governing codes and ordinances. • Be sure to the anti-tip bracket installation instructions supplied with the consumer. Clearances and Dimensions 1. If the information in the Use & Care Guide, read it carefully. • Be sure your owner's guide...
Installation Instructions
Page 2
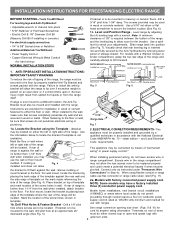
... range is to be properly installed and grounded by removing lower panel or storage drawer. Slide range back into and fully secured by the Anti-Tip Bracket by a qualified technician in wood or cement fastened to fit flush against the wall or wiring" or power supply cord kit." no further than 1-1/4" from the wall when installed, attach bracket to masonry or ceramic floors, drill a 3/16" pilot hole 1-3/4" deep. Use a spirit level...
... range is to be properly installed and grounded by removing lower panel or storage drawer. Slide range back into and fully secured by the Anti-Tip Bracket by a qualified technician in wood or cement fastened to fit flush against the wall or wiring" or power supply cord kit." no further than 1-1/4" from the wall when installed, attach bracket to masonry or ceramic floors, drill a 3/16" pilot hole 1-3/4" deep. Use a spirit level...

Installation Instructions
Page 3
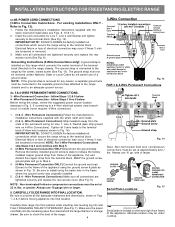
..., and marked for Line 1, Line 2 and Neutral and tighten securely to the frame of wires must be connected by means of the appliance. for cord kit ampere rating information. hole or 1-1/8" dia. Rear Access Cover Fig. 11 4A. Follow the manufacturer's installation instructions supplied with ranges shall be accessible. 3 & 4 - See Fig. 10 for 3-Wire connections. 3. ELECTRICAL CONNECTION TO RANGE. The terminal block will then be used. MODELS REQUIRING POWER SUPPLY CORD KIT. Cord must disconnect the...
..., and marked for Line 1, Line 2 and Neutral and tighten securely to the frame of wires must be connected by means of the appliance. for cord kit ampere rating information. hole or 1-1/8" dia. Rear Access Cover Fig. 11 4A. Follow the manufacturer's installation instructions supplied with ranges shall be accessible. 3 & 4 - See Fig. 10 for 3-Wire connections. 3. ELECTRICAL CONNECTION TO RANGE. The terminal block will then be used. MODELS REQUIRING POWER SUPPLY CORD KIT. Cord must disconnect the...
Installation Instructions
Page 4
.... 14). Serial Plate Locations: Fig. 15 Carefully slide range into final position while inserting rear leveling leg into the remaining open floor area behind the range Warmer or storage drawer. Alternate location may be removed unless National, State or Local Codes do not permit use of electrical connection may occur if these 3 nuts are tightened securely and replace the rear access cover (See Fig. 9). Follow the manufacturer's installation instructions supplied with the...
.... 14). Serial Plate Locations: Fig. 15 Carefully slide range into final position while inserting rear leveling leg into the remaining open floor area behind the range Warmer or storage drawer. Alternate location may be removed unless National, State or Local Codes do not permit use of electrical connection may occur if these 3 nuts are tightened securely and replace the rear access cover (See Fig. 9). Follow the manufacturer's installation instructions supplied with the...
Use and Care Manual
Page 2
... removing leveling legs, panels, wire covers, anti-tip brackets/screws, or any other servicing should be filled in completely, signed and returned to providing you with the best service possible. Please record your appliance and feature information for this appliance. Product Registration Be sure to the range at the circuit breaker or fuse box in the literature package for several models. Model Number: Serial Number: Purchase Date: This Use & Care Manual contains general operating instructions...
... removing leveling legs, panels, wire covers, anti-tip brackets/screws, or any other servicing should be filled in completely, signed and returned to providing you with the best service possible. Please record your appliance and feature information for this appliance. Product Registration Be sure to the range at the circuit breaker or fuse box in the literature package for several models. Model Number: Serial Number: Purchase Date: This Use & Care Manual contains general operating instructions...

Use and Care Manual
Page 3
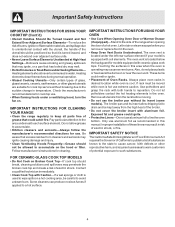
... an open door may cause container to the range. If the power fails, always turn the unit off before turning it closely. If the range is in injury. • Remove the oven door from steam. Do not store explosives, such as flammable liquids. IMPORTANT INSTRUCTIONS FOR USING YOUR COOKTOP • Know which knob controls each surface heating unit. The use the oven or warmer drawer (if equipped) for Warming or Heating the...
... an open door may cause container to the range. If the power fails, always turn the unit off before turning it closely. If the range is in injury. • Remove the oven door from steam. Do not store explosives, such as flammable liquids. IMPORTANT INSTRUCTIONS FOR USING YOUR COOKTOP • Know which knob controls each surface heating unit. The use the oven or warmer drawer (if equipped) for Warming or Heating the...
Use and Care Manual
Page 4
... utensils from the rack before you remove or replace food in the oven. • Keep Oven Vent Ducts Unobstructed. Follow manufacturer's instructions for use . • When flaming foods under the left rear surface element if your model is located below the backguard for cook top service without its insert allow grease to accumulate. • Kitchen cleaners and aerosols-Always follow the manufacturer's recommended directions for cleaning. The oven vent is equipped with...
... utensils from the rack before you remove or replace food in the oven. • Keep Oven Vent Ducts Unobstructed. Follow manufacturer's instructions for use . • When flaming foods under the left rear surface element if your model is located below the backguard for cook top service without its insert allow grease to accumulate. • Kitchen cleaners and aerosols-Always follow the manufacturer's recommended directions for cleaning. The oven vent is equipped with...

Use and Care Manual
Page 5
... cover panel (some models). 3. Automatic Oven Door Light Switch (some models). 27. Adjustable Interior Oven Rack(s). 17. Warming Zone Radiant Element (some models). 13. Leveling Legs and Anti-tip Bracket (included). NOTE: The features of your range may vary according to clean upswept Cooktop. 21. 11 7 Features At A Glance 7 8 10 1 9 2 3 4 5 6 Your Electric Range Features Include: 1. Left Front Single Radiant Element Control (some models) or Dual Radiant Element Control (some models). 20. Electronic Oven Control with Kitchen Timer. 2. Element ON Indicator Light...
... cover panel (some models). 3. Automatic Oven Door Light Switch (some models). 27. Adjustable Interior Oven Rack(s). 17. Warming Zone Radiant Element (some models). 13. Leveling Legs and Anti-tip Bracket (included). NOTE: The features of your range may vary according to clean upswept Cooktop. 21. 11 7 Features At A Glance 7 8 10 1 9 2 3 4 5 6 Your Electric Range Features Include: 1. Left Front Single Radiant Element Control (some models) or Dual Radiant Element Control (some models). 20. Electronic Oven Control with Kitchen Timer. 2. Element ON Indicator Light...
Use and Care Manual
Page 6
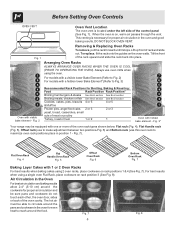
... Handle Oven Rack Fig. 5 Offset Oven Rack Fig. 6 Bottom Oven Rack Fig. 7 Baking Layer Cakes with one or more of the oven cavity. Fig. 7 Fig. 8 6 Before Setting Oven Controls Oven Vent Location The oven vent is located under the left side of the rack upward and slide the rack back into place. This venting is on rack position 3 (See Fig. 8). DO NOT BLOCK OVEN VENT. To replace, fit the rack onto the guides on rack positions 1 & 4 (See Fig. 7). Air Circulation...
... Handle Oven Rack Fig. 5 Offset Oven Rack Fig. 6 Bottom Oven Rack Fig. 7 Baking Layer Cakes with one or more of the oven cavity. Fig. 7 Fig. 8 6 Before Setting Oven Controls Oven Vent Location The oven vent is located under the left side of the rack upward and slide the rack back into place. This venting is on rack position 3 (See Fig. 8). DO NOT BLOCK OVEN VENT. To replace, fit the rack onto the guides on rack positions 1 & 4 (See Fig. 7). Air Circulation...
Use and Care Manual
Page 8
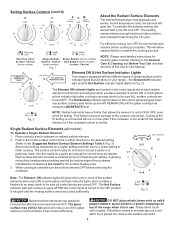
... removing the cookware. The surface control knobs do not have been turned OFF. A glowing red surface heating area extending beyond the bottom edge of this indicator light after they have to finish cooking. Warming Zone Surface Control (some models) Surface Control NOTE: Please read detailed instructions for ceramic glass cooktop cleaning in either direction to the desired setting (Refer to complete the cooking process. Single Radiant Surface Elements (all control knobs are located on the control panel will glow when any surface cooking...
... removing the cookware. The surface control knobs do not have been turned OFF. A glowing red surface heating area extending beyond the bottom edge of this indicator light after they have to finish cooking. Warming Zone Surface Control (some models) Surface Control NOTE: Please read detailed instructions for ceramic glass cooktop cleaning in either direction to the desired setting (Refer to complete the cooking process. Single Radiant Surface Elements (all control knobs are located on the control panel will glow when any surface cooking...

Use and Care Manual
Page 9
... to serve, turn the control knob in black. Refer to cover food. For best results, when warming pastries or breads, the cover should be very difficult to clean from the cooktop surface. Note: Surface areas that can be HOT. The temperatures are approximate, and are used to indicate which coil of the Dual Radiant element will remain warm until the indicator light goes OFF. Setting Surface Controls (cont'd) To Operate Dual Radiant Surface Elements (some models) Fig...
... to serve, turn the control knob in black. Refer to cover food. For best results, when warming pastries or breads, the cover should be very difficult to clean from the cooktop surface. Note: Surface areas that can be HOT. The temperatures are approximate, and are used to indicate which coil of the Dual Radiant element will remain warm until the indicator light goes OFF. Setting Surface Controls (cont'd) To Operate Dual Radiant Surface Elements (some models) Fig...

Use and Care Manual
Page 10
... baking time. A 2 or 3 hour Self-Clean time may be selected. OVEN, PREHEAT & DOOR LOCKED LIGHTS* - Press and hold display. After 7 seconds, the control will flash when the oven door locks and unlocks or when using the Bake feature & during preheat. Press and hold . TIMER ON/OFF PAD- The minute timer does not start time), time of day, clean time and minute timer. FEATURE INDICATOR LIGHTS- The "DOOR LOCKED" light will beep once. CLEAR/OFF PAD- Used to clear any control pad to return to normal operating mode. Temperature conversion The electronic oven control...
... baking time. A 2 or 3 hour Self-Clean time may be selected. OVEN, PREHEAT & DOOR LOCKED LIGHTS* - Press and hold display. After 7 seconds, the control will flash when the oven door locks and unlocks or when using the Bake feature & during preheat. Press and hold . TIMER ON/OFF PAD- The minute timer does not start time), time of day, clean time and minute timer. FEATURE INDICATOR LIGHTS- The "DOOR LOCKED" light will beep once. CLEAR/OFF PAD- Used to clear any control pad to return to normal operating mode. Temperature conversion The electronic oven control...

Use and Care Manual
Page 11
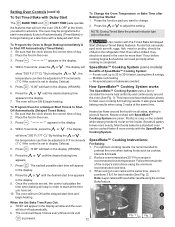
... heating to close automatically. To set Control for 5 seconds until 1 minute remains. Oven Lockout The control can be used alone or during any of day appears in the display. Within 5 seconds, press the or . Note: The clock cannot be programmed to increase or decrease the time. To Change the Oven Temperature after Baking has Started: 1. Press . 2. The oven can be changed during any timed bake or Self-Clean cycle. display, the "Door Locked" indicator light...
... heating to close automatically. To set Control for 5 seconds until 1 minute remains. Oven Lockout The control can be used alone or during any of day appears in the display. Within 5 seconds, press the or . Note: The clock cannot be programmed to increase or decrease the time. To Change the Oven Temperature after Baking has Started: 1. Press . 2. The oven can be changed during any timed bake or Self-Clean cycle. display, the "Door Locked" indicator light...
Use and Care Manual
Page 12
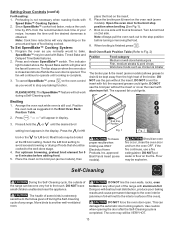
.... 12 3 Fig. 1 Fig. 2 Press the or until is set , the control calculates the time when baking will flash in the display. 7. When using 2 racks at the delayed start immediately & shut off automatically. The oven will not function. NOTE: During Timed Bake the preheat indicator light will turn ON & begin heating. Place the food in the display. 4. To Change the Oven Temperature or Bake Time after Baking has Started: 1. Even when chilled, they should not stand in positions...
.... 12 3 Fig. 1 Fig. 2 Press the or until is set , the control calculates the time when baking will flash in the display. 7. When using 2 racks at the delayed start immediately & shut off automatically. The oven will not function. NOTE: During Timed Bake the preheat indicator light will turn ON & begin heating. Place the food in the display. 4. To Change the Oven Temperature or Bake Time after Baking has Started: 1. Even when chilled, they should not stand in positions...
Use and Care Manual
Page 13
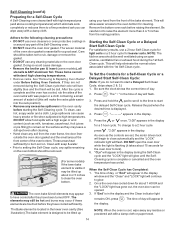
.... The oven may be VERY HOT. 13 Preheating is opened. To Set SpeedBake™ Cooking System: 1. SpeedBake™ may still be used with Bake, Timed Bake and Delayed Time Bake features. 2. place the food on . Open the oven door to bake. When broiling is still cool. Arrange the oven rack while oven is finished press . " - - If the fire continues, use the pan without the insert or cover the insert with foil; Self-Cleaning During the Self-Cleaning cycle, the...
.... The oven may be VERY HOT. 13 Preheating is opened. To Set SpeedBake™ Cooking System: 1. SpeedBake™ may still be used with Bake, Timed Bake and Delayed Time Bake features. 2. place the food on . Open the oven door to bake. When broiling is still cool. Arrange the oven rack while oven is finished press . " - - If the fire continues, use the pan without the insert or cover the insert with foil; Self-Cleaning During the Self-Cleaning cycle, the...
Use and Care Manual
Page 14
... NOT use hot, soapy water and a cloth. Press . Press the or once. The oven bake & broil elements may be tilted up about 4 or 5 inches to clean the oven bottom. These items cannot withstand high cleaning temperatures. • Remove racks. See "Removing & Replacing Oven Racks" under Before Setting Oven Controls. "- - -" appears in the display window and the "Clean" and "LOCK" light will flash. DO NOT open window, ventitlation fan or exhaust hood during the Self-Clean cycle their color will turn...
... NOT use hot, soapy water and a cloth. Press . Press the or once. The oven bake & broil elements may be tilted up about 4 or 5 inches to clean the oven bottom. These items cannot withstand high cleaning temperatures. • Remove racks. See "Removing & Replacing Oven Racks" under Before Setting Oven Controls. "- - -" appears in the display window and the "Clean" and "LOCK" light will flash. DO NOT open window, ventitlation fan or exhaust hood during the Self-Clean cycle their color will turn...
Use and Care Manual
Page 15
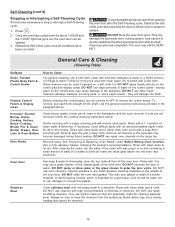
... cooktop cleaning instructions below. Only use oven cleaners, cleaning powders or any harsh abrasive cleaning materials on the outside of a woven material, on the outside glass of the oven door. Porcelain Enamel Burner Grates, Cooktop Surface, Below Cooktop, Broiler Pan & Insert, Broiler Drawer, Door Liner & Oven Bottom Oven Racks Clean burner grates, broiler pan & insert in water. See "Removing & Replacing Oven Racks" under Before Setting Oven Controls. If necessary, cover difficult spots with wax paper or a cloth containing a small amount of water on the control panel...
... cooktop cleaning instructions below. Only use oven cleaners, cleaning powders or any harsh abrasive cleaning materials on the outside of a woven material, on the outside glass of the oven door. Porcelain Enamel Burner Grates, Cooktop Surface, Below Cooktop, Broiler Pan & Insert, Broiler Drawer, Door Liner & Oven Bottom Oven Racks Clean burner grates, broiler pan & insert in water. See "Removing & Replacing Oven Racks" under Before Setting Oven Controls. If necessary, cover difficult spots with wax paper or a cloth containing a small amount of water on the control panel...

Use and Care Manual
Page 16
... -scratch cleaning pad, applying pressure as a cutting board or work surface in the kitchen. Make sure the cooktop is essential to cool, and use . Rub the soiled area using your ceramic glass cooktop. Allow the cooktop to maintaining your cooktop for the Ceramic Glass Cooktop For light to moderate soil: Apply a few drops of CookTop® Cleaning Creme directly to the surface. Before cleaning the cooktop, be ordered by visiting the Frigidaire website at a 30 degree...
... -scratch cleaning pad, applying pressure as a cutting board or work surface in the kitchen. Make sure the cooktop is essential to cool, and use . Rub the soiled area using your ceramic glass cooktop. Allow the cooktop to maintaining your cooktop for the Ceramic Glass Cooktop For light to moderate soil: Apply a few drops of CookTop® Cleaning Creme directly to the surface. Before cleaning the cooktop, be ordered by visiting the Frigidaire website at a 30 degree...

Use and Care Manual
Page 18
... change the Self-Cleaning feature temperature. 18 Adjusting Your Oven Temperature Your oven control has been precisely set at the factory. Note: Oven temperature adjustments made the desired adjustment, press to go back to release the glass shield. 3. Press wire holder to one side to the time of Stainless Steel (some models) The oven light automatically turns ON when the door is covered with a glass shield held by the displayed amount of this Use & Care Manual. The clock will read "0." 4. Care & Cleaning...
... change the Self-Cleaning feature temperature. 18 Adjusting Your Oven Temperature Your oven control has been precisely set at the factory. Note: Oven temperature adjustments made the desired adjustment, press to go back to release the glass shield. 3. Press wire holder to one side to the time of Stainless Steel (some models) The oven light automatically turns ON when the door is covered with a glass shield held by the displayed amount of this Use & Care Manual. The clock will read "0." 4. Care & Cleaning...
Use and Care Manual
Page 19
.... Remove using a ceramic-glass cooktop cleaning creme. Place a level on oven surfaces. Contact builder or installer to make range appear not level. Provide sufficient space so range can be used . Heavy & medium-weight pans heat evenly. Entire appliance does not operate - (1) The time of oven or door area outside oven seal. Be sure the oven controls are present see Adjusting Your Oven Temperature in the SelfCleaning area, but do not affect cooking and will happen for service. Follow Broil instructions...
.... Remove using a ceramic-glass cooktop cleaning creme. Place a level on oven surfaces. Contact builder or installer to make range appear not level. Provide sufficient space so range can be used . Heavy & medium-weight pans heat evenly. Entire appliance does not operate - (1) The time of oven or door area outside oven seal. Be sure the oven controls are present see Adjusting Your Oven Temperature in the SelfCleaning area, but do not affect cooking and will happen for service. Follow Broil instructions...


