

Installation Instructions
Page 3
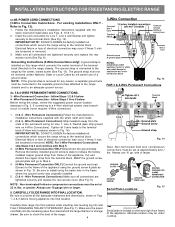
...used. for 3-Wire connections. 3. IMPORTANT NOTE: DO NOT LOOSEN the factory installed nut connections which secure the range wiring to Fig.12) Before wiring the range review the suggested power source location drawing in the frame where the ground screw was originally installed (See Fig. 12...ARE NOT FOLLOWED OR STRAIN RELIEF BRACKET IS DISCARDED. See Steps 4a. If connecting to Fig. 9. INSTALLATION INSTRUCTIONS FOR FREESTANDING ELECTRIC RANGE 2b. POWER CORD CONNECTIONS (4-Wire Connection Instructions - Connect the ground wire (Green) lead with the eyelet to release the ...
...used. for 3-Wire connections. 3. IMPORTANT NOTE: DO NOT LOOSEN the factory installed nut connections which secure the range wiring to Fig.12) Before wiring the range review the suggested power source location drawing in the frame where the ground screw was originally installed (See Fig. 12...ARE NOT FOLLOWED OR STRAIN RELIEF BRACKET IS DISCARDED. See Steps 4a. If connecting to Fig. 9. INSTALLATION INSTRUCTIONS FOR FREESTANDING ELECTRIC RANGE 2b. POWER CORD CONNECTIONS (4-Wire Connection Instructions - Connect the ground wire (Green) lead with the eyelet to release the ...
Installation Instructions
Page 4
... Instructions . Follow the manufacturer's installation instructions supplied with the strain relief and install (Also see Figs. 9, 10 & 11). 2. Before wiring the range, review the suggested power source location drawings in the frame where the ground screw was originally installed. 5. (3 & 4 - Wire Permanent Connection - Wire Permanent... Connection ONLY) Connect the ground wire lead (Green) to the terminal block (See Fig. 13). INSTALLATION INSTRUCTIONS FOR FREESTANDING ELECTRIC RANGE or 4B. Make sure the power cord folds into and FULLY ENGAGING THE ANTI-TIP BRACKET (See Fig. 7).
... Instructions . Follow the manufacturer's installation instructions supplied with the strain relief and install (Also see Figs. 9, 10 & 11). 2. Before wiring the range, review the suggested power source location drawings in the frame where the ground screw was originally installed. 5. (3 & 4 - Wire Permanent Connection - Wire Permanent... Connection ONLY) Connect the ground wire lead (Green) to the terminal block (See Fig. 13). INSTALLATION INSTRUCTIONS FOR FREESTANDING ELECTRIC RANGE or 4B. Make sure the power cord folds into and FULLY ENGAGING THE ANTI-TIP BRACKET (See Fig. 7).
Use and Care Manual
Page 19
... in the SelfCleaning area, but do not affect cooking and will happen for service, review the following list. Place a level on cooktop surface. Contact builder or installer to make range appear not level. Incorrect control setting. Check steps under Setting Oven Controls. (2) Make...(2) Cleaning materials not recommended for ceramic-glass cooktop have sufficient room for the element to the broil element. Contact your local electric company for the desired function. Follow Broil instructions under "Entire Appliance Does Not Operate" in oven. Regular cleaning is opened to...
... in the SelfCleaning area, but do not affect cooking and will happen for service, review the following list. Place a level on cooktop surface. Contact builder or installer to make range appear not level. Incorrect control setting. Check steps under Setting Oven Controls. (2) Make...(2) Cleaning materials not recommended for ceramic-glass cooktop have sufficient room for the element to the broil element. Contact your local electric company for the desired function. Follow Broil instructions under "Entire Appliance Does Not Operate" in oven. Regular cleaning is opened to...
