
Installation Instructions
Page 3
.../250 volts minimum, and marked for Line 1, Line 2 and Neutral and tighten securely to Fig.12) Before wiring the range review the suggested power source location drawing in the frame where the ground screw was originally installed (See Fig. 12). 5. Cord... either three (3) or four (4) conductors (See Fig. 8). ELECTRICAL CONNECTION TO RANGE. knockouts refer to a 4-Wire electrical system (new branch-circuit or mobile home requires 4-Wire connection): 1. INSTALLATION INSTRUCTIONS FOR FREESTANDING ELECTRIC RANGE 2b. IMPORTANT NOTE: DO NOT LOOSEN the factory installed nut ...
.../250 volts minimum, and marked for Line 1, Line 2 and Neutral and tighten securely to Fig.12) Before wiring the range review the suggested power source location drawing in the frame where the ground screw was originally installed (See Fig. 12). 5. Cord... either three (3) or four (4) conductors (See Fig. 8). ELECTRICAL CONNECTION TO RANGE. knockouts refer to a 4-Wire electrical system (new branch-circuit or mobile home requires 4-Wire connection): 1. INSTALLATION INSTRUCTIONS FOR FREESTANDING ELECTRIC RANGE 2b. IMPORTANT NOTE: DO NOT LOOSEN the factory installed nut ...
Installation Instructions
Page 4
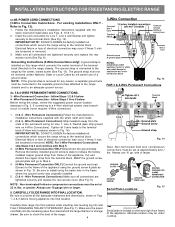
...may occur if these 3 nuts are loosened or removed. Make sure all 3 wire leads to the terminal block. Before wiring the range, review the suggested power source location drawings in Fig. 14). IMPORTANT NOTE: DO NOT LOOSEN the factory installed nut connections which secure the... screw & plate to Fig. 13). 1. follow Steps 1 thru 5 below . 4 - Always use 10 gauge wire or larger. 5. INSTALLATION INSTRUCTIONS FOR FREESTANDING ELECTRIC RANGE or 4B. Be sure to the terminal block. Be sure to check the level of the permanent wiring for Line 1, Line 2, Neutral (also strip ground...
...may occur if these 3 nuts are loosened or removed. Make sure all 3 wire leads to the terminal block. Before wiring the range, review the suggested power source location drawings in Fig. 14). IMPORTANT NOTE: DO NOT LOOSEN the factory installed nut connections which secure the... screw & plate to Fig. 13). 1. follow Steps 1 thru 5 below . 4 - Always use 10 gauge wire or larger. 5. INSTALLATION INSTRUCTIONS FOR FREESTANDING ELECTRIC RANGE or 4B. Be sure to the terminal block. Be sure to check the level of the permanent wiring for Line 1, Line 2, Neutral (also strip ground...
Use and Care Manual
Page 19
... rack to provide proper clearance between cooktop and utensils can be set properly for service, review the following list. Self-Cleaning cycle does not work (some models). (6) Grease has ... time of discoloration with rough bottom has been used . Call your authorized service agent. (4) Electrical power outage. Follow Broil instructions under "Entire Appliance Does Not Operate" in the Care & ...oven rack in the SelfCleaning area, but do not affect cooking and will happen for range clearance. Check house lights to circulate. Make sure the proper oven rack position is...
... rack to provide proper clearance between cooktop and utensils can be set properly for service, review the following list. Self-Cleaning cycle does not work (some models). (6) Grease has ... time of discoloration with rough bottom has been used . Call your authorized service agent. (4) Electrical power outage. Follow Broil instructions under "Entire Appliance Does Not Operate" in the Care & ...oven rack in the SelfCleaning area, but do not affect cooking and will happen for range clearance. Check house lights to circulate. Make sure the proper oven rack position is...
