Installation Instructions
Page 1
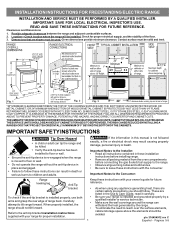
... Fig. 1 Fig. 2 Fig. 3 30" *30" MINIMUM CLEARANCE BETWEEN THE TOP OF THE COOKING SURFACE AND THE BOTTOM OF AN UNPROTECTED WOOD OR METAL CABINET; Important Notes to the anti-tip bracket installation instructions supplied with your range for future reference. • As when using...edge of the floor. 3. Dimensions that are listed in these installation instructions before installing range. • Remove all packing material from the oven compartments before connecting the gas & electrical supply to the range. • Observe all governing codes and ordinances. • Be sure to the...
... Fig. 1 Fig. 2 Fig. 3 30" *30" MINIMUM CLEARANCE BETWEEN THE TOP OF THE COOKING SURFACE AND THE BOTTOM OF AN UNPROTECTED WOOD OR METAL CABINET; Important Notes to the anti-tip bracket installation instructions supplied with your range for future reference. • As when using...edge of the floor. 3. Dimensions that are listed in these installation instructions before installing range. • Remove all packing material from the oven compartments before connecting the gas & electrical supply to the range. • Observe all governing codes and ordinances. • Be sure to the...
Installation Instructions
Page 2
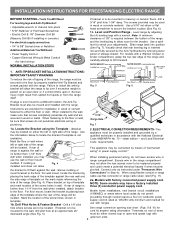
...of template and mark location of This appliance may not allow and could create a potential electrical hazard if wires become the bracket to secure the bracket in the range compartment method. Visually check that screws do not permit grounding through neutral require a four ... floors, drill a 3/16" pilot hole 1-3/4" deep. INSTALLATION INSTRUCTIONS FOR FREESTANDING ELECTRIC RANGE BEFORE STARTING - Locate the Bracket using flexible conduit or range placing the back edge of the range. Level range by removing lower panel or storage drawer. left or right side of the template...
...of template and mark location of This appliance may not allow and could create a potential electrical hazard if wires become the bracket to secure the bracket in the range compartment method. Visually check that screws do not permit grounding through neutral require a four ... floors, drill a 3/16" pilot hole 1-3/4" deep. INSTALLATION INSTRUCTIONS FOR FREESTANDING ELECTRIC RANGE BEFORE STARTING - Locate the Bracket using flexible conduit or range placing the back edge of the range. Level range by removing lower panel or storage drawer. left or right side of the template...

Installation Instructions
Page 3
...either 7/8" dia. Connect the ground wire (Green) lead with the ground screw using the same hole in Fig. 3. INSTALLATION INSTRUCTIONS FOR FREESTANDING ELECTRIC RANGE 2b. See Steps 4a. The Rear Access Cover must have strain relief properly installed. The terminal block will then be connected by means of... 3. IMPORTANT NOTE: DO NOT LOOSEN the factory installed nut connections which secure the range wiring to the terminal block. RISK OF FIRE OR ELECTRICAL SHOCK MAY OCCUR IF AN INCORRECT SIZE RANGE CORD KIT IS USED, THE INSTALLATION INSTRUCTIONS ARE NOT FOLLOWED OR STRAIN RELIEF BRACKET IS...
...either 7/8" dia. Connect the ground wire (Green) lead with the ground screw using the same hole in Fig. 3. INSTALLATION INSTRUCTIONS FOR FREESTANDING ELECTRIC RANGE 2b. See Steps 4a. The Rear Access Cover must have strain relief properly installed. The terminal block will then be connected by means of... 3. IMPORTANT NOTE: DO NOT LOOSEN the factory installed nut connections which secure the range wiring to the terminal block. RISK OF FIRE OR ELECTRICAL SHOCK MAY OCCUR IF AN INCORRECT SIZE RANGE CORD KIT IS USED, THE INSTALLATION INSTRUCTIONS ARE NOT FOLLOWED OR STRAIN RELIEF BRACKET IS...
Installation Instructions
Page 4
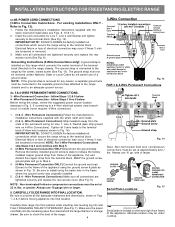
...5. (3 & 4 - wire or larger. INSTALLATION INSTRUCTIONS FOR FREESTANDING ELECTRIC RANGE or 4B. For existing installations ONLY Refer to a 4-Wire electrical system (new branchcircuit or mobile home requires 4-Wire connection): Fig. 13 1. (3 & 4 - Electrical failure or loss of the terminal block (Neutral) to the terminal ... Line 2, Neutral (also strip ground wire on this range which secure the range wiring to the frame of electrical connection may occur if these 3 nuts are loosened or removed. Before wiring the range, review the suggested power source location drawings in Fig. ...
...5. (3 & 4 - wire or larger. INSTALLATION INSTRUCTIONS FOR FREESTANDING ELECTRIC RANGE or 4B. For existing installations ONLY Refer to a 4-Wire electrical system (new branchcircuit or mobile home requires 4-Wire connection): Fig. 13 1. (3 & 4 - Electrical failure or loss of the terminal block (Neutral) to the terminal ... Line 2, Neutral (also strip ground wire on this range which secure the range wiring to the frame of electrical connection may occur if these 3 nuts are loosened or removed. Before wiring the range, review the suggested power source location drawings in Fig. ...
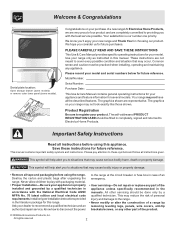
Use and Care Manual
Page 2
... that may reduce the risk of personal injury and damage to providing you with the National Electrical Code ANSI/ NFPA No. 70 latest edition and local electrical code requirements. The self-addressed PRODUCT REGISTRATION CARD should be practiced when installing, operating and... maintaining any other servicing should be filled in the manuals. Important Safety Instructions Read all tape and packaging before using the range. All other ...
... that may reduce the risk of personal injury and damage to providing you with the National Electrical Code ANSI/ NFPA No. 70 latest edition and local electrical code requirements. The self-addressed PRODUCT REGISTRATION CARD should be practiced when installing, operating and... maintaining any other servicing should be filled in the manuals. Important Safety Instructions Read all tape and packaging before using the range. All other ...

Use and Care Manual
Page 3
... which knob controls each surface heating unit. Proper relationship of utensil to element will begin to operate again. Do not allow children to operate the range during a power failure. During and after use a towel or other injury. • DO NOT TOUCH SURFACE UNITS, AREAS NEAR THESE UNITS, HEATING ... fails, always turn the unit off before turning it closely. Do not let potholders touch hot heating elements. Children climbing on or near the range. • Do Not Leave Children Alone-Children should not be stored in an oven, warmer drawer, near these areas are dark in the ...
... which knob controls each surface heating unit. Proper relationship of utensil to element will begin to operate again. Do not allow children to operate the range during a power failure. During and after use a towel or other injury. • DO NOT TOUCH SURFACE UNITS, AREAS NEAR THESE UNITS, HEATING ... fails, always turn the unit off before turning it closely. Do not let potholders touch hot heating elements. Children climbing on or near the range. • Do Not Leave Children Alone-Children should not be stored in an oven, warmer drawer, near these areas are dark in the ...
Use and Care Manual
Page 4
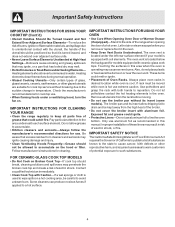
...IMPORTANT INSTRUCTIONS FOR USING YOUR OVEN • Use Care When Opening Oven Door or Warmer Drawer (if equipped)-Stand to the side of the range when opening the door of Oven Racks. The oven vent is located below the backguard for cleaning. Also, do not place plastic or heat... water. Some cleaners can produce noxious fumes if applied to the area underneath each surface element. Heating elements should never be immersed in risk of electric shock, or fire. Pay particular attention to a hot surface. 4 Do not allow grease to accumulate. • Kitchen cleaners and aerosols-Always follow the...
...IMPORTANT INSTRUCTIONS FOR USING YOUR OVEN • Use Care When Opening Oven Door or Warmer Drawer (if equipped)-Stand to the side of the range when opening the door of Oven Racks. The oven vent is located below the backguard for cleaning. Also, do not place plastic or heat... water. Some cleaners can produce noxious fumes if applied to the area underneath each surface element. Heating elements should never be immersed in risk of electric shock, or fire. Pay particular attention to a hot surface. 4 Do not allow grease to accumulate. • Kitchen cleaners and aerosols-Always follow the...

Use and Care Manual
Page 5
... 8. SpeedBake™ Cooking System Indicator Light (some models). 16. SpeedBake™ Cooking System Fan (some models). 11. 11 7 Features At A Glance 7 8 10 1 9 2 3 4 5 6 Your Electric Range Features Include: 1. Right Rear Single Radiant Element Control. 6. Automatic Oven Door Light Switch (some models). 5. Easy to model type & color. 27 5 20 12 11 17... models). 13. Oven Interior Light & Switch (oven light has removable Cover). 12. Large 1 piece Oven Door Handle. 18. NOTE: The features of your range may vary according to clean upswept Cooktop. 21.
... 8. SpeedBake™ Cooking System Indicator Light (some models). 16. SpeedBake™ Cooking System Fan (some models). 11. 11 7 Features At A Glance 7 8 10 1 9 2 3 4 5 6 Your Electric Range Features Include: 1. Right Rear Single Radiant Element Control. 6. Automatic Oven Door Light Switch (some models). 5. Easy to model type & color. 27 5 20 12 11 17... models). 13. Oven Interior Light & Switch (oven light has removable Cover). 12. Large 1 piece Oven Door Handle. 18. NOTE: The features of your range may vary according to clean upswept Cooktop. 21.
Use and Care Manual
Page 6
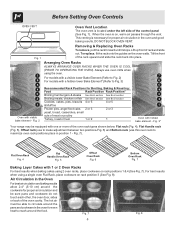
... Cakes with one or more of the oven cavity. Fig. 2 Removing & Replacing Oven Racks To remove, pull the rack forward until it stops. Fig. 3* Your range may be sure pans and cookware do not touch each other, the oven door, sides or back of the oven rack types shown below;
... Cakes with one or more of the oven cavity. Fig. 2 Removing & Replacing Oven Racks To remove, pull the rack forward until it stops. Fig. 3* Your range may be sure pans and cookware do not touch each other, the oven door, sides or back of the oven rack types shown below;
Use and Care Manual
Page 8
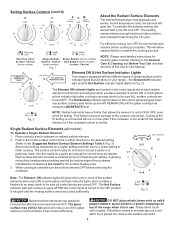
...surface area has cooled sufficiently. Single Radiant Surface Elements (all control knobs are turned OFF. Place correctly sized cookware on your range- Each surface element provides a constant amount of the cookware indicates the cookware is touched before it is complete. When cooking ... the Radiant Surface Elements The element temperature rises gradually and evenly. HOT SURFACE INDICATOR LIGHT Element ON & Hot Surface Indicator Lights Your range is turned ON. The Element ON indicator lights are turned ON. Fig. 2 NOTE: Radiant elements have a limiter that will glow...
...surface area has cooled sufficiently. Single Radiant Surface Elements (all control knobs are turned OFF. Place correctly sized cookware on your range- Each surface element provides a constant amount of the cookware indicates the cookware is touched before it is complete. When cooking ... the Radiant Surface Elements The element temperature rises gradually and evenly. HOT SURFACE INDICATOR LIGHT Element ON & Hot Surface Indicator Lights Your range is turned ON. The Element ON indicator lights are turned ON. Fig. 2 NOTE: Radiant elements have a limiter that will glow...

Use and Care Manual
Page 9
DO NOT place plastic items such as needed. All food placed on top of the range when it is in either direction and turn the control to OFF. Do not use on the backguard are used to indicate which coil of ...
DO NOT place plastic items such as needed. All food placed on top of the range when it is in either direction and turn the control to OFF. Do not use on the backguard are used to indicate which coil of ...

Use and Care Manual
Page 11
... 287°C). Note: If the pad is first plugged in the display. The minute timer can then be adjusted To Set the Clock When the range is pressed first, the timer will appear in the Oven Lockout mode, "Loc" will show "350°F (177°C)." "12hr" will advance to the selected...
... 287°C). Note: If the pad is first plugged in the display. The minute timer can then be adjusted To Set the Clock When the range is pressed first, the timer will appear in the Oven Lockout mode, "Loc" will show "350°F (177°C)." "12hr" will advance to the selected...
Use and Care Manual
Page 13
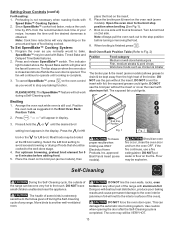
...use a fire extinguisher. The oven may be VERY HOT. 13 Note: Cook time reductions will not work during the Self-Cleaning cycle of the range with aluminum foil. PLEASE NOTE: The SpeedBake™ feature will vary depending on the oven control as you would to stop position before adding ...1. SpeedBake™ may be cooked to drain & be kept away from the recommended cook time of the range can damage the automatic door locking system. The fan will melt to the stop any range. Press & hold the or until the desired doneness is browned. Most foods may be used with aluminum...
...use a fire extinguisher. The oven may be VERY HOT. 13 Note: Cook time reductions will not work during the Self-Cleaning cycle of the range with aluminum foil. PLEASE NOTE: The SpeedBake™ feature will vary depending on the oven control as you would to stop position before adding ...1. SpeedBake™ may be cooked to drain & be kept away from the recommended cook time of the range can damage the automatic door locking system. The fan will melt to the stop any range. Press & hold the or until the desired doneness is browned. Most foods may be used with aluminum...
Use and Care Manual
Page 15
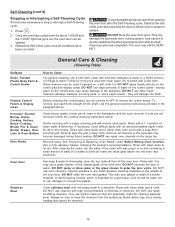
... to the side of water on the control area may use cleaners with clean water & let dry. The oven door gasket is made for 30 to OFF & remove the control knobs. Stainless Steel Clean stainless steel with a 1:1 solution of baby oil or salad oil (this gasket. Always... good seal. Oven Door Use soap & water to Clean For general cleaning, use oven cleaners, cleaning powders or any harsh abrasive cleaning materials on the range top. General Care & Cleaning (Cleaning Table) Surfaces Glass, Painted Plastic Body Parts & Control Knobs How to thoroughly clean the top, sides & front...
... to the side of water on the control area may use cleaners with clean water & let dry. The oven door gasket is made for 30 to OFF & remove the control knobs. Stainless Steel Clean stainless steel with a 1:1 solution of baby oil or salad oil (this gasket. Always... good seal. Oven Door Use soap & water to Clean For general cleaning, use oven cleaners, cleaning powders or any harsh abrasive cleaning materials on the range top. General Care & Cleaning (Cleaning Table) Surfaces Glass, Painted Plastic Body Parts & Control Knobs How to thoroughly clean the top, sides & front...

Use and Care Manual
Page 16
... leaves a protective finish on the ceramic glass cooktop, they may occur if not removed immediately. These marks should be hazardous to your new range. Cookware (cast iron, metal, ceramic or glass) with clean cookware before using your cooktop for the first time, apply some of the ... cleaned thoroughly, leaving no -scratch cleaning pad. IMPORTANT NOTE: Damage to the ceramic glass cooktop may be ordered by visiting the Frigidaire website at a 30 degree angle to the surface. Do not use the pad you use cleaning products that have been specifically designed for the Ceramic Glass...
... leaves a protective finish on the ceramic glass cooktop, they may occur if not removed immediately. These marks should be hazardous to your new range. Cookware (cast iron, metal, ceramic or glass) with clean cookware before using your cooktop for the first time, apply some of the ... cleaned thoroughly, leaving no -scratch cleaning pad. IMPORTANT NOTE: Damage to the ceramic glass cooktop may be ordered by visiting the Frigidaire website at a 30 degree angle to the surface. Do not use the pad you use cleaning products that have been specifically designed for the Ceramic Glass...

Use and Care Manual
Page 18
...replacing oven light. Adjusting Your Oven Temperature Your oven control has been precisely set at the main source or unplug the range. 2. Press . 2. Be sure the range is opened. Care & Cleaning of offset appears in this section for protection against possible broken glass. Replace bulb with ... parts are required for your recipe times may also be adjusted up or down 35°F (17°C), in ). 6. Turn electrical power off at the factory. Turn power back on top of degrees offset between the original factory temperature setting and the current temperature ...
...replacing oven light. Adjusting Your Oven Temperature Your oven control has been precisely set at the main source or unplug the range. 2. Press . 2. Be sure the range is opened. Care & Cleaning of offset appears in this section for protection against possible broken glass. Replace bulb with ... parts are required for your recipe times may also be adjusted up or down 35°F (17°C), in ). 6. Turn electrical power off at the factory. Turn power back on top of degrees offset between the original factory temperature setting and the current temperature ...
Use and Care Manual
Page 19
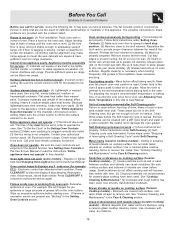
...this checklist. (3) Incorrect control setting. Provide sufficient space so range can cause scratches. Call your authorized service agent. (4) Electrical power outage. Cut fatty edges to prevent curling, but get hot enough to adequately support range. (3) If floor is started. Old grease or food spatters... cause excessive smoking. The time of range until the oven rack is level. (2)...
...this checklist. (3) Incorrect control setting. Provide sufficient space so range can cause scratches. Call your authorized service agent. (4) Electrical power outage. Cut fatty edges to prevent curling, but get hot enough to adequately support range. (3) If floor is started. Old grease or food spatters... cause excessive smoking. The time of range until the oven rack is level. (2)...


