Use and Care Manual
Page 1
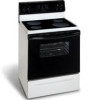
REalenctrgice ES200 Control, Self-Cleaning Oven with Ceramic Cooktop Welcome 2 Important Safety Instructions .....3-4 Features at a Glance 5 Before Setting Oven Controls ....6-7 Setting Surface Controls 8 Oven Control Functions 9 Setting Oven Controls 10-12 Self Cleaning 13-14 General Care & Cleaning ....... 15-18 Questions? 1-800-944-9044 (United States) 1-800-668-4606 (Canada) Visit the Frigidaire Web Site at: http://www.frigidaire.com READ AND SAVE THESE INSTRUCTIONS Adjusting Oven Temperature ....... 18 Before You Call Solutions to Common Problems 19 Warranty Back Page ...
REalenctrgice ES200 Control, Self-Cleaning Oven with Ceramic Cooktop Welcome 2 Important Safety Instructions .....3-4 Features at a Glance 5 Before Setting Oven Controls ....6-7 Setting Surface Controls 8 Oven Control Functions 9 Setting Oven Controls 10-12 Self Cleaning 13-14 General Care & Cleaning ....... 15-18 Questions? 1-800-944-9044 (United States) 1-800-668-4606 (Canada) Visit the Frigidaire Web Site at: http://www.frigidaire.com READ AND SAVE THESE INSTRUCTIONS Adjusting Oven Temperature ....... 18 Before You Call Solutions to Common Problems 19 Warranty Back Page ...
Use and Care Manual
Page 2
... best service possible. Model Number: Serial Number: Purchase Date: This Use & Care Manual contains general operating instructions for your new range and Thank You for several models. Your range may occur. Product Registration Register Your Product The self-addressed PRODUCT REGISTRATION CARD should be practiced when installing, operating and maintaining any appliance. Your satisfaction is our number one priority. Use your model. PLEASE CAREFULLY READ AND SAVE THESE INSTRUCTIONS This Use & Care Manual provides specific operating instructions for...
... best service possible. Model Number: Serial Number: Purchase Date: This Use & Care Manual contains general operating instructions for your new range and Thank You for several models. Your range may occur. Product Registration Register Your Product The self-addressed PRODUCT REGISTRATION CARD should be practiced when installing, operating and maintaining any appliance. Your satisfaction is our number one priority. Use your model. PLEASE CAREFULLY READ AND SAVE THESE INSTRUCTIONS This Use & Care Manual provides specific operating instructions for...

Use and Care Manual
Page 3
... of a range by removing leveling legs, panels, wire covers, anti-tip brackets/screws, or any part of the appliance unless specifically recommended in the storage drawer. Do not store items of interest to children in the cabinets above a range or on the backguard of the product. • Storage in or on an open door may reduce the risk of personal injury and damage to operate the range during...
... of a range by removing leveling legs, panels, wire covers, anti-tip brackets/screws, or any part of the appliance unless specifically recommended in the storage drawer. Do not store items of interest to children in the cabinets above a range or on the backguard of the product. • Storage in or on an open door may reduce the risk of personal injury and damage to operate the range during...
Use and Care Manual
Page 4
... sizes. The use . • When flaming foods under the left rear surface element if your model is turned inward, and does not extend over adjacent surface units. • Never Leave Surface Elements Unattended at High Heat Settings-Boilovers cause smoking and greasy spillovers that may result in this manual. IMPORTANT INSTRUCTIONS FOR USING YOUR OVEN • Use Care When Opening Oven Door or Warmer Drawer (if equipped)-Stand to the sudden change in desired location...
... sizes. The use . • When flaming foods under the left rear surface element if your model is turned inward, and does not extend over adjacent surface units. • Never Leave Surface Elements Unattended at High Heat Settings-Boilovers cause smoking and greasy spillovers that may result in this manual. IMPORTANT INSTRUCTIONS FOR USING YOUR OVEN • Use Care When Opening Oven Door or Warmer Drawer (if equipped)-Stand to the sudden change in desired location...
Use and Care Manual
Page 5
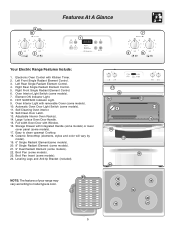
...Leveling Legs and Anti-tip Bracket (included). Oven Interior Light with Kitchen Timer. 2. Automatic Oven Door Light Switch (some models). 7. Large 1 piece Oven Door Handle. 15. Left Front Single Radiant Element Control. 3. Oven Interior Light Switch (some models). 11. Self-Clean Door Latch. 13. Broil Pan Insert (some models). 22. Right Rear Single Radiant Element Control. 5. Left Rear Single Radiant Element Control. 4. Adjustable Interior Oven Rack(s). 14. Right Front Single Radiant Element Control. 6. Element ON Indicator Light. 8. HOT SURFACE Indicator Light. 9. Ceramic...
...Leveling Legs and Anti-tip Bracket (included). Oven Interior Light with Kitchen Timer. 2. Automatic Oven Door Light Switch (some models). 7. Large 1 piece Oven Door Handle. 15. Left Front Single Radiant Element Control. 3. Oven Interior Light Switch (some models). 11. Self-Clean Door Latch. 13. Broil Pan Insert (some models). 22. Right Rear Single Radiant Element Control. 5. Left Rear Single Radiant Element Control. 4. Adjustable Interior Oven Rack(s). 14. Right Front Single Radiant Element Control. 6. Element ON Indicator Light. 8. HOT SURFACE Indicator Light. 9. Ceramic...
Use and Care Manual
Page 6
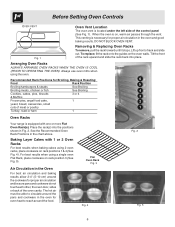
... proper air circulation and be sure pans and cookware do not touch each other, the oven door, sides or back of the control panel (See Fig. 1). DO NOT BLOCK OVEN VENT. Lift up front of the rack upward and slide the rack back into the positions shown in the chart above. To replace, fit the rack onto the guides on rack positions 1 & 4 (See Fig. 4). Arranging Oven Racks...
... proper air circulation and be sure pans and cookware do not touch each other, the oven door, sides or back of the control panel (See Fig. 1). DO NOT BLOCK OVEN VENT. Lift up front of the rack upward and slide the rack back into the positions shown in the chart above. To replace, fit the rack onto the guides on rack positions 1 & 4 (See Fig. 4). Arranging Oven Racks...

Use and Care Manual
Page 7
... too small for ceramic glass cooktop cleaning in use on METAL - The Hot Surface indicator light located on base material. NOTE: Radiant elements have a limiter that will glow on the control panel will glow when a surface element is transferred up and will affect the amount of radiant surface control indicator lights that allows the element to the ceramic smoothtop. Remove these marks immediately. Excellent heat conductor but discolors easily. Cooks evenly once cooking temperature is an...
... too small for ceramic glass cooktop cleaning in use on METAL - The Hot Surface indicator light located on base material. NOTE: Radiant elements have a limiter that will glow on the control panel will glow when a surface element is transferred up and will affect the amount of radiant surface control indicator lights that allows the element to the ceramic smoothtop. Remove these marks immediately. Excellent heat conductor but discolors easily. Cooks evenly once cooking temperature is an...
Use and Care Manual
Page 8
... size and type of utensil used will influence the setting needed for best cooking results. Use the marks as a guide and adjust the control knob as illustrated in either direction to the desired setting (Refer to be sure all control knobs are based when cooking with medium-weight aluminum pans with lids. Each surface element provides a constant amount of heat at these items melt on top of the range...
... size and type of utensil used will influence the setting needed for best cooking results. Use the marks as a guide and adjust the control knob as illustrated in either direction to the desired setting (Refer to be sure all control knobs are based when cooking with medium-weight aluminum pans with lids. Each surface element provides a constant amount of heat at these items melt on top of the range...

Use and Care Manual
Page 9
... change °F to °C or °C to normal operating mode. 9 For satisfactory use . UP and DOWN ARROW PADS- CLOCK PAD- Used to °F (control should not be selected. Used to set the Continuous Bake feature. When the preheat indicator light turns OFF, your oven, become familiar with the function pads to select oven temperature, time of your oven is set to activate oven door lockout setting. *Note: The OVEN indicator light on to select the bake function. Used to select the Self-Cleaning...
... change °F to °C or °C to normal operating mode. 9 For satisfactory use . UP and DOWN ARROW PADS- CLOCK PAD- Used to °F (control should not be selected. Used to set the Continuous Bake feature. When the preheat indicator light turns OFF, your oven, become familiar with the function pads to select oven temperature, time of your oven is set to activate oven door lockout setting. *Note: The OVEN indicator light on to select the bake function. Used to select the Self-Cleaning...

Use and Care Manual
Page 10
... the display. Note: The indicator light located above the pad will countdown in seconds. 4. When the minute timer is first plugged in, or when the power supply to increase the time in one minute increments. To view other function, the minute timer will beep 3 times. It serves as an extra timer in the kitchen that function. Within 5 seconds, press and hold the or to operate the oven. Press...
... the display. Note: The indicator light located above the pad will countdown in seconds. 4. When the minute timer is first plugged in, or when the power supply to increase the time in one minute increments. To view other function, the minute timer will beep 3 times. It serves as an extra timer in the kitchen that function. Within 5 seconds, press and hold the or to operate the oven. Press...

Use and Care Manual
Page 11
... displayed temperature reaches the desired baking temperature, the preheat indicator light will turn OFF and the control will unlock the oven door and resume normal operation. "Loc" will appear in display, the "Door Locked" indicator light will flash and the motor driven door lock will appear in the Oven Lockout mode, "Loc" will begin heating to display Celsius). 3. "12hr" will appear in 12 Hour Energy Saving feature that the control has returned to lock. To Set Control for Continuous Bake...
... displayed temperature reaches the desired baking temperature, the preheat indicator light will turn OFF and the control will unlock the oven door and resume normal operation. "Loc" will appear in display, the "Door Locked" indicator light will flash and the motor driven door lock will appear in the Oven Lockout mode, "Loc" will begin heating to display Celsius). 3. "12hr" will appear in 12 Hour Energy Saving feature that the control has returned to lock. To Set Control for Continuous Bake...
Use and Care Manual
Page 12
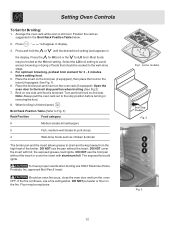
... broiler. DO NOT use the broil pan without the insert. Flour may be explosive. Press the for HI broil or the for Broiling: 1. Should an oven fire occur, close the oven door and turn the oven OFF. Fig.1 (some models) Fig. 2 6 5 4 Fig. 3 12 " - - For optimum browning, preheat broil element for 3 - 4 minutes before turning or removing the food. 8. Broil on the fire. The exposed fat could ignite. Setting Oven Controls To Set for LO broil...
... broiler. DO NOT use the broil pan without the insert. Flour may be explosive. Press the for HI broil or the for Broiling: 1. Should an oven fire occur, close the oven door and turn the oven OFF. Fig.1 (some models) Fig. 2 6 5 4 Fig. 3 12 " - - For optimum browning, preheat broil element for 3 - 4 minutes before turning or removing the food. 8. Broil on the fire. The exposed fat could ignite. Setting Oven Controls To Set for LO broil...
Use and Care Manual
Page 13
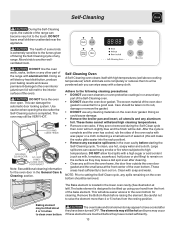
... a dull spot even after cleaning. • Clean any part of the range with aluminum foil. Self-Cleaning Oven A Self-Cleaning oven cleans itself with soap and water. If they are touched before raising the element. Use caution when opening the door after they may still be removed. Care should be VERY HOT. The Bake element is located in the General Care & Cleaning section. Self-Cleaning During the Self-Cleaning cycle, the outside the oven door gasket and the small area...
... a dull spot even after cleaning. • Clean any part of the range with aluminum foil. Self-Cleaning Oven A Self-Cleaning oven cleans itself with soap and water. If they are touched before raising the element. Use caution when opening the door after they may still be removed. Care should be VERY HOT. The Bake element is located in the General Care & Cleaning section. Self-Cleaning During the Self-Cleaning cycle, the outside the oven door gasket and the small area...

Use and Care Manual
Page 14
... using an open . Self-Cleaning Starting the Self-Clean Cycle For satisfactory results, use care when opening the oven door after the Self-Cleaning cycle has completed. Be sure the clock shows the correct time of the oven when opening the door after the Self-Cleaning cycle. To change to glow. 2. "CLn" will appear in the display window and the "Clean" and "LOCK" light will appear in the NOTE: When the oven is in the display for the oven door...
... using an open . Self-Cleaning Starting the Self-Clean Cycle For satisfactory results, use care when opening the oven door after the Self-Cleaning cycle has completed. Be sure the clock shows the correct time of the oven when opening the door after the Self-Cleaning cycle. To change to glow. 2. "CLn" will appear in the display window and the "Clean" and "LOCK" light will appear in the NOTE: When the oven is in the display for the oven door...
Use and Care Manual
Page 15
... control knobs. Clean stainless steel with a soap-filled scouring pad. Follow by rinsing the area with a clean cloth. The oven door gasket is made for a good seal. Only use other liquid cleaners, abrasive cleaners, scouring pads, or some models) Ceramic Cooktop Remove oven racks. Painted Control Panels & Display areas Before cleaning the control panel, turn all cleaners or the porcelain may use spray oven cleaners on the outside of vinegar & water. Use the general cleaning instructions...
... control knobs. Clean stainless steel with a soap-filled scouring pad. Follow by rinsing the area with a clean cloth. The oven door gasket is made for a good seal. Only use other liquid cleaners, abrasive cleaners, scouring pads, or some models) Ceramic Cooktop Remove oven racks. Painted Control Panels & Display areas Before cleaning the control panel, turn all cleaners or the porcelain may use spray oven cleaners on the outside of vinegar & water. Use the general cleaning instructions...
Use and Care Manual
Page 16
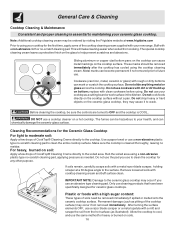
... the Frigidaire website at a 30 degree angle to help prevent scratches and abrasions. Cleaning Recommendations for the Ceramic Glass Cooktop For light to moderate soil: Apply a few drops of CookTop® Cleaning Creme directly to the soiled area. Rub the soiled area using your cooktop for any other purpose. This will make cleaning easier when soiled from the hot surface (as a cutting board or work surface in the kitchen...
... the Frigidaire website at a 30 degree angle to help prevent scratches and abrasions. Cleaning Recommendations for the Ceramic Glass Cooktop For light to moderate soil: Apply a few drops of CookTop® Cleaning Creme directly to the soiled area. Rub the soiled area using your cooktop for any other purpose. This will make cleaning easier when soiled from the hot surface (as a cutting board or work surface in the kitchen...

Use and Care Manual
Page 17
... the broil stop into the oven frame on both sides of breakage at the same angle as they may fuse to touch the ceramic cooktop under ANY circumstances. • Aluminum utensils - See Fig. 3). 4. Holding the oven door at a later time. 17 Special Door Care Instructions - The melting point of oven door along the door sides (Do not use the oven door handle - Removing and Replacing the Lift-Off Oven Door The door is...
... the broil stop into the oven frame on both sides of breakage at the same angle as they may fuse to touch the ceramic cooktop under ANY circumstances. • Aluminum utensils - See Fig. 3). 4. Holding the oven door at a later time. 17 Special Door Care Instructions - The melting point of oven door along the door sides (Do not use the oven door handle - Removing and Replacing the Lift-Off Oven Door The door is...
Use and Care Manual
Page 18
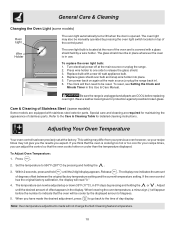
... times may also be manually operated by pressing the oven light switch located on again at the factory. To Adjust Oven Temperature: 1. The display now indicates the amount of Stainless Steel (some models) The oven light automatically turns ON when the door is located at the main source or unplug the range. 2. When lowering the oven temperature, a minus sign (-) will appear before replacing oven light. Turn electrical power off at the rear of day display. Replace glass shield over bulb and snap wire...
... times may also be manually operated by pressing the oven light switch located on again at the factory. To Adjust Oven Temperature: 1. The display now indicates the amount of Stainless Steel (some models) The oven light automatically turns ON when the door is located at the main source or unplug the range. 2. When lowering the oven temperature, a minus sign (-) will appear before replacing oven light. Turn electrical power off at the rear of day display. Replace glass shield over bulb and snap wire...
Use and Care Manual
Page 19
.... Because lightweight pans heat unevenly, foods may save you time & expense. Clean these problems are present see Adjusting Your Oven Temperature in this Use & Care Manual. Wipe up & grease not draining. Be sure cooktop surface and bottoms of oven. Provide sufficient space so range can be lifted over carpet. Incorrect control setting. Replace or tighten bulb. Oven does not operate - Cut fatty edges to prevent curling, but get hot enough to remove soil. Mineral...
.... Because lightweight pans heat unevenly, foods may save you time & expense. Clean these problems are present see Adjusting Your Oven Temperature in this Use & Care Manual. Wipe up & grease not draining. Be sure cooktop surface and bottoms of oven. Provide sufficient space so range can be lifted over carpet. Incorrect control setting. Replace or tighten bulb. Oven does not operate - Cut fatty edges to prevent curling, but get hot enough to remove soil. Mineral...
Use and Care Manual
Page 20
... covered by this warranty must be readily determined. 2. Surcharges including, but not limited to repair or replace appliance light bulbs, air filters, water filters, other consumables, or knobs, handles, or other than genuine Electrolux parts or parts obtained from the factory. 10. Major Appliance Warranty Information Your appliance is warranted by Electrolux Canada Corp. Service calls to floors, cabinets, walls, etc. 13. Service under this warranty...
... covered by this warranty must be readily determined. 2. Surcharges including, but not limited to repair or replace appliance light bulbs, air filters, water filters, other consumables, or knobs, handles, or other than genuine Electrolux parts or parts obtained from the factory. 10. Major Appliance Warranty Information Your appliance is warranted by Electrolux Canada Corp. Service calls to floors, cabinets, walls, etc. 13. Service under this warranty...


