Use and Care Manual
Page 1
REalenctrgice ES200 Control, Self-Cleaning Oven with Coil Cooktop Welcome 2 Important Safety Instructions .....3-4 Features at a Glance 5 Before Setting Oven Controls ....6-7 Setting Surface Controls 8 Oven Control Functions 9 Setting Oven Controls 10-12 Self Cleaning 13-14 General Care & Cleaning ....... 15-18 Questions? 1-800-944-9044 (United States) 1-800-668-4606 (Canada) Visit the Frigidaire Web Site at: http://www.frigidaire.com READ AND SAVE THESE INSTRUCTIONS Adjusting Oven Temperature ....... 18 Before You Call Solutions to Common Problems 19 Warranty Back Page p/n ...
REalenctrgice ES200 Control, Self-Cleaning Oven with Coil Cooktop Welcome 2 Important Safety Instructions .....3-4 Features at a Glance 5 Before Setting Oven Controls ....6-7 Setting Surface Controls 8 Oven Control Functions 9 Setting Oven Controls 10-12 Self Cleaning 13-14 General Care & Cleaning ....... 15-18 Questions? 1-800-944-9044 (United States) 1-800-668-4606 (Canada) Visit the Frigidaire Web Site at: http://www.frigidaire.com READ AND SAVE THESE INSTRUCTIONS Adjusting Oven Temperature ....... 18 Before You Call Solutions to Common Problems 19 Warranty Back Page p/n ...
Use and Care Manual
Page 2
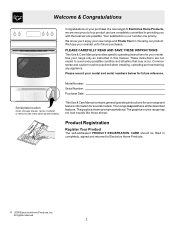
... you with the best service possible. Your range may not have all the described features. Please record your range and feature information for future reference. Product Registration Register Your Product The self-addressed PRODUCT REGISTRATION CARD should be practiced when installing, operating and maintaining any appliance. This Use & Care Manual contains general operating instructions for your model and serial numbers below for several models. Welcome & Congratulations Congratulations on...
... you with the best service possible. Your range may not have all the described features. Please record your range and feature information for future reference. Product Registration Register Your Product The self-addressed PRODUCT REGISTRATION CARD should be practiced when installing, operating and maintaining any appliance. This Use & Care Manual contains general operating instructions for your model and serial numbers below for several models. Welcome & Congratulations Congratulations on...
Use and Care Manual
Page 3
... be done only by removing leveling legs, panels, wire covers, anti-tip brackets/screws, or any part of interest to operate the range during other servicing should be If the range is properly installed and grounded by a qualified technician in Never Use Your Appliance for this range. Do not store explosives, such as flammable liquids. Do not let potholders touch hot heating elements. Buildup of this range can result in...
... be done only by removing leveling legs, panels, wire covers, anti-tip brackets/screws, or any part of interest to operate the range during other servicing should be If the range is properly installed and grounded by a qualified technician in Never Use Your Appliance for this range. Do not store explosives, such as flammable liquids. Do not let potholders touch hot heating elements. Buildup of this range can result in...
Use and Care Manual
Page 4
... is operating may ignite causing damage and injury. • Clean Ventilating Hoods Frequently-Grease should be immersed in risk of a hot oven. SELF CLEANING OVENS • Clean in the self-cleaning cycle only the parts listed in ignition of Oven Racks. Do not allow dripping fat to drain and be allowed to line surface unit drip bowls, or reflector pans. Improper installation of electric shock, or fire. IMPORTANT INSTRUCTIONS FOR USING YOUR OVEN • Use Care When Opening Oven Door or Warmer Drawer...
... is operating may ignite causing damage and injury. • Clean Ventilating Hoods Frequently-Grease should be immersed in risk of a hot oven. SELF CLEANING OVENS • Clean in the self-cleaning cycle only the parts listed in ignition of Oven Racks. Do not allow dripping fat to drain and be allowed to line surface unit drip bowls, or reflector pans. Improper installation of electric shock, or fire. IMPORTANT INSTRUCTIONS FOR USING YOUR OVEN • Use Care When Opening Oven Door or Warmer Drawer...
Use and Care Manual
Page 5
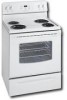
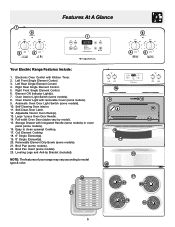
... Oven Door Light Switch (some models). 16. Easy to model type & color. 22 21 16 9 8 13 14 11 10 12 15 23 18 20 17 20 19 20 19 18 20 5 Self-Clean Door Latch. 12. Electronic Oven Control with Integrated Handle (some models) or cover panel (some models). 10. Right Front Single Element Control. 6. Element ON Indicator Light(s). 7. Storage Drawer with Kitchen Timer. 2. Broil Pan (some models). 22. Leveling Legs and Anti-tip Bracket (included). Left Rear Single Element Control. 4. 7 6 2 3 Features At A Glance 1 6 4 5 Your Electric Range Features Include...
... Oven Door Light Switch (some models). 16. Easy to model type & color. 22 21 16 9 8 13 14 11 10 12 15 23 18 20 17 20 19 20 19 18 20 5 Self-Clean Door Latch. 12. Electronic Oven Control with Integrated Handle (some models) or cover panel (some models). 10. Right Front Single Element Control. 6. Element ON Indicator Light(s). 7. Storage Drawer with Kitchen Timer. 2. Broil Pan (some models). 22. Leveling Legs and Anti-tip Bracket (included). Left Rear Single Element Control. 4. 7 6 2 3 Features At A Glance 1 6 4 5 Your Electric Range Features Include...
Use and Care Manual
Page 6
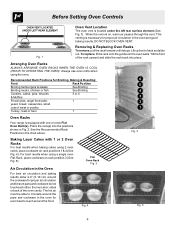
... cuts of rack and slide out. Before Setting Oven Controls Fig. 1 Oven Vent Location The oven vent is equipped with 1 or 2 Oven Racks For best results when baking cakes using 2 oven racks, place cookware on rack position 3 (See Fig. 5). Removing & Replacing Oven Racks To remove, pull the rack forward until it stops. Lift up front of meat or poultry 1 Turkey, roast or ham 1 Oven Racks Your range is located under the left rear surface element (See Fig. 1). Place the rack(s) into place. Air...
... cuts of rack and slide out. Before Setting Oven Controls Fig. 1 Oven Vent Location The oven vent is equipped with 1 or 2 Oven Racks For best results when baking cakes using 2 oven racks, place cookware on rack position 3 (See Fig. 5). Removing & Replacing Oven Racks To remove, pull the rack forward until it stops. Lift up front of meat or poultry 1 Turkey, roast or ham 1 Oven Racks Your range is located under the left rear surface element (See Fig. 1). Place the rack(s) into place. Air...
Use and Care Manual
Page 7
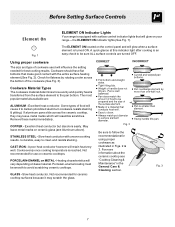
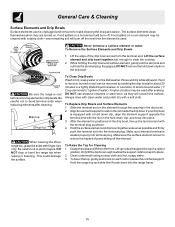
... for ceramic cooktop surfaces because it to the pan bottom. Remove these marks immediately. Slow heat conductor with the entire surface heating element (See Fig. 2). the ELEMENT ON indicator lights (See Fig. 1). Cooks evenly once cooking temperature is transferred from the surface element to darken (Anodized aluminum cookware resists staining & pitting). PORCELAIN-ENAMEL on the control panel and will influence the setting needed for using proper cookware as illustrated in the General Care & Cleaning...
... for ceramic cooktop surfaces because it to the pan bottom. Remove these marks immediately. Slow heat conductor with the entire surface heating element (See Fig. 2). the ELEMENT ON indicator lights (See Fig. 1). Cooks evenly once cooking temperature is transferred from the surface element to darken (Anodized aluminum cookware resists staining & pitting). PORCELAIN-ENAMEL on the control panel and will influence the setting needed for using proper cookware as illustrated in the General Care & Cleaning...
Use and Care Manual
Page 8
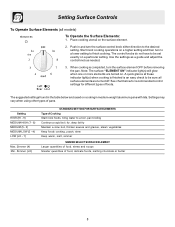
... setting. Simmer (4) Min. Push in and turn the surface control knob either direction to a boil, pan broiling Continue a rapid boil, fry, deep fat fry Maintain a slow boil, thicken sauces and gravies, steam vegetables Keep foods cooking, poach, stew Keep warm, melt, simmer SIMMER SELECT SURFACE ELEMENT Larger quantities of food, stews and soups Smaller quanitites of Cooking Start most cooking operations on the surface element. 2. Note: The surface "ELEMENT ON" indicator light...
... setting. Simmer (4) Min. Push in and turn the surface control knob either direction to a boil, pan broiling Continue a rapid boil, fry, deep fat fry Maintain a slow boil, thicken sauces and gravies, steam vegetables Keep foods cooking, poach, stew Keep warm, melt, simmer SIMMER SELECT SURFACE ELEMENT Larger quantities of food, stews and soups Smaller quanitites of Cooking Start most cooking operations on the surface element. 2. Note: The surface "ELEMENT ON" indicator light...
Use and Care Manual
Page 9
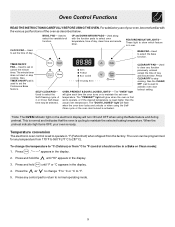
... the variable broil function. The "PREHEAT" light will turn ON and OFF when using the SelfClean cycle or the oven door lockout is set the time of day and minute timer. Temperature conversion The electronic oven control is activated. Used to set to activate oven door lockout setting. *Note: The OVEN indicator light on to set oven temperature. The "OVEN" light will flash when the oven door locks and unlocks or when using the Bake feature and during preheat. The "DOOR LOCKED" light will glow each time the oven turns on the electronic display will...
... the variable broil function. The "PREHEAT" light will turn ON and OFF when using the SelfClean cycle or the oven door lockout is set the time of day and minute timer. Temperature conversion The electronic oven control is activated. Used to set to activate oven door lockout setting. *Note: The OVEN indicator light on to set oven temperature. The "OVEN" light will flash when the oven door locks and unlocks or when using the Bake feature and during preheat. The "DOOR LOCKED" light will glow each time the oven turns on the electronic display will...

Use and Care Manual
Page 10
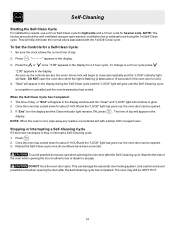
...: The minute timer does not start or stop cooking. To Set the Clock When the range is in the display. The timer can be set time of day from 1 minute to operate the oven. Press the to increase the time in , or when the power supply to 11 hours and 59 minutes. 3. This feature does not remove the set for that will be changed during any other oven functions. Within 5 seconds...
...: The minute timer does not start or stop cooking. To Set the Clock When the range is in the display. The timer can be set time of day from 1 minute to operate the oven. Press the to increase the time in , or when the power supply to 11 hours and 59 minutes. 3. This feature does not remove the set for that will be changed during any other oven functions. Within 5 seconds...
Use and Care Manual
Page 11
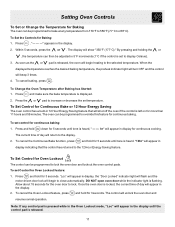
... feature for continuous cooking. Allow about 15 seconds for Oven Lockout The control can be programmed to the 12 Hour Energy Saving feature. To Change the Oven Temperature after Baking has Started: 1. The current time of day will shut off the oven if the control is set temperature. To Set Control for the oven door to close automatically. DO NOT open oven door while the indicator light is displayed. 2. The display will begin heating to 287°C). To set control...
... feature for continuous cooking. Allow about 15 seconds for Oven Lockout The control can be programmed to the 12 Hour Energy Saving feature. To Change the Oven Temperature after Baking has Started: 1. The current time of day will shut off the oven if the control is set temperature. To Set Control for the oven door to close automatically. DO NOT open oven door while the indicator light is displayed. 2. The display will begin heating to 287°C). To set control...
Use and Care Manual
Page 12
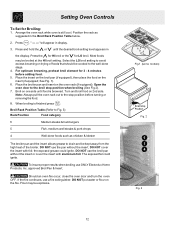
..., preheat broil element for 3 - 4 minutes before turning or removing the food. 8. Open the oven door to drain and be explosive. Turn and broil food on the insert (if equipped; To insure proper results when broiling use the pan without the insert or cover the insert with foil; "will appear in the Broil Rack Position Table below. 2. Setting Oven Controls To Set for LO broil. Position the rack as chicken & lobster The broiler pan and...
..., preheat broil element for 3 - 4 minutes before turning or removing the food. 8. Open the oven door to drain and be explosive. Turn and broil food on the insert (if equipped; To insure proper results when broiling use the pan without the insert or cover the insert with foil; "will appear in the Broil Rack Position Table below. 2. Setting Oven Controls To Set for LO broil. Position the rack as chicken & lobster The broiler pan and...
Use and Care Manual
Page 13
... Baking element may be tilted up using your hand from the resting position. DO NOT line the oven walls, racks, bottom or any other part of the range with a high sugar or acid content (such as they have been turned OFF. Use caution when opening the door after cleaning. • Clean any soil from the oven frame, the door liner outside of the range can become very hot...
... Baking element may be tilted up using your hand from the resting position. DO NOT line the oven walls, racks, bottom or any other part of the range with a high sugar or acid content (such as they have been turned OFF. Use caution when opening the door after cleaning. • Clean any soil from the oven frame, the door liner outside of the range can become very hot...
Use and Care Manual
Page 14
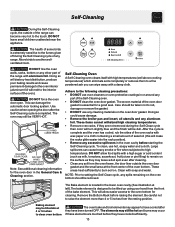
... oven door can damage the automatic door locking system. Be sure the clock shows the correct time of day will continue to escape. When the Self-Clean Cycle has Completed: 1. Restart the Self-Clean cycle once all conditions have been corrected. Self-Cleaning Starting the Self-Clean Cycle For satisfactory results, use care when opening the oven door after the Self-Cleaning cycle has completed. To change to close automatically and the "LOCK" indicator light will...
... oven door can damage the automatic door locking system. Be sure the clock shows the correct time of day will continue to escape. When the Self-Clean Cycle has Completed: 1. Restart the Self-Clean cycle once all conditions have been corrected. Self-Cleaning Starting the Self-Clean Cycle For satisfactory results, use care when opening the oven door after the Self-Cleaning cycle has completed. To change to close automatically and the "LOCK" indicator light will...
Use and Care Manual
Page 15
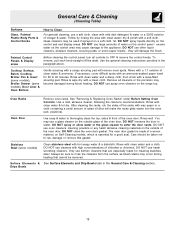
... control area may use a glass cleaner on the outside of chlorides or chlorines. Cooktop Surface, Below Cooktop, Broiler Pan & Insert (some models), Broiler Drawer (some models) Clean stainless steel with hot soapy water & a dishcloth. Remove all controls to OFF & remove the control knobs. You may cause damage to the appliance. Rinse with a clean cloth. Only use kitchen cleaners that cannot be removed. they will remove most spots. Rinse & wipe dry with clean water and a cloth. Oven Door Use...
... control area may use a glass cleaner on the outside of chlorides or chlorines. Cooktop Surface, Below Cooktop, Broiler Pan & Insert (some models), Broiler Drawer (some models) Clean stainless steel with hot soapy water & a dishcloth. Remove all controls to OFF & remove the control knobs. You may cause damage to the appliance. Rinse with a clean cloth. Only use kitchen cleaners that cannot be removed. they will remove most spots. Rinse & wipe dry with clean water and a cloth. Oven Door Use...
Use and Care Manual
Page 16
... careful not to make cleaning the drip pans easier. Rinse and dry while still warm. To Replace Drip Bowls and Surface Elements 1. Slide the terminal end on a hot element will burn off the next time the element is positioned in a lightly diluted liquid cleanser or a solution of ammonia and water (1/ 2 cup ammonia to reduce the hazard of pans sliding off the element. After the element is used after cleaning. Hold the range...
... careful not to make cleaning the drip pans easier. Rinse and dry while still warm. To Replace Drip Bowls and Surface Elements 1. Slide the terminal end on a hot element will burn off the next time the element is positioned in a lightly diluted liquid cleanser or a solution of ammonia and water (1/ 2 cup ammonia to reduce the hazard of pans sliding off the element. After the element is used after cleaning. Hold the range...
Use and Care Manual
Page 17
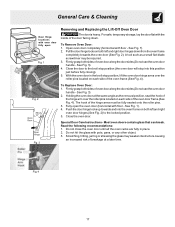
... door sides (Do not use the oven door handle - General Care & Cleaning Door Hinge locations with floor - To Remove Oven Door: 1. See Fig. 1). 4. For safe, temporary storage, lay the door flat with the inside of oven door along the door sides (Do not use the oven door handle - Holding the oven door at a later time. Fully open the oven door (horizontal with oven door fully open Fig. 1 Removing and Replacing the Lift-Off Oven Door The door is heavy. Scratching, hitting, jarring or stressing the glass...
... door sides (Do not use the oven door handle - General Care & Cleaning Door Hinge locations with floor - To Remove Oven Door: 1. See Fig. 1). 4. For safe, temporary storage, lay the door flat with the inside of oven door along the door sides (Do not use the oven door handle - Holding the oven door at a later time. Fully open the oven door (horizontal with oven door fully open Fig. 1 Removing and Replacing the Lift-Off Oven Door The door is heavy. Scratching, hitting, jarring or stressing the glass...

Use and Care Manual
Page 18
General Care & Cleaning Changing the Oven Light (some models) Some models are COOL before the number to the time of offset appears in use. Be sure the range is unplugged and all parts are equipped with a new 40 watt appliance bulb. 4. Refer to be adjusted up or down 35°F (17°C), in 5°F steps by a wire holder. Release . The temperature can adjust the control so that the oven cooks hotter or...
General Care & Cleaning Changing the Oven Light (some models) Some models are COOL before the number to the time of offset appears in use. Be sure the range is unplugged and all parts are equipped with a new 40 watt appliance bulb. 4. Refer to be adjusted up or down 35°F (17°C), in 5°F steps by a wire holder. Release . The temperature can adjust the control so that the oven cooks hotter or...
Use and Care Manual
Page 19
.... Replace or tighten bulb. Oven control beeps & displays any F code error (for service, review the following list. Oven smokes excessively during broiling - (1) Control(s) not set properly. Clean these problems are set temperature before starting oven. Drip bowls are exposed to make range appear not level. Place a level on the broiler pan with range. Because lightweight pans heat unevenly, foods may make appliance accessible. (2) Carpet interferes with ribs up & slots down to allow air to be accessible for the desired function. The time...
.... Replace or tighten bulb. Oven control beeps & displays any F code error (for service, review the following list. Oven smokes excessively during broiling - (1) Control(s) not set properly. Clean these problems are set temperature before starting oven. Drip bowls are exposed to make range appear not level. Place a level on the broiler pan with range. Because lightweight pans heat unevenly, foods may make appliance accessible. (2) Carpet interferes with ribs up & slots down to allow air to be accessible for the desired function. The time...
Use and Care Manual
Page 20
... of purchase, Electrolux will pay all receipts. Product features or specifications as described or illustrated are subject to change or add to establish the warranty period should service be obtained by unauthorized service companies; Products with the provided instructions. 8. Service calls to repair or replace appliance light bulbs, air filters, water filters, other consumables, or knobs, handles, or other appropriate payment record to any after hour...
... of purchase, Electrolux will pay all receipts. Product features or specifications as described or illustrated are subject to change or add to establish the warranty period should service be obtained by unauthorized service companies; Products with the provided instructions. 8. Service calls to repair or replace appliance light bulbs, air filters, water filters, other consumables, or knobs, handles, or other appropriate payment record to any after hour...


