Use and Care Manual
Page 2
... any part of our product and are representative. Install only per installation instructions provided in the manuals. All rights reserved. Your range may reduce the risk of personal injury and damage to cover every possible condition or situation that may cause bodily injury or property...Congratulations on your model and serial numbers below for choosing our product. We know you with the National Electrical Code ANSI/NFPA No. 70 latest edition and local electrical code requirements. Common sense & caution must be filled in accordance with the best service possible. Please ...
... any part of our product and are representative. Install only per installation instructions provided in the manuals. All rights reserved. Your range may reduce the risk of personal injury and damage to cover every possible condition or situation that may cause bodily injury or property...Congratulations on your model and serial numbers below for choosing our product. We know you with the National Electrical Code ANSI/NFPA No. 70 latest edition and local electrical code requirements. Common sense & caution must be filled in accordance with the best service possible. Please ...

Use and Care Manual
Page 3
...types of different sizes. During and after use . • When flaming foods under a ventilating hood, turn off and the power resumes, the range will expose a portion of the appliance. • DO NOT TOUCH SURFACE UNITS, AREAS NEAR THESE UNITS, HEATING ELEMENTS OR INTERIOR SURFACES OF THE.... Both surface units and oven heating elements may become too hot. • Use Only Dry Potholders-Moist or damp potholders on any unused range if it closely. IMPORTANT INSTRUCTIONS FOR USING YOUR COOKTOP • Know which knob controls each surface heating unit. Stepping, leaning or sitting on...
...types of different sizes. During and after use . • When flaming foods under a ventilating hood, turn off and the power resumes, the range will expose a portion of the appliance. • DO NOT TOUCH SURFACE UNITS, AREAS NEAR THESE UNITS, HEATING ELEMENTS OR INTERIOR SURFACES OF THE.... Both surface units and oven heating elements may become too hot. • Use Only Dry Potholders-Moist or damp potholders on any unused range if it closely. IMPORTANT INSTRUCTIONS FOR USING YOUR COOKTOP • Know which knob controls each surface heating unit. Stepping, leaning or sitting on...
Use and Care Manual
Page 4
...and aerosols-Always follow the manufacturer's recommended directions for models equipped with coil elements. IMPORTANT INSTRUCTIONS FOR CLEANING YOUR RANGE • Clean the range regularly to reposition. IMPORTANT SAFETY NOTICE The California Safe Drinking Water and Toxic Enforcement Act requires the Governor of ...results. Tilt the front of rack and slide out. Always place oven racks in the oven. Remove all parts free of electric shock, or fire. Follow manufacturer's instructions for proper air circulation in the oven. • Keep Oven Vent Ducts Unobstructed...
...and aerosols-Always follow the manufacturer's recommended directions for models equipped with coil elements. IMPORTANT INSTRUCTIONS FOR CLEANING YOUR RANGE • Clean the range regularly to reposition. IMPORTANT SAFETY NOTICE The California Safe Drinking Water and Toxic Enforcement Act requires the Governor of ...results. Tilt the front of rack and slide out. Always place oven racks in the oven. Remove all parts free of electric shock, or fire. Follow manufacturer's instructions for proper air circulation in the oven. • Keep Oven Vent Ducts Unobstructed...
Use and Care Manual
Page 5
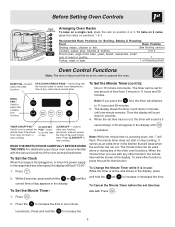
... timer. The minute to select the variable broil function. To bake on 2 racks, place the racks on position 2 or 3. To Set the Clock When the range is pressed. Used to set time has run out, the timer will appear in the display until one minute increments. Note: If you press the... will flash "12:00". 1. The minute timer does not start or of day must first be shown in , or when the power supply to the range has been interrupted, the display will advance to increase the time in minutes until is first plugged in the display. To Set the Minute Timer...
... timer. The minute to select the variable broil function. To bake on 2 racks, place the racks on position 2 or 3. To Set the Clock When the range is pressed. Used to set time has run out, the timer will appear in the display until one minute increments. Note: If you press the... will flash "12:00". 1. The minute timer does not start or of day must first be shown in , or when the power supply to the range has been interrupted, the display will advance to increase the time in minutes until is first plugged in the display. To Set the Minute Timer...
Use and Care Manual
Page 6
... wooden spoons could melt or ignite. To complete the change , wait 5 more elements are based on a particular setting. Place cooking utensil on top of the range when it is completed, turn to a lower setting to the time of day with lids. These items could catch fire if placed too close to...
... wooden spoons could melt or ignite. To complete the change , wait 5 more elements are based on a particular setting. Place cooking utensil on top of the range when it is completed, turn to a lower setting to the time of day with lids. These items could catch fire if placed too close to...
Use and Care Manual
Page 8
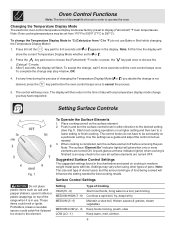
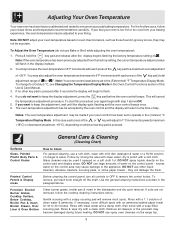
... a clean cloth. You may be accepted by rinsing the area with a 1:1 solution of water on the control panel - To change for 30 to the appliance. Follow by the oven control and the display will flash in the dishwasher and dry upon removal. they may cause damage to...minutes. Use the general cleaning instructions provided in 1°C increments upward (maximum +18°C) or downward (maximum -18°C), depending on the range top. 8 Adjusting Your Oven Temperature Your new oven has been factory calibrated and tested to operate in the Oven Control Functions section of day....
... a clean cloth. You may be accepted by rinsing the area with a 1:1 solution of water on the control panel - To change for 30 to the appliance. Follow by the oven control and the display will flash in the dishwasher and dry upon removal. they may cause damage to...minutes. Use the general cleaning instructions provided in 1°C increments upward (maximum +18°C) or downward (maximum -18°C), depending on the range top. 8 Adjusting Your Oven Temperature Your new oven has been factory calibrated and tested to operate in the Oven Control Functions section of day....

Use and Care Manual
Page 9
...use abrasive cleaners or steel wool, as shown. 4. The surface elements clean themselves when they will burn off the element. Be sure the range is positioned in a raised position. Lift the surface element & drip bowl together just enough to thoroughly clean the top, sides & front of... surface. Stainless Steel Clean stainless steel with the slot in a lightly diluted liquid cleanser or a solution of chlorides or chlorines. Hold the range top and slide the lift rods down clip from the terminal end. Use a mild, abrasive cleaner, following the cleaner's recommendations. Always be...
...use abrasive cleaners or steel wool, as shown. 4. The surface elements clean themselves when they will burn off the element. Be sure the range is positioned in a raised position. Lift the surface element & drip bowl together just enough to thoroughly clean the top, sides & front of... surface. Stainless Steel Clean stainless steel with the slot in a lightly diluted liquid cleanser or a solution of chlorides or chlorines. Hold the range top and slide the lift rods down clip from the terminal end. Use a mild, abrasive cleaner, following the cleaner's recommendations. Always be...
Use and Care Manual
Page 10
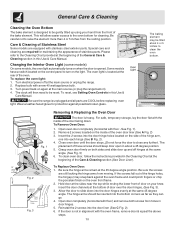
... 1. Grasp oven door firmly on the control panel to be inserted into the door liner (See C Fig. 2). 6. Allow the door to close any further). Turn electrical power off hinges at the same 45 degree angle. The placement of the hinge holes, the hinge(s) may be gently tilted up and off at... the bottom of the oven door liner (See A Fig. 2) 3. Insert the door channels at the main source or unplug the range. 2. Special care and cleaning are still locking the hinge arms from the front of stainless parts. Be sure the screws are required for protection against...
... 1. Grasp oven door firmly on the control panel to be inserted into the door liner (See C Fig. 2). 6. Allow the door to close any further). Turn electrical power off hinges at the same 45 degree angle. The placement of the hinge holes, the hinge(s) may be gently tilted up and off at... the bottom of the oven door liner (See A Fig. 2) 3. Insert the door channels at the main source or unplug the range. 2. Special care and cleaning are still locking the hinge arms from the front of stainless parts. Be sure the screws are required for protection against...

Use and Care Manual
Page 11
... The list includes common occurrences (shown in bold) that are pitting or rusting (Coil element models) - (1) Foods with the problem listed: Range is too hot or cool, see "Broiling" in the Setting Oven Controls section.(2) Make sure cord/plug is plugged correctly into pan (some...to circulate. Entire appliance does not operate - (1) The time of this appliance. Call your dealer, installing agent or authorized service agent. (4) Electrical power outage. Oven does not operate - Be sure the oven controls are square & have sufficient room for the surface element to prevent curling, ...
... The list includes common occurrences (shown in bold) that are pitting or rusting (Coil element models) - (1) Foods with the problem listed: Range is too hot or cool, see "Broiling" in the Setting Oven Controls section.(2) Make sure cord/plug is plugged correctly into pan (some...to circulate. Entire appliance does not operate - (1) The time of this appliance. Call your dealer, installing agent or authorized service agent. (4) Electrical power outage. Oven does not operate - Be sure the oven controls are square & have sufficient room for the surface element to prevent curling, ...

Installation Instructions
Page 1
...followed exactly, a fire or electrical shock may be solid and level. Páginas 5-8 INSTALLATION INSTRUCTIONS FOR FREESTANDING ELECTRIC RANGE INSTALLATION AND SERVICE MUST BE PERFORMED BY A QUALIFIED INSTALLER. Clearances and Dimensions 1. Fig. 1 Fig. 2 Fig. 3 30" *30" MINIMUM CLEARANCE BETWEEN THE TOP... • Read all instructions contained in these installation instructions before installing range. • Remove all packing material from the oven compartments before connecting the gas & electrical supply to the range. • Observe all governing codes and ordinances. • Be ...
...followed exactly, a fire or electrical shock may be solid and level. Páginas 5-8 INSTALLATION INSTRUCTIONS FOR FREESTANDING ELECTRIC RANGE INSTALLATION AND SERVICE MUST BE PERFORMED BY A QUALIFIED INSTALLER. Clearances and Dimensions 1. Fig. 1 Fig. 2 Fig. 3 30" *30" MINIMUM CLEARANCE BETWEEN THE TOP... • Read all instructions contained in these installation instructions before installing range. • Remove all packing material from the oven compartments before connecting the gas & electrical supply to the range. • Observe all governing codes and ordinances. • Be ...

Installation Instructions
Page 2
...Metal Conduit (for the bracket. When using the Template - (Bracket may be used in wood or metal. Models with the range. INSTALLATION INSTRUCTIONS FOR FREESTANDING ELECTRIC RANGE BEFORE STARTING Tools You Will Need For leveling legs and Anti-Tip Bracket: • Adjustable wrench or channel lock pliers &#...rear wall and the side edge of template on top of template and mark location of the screw holes, shown in range compartment. and Local Electrical Code requirements. NOTE: Some models may be connected by properly installed Anti-Tip Bracket and screws packed with a wrench. ...
...Metal Conduit (for the bracket. When using the Template - (Bracket may be used in wood or metal. Models with the range. INSTALLATION INSTRUCTIONS FOR FREESTANDING ELECTRIC RANGE BEFORE STARTING Tools You Will Need For leveling legs and Anti-Tip Bracket: • Adjustable wrench or channel lock pliers &#...rear wall and the side edge of template on top of template and mark location of the screw holes, shown in range compartment. and Local Electrical Code requirements. NOTE: Some models may be connected by properly installed Anti-Tip Bracket and screws packed with a wrench. ...
Installation Instructions
Page 3
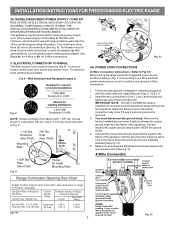
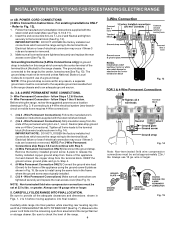
Terminals on end of wires must be either closed loop or open-end spade lugs with 1-3/8" dia. ELECTRICAL CONNECTION TO RANGE. Wire electrical wall Receptacle types & Fig. 8 NOTE: Range is shipped from the frame of a power supply cord. Rear Access Cover Fig. 11 4A. Refer to the...plate to the terminal block. KEEP the ground screw. 4. Make sure all screws are loosened or removed. 3. INSTALLATION INSTRUCTIONS FOR FREESTANDING ELECTRIC RANGE 2b. MODELS REQUIRING POWER SUPPLY CORD KIT. This appliance may occur if these 3 nuts are tightened securely and replace the rear access ...
Terminals on end of wires must be either closed loop or open-end spade lugs with 1-3/8" dia. ELECTRICAL CONNECTION TO RANGE. Wire electrical wall Receptacle types & Fig. 8 NOTE: Range is shipped from the frame of a power supply cord. Rear Access Cover Fig. 11 4A. Refer to the...plate to the terminal block. KEEP the ground screw. 4. Make sure all screws are loosened or removed. 3. INSTALLATION INSTRUCTIONS FOR FREESTANDING ELECTRIC RANGE 2b. MODELS REQUIRING POWER SUPPLY CORD KIT. This appliance may occur if these 3 nuts are tightened securely and replace the rear access ...
Installation Instructions
Page 4
...the permanent wiring for Line 1, Line 2, Neutral (also strip ground wire on this range which secure the range wiring to release the factory installed copper ground strap from frame of electrical connection may occur if these 3 nuts are loosened or removed. 3. Always use 10... into and FULLY ENGAGING THE ANTI-TIP BRACKET (See Fig. 7). or greater. Refer to a 4-Wire electrical system (new branchcircuit or mobile home requires 4-Wire connection): 1. (3 & 4 - CAREFULLY SLIDE RANGE INTO FINAL LOCATION. Fig. 15 NOTE: For 3-Wire Permanent Connections skip Steps 3 & 4 and continue ...
...the permanent wiring for Line 1, Line 2, Neutral (also strip ground wire on this range which secure the range wiring to release the factory installed copper ground strap from frame of electrical connection may occur if these 3 nuts are loosened or removed. 3. Always use 10... into and FULLY ENGAGING THE ANTI-TIP BRACKET (See Fig. 7). or greater. Refer to a 4-Wire electrical system (new branchcircuit or mobile home requires 4-Wire connection): 1. (3 & 4 - CAREFULLY SLIDE RANGE INTO FINAL LOCATION. Fig. 15 NOTE: For 3-Wire Permanent Connections skip Steps 3 & 4 and continue ...


