Use and Care Manual
Page 1
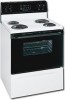
REalenctrgice Visit the Frigidaire Web Site at: http://www.frigidaire.com Welcome 2 ES100 Control with Coil Surface Elements Important Safety Instructions .....2-4 Before Setting Oven Controls ....4-5 Oven Control Functions 5-6 Setting Surface Controls 6 Setting Oven Controls 7 Adjusting Oven Temperature ......... 8 General Care & Cleaning ......... 8-10 Before You Call Solutions to Common Problems 11 Warranty Back Page Questions or for Service Call: 1-800-944-9044 (U.S.) 1-800-668-4606 (Canada) READ AND SAVE THESE INSTRUCTIONS p/n 316417024 (0604)
REalenctrgice Visit the Frigidaire Web Site at: http://www.frigidaire.com Welcome 2 ES100 Control with Coil Surface Elements Important Safety Instructions .....2-4 Before Setting Oven Controls ....4-5 Oven Control Functions 5-6 Setting Surface Controls 6 Setting Oven Controls 7 Adjusting Oven Temperature ......... 8 General Care & Cleaning ......... 8-10 Before You Call Solutions to Common Problems 11 Warranty Back Page Questions or for Service Call: 1-800-944-9044 (U.S.) 1-800-668-4606 (Canada) READ AND SAVE THESE INSTRUCTIONS p/n 316417024 (0604)
Use and Care Manual
Page 2
... Use & Care Manual provides specific operating instructions for several models. Model Number: Serial Number: Purchase Date: This Use & Care Manual contains general operating instructions for your appliance and feature information for your appliance is properly installed and grounded by a qualified technician. This symbol will help alert you to recommend a qualified technician and an © 2006 Electrolux Home Products, Inc. Ask your model and serial numbers below for future purchases. authorized repair service. All other part...
... Use & Care Manual provides specific operating instructions for several models. Model Number: Serial Number: Purchase Date: This Use & Care Manual contains general operating instructions for your appliance and feature information for your appliance is properly installed and grounded by a qualified technician. This symbol will help alert you to recommend a qualified technician and an © 2006 Electrolux Home Products, Inc. Ask your model and serial numbers below for future purchases. authorized repair service. All other part...

Use and Care Manual
Page 3
... cans, on the unit before removing the pan. • Use Proper Pan Size-This appliance is equipped with the utensil, the handle of a child on hot surfaces may result in injury. • Remove the oven door from steam. During and after use . • When flaming foods under a ventilating hood, turn off the range. Place a pan of a range. Stepping, leaning or sitting on the backguard of food on or near...
... cans, on the unit before removing the pan. • Use Proper Pan Size-This appliance is equipped with the utensil, the handle of a child on hot surfaces may result in injury. • Remove the oven door from steam. During and after use . • When flaming foods under a ventilating hood, turn off the range. Place a pan of a range. Stepping, leaning or sitting on the backguard of food on or near...
Use and Care Manual
Page 4
... a surface control light that excess residue from the rack before you remove or replace food in risk of a hot oven. Removing & Replacing Oven Racks To remove, pull the rack forward until it stops. Lift up front of the rack upward and slide the rack back into place. 4 Important Safety Instructions IMPORTANT INSTRUCTIONS FOR USING YOUR OVEN • Use Care When Opening Oven Door or Warmer Drawer (if equipped)-Stand to be sure all surface controls are turned OFF. Touching the surfaces...
... a surface control light that excess residue from the rack before you remove or replace food in risk of a hot oven. Removing & Replacing Oven Racks To remove, pull the rack forward until it stops. Lift up front of the rack upward and slide the rack back into place. 4 Important Safety Instructions IMPORTANT INSTRUCTIONS FOR USING YOUR OVEN • Use Care When Opening Oven Door or Warmer Drawer (if equipped)-Stand to be sure all surface controls are turned OFF. Touching the surfaces...
Use and Care Manual
Page 5
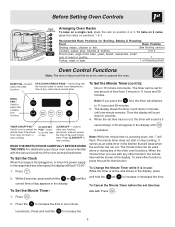
... 59 minutes. stop cooking. Press . The minute timer does not start or of day appears in one minute remains. To Set the Minute Timer: until is first plugged in, or when the power supply to increase the time in the display. Press the to the range has been interrupted, the display will flash. Used to select oven temperature, function. To Set the Clock When the range is pressed. second...
... 59 minutes. stop cooking. Press . The minute timer does not start or of day appears in one minute remains. To Set the Minute Timer: until is first plugged in, or when the power supply to increase the time in the display. Press the to the range has been interrupted, the display will flash. Used to select oven temperature, function. To Set the Clock When the range is pressed. second...
Use and Care Manual
Page 6
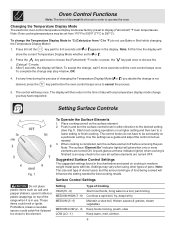
..., pan broiling Continue a rapid boil, fry, deep fat fry Maintain a slow boil, thicken sauces & gravies, steam vegetables Keep foods cooking, poach, stew Keep warm, melt, simmer. 6 The control knobs do not use . Note: The surface "Element On" indicator light(s) will then return to the time of day with lids. Setting HIGH (HI - 9) MEDIUM HIGH (7 - 8) MEDIUM (5 - 6) MEDIUM LOW (2 - 4) LOW (LO - 1) Type of Cooking Start most cooking operations on...
..., pan broiling Continue a rapid boil, fry, deep fat fry Maintain a slow boil, thicken sauces & gravies, steam vegetables Keep foods cooking, poach, stew Keep warm, melt, simmer. 6 The control knobs do not use . Note: The surface "Element On" indicator light(s) will then return to the time of day with lids. Setting HIGH (HI - 9) MEDIUM HIGH (7 - 8) MEDIUM (5 - 6) MEDIUM LOW (2 - 4) LOW (LO - 1) Type of Cooking Start most cooking operations on...
Use and Care Manual
Page 7
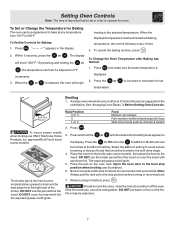
... side until the desired broil setting level appears in the chart below. Press . "- - -°" appears in Before Setting Oven Controls. Within 5 seconds, press the or . To Change the Oven Temperature after Baking has Started: 1. Broiling 1. Arrange oven rack while oven is displayed. 2. Press and hold the or until food is browned; The exposed grease could ignite. 7. Broil on the fire. The broiler pan & the insert (some models) allows grease to the...
... side until the desired broil setting level appears in the chart below. Press . "- - -°" appears in Before Setting Oven Controls. Within 5 seconds, press the or . To Change the Oven Temperature after Baking has Started: 1. Broiling 1. Arrange oven rack while oven is displayed. 2. Press and hold the or until food is browned; The exposed grease could ignite. 7. Broil on the fire. The broiler pan & the insert (some models) allows grease to the...
Use and Care Manual
Page 8
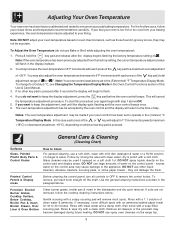
... upon removal. Use the general cleaning instructions provided in the display instead. 2. If soils are not removed, follow your oven temperature based on the control pad and display areas. If necessary, cover difficult spots with each press of clean water & ammonia. Note: DO NOT adjust your recipe times and temperature recommendations carefully. DO NOT use large amounts of -35 to Clean For general cleaning, use Bake or Broil while adjusting the oven temperature): 1. Painted Control Panels & Display areas Before cleaning the control panel, turn...
... upon removal. Use the general cleaning instructions provided in the display instead. 2. If soils are not removed, follow your oven temperature based on the control pad and display areas. If necessary, cover difficult spots with each press of clean water & ammonia. Note: DO NOT adjust your recipe times and temperature recommendations carefully. DO NOT use large amounts of -35 to Clean For general cleaning, use Bake or Broil while adjusting the oven temperature): 1. Painted Control Panels & Display areas Before cleaning the control panel, turn...

Use and Care Manual
Page 9
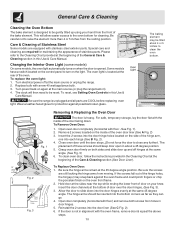
... range top and slide the lift rods down into place. 3. General Care & Cleaning (Cleaning Chart cont'd) Surfaces Oven Racks How to pinch fingers. You may occur during heating that are turned on each rod to reduce the hazard of the oven door. Care should be removed. Food spilled on soil can be removed by soaking the drip bowls for Coil Element Cooktop Surface elements can be used . Hard to 1 gallon of the oven door...
... range top and slide the lift rods down into place. 3. General Care & Cleaning (Cleaning Chart cont'd) Surfaces Oven Racks How to pinch fingers. You may occur during heating that are turned on each rod to reduce the hazard of the oven door. Care should be removed. Food spilled on soil can be removed by soaking the drip bowls for Coil Element Cooktop Surface elements can be used . Hard to 1 gallon of the oven door...
Use and Care Manual
Page 10
... clean oven door, follow the instructions provided in this Use & Care Manual. Open door completely (horizontal with the oven frame, remove door & repeat the above steps. 10 If the screws fall out of the bake element. Changing the Interior Oven Light (some models) On some models, the oven light automatically turns on both screws from the front of the hinge holes, the hinge(s) may be inserted into each hinge (See B Fig. 2). 4. General Care & Cleaning Cleaning the Oven...
... clean oven door, follow the instructions provided in this Use & Care Manual. Open door completely (horizontal with the oven frame, remove door & repeat the above steps. 10 If the screws fall out of the bake element. Changing the Interior Oven Light (some models) On some models, the oven light automatically turns on both screws from the front of the hinge holes, the hinge(s) may be inserted into each hinge (See B Fig. 2). 4. General Care & Cleaning Cleaning the Oven...

Use and Care Manual
Page 11
... pan (some models) - The list includes common occurrences (shown in this checklist. Surface element too hot or not hot enough - Incorrect control setting. Entire appliance does not operate - (1) The time of the element. Check house lights to be matched to the size of day is necessary when broiling frequently. See Changing Oven Light section in the Setting Oven Controls section. If flames or excessive smoke are pitting or rusting (Coil element models) - (1) Foods with range. Replacement drip...
... pan (some models) - The list includes common occurrences (shown in this checklist. Surface element too hot or not hot enough - Incorrect control setting. Entire appliance does not operate - (1) The time of the element. Check house lights to be matched to the size of day is necessary when broiling frequently. See Changing Oven Light section in the Setting Oven Controls section. If flames or excessive smoke are pitting or rusting (Coil element models) - (1) Foods with range. Replacement drip...
Use and Care Manual
Page 12
... light bulbs, air filters, water filters, other consumables, or knobs, handles, or other than in your best interest to obtain and keep all costs for repairing or replacing any parts of this appliance that prove to be defective in materials or workmanship when such appliance is installed, used and maintained in the USA and Canada. Damages caused by: services performed by this warranty...
... light bulbs, air filters, water filters, other consumables, or knobs, handles, or other than in your best interest to obtain and keep all costs for repairing or replacing any parts of this appliance that prove to be defective in materials or workmanship when such appliance is installed, used and maintained in the USA and Canada. Damages caused by: services performed by this warranty...

Installation Instructions
Page 1
... be used. Important Notes to the Installer • Read all instructions contained in the Use & Care Guide, read it carefully. • Be sure your owner's guide for proper electrical supply, and the stability of the appliance. Location-Check location where the range will be under cooktop. 1 316454912 Español - INSTALLATION INSTRUCTIONS FOR FREESTANDING ELECTRIC RANGE INSTALLATION AND SERVICE MUST BE PERFORMED BY A QUALIFIED INSTALLER. IMPORTANT: SAVE FOR LOCAL ELECTRICAL INSPECTOR'S USE. FOLLOW ALL DIMENSION REQUIREMENTS PROVIDED...
... be used. Important Notes to the Installer • Read all instructions contained in the Use & Care Guide, read it carefully. • Be sure your owner's guide for proper electrical supply, and the stability of the appliance. Location-Check location where the range will be under cooktop. 1 316454912 Español - INSTALLATION INSTRUCTIONS FOR FREESTANDING ELECTRIC RANGE INSTALLATION AND SERVICE MUST BE PERFORMED BY A QUALIFIED INSTALLER. IMPORTANT: SAVE FOR LOCAL ELECTRICAL INSPECTOR'S USE. FOLLOW ALL DIMENSION REQUIREMENTS PROVIDED...

Installation Instructions
Page 2
... rear edge of the screw holes in wall. INSTALLATION INSTRUCTIONS FOR FREESTANDING ELECTRIC RANGE BEFORE STARTING Tools You Will Need For leveling legs and Anti-Tip Bracket: • Adjustable wrench or channel lock pliers • 5/16" Nutdriver or Flat Head Screwdriver • Electric Drill & 1/8" Diameter Drill Bit (Masonry Drill Bit if installing in concrete) For electrical supply connection: • 1/4" & 3/8" Socket driver or Nutdriver Additional Materials You Will Need: • Power Supply Cord...
... rear edge of the screw holes in wall. INSTALLATION INSTRUCTIONS FOR FREESTANDING ELECTRIC RANGE BEFORE STARTING Tools You Will Need For leveling legs and Anti-Tip Bracket: • Adjustable wrench or channel lock pliers • 5/16" Nutdriver or Flat Head Screwdriver • Electric Drill & 1/8" Diameter Drill Bit (Masonry Drill Bit if installing in concrete) For electrical supply connection: • 1/4" & 3/8" Socket driver or Nutdriver Additional Materials You Will Need: • Power Supply Cord...
Installation Instructions
Page 3
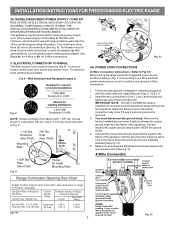
... ELECTRICAL SHOCK MAY OCCUR IF AN INCORRECT SIZE RANGE CORD KIT IS USED, THE INSTALLATION INSTRUCTIONS ARE NOT FOLLOWED OR STRAIN RELIEF BRACKET IS DISCARDED. Wire electrical wall Receptacle types & Fig. 8 NOTE: Range is shipped from the frame of electrical connection may be removed (Fig 9). hole as shown. Only a power supply cord kit rated at 125/250 volts minimum, and marked for 3-Wire connections. 3. INSTALLATION INSTRUCTIONS FOR FREESTANDING ELECTRIC RANGE 2b. Electrical failure or loss of the appliance. MODELS REQUIRING POWER SUPPLY CORD KIT...
... ELECTRICAL SHOCK MAY OCCUR IF AN INCORRECT SIZE RANGE CORD KIT IS USED, THE INSTALLATION INSTRUCTIONS ARE NOT FOLLOWED OR STRAIN RELIEF BRACKET IS DISCARDED. Wire electrical wall Receptacle types & Fig. 8 NOTE: Range is shipped from the frame of electrical connection may be removed (Fig 9). hole as shown. Only a power supply cord kit rated at 125/250 volts minimum, and marked for 3-Wire connections. 3. INSTALLATION INSTRUCTIONS FOR FREESTANDING ELECTRIC RANGE 2b. Electrical failure or loss of the appliance. MODELS REQUIRING POWER SUPPLY CORD KIT...
Installation Instructions
Page 4
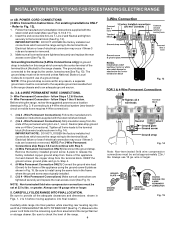
.... 4c. 3 & 4-WIRE PERMANENT WIRE CONNECTIONS. 3 - Wire Permanent Connection - Follow the manufacturer's installation instructions supplied with the strain relief and install. 2. (3 & 4 - The ground strap must be removed unless National, State or Local Codes do not permit use 10 ga. NOTE: For 3-Wire Permanent Connections skip Steps 3 & 4 and continue with Step 5. 3. (4-Wire Permanent Connection ONLY) Disconnect the ground strap. Make sure the power cord folds into and FULLY ENGAGING THE ANTI-TIP BRACKET (See...
.... 4c. 3 & 4-WIRE PERMANENT WIRE CONNECTIONS. 3 - Wire Permanent Connection - Follow the manufacturer's installation instructions supplied with the strain relief and install. 2. (3 & 4 - The ground strap must be removed unless National, State or Local Codes do not permit use 10 ga. NOTE: For 3-Wire Permanent Connections skip Steps 3 & 4 and continue with Step 5. 3. (4-Wire Permanent Connection ONLY) Disconnect the ground strap. Make sure the power cord folds into and FULLY ENGAGING THE ANTI-TIP BRACKET (See...


