
Installation Instructions
Page 1
...Fig. 3 30" *30" MINIMUM CLEARANCE BETWEEN THE TOP OF THE COOKING SURFACE AND THE BOTTOM OF AN UNPROTECTED WOOD OR METAL CABINET; Alternate location may result causing property damage, personal injury or death. INSTALLATION INSTRUCTIONS FOR FREESTANDING ELECTRIC RANGE INSTALLATION AND SERVICE... MUST BE PERFORMED BY A QUALIFIED INSTALLER. Provide adequate clearances between the range and adjacent combustible surfaces. 2. Páginas 5-8 Given dimensions ...
...Fig. 3 30" *30" MINIMUM CLEARANCE BETWEEN THE TOP OF THE COOKING SURFACE AND THE BOTTOM OF AN UNPROTECTED WOOD OR METAL CABINET; Alternate location may result causing property damage, personal injury or death. INSTALLATION INSTRUCTIONS FOR FREESTANDING ELECTRIC RANGE INSTALLATION AND SERVICE... MUST BE PERFORMED BY A QUALIFIED INSTALLER. Provide adequate clearances between the range and adjacent combustible surfaces. 2. Páginas 5-8 Given dimensions ...

Installation Instructions
Page 2
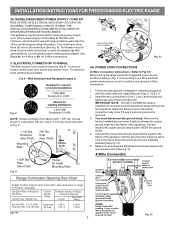
... branch circuit installations (1996NEC) or areas where Local Codes do not leave excess wire in Step 4c. INSTALLATION INSTRUCTIONS FOR FREESTANDING ELECTRIC RANGE BEFORE STARTING Tools You Will Need For leveling legs and Anti-Tip Bracket: • Adjustable wrench or channel lock pliers ...Nutdriver Additional Materials You Will Need: • Power Supply Cord or • Copper Electrical Wiring & Metal Conduit (for cord kit ampere rating information. Level and Position Range - and Local Electrical Code requirements. Mark the location of the screw holes in wall. Terminals on either ...
... branch circuit installations (1996NEC) or areas where Local Codes do not leave excess wire in Step 4c. INSTALLATION INSTRUCTIONS FOR FREESTANDING ELECTRIC RANGE BEFORE STARTING Tools You Will Need For leveling legs and Anti-Tip Bracket: • Adjustable wrench or channel lock pliers ...Nutdriver Additional Materials You Will Need: • Power Supply Cord or • Copper Electrical Wiring & Metal Conduit (for cord kit ampere rating information. Level and Position Range - and Local Electrical Code requirements. Mark the location of the screw holes in wall. Terminals on either ...
Installation Instructions
Page 3
.... 9, 10 & 11). 2. The Rear Access Cover must be connected by means of a power supply cord. Wire electrical wall Receptacle types & Fig. 8 NOTE: Range is shipped from the frame of the appliance with the ground screw using the same hole in Fig. 3. To use ...). 5. RISK OF FIRE OR ELECTRICAL SHOCK MAY OCCUR IF AN INCORRECT SIZE RANGE CORD KIT IS USED, THE INSTALLATION INSTRUCTIONS ARE NOT FOLLOWED OR STRAIN RELIEF BRACKET IS DISCARDED. The terminal block will then be either 7/8" dia. INSTALLATION INSTRUCTIONS FOR FREESTANDING ELECTRIC RANGE 2b. KEEP the ground screw....
.... 9, 10 & 11). 2. The Rear Access Cover must be connected by means of a power supply cord. Wire electrical wall Receptacle types & Fig. 8 NOTE: Range is shipped from the frame of the appliance with the ground screw using the same hole in Fig. 3. To use ...). 5. RISK OF FIRE OR ELECTRICAL SHOCK MAY OCCUR IF AN INCORRECT SIZE RANGE CORD KIT IS USED, THE INSTALLATION INSTRUCTIONS ARE NOT FOLLOWED OR STRAIN RELIEF BRACKET IS DISCARDED. The terminal block will then be either 7/8" dia. INSTALLATION INSTRUCTIONS FOR FREESTANDING ELECTRIC RANGE 2b. KEEP the ground screw....
Installation Instructions
Page 4
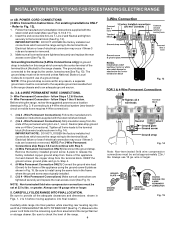
... sure to an adequate ground source. 4c. 3 & 4-WIRE PERMANENT WIRE CONNECTIONS. 3 - Carefully slide range into final position while inserting rear leveling leg into the remaining open floor area behind the range Warmer or storage drawer. INSTALLATION INSTRUCTIONS FOR FREESTANDING ELECTRIC RANGE or 4B. Wire Permanent Connection - follow Steps 1,2 & 5 below . IMPORTANT NOTE: DO NOT LOOSEN the...
... sure to an adequate ground source. 4c. 3 & 4-WIRE PERMANENT WIRE CONNECTIONS. 3 - Carefully slide range into final position while inserting rear leveling leg into the remaining open floor area behind the range Warmer or storage drawer. INSTALLATION INSTRUCTIONS FOR FREESTANDING ELECTRIC RANGE or 4B. Wire Permanent Connection - follow Steps 1,2 & 5 below . IMPORTANT NOTE: DO NOT LOOSEN the...


