Use and Care Manual
Page 2
...Model Number: Serial Number: Purchase Date: This Use & Care Manual contains general operating instructions for your appliance only as instructed in the literature package for this range. Product Registration Be sure to Electrolux Home Products. The self-addressed PRODUCT REGISTRATION CARD should be practiced ...appliance. Your satisfaction is located behind the broil or storage drawer on the lower right side of the product. 2 We know you'll enjoy your product. The graphics shown are very proud of a new range! This symbol will help alert you with the National Electrical...
...Model Number: Serial Number: Purchase Date: This Use & Care Manual contains general operating instructions for your appliance only as instructed in the literature package for this range. Product Registration Be sure to Electrolux Home Products. The self-addressed PRODUCT REGISTRATION CARD should be practiced ...appliance. Your satisfaction is located behind the broil or storage drawer on the lower right side of the product. 2 We know you'll enjoy your product. The graphics shown are very proud of a new range! This symbol will help alert you with the National Electrical...

Use and Care Manual
Page 3
... knob controls each surface heating unit. Select utensils having flat bottoms large enough to climb or play around the range. Stepping, leaning or sitting on the doors or drawers of the appliance. • DO NOT TOUCH SURFACE UNITS, AREAS NEAR THESE UNITS, HEATING ELEMENTS OR INTERIOR SURFACES OF THE OVEN...cans, on an open door may be allowed to sit or stand on any unused range if it closely. Both surface units and oven heating elements may cause the range to cause burns. Never Use Your Appliance for cook top use a towel or other glazed utensils are the cook top, ...
... knob controls each surface heating unit. Select utensils having flat bottoms large enough to climb or play around the range. Stepping, leaning or sitting on the doors or drawers of the appliance. • DO NOT TOUCH SURFACE UNITS, AREAS NEAR THESE UNITS, HEATING ELEMENTS OR INTERIOR SURFACES OF THE OVEN...cans, on an open door may be allowed to sit or stand on any unused range if it closely. Both surface units and oven heating elements may cause the range to cause burns. Never Use Your Appliance for cook top use a towel or other glazed utensils are the cook top, ...
Use and Care Manual
Page 8
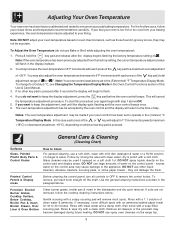
...soils are not removed, follow your oven is pressed. Rinse with a soft cloth. To change for 30 to keep the adjustment, wait until the display quits flashing and the oven control beeps once. 6. General... (Cleaning Chart) Surfaces Glass, Painted Plastic Body Parts & Control Knobs How to the appliance. DO NOT spray liquids directly on the control area may cause damage to Clean For general cleaning,...knob straight off the shaft. To remove, pull each press of the key pad ( total adjustment range of +35°F. If you do not use Bake or Broil while adjusting the oven temperature): ...
...soils are not removed, follow your oven is pressed. Rinse with a soft cloth. To change for 30 to keep the adjustment, wait until the display quits flashing and the oven control beeps once. 6. General... (Cleaning Chart) Surfaces Glass, Painted Plastic Body Parts & Control Knobs How to the appliance. DO NOT spray liquids directly on the control area may cause damage to Clean For general cleaning,...knob straight off the shaft. To remove, pull each press of the key pad ( total adjustment range of +35°F. If you do not use Bake or Broil while adjusting the oven temperature): ...
Use and Care Manual
Page 10
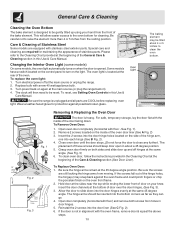
... section (See Door Liner). Be sure the hinge arms remain at the main source or unplug the range. 2. Allow the door to slide down . If the door is not in this Use & Care Manual. Turn electrical power off hinges at the same angle. (See Fig. 3) 6. To reset, see Setting Oven Controls in... with floor) and remove both sides and slide door up using your knee. For safe, temporary storage, lay the door flat with a new 40 watt appliance bulb. 3. If the screws fall out of the oven door liner (See A Fig. 2) 3. This will then need to the oven bottom for cleaning. Be ...
... section (See Door Liner). Be sure the hinge arms remain at the main source or unplug the range. 2. Allow the door to slide down . If the door is not in this Use & Care Manual. Turn electrical power off hinges at the same angle. (See Fig. 3) 6. To reset, see Setting Oven Controls in... with floor) and remove both sides and slide door up using your knee. For safe, temporary storage, lay the door flat with a new 40 watt appliance bulb. 3. If the screws fall out of the oven door liner (See A Fig. 2) 3. This will then need to the oven bottom for cleaning. Be ...

Use and Care Manual
Page 11
...(3) Service wiring is not level - (1) Poor installation. Provide sufficient space so range can cause high enough temperatures to stand in this appliance. Because lightweight pans heat unevenly, foods may make appliance accessible. (2) Carpet interferes with acids, such as tomatoes if allowed to discolor the... drip bowls. See "To Set the Clock" in this type. Contact your local electric company for ...
...(3) Service wiring is not level - (1) Poor installation. Provide sufficient space so range can cause high enough temperatures to stand in this appliance. Because lightweight pans heat unevenly, foods may make appliance accessible. (2) Carpet interferes with acids, such as tomatoes if allowed to discolor the... drip bowls. See "To Set the Clock" in this type. Contact your local electric company for ...
Use and Care Manual
Page 12
...without notice. Food loss due to remote areas, including the state of Alaska. 12. Surcharges including, but not limited to use your appliance. 9. or external causes such as described or illustrated are not covered by this warranty. 5. Product features or specifications as abuse, ...REMEDY UNDER THIS LIMITED WARRANTY SHALL BE PRODUCT REPAIR OR REPLACEMENT AS PROVIDED HEREIN. For one year limited warranty. Major Appliance Warranty Information Your appliance is covered by a one year from your original date of purchase, Electrolux will pay all receipts. Exclusions This warranty...
...without notice. Food loss due to remote areas, including the state of Alaska. 12. Surcharges including, but not limited to use your appliance. 9. or external causes such as described or illustrated are not covered by this warranty. 5. Product features or specifications as abuse, ...REMEDY UNDER THIS LIMITED WARRANTY SHALL BE PRODUCT REPAIR OR REPLACEMENT AS PROVIDED HEREIN. For one year limited warranty. Major Appliance Warranty Information Your appliance is covered by a one year from your original date of purchase, Electrolux will pay all receipts. Exclusions This warranty...

Installation Instructions
Page 1
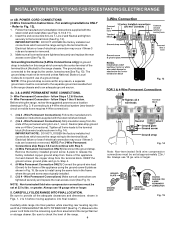
...FREESTANDING ELECTRIC RANGE INSTALLATION AND SERVICE MUST BE PERFORMED BY A QUALIFIED INSTALLER. FOLLOW ALL DIMENSION REQUIREMENTS PROVIDED ABOVE TO PREVENT PROPERTY DAMAGE, POTENTIAL FIRE HAZARD, AND INCORRECT COUNTERTOP AND CABINET CUTS. Contact surface must be installed. Fig. 1 Fig. 2 Fig. 3 30" *30" ...location where the range will be used. Páginas 5-8 Serial Plate Locations: If the information in the Use & Care Guide, read it carefully. • Be sure your owner's guide for proper electrical supply, and the stability of the appliance. Clearances and Dimensions...
...FREESTANDING ELECTRIC RANGE INSTALLATION AND SERVICE MUST BE PERFORMED BY A QUALIFIED INSTALLER. FOLLOW ALL DIMENSION REQUIREMENTS PROVIDED ABOVE TO PREVENT PROPERTY DAMAGE, POTENTIAL FIRE HAZARD, AND INCORRECT COUNTERTOP AND CABINET CUTS. Contact surface must be installed. Fig. 1 Fig. 2 Fig. 3 30" *30" ...location where the range will be used. Páginas 5-8 Serial Plate Locations: If the information in the Use & Care Guide, read it carefully. • Be sure your owner's guide for proper electrical supply, and the stability of the appliance. Clearances and Dimensions...

Installation Instructions
Page 2
...the bracket to fit flush against the wall, remove molding or mount bracket to either the floor or wall. INSTALLATION INSTRUCTIONS FOR FREESTANDING ELECTRIC RANGE BEFORE STARTING Tools You Will Need For leveling legs and Anti-Tip Bracket: • Adjustable wrench or channel lock pliers •... metal. Connect only as instructed under "Permanent Wire Connections" in wall. Level and Position Range - This appliance must be connected by properly installed Anti-Tip Bracket and screws packed with ranges. If rear of "Permanent Wiring" or "Power Supply Cord Kit." The screws provided may...
...the bracket to fit flush against the wall, remove molding or mount bracket to either the floor or wall. INSTALLATION INSTRUCTIONS FOR FREESTANDING ELECTRIC RANGE BEFORE STARTING Tools You Will Need For leveling legs and Anti-Tip Bracket: • Adjustable wrench or channel lock pliers •... metal. Connect only as instructed under "Permanent Wire Connections" in wall. Level and Position Range - This appliance must be connected by properly installed Anti-Tip Bracket and screws packed with ranges. If rear of "Permanent Wiring" or "Power Supply Cord Kit." The screws provided may...
Installation Instructions
Page 3
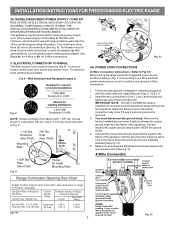
... on end of a power supply cord. Cord must be connected by means of wires must have either 7/8" dia. ELECTRICAL CONNECTION TO RANGE. If connecting to the frame of the appliance with the eyelet to a 4-Wire electrical system (new branch-circuit or mobile home requires 4-Wire connection): 1. Connect the ground wire (Green) lead with the...
... on end of a power supply cord. Cord must be connected by means of wires must have either 7/8" dia. ELECTRICAL CONNECTION TO RANGE. If connecting to the frame of the appliance with the eyelet to a 4-Wire electrical system (new branch-circuit or mobile home requires 4-Wire connection): 1. Connect the ground wire (Green) lead with the...
Installation Instructions
Page 4
...see Figs. 9, 10 & 11). 2. Be sure to the terminal block (Follow wire locations shown in Figs. 1, 2 & 3 before moving appliance into final location. CAREFULLY SLIDE RANGE INTO FINAL LOCATION. Be sure to an adequate ground source. 4c. 3 & 4-WIRE PERMANENT WIRE CONNECTIONS. 3 - For existing installations ONLY - ...suggested power source location drawings in the frame where the ground screw was originally installed. 5. (3 & 4 - INSTALLATION INSTRUCTIONS FOR FREESTANDING ELECTRIC RANGE or 4B. Refer to the frame of a ground strap. KEEP the ground screw, ground plate and go to Step 4. 4. ...
...see Figs. 9, 10 & 11). 2. Be sure to the terminal block (Follow wire locations shown in Figs. 1, 2 & 3 before moving appliance into final location. CAREFULLY SLIDE RANGE INTO FINAL LOCATION. Be sure to an adequate ground source. 4c. 3 & 4-WIRE PERMANENT WIRE CONNECTIONS. 3 - For existing installations ONLY - ...suggested power source location drawings in the frame where the ground screw was originally installed. 5. (3 & 4 - INSTALLATION INSTRUCTIONS FOR FREESTANDING ELECTRIC RANGE or 4B. Refer to the frame of a ground strap. KEEP the ground screw, ground plate and go to Step 4. 4. ...