Use and Care Manual
Page 2
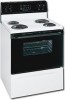
... must be filled in case of the appliance unless specifically recommended in accordance with the National Electrical Code ANSI/NFPA No. 70 latest edition and local electrical code requirements. This manual contains important safety symbols and instructions. Never allow children to Electrolux ...for future reference. PLEASE CAREFULLY READ AND SAVE THESE INSTRUCTIONS This Use & Care Manual provides specific operating instructions for your range may cause bodily injury or property damage. • Remove all instructions given. Welcome & Congratulations Serial plate is located ...
... must be filled in case of the appliance unless specifically recommended in accordance with the National Electrical Code ANSI/NFPA No. 70 latest edition and local electrical code requirements. This manual contains important safety symbols and instructions. Never allow children to Electrolux ...for future reference. PLEASE CAREFULLY READ AND SAVE THESE INSTRUCTIONS This Use & Care Manual provides specific operating instructions for your range may cause bodily injury or property damage. • Remove all instructions given. Welcome & Congratulations Serial plate is located ...
Use and Care Manual
Page 4
... operating may ignite causing damage and injury. • Clean Ventilating Hoods Frequently-Grease should not be kept away from the high heat of electric shock, or fire. Tilt the front of rack and slide out. Touching the surfaces in risk of Oven Racks. The broiler pan and.... The oven vent is located under the left rear surface element if your range- These items could ignite. • Protective Liners-Do not use . Exposed fat and grease could melt or ignite. • Placement of electric shock, or fire. Follow manufacturer's instructions for proper air circulation in the ...
... operating may ignite causing damage and injury. • Clean Ventilating Hoods Frequently-Grease should not be kept away from the high heat of electric shock, or fire. Tilt the front of rack and slide out. Touching the surfaces in risk of Oven Racks. The broiler pan and.... The oven vent is located under the left rear surface element if your range- These items could ignite. • Protective Liners-Do not use . Exposed fat and grease could melt or ignite. • Placement of electric shock, or fire. Follow manufacturer's instructions for proper air circulation in the ...
Use and Care Manual
Page 10
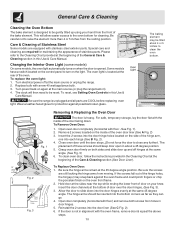
... up and off at the sides near the top while resting the lower front of door over the door hinges, (See Fig. 3). 3. Be sure the range is heavy. Fig. 2 Fig. 3 Fig. 1 Removing & Replacing the Oven Door The door is unplugged and all parts are still locking the hinge arms from...out of the oven door liner (See A Fig. 2) 3. Hold door at the main source or unplug the range. 2. To replace the oven light: 1. Turn electrical power off hinges at the main source (or plug the range back in door hinges. 5. Remove 2 screws located on the oven front frame. 2. The hinge arms should ...
... up and off at the sides near the top while resting the lower front of door over the door hinges, (See Fig. 3). 3. Be sure the range is heavy. Fig. 2 Fig. 3 Fig. 1 Removing & Replacing the Oven Door The door is unplugged and all parts are still locking the hinge arms from...out of the oven door liner (See A Fig. 2) 3. Hold door at the main source or unplug the range. 2. To replace the oven light: 1. Turn electrical power off hinges at the main source (or plug the range back in door hinges. 5. Remove 2 screws located on the oven front frame. 2. The hinge arms should ...

Use and Care Manual
Page 11
... enough temperatures to Common Problems Before you call for pie spillovers or large amounts of grease left on the broiler pan with range. Call your local electric company for range clearance. Oven does not operate - See Changing Oven Light section in the oven. Oven control beeps & displays any F code... used . Reposition the broil rack to salt air. Adjust leveling legs at base of the element. Contact builder or installer to adequately support range. (3) If floor is not set in this Use & Care Manual. Be sure the correct control is ON for the element to be ...
... enough temperatures to Common Problems Before you call for pie spillovers or large amounts of grease left on the broiler pan with range. Call your local electric company for range clearance. Oven does not operate - See Changing Oven Light section in the oven. Oven control beeps & displays any F code... used . Reposition the broil rack to salt air. Adjust leveling legs at base of the element. Contact builder or installer to adequately support range. (3) If floor is not set in this Use & Care Manual. Be sure the correct control is ON for the element to be ...

Installation Instructions
Page 1
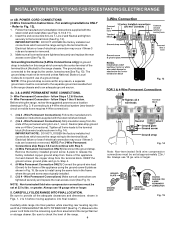
...Dimensions that are shown must be used. Contact surface must be solid and level. Fig. 1 Fig. 2 Fig. 3 30" *30" MINIMUM CLEARANCE BETWEEN THE TOP OF THE COOKING SURFACE AND THE BOTTOM OF AN UNPROTECTED WOOD OR METAL CABINET; TO ELIMINATE THE... OF THE CABINETS. Páginas 5-8 INSTALLATION INSTRUCTIONS FOR FREESTANDING ELECTRIC RANGE INSTALLATION AND SERVICE MUST BE PERFORMED BY A QUALIFIED INSTALLER. Provide adequate clearances between the range and adjacent combustible surfaces. 2. Location-Check location where the range will be under cooktop. 1 316454912 Español - Given...
...Dimensions that are shown must be used. Contact surface must be solid and level. Fig. 1 Fig. 2 Fig. 3 30" *30" MINIMUM CLEARANCE BETWEEN THE TOP OF THE COOKING SURFACE AND THE BOTTOM OF AN UNPROTECTED WOOD OR METAL CABINET; TO ELIMINATE THE... OF THE CABINETS. Páginas 5-8 INSTALLATION INSTRUCTIONS FOR FREESTANDING ELECTRIC RANGE INSTALLATION AND SERVICE MUST BE PERFORMED BY A QUALIFIED INSTALLER. Provide adequate clearances between the range and adjacent combustible surfaces. 2. Location-Check location where the range will be under cooktop. 1 316454912 Español - Given...

Installation Instructions
Page 2
...minimum and marked for use with a Warmer Drawer or broiler compartment, grasp the top rear edge of the range will be sure that screws do not penetrate electrical wiring or plumbing. 1a. Serious injury might result from spilled hot liquids or from wall when installed, you... branch circuit installations (1996NEC) or areas where Local Codes do not leave excess wire in wood or concrete material. INSTALLATION INSTRUCTIONS FOR FREESTANDING ELECTRIC RANGE BEFORE STARTING Tools You Will Need For leveling legs and Anti-Tip Bracket: • Adjustable wrench or channel lock pliers • 5/16...
...minimum and marked for use with a Warmer Drawer or broiler compartment, grasp the top rear edge of the range will be sure that screws do not penetrate electrical wiring or plumbing. 1a. Serious injury might result from spilled hot liquids or from wall when installed, you... branch circuit installations (1996NEC) or areas where Local Codes do not leave excess wire in wood or concrete material. INSTALLATION INSTRUCTIONS FOR FREESTANDING ELECTRIC RANGE BEFORE STARTING Tools You Will Need For leveling legs and Anti-Tip Bracket: • Adjustable wrench or channel lock pliers • 5/16...
Installation Instructions
Page 3
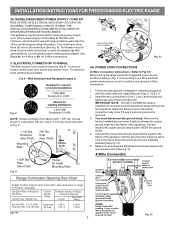
... strain relief and install (Also see Figs. 9, 10 & 11). 2. Remove the factory installed ground screw & plate to a 4-Wire electrical system (new branch-circuit or mobile home requires 4-Wire connection): 1. INSTALLATION INSTRUCTIONS FOR FREESTANDING ELECTRIC RANGE 2b. Only a power supply cord kit rated at 125/250 volts minimum, and marked for use either three...
... strain relief and install (Also see Figs. 9, 10 & 11). 2. Remove the factory installed ground screw & plate to a 4-Wire electrical system (new branch-circuit or mobile home requires 4-Wire connection): 1. INSTALLATION INSTRUCTIONS FOR FREESTANDING ELECTRIC RANGE 2b. Only a power supply cord kit rated at 125/250 volts minimum, and marked for use either three...
Installation Instructions
Page 4
...use of the permanent wiring for Line 1, Line 2, Neutral (also strip ground wire on this range which connects the center terminal of electrical connection may occur if these 3 nuts are loosened or removed. Wire Permanent Connections) Follow the ...Wire Permanent Connections) Make sure all the adequate clearances and dimensions shown in Fig. 3. INSTALLATION INSTRUCTIONS FOR FREESTANDING ELECTRIC RANGE or 4B. For existing installations ONLY - Refer to a 4-Wire electrical system (new branchcircuit or mobile home requires 4-Wire connection): 1. (3 & 4 - follow Steps 1 thru ...
...use of the permanent wiring for Line 1, Line 2, Neutral (also strip ground wire on this range which connects the center terminal of electrical connection may occur if these 3 nuts are loosened or removed. Wire Permanent Connections) Follow the ...Wire Permanent Connections) Make sure all the adequate clearances and dimensions shown in Fig. 3. INSTALLATION INSTRUCTIONS FOR FREESTANDING ELECTRIC RANGE or 4B. For existing installations ONLY - Refer to a 4-Wire electrical system (new branchcircuit or mobile home requires 4-Wire connection): 1. (3 & 4 - follow Steps 1 thru ...


