Use and Care Manual
Page 1
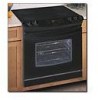
A Electric Range Drop-in / Slide-in Models Welcome 2 Important Safety Instructions .. 3-5 Features at a Glance 6 Setting Surface Controls.. 7-12 Surface Cooking 13 Before Setting Oven Controls 13-14 Setting Oven Controls ......... 14 Setting Warmer Drawer Controls ...... 15 Cooking Informations ..... 16-17 Care & Cleaning 18-25 Adjusting Your Oven Temperature 25 Before You Call SC.oo.lm.u.tm.io.on.n.s..Pt.or.o.b.l.e.m..s 26-27 Warranty Back Cover 318203821 (0703) Rev.
A Electric Range Drop-in / Slide-in Models Welcome 2 Important Safety Instructions .. 3-5 Features at a Glance 6 Setting Surface Controls.. 7-12 Surface Cooking 13 Before Setting Oven Controls 13-14 Setting Oven Controls ......... 14 Setting Warmer Drawer Controls ...... 15 Cooking Informations ..... 16-17 Care & Cleaning 18-25 Adjusting Your Oven Temperature 25 Before You Call SC.oo.lm.u.tm.io.on.n.s..Pt.or.o.b.l.e.m..s 26-27 Warranty Back Cover 318203821 (0703) Rev.
Use and Care Manual
Page 2
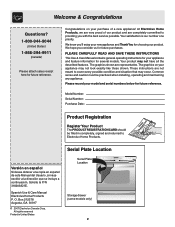
...completely, signed and returned to Electrolux Home Products. We hope you 'll enjoy your new appliance and Thank You for several models. The graphics shown are not meant to providing you with the best service possible.Your satisfaction is our number one priority. Please... are representative. We know you consider us for future reference. The graphics on your appliance may not look exactly like those shown. Model Number: Serial Number: Purchase Date: Product Registration Register Your Product The PRODUCT REGISTRATION CARD should be practiced when installing, operating and maintaining...
...completely, signed and returned to Electrolux Home Products. We hope you 'll enjoy your new appliance and Thank You for several models. The graphics shown are not meant to providing you with the best service possible.Your satisfaction is our number one priority. Please... are representative. We know you consider us for future reference. The graphics on your appliance may not look exactly like those shown. Model Number: Serial Number: Purchase Date: Product Registration Register Your Product The PRODUCT REGISTRATION CARD should be practiced when installing, operating and maintaining...
Use and Care Manual
Page 3
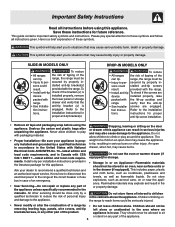
sons could stalled anti-tip screws result. provided with the lower panel or storage range. engaged. DROP-IN MODELS ONLY To reduce • All ranges the risk of tipping of the can tip. Destroy the carton and plastic bags after unpacking the appliance. This includes paper, ...the installation tions. tion Instruc- instructions for storage. • Storage in an oven, near the appliance. Know how to disconnect the electrical power to the range at the circuit breaker or fuse box in case of an emergency. • User Servicing-Do not repair or replace any part ...
sons could stalled anti-tip screws result. provided with the lower panel or storage range. engaged. DROP-IN MODELS ONLY To reduce • All ranges the risk of tipping of the can tip. Destroy the carton and plastic bags after unpacking the appliance. This includes paper, ...the installation tions. tion Instruc- instructions for storage. • Storage in an oven, near the appliance. Know how to disconnect the electrical power to the range at the circuit breaker or fuse box in case of an emergency. • User Servicing-Do not repair or replace any part ...
Use and Care Manual
Page 5
...desired location while oven/drawer (if equipped) is vented at the front above the oven door (ceramic glass cooktop models) or through the right rear element (coil element models). If rack must be moved while oven is essential for use a broiler pan without its insert. The door ... oven during a self-cleaning cycle. • Do not use extreme caution. Oven racks color will change if left in or around any range. Do not allow dripping fat to the appliance before removing and replacing light bulb. IMPORTANT INSTRUCTIONS FOR USING YOUR OVEN • Use Care ...
...desired location while oven/drawer (if equipped) is vented at the front above the oven door (ceramic glass cooktop models) or through the right rear element (coil element models). If rack must be moved while oven is essential for use a broiler pan without its insert. The door ... oven during a self-cleaning cycle. • Do not use extreme caution. Oven racks color will change if left in or around any range. Do not allow dripping fat to the appliance before removing and replacing light bulb. IMPORTANT INSTRUCTIONS FOR USING YOUR OVEN • Use Care ...
Use and Care Manual
Page 6
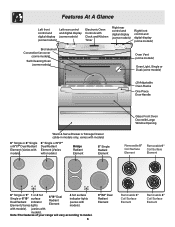
with models). (varies with models). Note:The features of your range will vary according to model. 6 9"/12" Dual Radiant Element Removable 6" Coil Surface Element Removable 8" Coil Surface Element Features At A Glance Left front Left rear control control and and digital display digital display (some models) (some models) Electronic Oven Controls with Clock and Kitchen Timer Right rear...
with models). (varies with models). Note:The features of your range will vary according to model. 6 9"/12" Dual Radiant Element Removable 6" Coil Surface Element Removable 8" Coil Surface Element Features At A Glance Left front Left rear control control and and digital display digital display (some models) (some models) Electronic Oven Controls with Clock and Kitchen Timer Right rear...
Use and Care Manual
Page 7
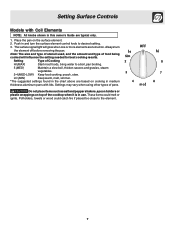
... are typical only. 1. Do not place items such as salt and pepper shakers, spoon holders or plastic wrappings on the surface element. 2. Setting Surface Controls Models with lids. Push in this owner's Guide are based on . Settings may vary when using other types of food being cooked will glow when one...
... are typical only. 1. Do not place items such as salt and pepper shakers, spoon holders or plastic wrappings on the surface element. 2. Setting Surface Controls Models with lids. Push in this owner's Guide are based on . Settings may vary when using other types of food being cooked will glow when one...
Use and Care Manual
Page 8
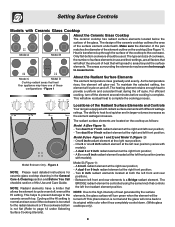
... cooktop to the high intensity of the Radiant Surface Elements and Controls Your range is complete. Heat is a Bridge radiant element. Locations of heat generated by the surface elements, the glass surface will be used. Model D (Figure 1): - The type and size of cookware, the number ...the diameter of the glass. Two dual 5 or 7 inch radiant element at the left front radiant element position. One 6 or one 9 inch radiant element located at the right and left front position (varies with models); A dual 6 or 9 inch radiant element at both the left rear position; - ...
... cooktop to the high intensity of the Radiant Surface Elements and Controls Your range is complete. Heat is a Bridge radiant element. Locations of heat generated by the surface elements, the glass surface will be used. Model D (Figure 1): - The type and size of cookware, the number ...the diameter of the glass. Two dual 5 or 7 inch radiant element at the left front radiant element position. One 6 or one 9 inch radiant element located at the right and left front position (varies with models); A dual 6 or 9 inch radiant element at both the left rear position; - ...

Use and Care Manual
Page 9
... sauces and gravies, steam vegetables Keep foods cooking, poach, stew Keep warm, melt, simmer Figure 1 The Electronic Surface Element Control (ESEC) (some models) Radiant surface elements may occur if the glass surface is in digital windows (Figs. 2 thru 5). These items could melt or ignite. Note: The...Do not place plastic items such as salt and pepper shakers, spoon holders or plastic wrappings on and will come on top of the range when it is touched before it is touched before the indicator light has turned off . The Electronic Surface Element Control ("ESEC") feature...
... sauces and gravies, steam vegetables Keep foods cooking, poach, stew Keep warm, melt, simmer Figure 1 The Electronic Surface Element Control (ESEC) (some models) Radiant surface elements may occur if the glass surface is in digital windows (Figs. 2 thru 5). These items could melt or ignite. Note: The...Do not place plastic items such as salt and pepper shakers, spoon holders or plastic wrappings on and will come on top of the range when it is touched before it is touched before the indicator light has turned off . The Electronic Surface Element Control ("ESEC") feature...
Use and Care Manual
Page 10
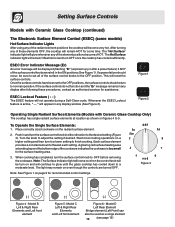
...to the OFF positions, the surface controls should occur, be used as shown on page 9 for assistance. Setting Surface Controls Models with Ceramic Glass Cooktop Only) The cooktop has single radiant surface elements at each setting. The "Hot Surface" indicator light will... desired. ESEC Lockout Feature ( - - ) The ESEC feature will reset the surface controls. Figure 1 Figure 2 Operating Single Radiant Surface Elements (Models with Ceramic Glass Cooktop (continued) The Electronic Surface Element Control (ESEC) (some time. Turn the knob to the desired setting (Figure 3). A ...
...to the OFF positions, the surface controls should occur, be used as shown on page 9 for assistance. Setting Surface Controls Models with Ceramic Glass Cooktop Only) The cooktop has single radiant surface elements at each setting. The "Hot Surface" indicator light will... desired. ESEC Lockout Feature ( - - ) The ESEC feature will reset the surface controls. Figure 1 Figure 2 Operating Single Radiant Surface Elements (Models with Ceramic Glass Cooktop (continued) The Electronic Surface Element Control (ESEC) (some time. Turn the knob to the desired setting (Figure 3). A ...
Use and Care Manual
Page 11
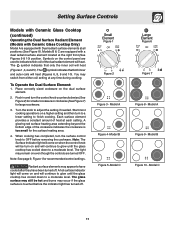
... 6 4 4 ..... 2 ...... 2 lo lo Figure 2 Figure 3 - Model C 11 Setting Surface Controls Models with Ceramic Glass Cooktop (continued) Operating the Dual Surface Radiant Element (Models with Ceramic Glass Cooktop Only) Model A is equipped with a dual radiant surface element located at any time during...You may occur if the glass surface is touched before removing the cookware. Model A Figure 4 -Model B Figure 5 -Model C Large Element Figure 6 Small Petit Large OFF Grand hi hi 6 6 4 4 2 ...... Model B Figure 10 - A hot surface indicator light will come on and ...
... 6 4 4 ..... 2 ...... 2 lo lo Figure 2 Figure 3 - Model C 11 Setting Surface Controls Models with Ceramic Glass Cooktop (continued) Operating the Dual Surface Radiant Element (Models with Ceramic Glass Cooktop Only) Model A is equipped with a dual radiant surface element located at any time during...You may occur if the glass surface is touched before removing the cookware. Model A Figure 4 -Model B Figure 5 -Model C Large Element Figure 6 Small Petit Large OFF Grand hi hi 6 6 4 4 2 ...... Model B Figure 10 - A hot surface indicator light will come on and ...
Use and Care Manual
Page 12
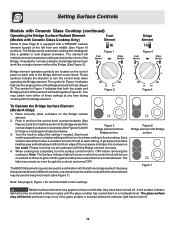
... Ceramic Glass Cooktop (continued) Operating the Bridge Surface Radiant Element (Models with Ceramic Glass Cooktop Only) Model D (See Page 8) is equipped with a "BRIDGE" surface element located at each side of these elements have been turned off . 12 Figure 1 Figure 4... correctly. 4. The Bridge can be used to OFF before the indicator light has turned off . Figure 2 Figure 5 To Operate the Bridge Surface Element (Model A Only): 1. A glowing red surface heating area extending beyond the bottom edge of the Bridge. The light may appear to have cooled after they have ...
... Ceramic Glass Cooktop (continued) Operating the Bridge Surface Radiant Element (Models with Ceramic Glass Cooktop Only) Model D (See Page 8) is equipped with a "BRIDGE" surface element located at each side of these elements have been turned off . 12 Figure 1 Figure 4... correctly. 4. The Bridge can be used to OFF before the indicator light has turned off . Figure 2 Figure 5 To Operate the Bridge Surface Element (Model A Only): 1. A glowing red surface heating area extending beyond the bottom edge of the Bridge. The light may appear to have cooled after they have ...
Use and Care Manual
Page 14
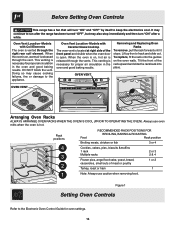
... casseroles, small cuts of the front panel and visible when the oven door is hot. Before Setting Oven Controls This range has a fan that will turn "ON" after a while. Oven Vent Location -Models with Ceramic Glass Cooktop The oven vent is located at right side of meat or poultry 1 or 2 Turkey, roast... or ham 1 Note: Always use oven mitts when the oven is open. It may continue to run after the range has been turned "OFF", but may...
... casseroles, small cuts of the front panel and visible when the oven door is hot. Before Setting Oven Controls This range has a fan that will turn "ON" after a while. Oven Vent Location -Models with Ceramic Glass Cooktop The oven vent is located at right side of meat or poultry 1 or 2 Turkey, roast... or ham 1 Note: Always use oven mitts when the oven is open. It may continue to run after the range has been turned "OFF", but may...

Use and Care Manual
Page 17
... tender cuts of meat by direct heat under the broil element of meat, fat content and doneness preferred. Broiler Pan Broiler Clean-Up Tips (some models) The broiler pan and its grid. Always pull rack out to BROIL as possible after each use a fire extinguisher. Frozen meats also require additional ...kept away from the element, but on hot metal.) To preheat, set the oven control(s) to the "stop " position before turning or removing food. Some Models Should an oven fire occur, close the oven door and turn and cook on the distance from the Grid high heat of the broiler pan...
... tender cuts of meat by direct heat under the broil element of meat, fat content and doneness preferred. Broiler Pan Broiler Clean-Up Tips (some models) The broiler pan and its grid. Always pull rack out to BROIL as possible after each use a fire extinguisher. Frozen meats also require additional ...kept away from the element, but on hot metal.) To preheat, set the oven control(s) to the "stop " position before turning or removing food. Some Models Should an oven fire occur, close the oven door and turn and cook on the distance from the Grid high heat of the broiler pan...
Use and Care Manual
Page 18
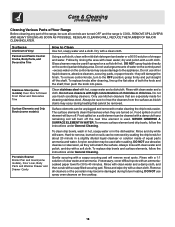
... of chlorides or chlorines. Care & Cleaning (Cleaning Chart) Cleaning Various Parts of Your Range Before cleaning any remaining soil will remove most spots. REGULAR CLEANING WILL REDUCE THE NUMBER...Trim Stainless Steel (some models) Oven Door & Drawer Front Panel and Decorative Trim Surface Elements and Drip Bowls (some models) Porcelain Enamel Broiler Pan and Insert(some models), Door Liner, Body Parts... wash in hot, soapy water or in a slightly diluted liquid cleanser or solution made for 30 to the appliance. Gentle scouring with a 1:1 solution of vinegar and water. DO NOT spray...
... of chlorides or chlorines. Care & Cleaning (Cleaning Chart) Cleaning Various Parts of Your Range Before cleaning any remaining soil will remove most spots. REGULAR CLEANING WILL REDUCE THE NUMBER...Trim Stainless Steel (some models) Oven Door & Drawer Front Panel and Decorative Trim Surface Elements and Drip Bowls (some models) Porcelain Enamel Broiler Pan and Insert(some models), Door Liner, Body Parts... wash in hot, soapy water or in a slightly diluted liquid cleanser or solution made for 30 to the appliance. Gentle scouring with a 1:1 solution of vinegar and water. DO NOT spray...
Use and Care Manual
Page 19
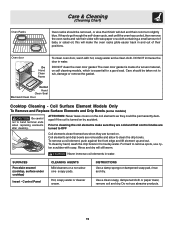
... Door Cooktop Cleaning - ATTENTION: Never leave covers on the coil elements as they could be permanently damaged if the coil is turned on self cleaning models, which is made of a woven material, on by hand, wash the drip bowls in and out of baby or salad oil; Never immerse coil elements... allow to cleaning the coil elements make the oven racks glide easier back in hot sudsy water. Coil Surface Element Models Only To Remove and Replace Surface Elements and Drip Bowls (some models) Be careful not to rub, damage or remove the gasket. To remove a coil element, push against the front ...
... Door Cooktop Cleaning - ATTENTION: Never leave covers on the coil elements as they could be permanently damaged if the coil is turned on self cleaning models, which is made of a woven material, on by hand, wash the drip bowls in and out of baby or salad oil; Never immerse coil elements... allow to cleaning the coil elements make the oven racks glide easier back in hot sudsy water. Coil Surface Element Models Only To Remove and Replace Surface Elements and Drip Bowls (some models) Be careful not to rub, damage or remove the gasket. To remove a coil element, push against the front ...
Use and Care Manual
Page 20
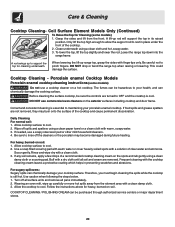
... following the steps below. 1. Allow cooktop surface to your health, and can chemically damage your porcelain enamel cooktop. Coil Surface Element Models Only (Continued) To Raise the Top for cleaning underneath. To lower the top, lift the top slightly and lower the rod. Be... careful not to maintaining your cooktop surface. DO NOT drop or bend the range top when raising or lowering. Porcelain enamel Cooktop Models Porcelain enamel cooktop cleaning instructions (some models) 1. Correct and consistent cleaning is still hot. If any soil remains, apply ...
... following the steps below. 1. Allow cooktop surface to your health, and can chemically damage your porcelain enamel cooktop. Coil Surface Element Models Only (Continued) To Raise the Top for cleaning underneath. To lower the top, lift the top slightly and lower the rod. Be... careful not to maintaining your cooktop surface. DO NOT drop or bend the range top when raising or lowering. Porcelain enamel Cooktop Models Porcelain enamel cooktop cleaning instructions (some models) 1. Correct and consistent cleaning is still hot. If any soil remains, apply ...
Use and Care Manual
Page 21
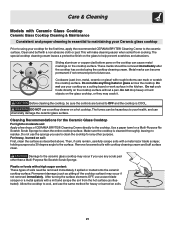
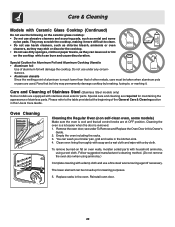
...drop heavy or hard objects on soils. 21 Cleaning Recommendations for any scrub pad other purpose. Remove loosened soils with Ceramic Glass Cooktop Ceramic Glass Cooktop Cleaning & Maintenance Consistent and proper cleaning is essential to OFF and the cooktop is cleaned thoroughly, leaving no residue. Care & Cleaning Models...; Cleaning Creme directly to the ceramic surface. Plastic or foods with a metal razor blade scraper, holding scraper at a 30 degree angle to clean the entire cooktop surface. After turning the surface elements OFF, use any other than a Multi-Purpose No...
...drop heavy or hard objects on soils. 21 Cleaning Recommendations for any scrub pad other purpose. Remove loosened soils with Ceramic Glass Cooktop Ceramic Glass Cooktop Cleaning & Maintenance Consistent and proper cleaning is essential to OFF and the cooktop is cleaned thoroughly, leaving no residue. Care & Cleaning Models...; Cleaning Creme directly to the ceramic surface. Plastic or foods with a metal razor blade scraper, holding scraper at a 30 degree angle to clean the entire cooktop surface. After turning the surface elements OFF, use any other than a Multi-Purpose No...
Use and Care Manual
Page 22
... or marking it more difficult to clean. • Do not use harsh cleaners, such as chlorine bleach, ammonia or oven cleaners, as metal and some models) Make sure the oven is removed. 1. Remove the oven door; You can burn and cause discoloration. The lower element can be taken when aluminum pots... point of aluminum is much lower than that boil dry may scratch the cooktop, making it . Empty the oven including the racks. 3. Care & Cleaning Models with a dry cloth. Pans that of aluminum foil will damage the cooktop. To remove burned-on fat on the ceramic glass cooktop: • Do not...
... or marking it more difficult to clean. • Do not use harsh cleaners, such as chlorine bleach, ammonia or oven cleaners, as metal and some models) Make sure the oven is removed. 1. Remove the oven door; You can burn and cause discoloration. The lower element can be taken when aluminum pots... point of aluminum is much lower than that boil dry may scratch the cooktop, making it . Empty the oven including the racks. 3. Care & Cleaning Models with a dry cloth. Pans that of aluminum foil will damage the cooktop. To remove burned-on fat on the ceramic glass cooktop: • Do not...
Use and Care Manual
Page 23
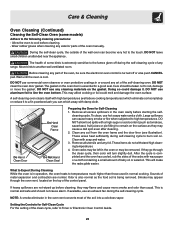
... leave small children unattended near the appliance. Move birds to cool before cleaning, they may be left in the oven vent converts most of some models) Adhere to the following cleaning precautions: - DO NOT use hot soapy water and a cloth. Care should not cause alarm. DO NOT use an...cleaning cycle to burn soil on. Doing so could melt and damage the oven surface. Remove all utensils and any exterior parts of any range. Remove all excess spillovers in or around any cleaning materials on the oven door is being removed. This will turn slightly dull. What to...
... leave small children unattended near the appliance. Move birds to cool before cleaning, they may be left in the oven vent converts most of some models) Adhere to the following cleaning precautions: - DO NOT use hot soapy water and a cloth. Care should not cause alarm. DO NOT use an...cleaning cycle to burn soil on. Doing so could melt and damage the oven surface. Remove all utensils and any exterior parts of any range. Remove all excess spillovers in or around any cleaning materials on the oven door is being removed. This will turn slightly dull. What to...
Use and Care Manual
Page 24
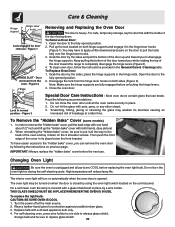
... not close the oven door until all the oven racks are fully engaged before unlocking the hinge levers. 3. To Remove the "Hidden Bake" Cover (some models) 1. In order to disengage the hinge supports. High temperature will turn the oven light on the control panel. THIS GLASS SHIELD MUST BE IN PLACE... "hidden bake" cover, be turned on when the door is opened. For self-cleaning oven, press wire holder to one hand about 1/2" inch and lift up and toward the range to the "hidden bake" cover, you while rotating the top of the door up the "hidden bake" cover with a glass shield held...
... not close the oven door until all the oven racks are fully engaged before unlocking the hinge levers. 3. To Remove the "Hidden Bake" Cover (some models) 1. In order to disengage the hinge supports. High temperature will turn the oven light on the control panel. THIS GLASS SHIELD MUST BE IN PLACE... "hidden bake" cover, be turned on when the door is opened. For self-cleaning oven, press wire holder to one hand about 1/2" inch and lift up and toward the range to the "hidden bake" cover, you while rotating the top of the door up the "hidden bake" cover with a glass shield held...


