
Installation Instructions (All Languages)
Page 1
... protected surface Figure 1 MODEL 26" Coil Elements 30" Ceramic-Glass 30" Coil Elements 32" Ceramic-Glass 32" Coil Elements 36" Ceramic-Glass 36" Coil Elements (36"X18"model) 36" Coil Elements (36"X211/2"model) A. for unprotected cabinet 24" (61 cm) min. DEPTH 3 ½ (8.9) 3 ¼ (8.3) 3 (7.6) 3 ¾ (9.5) 3 ¾ (9.5) 3 ¼ (8.3) 3 7/8 (9.8) CUTOUT DIMENSIONS D. LENGTH E. WIDTH MIN. ELECTRIC COOKTOP INSTALLATION INSTRUCTIONS INSTALLATION...
... protected surface Figure 1 MODEL 26" Coil Elements 30" Ceramic-Glass 30" Coil Elements 32" Ceramic-Glass 32" Coil Elements 36" Ceramic-Glass 36" Coil Elements (36"X18"model) 36" Coil Elements (36"X211/2"model) A. for unprotected cabinet 24" (61 cm) min. DEPTH 3 ½ (8.9) 3 ¼ (8.3) 3 (7.6) 3 ¾ (9.5) 3 ¾ (9.5) 3 ¼ (8.3) 3 7/8 (9.8) CUTOUT DIMENSIONS D. LENGTH E. WIDTH MIN. ELECTRIC COOKTOP INSTALLATION INSTRUCTIONS INSTALLATION...

Installation Instructions (All Languages)
Page 2
when Bottom of Wood or Metal Cabinet is provided, risk can be avoided. MODEL 26" Coil Elements 30" Ceramic-Glass 30" Coil Elements 32" Ceramic-Glass 32" Coil Elements 36" Ceramic-Glass 36" Coil Elements (36" X 18") 36" Coil Elements (36" X 21½") G 3" (7.6 cm) ...an Unprotected Wood or Metal Cabinet 24" (61 cm) Min. CAUTION To eliminate the risk of Junction Box 12" (30.5 cm) It is needed for G, H and J. H Min. ELECTRIC COOKTOP INSTALLATION INSTRUCTIONS Overhead Cabinet Should Not Exceed a Maximum Depth of the cabinets. If cabinet storage is Protected by reaching over ...
when Bottom of Wood or Metal Cabinet is provided, risk can be avoided. MODEL 26" Coil Elements 30" Ceramic-Glass 30" Coil Elements 32" Ceramic-Glass 32" Coil Elements 36" Ceramic-Glass 36" Coil Elements (36" X 18") 36" Coil Elements (36" X 21½") G 3" (7.6 cm) ...an Unprotected Wood or Metal Cabinet 24" (61 cm) Min. CAUTION To eliminate the risk of Junction Box 12" (30.5 cm) It is needed for G, H and J. H Min. ELECTRIC COOKTOP INSTALLATION INSTRUCTIONS Overhead Cabinet Should Not Exceed a Maximum Depth of the cabinets. If cabinet storage is Protected by reaching over ...

Installation Instructions (All Languages)
Page 3
... to the junction box using a suitable strain relief at this appliance. ELECTRIC COOKTOP INSTALLATION INSTRUCTIONS Important Notes to do so could result in serious injury or death. Electrical Connection Connect the flexible armored cable that the ceramic-glass smoothtop be connected... to leave these installation instructions before connecting the electrical supply to the circuit panel at the point the armored cable enters the junction box. WARNING Unpacking Instructions (Models with CSA Standard C22.1, Canadian Electrical Code, Part 1, in these instructions with the...
... to the junction box using a suitable strain relief at this appliance. ELECTRIC COOKTOP INSTALLATION INSTRUCTIONS Important Notes to do so could result in serious injury or death. Electrical Connection Connect the flexible armored cable that the ceramic-glass smoothtop be connected... to leave these installation instructions before connecting the electrical supply to the circuit panel at the point the armored cable enters the junction box. WARNING Unpacking Instructions (Models with CSA Standard C22.1, Canadian Electrical Code, Part 1, in these instructions with the...

Installation Instructions (All Languages)
Page 4
...Supply Ground Wire Red Wires Black Wires Junction Box Ground Wire (Bare or Green Wire) U.L.-Listed Conduit Cable from appliance Figure 5 - Only Models 36" with Warmer Zone Only 3-WIRE GROUNDED JUNCTION BOX WARNING Improper connection of aluminum house wiring to the power supply cable white wire. DO... Connect the ground wire before turning on the power. 4 Cap the white wire from the appliance cable to a 3-wire supply cable (U.S.A. ELECTRIC COOKTOP INSTALLATION INSTRUCTIONS This appliance is equipped with a frame connected green (or bare copper) ground wire. 1.
...Supply Ground Wire Red Wires Black Wires Junction Box Ground Wire (Bare or Green Wire) U.L.-Listed Conduit Cable from appliance Figure 5 - Only Models 36" with Warmer Zone Only 3-WIRE GROUNDED JUNCTION BOX WARNING Improper connection of aluminum house wiring to the power supply cable white wire. DO... Connect the ground wire before turning on the power. 4 Cap the white wire from the appliance cable to a 3-wire supply cable (U.S.A. ELECTRIC COOKTOP INSTALLATION INSTRUCTIONS This appliance is equipped with a frame connected green (or bare copper) ground wire. 1.

Installation Instructions (All Languages)
Page 5
... Installed At Least 1/16" (0.16 cm) BELOW Countertop RETAINER BRACKET SCREWS Figure 8 Set the cooktop into the countertop cutout. The cooktop must clamp unit down as outlined in the space provided. Figure 10 2. Models: 32" Coil Elements Cooktops 1. Make electrical connections as shown in cutout. 2. The retainer brackets MUST be installed, to meet local codes...
... Installed At Least 1/16" (0.16 cm) BELOW Countertop RETAINER BRACKET SCREWS Figure 8 Set the cooktop into the countertop cutout. The cooktop must clamp unit down as outlined in the space provided. Figure 10 2. Models: 32" Coil Elements Cooktops 1. Make electrical connections as shown in cutout. 2. The retainer brackets MUST be installed, to meet local codes...

Installation Instructions (All Languages)
Page 6
... up the main top of unit. Models: 30" and 36" (36" X 21½") Coil Elements Cooktops - SPACER BURNER BOX SCREW Figure 13 3. Tighten all screws evenly. 5. Unit clamp down as shown in your Owner's Guide for our service phone number and address. Make electrical connections as shown. Model and Serial Number Location The serial plate...
... up the main top of unit. Models: 30" and 36" (36" X 21½") Coil Elements Cooktops - SPACER BURNER BOX SCREW Figure 13 3. Tighten all screws evenly. 5. Unit clamp down as shown in your Owner's Guide for our service phone number and address. Make electrical connections as shown. Model and Serial Number Location The serial plate...
Complete Owner's Guide (English)
Page 1
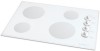
F Electric Cooktop CONTENTS Page Versión en español 2 Product Registration 2 Important Safety Instructions 3-4 Selecting Surface Cooking Utensils 5 Specialty Pans & Trivets 5 Canning Tips & Information 6 Setting Surface Controls 6 Indicator Lights (Coil Elements Models 6 Ceramic Glass Cooktop (Some Models 7-10 Types of Heating Units Used 7 Hot Surface Indicator Light 7 Warm Zone Feature 8 Special Caution for Aluminum Foil...
F Electric Cooktop CONTENTS Page Versión en español 2 Product Registration 2 Important Safety Instructions 3-4 Selecting Surface Cooking Utensils 5 Specialty Pans & Trivets 5 Canning Tips & Information 6 Setting Surface Controls 6 Indicator Lights (Coil Elements Models 6 Ceramic Glass Cooktop (Some Models 7-10 Types of Heating Units Used 7 Hot Surface Indicator Light 7 Warm Zone Feature 8 Special Caution for Aluminum Foil...
Complete Owner's Guide (English)
Page 2
... this Owner's Guide will instruct you for your bill of sale. © 2001 White Consolidated Industries All rights reserved 2 Record Your Model and Serial Numbers Record in this appliance. Your cooktop may occur. Please read through the information contained in completely, signed and returned to the Electrolux Home Products North America. Common...
... this Owner's Guide will instruct you for your bill of sale. © 2001 White Consolidated Industries All rights reserved 2 Record Your Model and Serial Numbers Record in this appliance. Your cooktop may occur. Please read through the information contained in completely, signed and returned to the Electrolux Home Products North America. Common...
Complete Owner's Guide (English)
Page 5
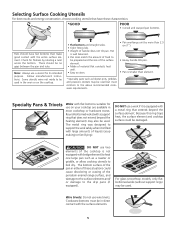
...griddle, or allow cooking utensils to boil dry. Follow manufacturer's instructions. Specialty Pans & Trivets Woks with the surface elements. 5 For glass smoothtop models, only flat bottomed woks (without support rings) may be used but must be used. Pan is well balanced. • Pan sizes match the...beyond the heating element) may also be in most cookshop or hardware stores. Because this ring traps heat, the surface element and cooktop surface could cause discoloring or crazing of the porcelain enamel range surface, and damage to the surface elements and/ or damage to...
...griddle, or allow cooking utensils to boil dry. Follow manufacturer's instructions. Specialty Pans & Trivets Woks with the surface elements. 5 For glass smoothtop models, only flat bottomed woks (without support rings) may be used but must be used. Pan is well balanced. • Pan sizes match the...beyond the heating element) may also be in most cookshop or hardware stores. Because this ring traps heat, the surface element and cooktop surface could cause discoloring or crazing of the porcelain enamel range surface, and damage to the surface elements and/ or damage to...
Complete Owner's Guide (English)
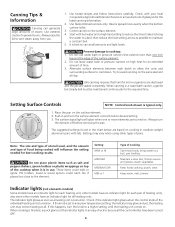
Page 6
...the jars are turned on cooking in an easy check to desired setting. 3. Check if the indicator light glows when the control knob of the cooktop when it takes to bring water to maintain a constant boil. 5. Prevent damage to vent steam away from you. 1. The suggested settings found in... water to a very low temperature setting, the indicator may glow and yet, the heating unit may vary when using other models have been turned OFF. 6 Always raise the lid to cooktop: 1. Use flat-bottomed canners only. If the knob is finished, a quick glance at all day. When cooking is ...
...the jars are turned on cooking in an easy check to desired setting. 3. Check if the indicator light glows when the control knob of the cooktop when it takes to bring water to maintain a constant boil. 5. Prevent damage to vent steam away from you. 1. The suggested settings found in... water to a very low temperature setting, the indicator may glow and yet, the heating unit may vary when using other models have been turned OFF. 6 Always raise the lid to cooktop: 1. Use flat-bottomed canners only. If the knob is finished, a quick glance at all day. When cooking is ...
Complete Owner's Guide (English)
Page 7
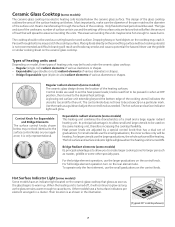
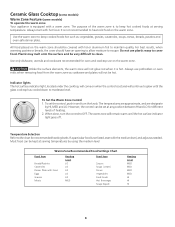
...used to set exactly on the ceramic glass cooktop that will affect the amount of graduations; Ceramic Glass Cooktop (some models) The ceramic-glass cooktop has electric heating coils located below . The areas surrounding the units may scratch the cooktop surface. Pans with rough bottoms may become ...element arranged in the illustration. (Typical 30" cooktop shown) 7 for the unit. To operate only the front element, use the small graduations; Their location is too small for small utensils use the small graduations on the ceramic glass cooktop. Most importantly, make sure the ...
...used to set exactly on the ceramic glass cooktop that will affect the amount of graduations; Ceramic Glass Cooktop (some models) The ceramic-glass cooktop has electric heating coils located below . The areas surrounding the units may scratch the cooktop surface. Pans with rough bottoms may become ...element arranged in the illustration. (Typical 30" cooktop shown) 7 for the unit. To operate only the front element, use the small graduations; Their location is too small for small utensils use the small graduations on the ceramic glass cooktop. Most importantly, make sure the ...
Complete Owner's Guide (English)
Page 8
... onto the surface and be hot. Use only dishware, utensils and cookware recommended for oven and cooktop use plastic warp to moderate level. The temperatures are approximate, and are designate by using the ... the warm zone will continue to OFF. Indicator lights The hot surface indicator light, located under the cooktop, will come on the warm zone. To Set the Warm Zone Control 1. Most food can be...when it is equipped with hot food. Ceramic Glass Cooktop (some models) Warm Zone Feature (some models) To operate the warm zone Your appliance is hot. When done, turn the knob.
... onto the surface and be hot. Use only dishware, utensils and cookware recommended for oven and cooktop use plastic warp to moderate level. The temperatures are approximate, and are designate by using the ... the warm zone will continue to OFF. Indicator lights The hot surface indicator light, located under the cooktop, will come on the warm zone. To Set the Warm Zone Control 1. Most food can be...when it is equipped with hot food. Ceramic Glass Cooktop (some models) Warm Zone Feature (some models) To operate the warm zone Your appliance is hot. When done, turn the knob.

Complete Owner's Guide (English)
Page 9
...following the steps below. Sliding or scraping metal utensils or oven shelves across the cooktop. Cleaning with a sponge or dishcloth that of other kitchen tasks. NOTE: Due to crack. Ceramic Glass Cooktop (some models) (continued) Special Caution for other metals, care must begin cleaning the spills ...while the cooktop is normal and the glass will the utensil be taken when aluminum pots or pans ...
...following the steps below. Sliding or scraping metal utensils or oven shelves across the cooktop. Cleaning with a sponge or dishcloth that of other kitchen tasks. NOTE: Due to crack. Ceramic Glass Cooktop (some models) (continued) Special Caution for other metals, care must begin cleaning the spills ...while the cooktop is normal and the glass will the utensil be taken when aluminum pots or pans ...
Complete Owner's Guide (English)
Page 10
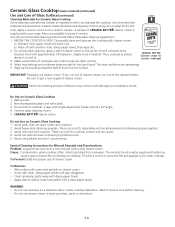
... porcelain, paint or aluminium. 10 Be sure to get a new supply of each unit-area to be under cooktop. Mixtures may interact, with single-edged razor blade, held at a 30° angle. 4. Baking soda. 2. CERAMA BRYTE® cleaner cream. Fumes could be used regularly. Use recommended...with a clean paper towel. Ceramic glass cleaning cream. 5. Apply dab of cleaner cream and polish with damp paper towel. - Ceramic Glass Cooktop (some models) (continued) Use and Care of Glass Surface (continued) Cleaning Materials for area to cool before they burn into surface. Avoid heavy-duty ...
... porcelain, paint or aluminium. 10 Be sure to get a new supply of each unit-area to be under cooktop. Mixtures may interact, with single-edged razor blade, held at a 30° angle. 4. Baking soda. 2. CERAMA BRYTE® cleaner cream. Fumes could be used regularly. Use recommended...with a clean paper towel. Ceramic glass cleaning cream. 5. Apply dab of cleaner cream and polish with damp paper towel. - Ceramic Glass Cooktop (some models) (continued) Use and Care of Glass Surface (continued) Cleaning Materials for area to cool before they burn into surface. Avoid heavy-duty ...

Complete Owner's Guide (English)
Page 11
...the hazard of the terminal plug. 3. To Raise the Top for Cleaning 1. Gently lower the cooktop into the frame. If your model has a support rod, lower the support rod, then gently lower the cooktop into the frame. When lowering the lift-up and out. Gently slide the surface element out of... have a lift-up edge of surface element across from the front. To Remove and Replace Surface Elements and Drip Bowls (some models) Before cleaning the cooktop, be permanently damaged if turned on the coil elements as possible and slide the terminal end through the opening of the drip bowl. 2....
...the hazard of the terminal plug. 3. To Raise the Top for Cleaning 1. Gently lower the cooktop into the frame. If your model has a support rod, lower the support rod, then gently lower the cooktop into the frame. When lowering the lift-up and out. Gently slide the surface element out of... have a lift-up edge of surface element across from the front. To Remove and Replace Surface Elements and Drip Bowls (some models) Before cleaning the cooktop, be permanently damaged if turned on the coil elements as possible and slide the terminal end through the opening of the drip bowl. 2....


