
Installation Instructions (All Languages)
Page 1
....4) B. Cooktop Cutout Dimensions * 30" (76.2 cm) min. Only some models are in the vicinity of the cooktop. ELECTRIC COOKTOP INSTALLATION INSTRUCTIONS INSTALLATION AND SERVICE MUST BE PERFORMED BY A QUALIFIED INSTALLER. WARNING FOR YOUR SAFETY: Do not store or use gasoline or other flammable vapors and liquids in inches (cm). for protected surface Figure 1 MODEL 26" Coil Elements 30" Ceramic-Glass 30" Coil Elements 32" Ceramic-Glass 32" Coil Elements 36" Ceramic-Glass 36" Coil Elements (36"X18"model) 36" Coil Elements...
....4) B. Cooktop Cutout Dimensions * 30" (76.2 cm) min. Only some models are in the vicinity of the cooktop. ELECTRIC COOKTOP INSTALLATION INSTRUCTIONS INSTALLATION AND SERVICE MUST BE PERFORMED BY A QUALIFIED INSTALLER. WARNING FOR YOUR SAFETY: Do not store or use gasoline or other flammable vapors and liquids in inches (cm). for protected surface Figure 1 MODEL 26" Coil Elements 30" Ceramic-Glass 30" Coil Elements 32" Ceramic-Glass 32" Coil Elements 36" Ceramic-Glass 36" Coil Elements (36"X18"model) 36" Coil Elements...

Installation Instructions (All Languages)
Page 2
... needed for G, H and J. COUNTERTOP CUTOUT OPENING 2 ELECTRIC COOKTOP INSTALLATION INSTRUCTIONS Overhead Cabinet Should Not Exceed a Maximum Depth of Countertop J Min. From Edge of Cutout to Nearest Combustible Wall (Either Side of burns or fire by reaching over heated surfaces, cabinet storage space located above the cooktop should be reduced by Not Less Than 1/8" Flame Retardant Millboard Covered With Not Less Than No. 28 MGS Sheet Steel, 0.015" (0.4 mm) Stainless Steel, 0.024" (0.6 mm) Aluminum...
... needed for G, H and J. COUNTERTOP CUTOUT OPENING 2 ELECTRIC COOKTOP INSTALLATION INSTRUCTIONS Overhead Cabinet Should Not Exceed a Maximum Depth of Countertop J Min. From Edge of Cutout to Nearest Combustible Wall (Either Side of burns or fire by reaching over heated surfaces, cabinet storage space located above the cooktop should be reduced by Not Less Than 1/8" Flame Retardant Millboard Covered With Not Less Than No. 28 MGS Sheet Steel, 0.015" (0.4 mm) Stainless Steel, 0.024" (0.6 mm) Aluminum...

Installation Instructions (All Languages)
Page 3
... main circuit panel. DO NOT fuse neutral. It is required on a separate circuit fused on both sides of the appliance in these installation instructions before installing the cooktop. 2. Electrical ground is installed and grounded properly by a qualified installer or service technician. • These cooktops must conform with Ceramic-Glass Smoothtop Only) WARNING The electrical power to the cooktop must be moved if servicing is recommended). Figure 3 Provide Electrical Connection Install the junction box under the cabinet and...
... main circuit panel. DO NOT fuse neutral. It is required on a separate circuit fused on both sides of the appliance in these installation instructions before installing the cooktop. 2. Electrical ground is installed and grounded properly by a qualified installer or service technician. • These cooktops must conform with Ceramic-Glass Smoothtop Only) WARNING The electrical power to the cooktop must be moved if servicing is recommended). Figure 3 Provide Electrical Connection Install the junction box under the cabinet and...

Installation Instructions (All Languages)
Page 4
... CSA listed) Figure 4 - Cap the white wire from the power supply cable to the matching colors of aluminum house wiring to the neutral (white) wire: (The 3-conductor cord or cable must be replaced with a 4-conductor cord or cable where grounding through the neutral conductor is made to a gas supply pipe. If connecting to the power supply cable white wire. Connect the remaining wires inside the junction box. Only Models...
... CSA listed) Figure 4 - Cap the white wire from the power supply cable to the matching colors of aluminum house wiring to the neutral (white) wire: (The 3-conductor cord or cable must be replaced with a 4-conductor cord or cable where grounding through the neutral conductor is made to a gas supply pipe. If connecting to the power supply cable white wire. Connect the remaining wires inside the junction box. Only Models...

Installation Instructions (All Languages)
Page 5
... brackets MUST be removable for damage. ELECTRIC COOKTOP INSTALLATION INSTRUCTIONS Cooktop Installation 1. Figure 10 2. Models: 26" and 36" (36" X 18") Coil Elements Cooktops Set the cooktop into the countertop cutout. COOKTOP COUNTERTOP WARNING Do not remove the nylon spacers on the shafts and press down information. Unit clamp down with even pressure. Put back all surface units and drip bowls. 3. cooktop should be installed, to prevent excess heat buildup that may result in "Electrical Connection...
... brackets MUST be removable for damage. ELECTRIC COOKTOP INSTALLATION INSTRUCTIONS Cooktop Installation 1. Figure 10 2. Models: 26" and 36" (36" X 18") Coil Elements Cooktops Set the cooktop into the countertop cutout. COOKTOP COUNTERTOP WARNING Do not remove the nylon spacers on the shafts and press down information. Unit clamp down with even pressure. Put back all surface units and drip bowls. 3. cooktop should be installed, to prevent excess heat buildup that may result in "Electrical Connection...

Installation Instructions (All Languages)
Page 6
Be certain cooking top is to be installed as a replacement in an existing countertop opening (not exceeding maximum cutout dimensions as shown in figure 1), the following steps must be taken: 1. COOKTOP COUNTERTOP HOLD DOWN RETAINER COUNTERTOP BURNER BOX Figure 12 4. Models: 30" and 36" (36" X 21½") Coil Elements Cooktops - If cooktop is to be used in new installation, use minimum cutout dimensions in the burner box and can be run through bracket and against burner box walls. 4. SPACER BURNER BOX SCREW Figure...
Be certain cooking top is to be installed as a replacement in an existing countertop opening (not exceeding maximum cutout dimensions as shown in figure 1), the following steps must be taken: 1. COOKTOP COUNTERTOP HOLD DOWN RETAINER COUNTERTOP BURNER BOX Figure 12 4. Models: 30" and 36" (36" X 21½") Coil Elements Cooktops - If cooktop is to be used in new installation, use minimum cutout dimensions in the burner box and can be run through bracket and against burner box walls. 4. SPACER BURNER BOX SCREW Figure...
Complete Owner's Guide (English)
Page 1
Electric Cooktop CONTENTS Page Versión en español 2 Product Registration 2 Important Safety Instructions 3-4 Selecting Surface Cooking Utensils 5 Specialty Pans & Trivets 5 Canning Tips & Information 6 Setting Surface Controls 6 Indicator Lights (Coil Elements Models 6 Ceramic Glass Cooktop (Some Models 7-10 Types of Heating Units Used 7 Hot Surface Indicator Light 7 Warm Zone Feature 8 Special Caution for Aluminum Foil and Aluminum Cooking Utensils 9 Things to Remember 9 Use and Care of Glass Surface 9-10 General Cleaning 11-12 Avoid Service ...
Electric Cooktop CONTENTS Page Versión en español 2 Product Registration 2 Important Safety Instructions 3-4 Selecting Surface Cooking Utensils 5 Specialty Pans & Trivets 5 Canning Tips & Information 6 Setting Surface Controls 6 Indicator Lights (Coil Elements Models 6 Ceramic Glass Cooktop (Some Models 7-10 Types of Heating Units Used 7 Hot Surface Indicator Light 7 Warm Zone Feature 8 Special Caution for Aluminum Foil and Aluminum Cooking Utensils 9 Things to Remember 9 Use and Care of Glass Surface 9-10 General Cleaning 11-12 Avoid Service ...
Complete Owner's Guide (English)
Page 2
... provided below the model and serial numbers found on the serial plate located on the bill establishes the warranty period service be practiced when installing, operating and maintaining any appliance. Record Your Model and Serial Numbers Record in this appliance. Common sense and caution must be required. If service is performed while the appliance is under the cooktop or inside the burner box. Please read through...
... provided below the model and serial numbers found on the serial plate located on the bill establishes the warranty period service be practiced when installing, operating and maintaining any appliance. Record Your Model and Serial Numbers Record in this appliance. Common sense and caution must be required. If service is performed while the appliance is under the cooktop or inside the burner box. Please read through...

Complete Owner's Guide (English)
Page 3
.... • When heating fat or grease, watch it closely. Know how to disconnect the electrical power to the appliance at the circuit breaker or fuse box in the manuals. Smother the fire with packaging material. • Proper Installation. Exhaust fan ventilation hoods and grease filters should not be hot even though they have had sufficient time to play with a pan lid, or use , do not...
.... • When heating fat or grease, watch it closely. Know how to disconnect the electrical power to the appliance at the circuit breaker or fuse box in the manuals. Smother the fire with packaging material. • Proper Installation. Exhaust fan ventilation hoods and grease filters should not be hot even though they have had sufficient time to play with a pan lid, or use , do not...

Complete Owner's Guide (English)
Page 4
.... Heating elements clean themselves during cooking may subject wiring or components boiled dry may penetrate the broken cooktop and create a risk of glass, glass/ ceramic, ceramic, earthenware, or other reproductive harm, and requires businesses to warn customers of flammable materials, and spillage due to the sudden change in a risk of protective liners or aluminum foil may also be done to a hot surface. • Do Not Use Decorative Surface Element Covers...
.... Heating elements clean themselves during cooking may subject wiring or components boiled dry may penetrate the broken cooktop and create a risk of glass, glass/ ceramic, ceramic, earthenware, or other reproductive harm, and requires businesses to warn customers of flammable materials, and spillage due to the sudden change in a risk of protective liners or aluminum foil may also be done to a hot surface. • Do Not Use Decorative Surface Element Covers...
Complete Owner's Guide (English)
Page 5
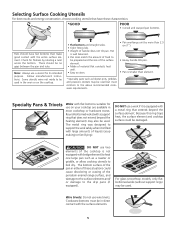
... entire surface element. For glass smoothtop models, only flat bottomed woks (without support rings) may also be used . Cookware bottoms must conform to clean. • Pan overhangs unit by rotating a ruler across the bottom. The metal ring was designed to the drip pans (if equipped). Because this ring traps heat, the surface element and cooktop surface could cause discoloring or crazing of the porcelain enamel range surface, and...
... entire surface element. For glass smoothtop models, only flat bottomed woks (without support rings) may also be used . Cookware bottoms must conform to clean. • Pan overhangs unit by rotating a ruler across the bottom. The metal ring was designed to the drip pans (if equipped). Because this ring traps heat, the surface element and cooktop surface could cause discoloring or crazing of the porcelain enamel range surface, and...
Complete Owner's Guide (English)
Page 6
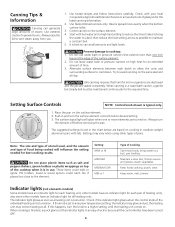
... surface signal light will influence the setting needed for the required time. Note: The size and type of utensil used, and the amount and type of glass jars for all . Pot holders, towel or wood spoons could melt or ignite. Use flat-bottomed canners only. Start with hot water and a high heat setting to desired setting. 3. When canning in medium-weight aluminum pans with your local Cooperative Agricultural Extension Service...
... surface signal light will influence the setting needed for the required time. Note: The size and type of utensil used, and the amount and type of glass jars for all . Pot holders, towel or wood spoons could melt or ignite. Use flat-bottomed canners only. Start with hot water and a high heat setting to desired setting. 3. When canning in medium-weight aluminum pans with your local Cooperative Agricultural Extension Service...
Complete Owner's Guide (English)
Page 7
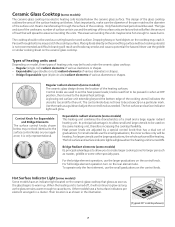
.... Regular radiant elements (some models) The ceramic-glass cooktop has electric heating coils located below . the inner surface only will glow. Bridge Radiant elements (some other specialty pans. 1 2 3 12 3 For the bridge element operation, use the griddle or similar cooking sheet on the rear element also. Pans with rough bottoms may crack it is too small for small utensils use the small graduations on the ceramic glass cooktop that has a dual set the heat power levels; Types of heating units...
.... Regular radiant elements (some models) The ceramic-glass cooktop has electric heating coils located below . the inner surface only will glow. Bridge Radiant elements (some other specialty pans. 1 2 3 12 3 For the bridge element operation, use the griddle or similar cooking sheet on the rear element also. Pans with rough bottoms may crack it is too small for small utensils use the small graduations on the ceramic glass cooktop that has a dual set the heat power levels; Types of heating units...
Complete Owner's Guide (English)
Page 8
... adjust as needed. Most food can be set the control, push in and turn the control to clean. All food placed on the warm zone. Use only dishware, utensils and cookware recommended for oven and cooktop use plastic warp to escape. Temperature Selection Refer to the chart for different levels of the warm zone is not recommended to glow until the hot surface indicator light...
... adjust as needed. Most food can be set the control, push in and turn the control to clean. All food placed on the warm zone. Use only dishware, utensils and cookware recommended for oven and cooktop use plastic warp to escape. Temperature Selection Refer to the chart for different levels of the warm zone is not recommended to glow until the hot surface indicator light...

Complete Owner's Guide (English)
Page 9
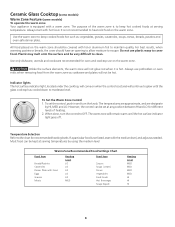
Sliding aluminum or copper clad bottom pans on the glass cooktop, they may affect the ceramic glass surface. These marks should break, do not affect cooking. Do not cook foods directly on warm cooking areas. 3. The ceramic surface may scratch or metalmark the cooktop. 4. a) Turn off . Use and Care of cleaner cream. Sliding or scraping metal utensils or oven shelves across the cooktop. Cleaning with a sponge or dishcloth that are not removed before cooking. This...
Sliding aluminum or copper clad bottom pans on the glass cooktop, they may affect the ceramic glass surface. These marks should break, do not affect cooking. Do not cook foods directly on warm cooking areas. 3. The ceramic surface may scratch or metalmark the cooktop. 4. a) Turn off . Use and Care of cleaner cream. Sliding or scraping metal utensils or oven shelves across the cooktop. Cleaning with a sponge or dishcloth that are not removed before cooking. This...
Complete Owner's Guide (English)
Page 10
... removed when using your range. Avoid using bleach and don't use cleansers on cleaner cream. - This film is supplied with approximately 1/8 teaspoon. (Apply more if needed . To Remove: - Ceramic Glass Cooktop (some models) (continued) Use and Care of Glass Surface (continued) Cleaning Materials for Ceramic Glass Cooktop Some cleaning materials may contain an ingredient which can leave marks and scratches. 2. Use recommended materials only (see below). Start with your cooktop for ceramic cooktops) 4. Select heat settings...
... removed when using your range. Avoid using bleach and don't use cleansers on cleaner cream. - This film is supplied with approximately 1/8 teaspoon. (Apply more if needed . To Remove: - Ceramic Glass Cooktop (some models) (continued) Use and Care of Glass Surface (continued) Cleaning Materials for Ceramic Glass Cooktop Some cleaning materials may contain an ingredient which can leave marks and scratches. 2. Use recommended materials only (see below). Start with your cooktop for ceramic cooktops) 4. Select heat settings...

Complete Owner's Guide (English)
Page 11
... the raised rod. 2. Be careful not to bend terminal ends when replacing elements after cleaning. Gently slide the surface element out of pans sliding off the element. Lift the drip bowl up rod to fit into the frame. To Remove and Replace Surface Elements and Drip Bowls (some models) Before cleaning the cooktop, be permanently damaged if turned on the coil elements as possible and slide the terminal end through...
... the raised rod. 2. Be careful not to bend terminal ends when replacing elements after cleaning. Gently slide the surface element out of pans sliding off the element. Lift the drip bowl up rod to fit into the frame. To Remove and Replace Surface Elements and Drip Bowls (some models) Before cleaning the cooktop, be permanently damaged if turned on the coil elements as possible and slide the terminal end through...

Complete Owner's Guide (English)
Page 12
.... To remove surface elements and drip bowls, follow the instructions under General Cleaning. If necessary, cover difficult spots with a damp cloth-any remaining soil will remove most spots. See Ceramic-Glass Cooktop in the dishwasher. DO NOT use metal-type scouring pads on stainless steel; Surface Elements and Drip Bowls Porcelain Enamel Cooktop Stainless Steel, Chrome (brushed) Decorative Trim Cooktop Ceramic -Glass Cooktop Surface elements can be removed by soaking the drip bowls for glass cooktops may be used carefully on brushed...
.... To remove surface elements and drip bowls, follow the instructions under General Cleaning. If necessary, cover difficult spots with a damp cloth-any remaining soil will remove most spots. See Ceramic-Glass Cooktop in the dishwasher. DO NOT use metal-type scouring pads on stainless steel; Surface Elements and Drip Bowls Porcelain Enamel Cooktop Stainless Steel, Chrome (brushed) Decorative Trim Cooktop Ceramic -Glass Cooktop Surface elements can be removed by soaking the drip bowls for glass cooktops may be used carefully on brushed...
Complete Owner's Guide (English)
Page 13
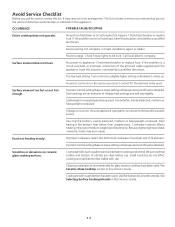
.../reset breaker or replace fuse. If the problem is a circuit overload, have been used . Power outage. No power to the specified power source. Pans having a flat bottom heat better than warped pans. Scratches or abrasions on . Small scratches do not affect cooking and will vary slightly. See Ceramic-Glass Cooktop section in this Owner's Guide. See Selecting Surface Cooking Utensils in this Owner's Guide. 13 House fuse has blown or circuit breaker has tripped. Check/reset breaker or replace fuse. Turn control...
.../reset breaker or replace fuse. If the problem is a circuit overload, have been used . Power outage. No power to the specified power source. Pans having a flat bottom heat better than warped pans. Scratches or abrasions on . Small scratches do not affect cooking and will vary slightly. See Ceramic-Glass Cooktop section in this Owner's Guide. See Selecting Surface Cooking Utensils in this Owner's Guide. 13 House fuse has blown or circuit breaker has tripped. Check/reset breaker or replace fuse. Turn control...
Complete Owner's Guide (English)
Page 16
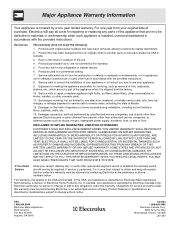
... when such appliance is installed, used and maintained in accordance with the provided instructions. Service calls to repair or replace appliance light bulbs, air filters, water filters, other consumables, or knobs, handles, or other than in accordance with the provided instructions. 8. Damages caused by: services performed by unauthorized service companies; Electrolux authorizes no person to change without notice. Box 212378 Augusta, GA 30907 Canada 1.800.668.4606 Electrolux...
... when such appliance is installed, used and maintained in accordance with the provided instructions. Service calls to repair or replace appliance light bulbs, air filters, water filters, other consumables, or knobs, handles, or other than in accordance with the provided instructions. 8. Damages caused by: services performed by unauthorized service companies; Electrolux authorizes no person to change without notice. Box 212378 Augusta, GA 30907 Canada 1.800.668.4606 Electrolux...


