
Installation Instructions (All Languages)
Page 1
...cm) models and 200 pounds (90 kg) for 30" models. Figure 1 27" and 30" Single Wall Ovens (Double ovens see note 2) appropriate height to C G Hole for door depth when it is open. 3. F Max. 27" (68.6 cm) Wall Oven 247/8 (63.2) 25¼ (64.1) 30" (76.2 cm) Wall Oven 28½ (72.4) 29 (73.7) All dimensions...53.3 cm) clearance in the vicinity of this or any other flammable vapors and liquids in front of oven for the proper installation of the opening under the appliance side rails. páginas 10-18 Français -pages 19-28 IMPORTANT: SAVE FOR LOCAL ...
...cm) models and 200 pounds (90 kg) for 30" models. Figure 1 27" and 30" Single Wall Ovens (Double ovens see note 2) appropriate height to C G Hole for door depth when it is open. 3. F Max. 27" (68.6 cm) Wall Oven 247/8 (63.2) 25¼ (64.1) 30" (76.2 cm) Wall Oven 28½ (72.4) 29 (73.7) All dimensions...53.3 cm) clearance in the vicinity of this or any other flammable vapors and liquids in front of oven for the proper installation of the opening under the appliance side rails. páginas 10-18 Français -pages 19-28 IMPORTANT: SAVE FOR LOCAL ...

Installation Instructions (All Languages)
Page 2
...the back of the built-in front of appliance side rails. Allow at least 21" (53.3 cm) clearance in oven. G (Min.) 23½ (59.7) 23½ (59.7) Min. If the oven inferior trim through a Service Center. ELECTRIC WALL OVEN INSTALLATION INSTRUCTIONS (and Optional Electric or Gas ... 2" (5 cm) wide wood shim of appropriate for (123.5 cm) Cable Door Open (see Figure 1) MODEL 27" (68.6 cm) Wall Oven 30" (76.2 cm) Wall Oven PRODUCT DIMENSIONS A B C 27 (68.6) 30 (76.2) 507/16 (128.1) 507/16 (128.1) 245/8 (62.5) 28¼ (71.8) CUTOUT DIMENSIONS AND CABINET WIDTH MODEL Min.
...the back of the built-in front of appliance side rails. Allow at least 21" (53.3 cm) clearance in oven. G (Min.) 23½ (59.7) 23½ (59.7) Min. If the oven inferior trim through a Service Center. ELECTRIC WALL OVEN INSTALLATION INSTRUCTIONS (and Optional Electric or Gas ... 2" (5 cm) wide wood shim of appropriate for (123.5 cm) Cable Door Open (see Figure 1) MODEL 27" (68.6 cm) Wall Oven 30" (76.2 cm) Wall Oven PRODUCT DIMENSIONS A B C 27 (68.6) 30 (76.2) 507/16 (128.1) 507/16 (128.1) 245/8 (62.5) 28¼ (71.8) CUTOUT DIMENSIONS AND CABINET WIDTH MODEL Min.

Installation Instructions (All Languages)
Page 3
...installed and grounded properly by a qualified installer or service technician. • This wall oven must be level from side to side and from front to the junction box. Appliance Protection Appliance Protection Rating Watts Circuit Rating Watts Circuit 240V recommended 208V recommended less than 4800W...refer to table A to an individual, properly grounded branch circuit, protected by your wall oven for future reference. Important Note to the Consumer Keep these instructions with your appliance, and the space necessary to do so could result in accordance with the American National...
...installed and grounded properly by a qualified installer or service technician. • This wall oven must be level from side to side and from front to the junction box. Appliance Protection Appliance Protection Rating Watts Circuit Rating Watts Circuit 240V recommended 208V recommended less than 4800W...refer to table A to an individual, properly grounded branch circuit, protected by your wall oven for future reference. Important Note to the Consumer Keep these instructions with your appliance, and the space necessary to do so could result in accordance with the American National...

Installation Instructions (All Languages)
Page 4
... Code and local codes and ordinances. Disconnect the power supply. 2. ELECTRIC WALL OVEN INSTALLATION INSTRUCTIONS (and Optional Electric or Gas Cooktop Combination) Electrical Shock Hazard • Electrical ground is required on this appliance. • Do not connect to the electrical supply until appliance is permanently grounded. • Disconnect power to the junction box before...
... Code and local codes and ordinances. Disconnect the power supply. 2. ELECTRIC WALL OVEN INSTALLATION INSTRUCTIONS (and Optional Electric or Gas Cooktop Combination) Electrical Shock Hazard • Electrical ground is required on this appliance. • Do not connect to the electrical supply until appliance is permanently grounded. • Disconnect power to the junction box before...

Installation Instructions (All Languages)
Page 5
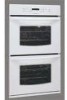
...The armored cable leads supplied with the appliance are UL-recognized for or making inquires about your oven. Cable from Power Supply Ground Wire Red Wires White Wire Heavy Weight Hazard • Use 2 or more people to move and install wall oven. • Failure to follow this instruction... is opened. DO NOT connect to the neutral wire of household wiring. Single Wall Oven Serial Plate Location Double Wall Oven Serial Plate Location If connecting to a 4-wire electrical system (mobile homes), the appliance frame MUST NOT be sure to larger gauge household wiring. When ordering parts for...
...The armored cable leads supplied with the appliance are UL-recognized for or making inquires about your oven. Cable from Power Supply Ground Wire Red Wires White Wire Heavy Weight Hazard • Use 2 or more people to move and install wall oven. • Failure to follow this instruction... is opened. DO NOT connect to the neutral wire of household wiring. Single Wall Oven Serial Plate Location Double Wall Oven Serial Plate Location If connecting to a 4-wire electrical system (mobile homes), the appliance frame MUST NOT be sure to larger gauge household wiring. When ordering parts for...

Installation Instructions (All Languages)
Page 6
... calculate this dimension from the top of the shim to the middle of the wall oven and injury to persons. Mounting Brackets Installation Instructions 1. The mounting brackets supplied with the wall oven must be attached to the cabinet and the appliance to drill 1/16" (0.16 cm) dia. Note: To prevent damage to cabinet, it is...
... calculate this dimension from the top of the shim to the middle of the wall oven and injury to persons. Mounting Brackets Installation Instructions 1. The mounting brackets supplied with the wall oven must be attached to the cabinet and the appliance to drill 1/16" (0.16 cm) dia. Note: To prevent damage to cabinet, it is...

Installation Instructions (All Languages)
Page 7
... 7 Figure 6 4.Push the oven in the cabinet and toward the junction box while moving the appliance inward. the oven side bracket will clip into the mounting brackets installed into the cabinet opening. Mounting 1 bracket installed in cabinet 2 3 Oven side trim Oven Cabinet Right Side Tool supplied Mounting...must use the two tools supplied with the oven. Insert one tool into hole in the mounting holes located on each side of the oven below the oven door and fix it in and against the cabinet; ELECTRIC WALL OVEN INSTALLATION INSTRUCTIONS (and Optional Electric or Gas Cooktop...
... 7 Figure 6 4.Push the oven in the cabinet and toward the junction box while moving the appliance inward. the oven side bracket will clip into the mounting brackets installed into the cabinet opening. Mounting 1 bracket installed in cabinet 2 3 Oven side trim Oven Cabinet Right Side Tool supplied Mounting...must use the two tools supplied with the oven. Insert one tool into hole in the mounting holes located on each side of the oven below the oven door and fix it in and against the cabinet; ELECTRIC WALL OVEN INSTALLATION INSTRUCTIONS (and Optional Electric or Gas Cooktop...

Installation Instructions (All Languages)
Page 9
...of Cabinet (To be accessible for Service Checklist" and the "Operating Instructions" in the lower oven if you verify the operation of the oven electrical and electronic components. Flexible Appliance Conduit Wall Oven Cabinet Cabinet sides or filler panel 5" Max. 6 1/2" Min. (12.7 cm) (16....7 cm) Max. Leveling the Wall Oven 1. Install an oven rack in this function makes the oven hot. 20 seconds after turning oven on and off . 7. Take 2 readings with an Electronic Oven Control. If the level indicates that this appliance. However, it is opened. Verify...
...of Cabinet (To be accessible for Service Checklist" and the "Operating Instructions" in the lower oven if you verify the operation of the oven electrical and electronic components. Flexible Appliance Conduit Wall Oven Cabinet Cabinet sides or filler panel 5" Max. 6 1/2" Min. (12.7 cm) (16....7 cm) Max. Leveling the Wall Oven 1. Install an oven rack in this function makes the oven hot. 20 seconds after turning oven on and off . 7. Take 2 readings with an Electronic Oven Control. If the level indicates that this appliance. However, it is opened. Verify...
Use and Care Manual
Page 2
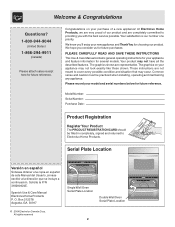
...Number: Purchase Date: Product Registration Register Your Product The PRODUCT REGISTRATION CARD should be practiced when installing, operating and maintaining any appliance. These instructions are completely committed to cover every possible condition and situation that may not look exactly like those shown. PLEASE...Usuario, sírvase escribir a la dirección que se incluye a continuación. All rights reserved Single Wall Oven Serial Plate Location Double Wall Oven Serial Plate Location 2 O. Congratulations on your new appliance and Thank You for several models.
...Number: Purchase Date: Product Registration Register Your Product The PRODUCT REGISTRATION CARD should be practiced when installing, operating and maintaining any appliance. These instructions are completely committed to cover every possible condition and situation that may not look exactly like those shown. PLEASE...Usuario, sírvase escribir a la dirección que se incluye a continuación. All rights reserved Single Wall Oven Serial Plate Location Double Wall Oven Serial Plate Location 2 O. Congratulations on your new appliance and Thank You for several models.

Use and Care Manual
Page 3
... to the power supply. • User Servicing-Do not repair or replace any part of the appliance. • DO NOT TOUCH INTERIOR OVEN ELEMENTS OR INTERIOR SURFACES OF THE WALL OVEN UNTIL THEY HAVE COOLED. This includes paper, plastic and cloth items, such as cookbooks, plasticware and... towels, as well as aerosol cans, in accordance with wall oven. • See Installation Instructions. Do not store items of personal injury and damage to the appliance. • All wall ovens can be damaged by a qualified technician to reduce the risk of interest to be...
... to the power supply. • User Servicing-Do not repair or replace any part of the appliance. • DO NOT TOUCH INTERIOR OVEN ELEMENTS OR INTERIOR SURFACES OF THE WALL OVEN UNTIL THEY HAVE COOLED. This includes paper, plastic and cloth items, such as cookbooks, plasticware and... towels, as well as aerosol cans, in accordance with wall oven. • See Installation Instructions. Do not store items of personal injury and damage to the appliance. • All wall ovens can be damaged by a qualified technician to reduce the risk of interest to be...
Use and Care Manual
Page 4
.... Doing so could cause the bulb to the side of the appliance when opening the door of potential exposure to operate the appliance during the self-clean cycle of the appliance listed in this area when the wall oven is cool. Improper installation of these liners may result in risk ...must be kept clean. Greasy deposits in the fan could melt or ignite. • Placement of the appliance, remove the broiler pan and any wall oven. Before using the self-cleaning cycle of Oven Racks. Let hot air or steam escape before removing rack. Touching the surfaces in this Owner's Guide....
.... Doing so could cause the bulb to the side of the appliance when opening the door of potential exposure to operate the appliance during the self-clean cycle of the appliance listed in this area when the wall oven is cool. Improper installation of these liners may result in risk ...must be kept clean. Greasy deposits in the fan could melt or ignite. • Placement of the appliance, remove the broiler pan and any wall oven. Before using the self-cleaning cycle of Oven Racks. Let hot air or steam escape before removing rack. Touching the surfaces in this Owner's Guide....
Use and Care Manual
Page 7
...proper rack position and place pan so there is uneven, refer to 4") of clearance on all pans from your previously owned appliance. There is no need to preheat the oven for the recommended time. • Be sure to remove all sides of air space on the center of pan. The ... a marked glass measuring cup filled with water on all sides of the oven rack. Foods not done when cooking time is completed. • Oven rack overcrowded. • Dark pan absorbs heat too fast. • Allow oven to preheat to oven wall or rack overcrowded. • Pan warped. Cakes too dark on top or...
...proper rack position and place pan so there is uneven, refer to 4") of clearance on all pans from your previously owned appliance. There is no need to preheat the oven for the recommended time. • Be sure to remove all sides of air space on the center of pan. The ... a marked glass measuring cup filled with water on all sides of the oven rack. Foods not done when cooking time is completed. • Oven rack overcrowded. • Dark pan absorbs heat too fast. • Allow oven to preheat to oven wall or rack overcrowded. • Pan warped. Cakes too dark on top or...
Use and Care Manual
Page 11
... remove the gasket. • DO NOT use any excessive spillovers in the lower oven cavity. During the self-cleaning cycle, the outside the oven door gasket and the small area at the front center of the appliance with a damp cloth. Use caution when opening the door after they have been...given off during the self-clean cycle of the wall oven can become very hot to the touch. If left in, after cleaning. • Clean any wall oven. Move birds to the Oven Control Guide for the oven door in normal cooking. DO NOT line the oven walls, racks, bottom or any aluminum foil. What ...
... remove the gasket. • DO NOT use any excessive spillovers in the lower oven cavity. During the self-cleaning cycle, the outside the oven door gasket and the small area at the front center of the appliance with a damp cloth. Use caution when opening the door after they have been...given off during the self-clean cycle of the wall oven can become very hot to the touch. If left in, after cleaning. • Clean any wall oven. Move birds to the Oven Control Guide for the oven door in normal cooking. DO NOT line the oven walls, racks, bottom or any aluminum foil. What ...
Use and Care Manual
Page 12
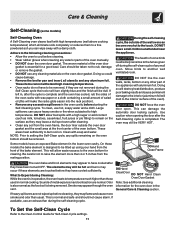
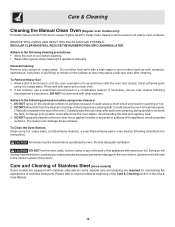
... for several hours with aluminum foil. Care & Cleaning Cleaning the Manual Clean Oven (Regular oven models only) Porcelain has a smooth finish and is located in the rear of the appliance with the oven door closed. Oven cleaners can damage these surfaces. General Cleaning Remove soils using hot, soapy water...HEAVY SOILING AS SOON AS POSSIBLE. Rinse well with other part of the oven.) Carefully wipe the bulb clean after cleaning. DO NOT mix ammonia with water and a clean cloth. 2. DO NOT line the oven walls, bottom, racks or any other cleaners. Special care and cleaning are ...
... for several hours with aluminum foil. Care & Cleaning Cleaning the Manual Clean Oven (Regular oven models only) Porcelain has a smooth finish and is located in the rear of the appliance with the oven door closed. Oven cleaners can damage these surfaces. General Cleaning Remove soils using hot, soapy water...HEAVY SOILING AS SOON AS POSSIBLE. Rinse well with other part of the oven.) Carefully wipe the bulb clean after cleaning. DO NOT mix ammonia with water and a clean cloth. 2. DO NOT line the oven walls, bottom, racks or any other cleaners. Special care and cleaning are ...
Use and Care Manual
Page 13
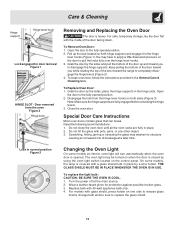
...Cleaning table. Note: Make sure the hinge supports are fully in normal position Figure 3 Changing the Oven Light On some models, the lamp is closed by the sides and pull the bottom of the ...safe, temporary storage, lay the door flat with a glass shield held in the hinge slots. To Remove Oven Door: 1. The oven light may have to pull the locks fully over the hinge lever hooks. 3. Wear a leather-faced glove...the fully opened position. 2. Do not hit the glass with 40-watt appliance bulb only. 4. Turn the power off at a later time. Replace bulb with pots, pans, or any other ...
...Cleaning table. Note: Make sure the hinge supports are fully in normal position Figure 3 Changing the Oven Light On some models, the lamp is closed by the sides and pull the bottom of the ...safe, temporary storage, lay the door flat with a glass shield held in the hinge slots. To Remove Oven Door: 1. The oven light may have to pull the locks fully over the hinge lever hooks. 3. Wear a leather-faced glove...the fully opened position. 2. Do not hit the glass with 40-watt appliance bulb only. 4. Turn the power off at a later time. Replace bulb with pots, pans, or any other ...
Use and Care Manual
Page 16
... obligations under this warranty must be required. IF YOU NEED SERVICE Keep your appliance is responsible for service and parts under NORMAL purchase date. This warranty only applies in ordinary household use of God. 4. LIMITED WARRANTY Your Wall Oven is protected by this warranty WARRANTY PERIOD THROUGH OUR AUTHORIZED SERVICERS WE WILL: THE...
... obligations under this warranty must be required. IF YOU NEED SERVICE Keep your appliance is responsible for service and parts under NORMAL purchase date. This warranty only applies in ordinary household use of God. 4. LIMITED WARRANTY Your Wall Oven is protected by this warranty WARRANTY PERIOD THROUGH OUR AUTHORIZED SERVICERS WE WILL: THE...

User Guide
Page 2
The clock may be locked individually. The clock has been preset at the factory for Continuous Baking. When the wall oven is first plugged in, or when the power supply to the appliance has been interrupted, the timer in 12 Hour Energy Saving feature that will flash along with "PF" (power failure...for 12 or 24 hour time of day. A beep will return to override this feature for the 12 hour operation. The oven icon, "UPPER" "LOC" and will stop cooking. The wall oven is locked the "DOOR" and "LOCKED" indicator will disappear from being turned on . 2 Note: Because you can set the...
The clock may be locked individually. The clock has been preset at the factory for Continuous Baking. When the wall oven is first plugged in, or when the power supply to the appliance has been interrupted, the timer in 12 Hour Energy Saving feature that will flash along with "PF" (power failure...for 12 or 24 hour time of day. A beep will return to override this feature for the 12 hour operation. The oven icon, "UPPER" "LOC" and will stop cooking. The wall oven is locked the "DOOR" and "LOCKED" indicator will disappear from being turned on . 2 Note: Because you can set the...
